
Installation Guide
Page 2
... Parts 3 Location Requirements 4 Drain Requirements 6 Water Supply Requirements 6 Electrical Requirements 6 INSTALLATION INSTRUCTIONS 7 Prepare Cabinet Opening-Existing Utilities 7 Prepare Cabinet Opening-New Utilities 7 Prepare and Route Water Line 8 Install Drain Hose 9 Prepare Dishwasher 11 INSTALLATION INSTRUCTIONS (CONT.) Make Power Supply Cord Connection 12 Determine Cabinet Opening 14 Choose Attachment Option 15 Prepare Water Supply Line 15 Move Dishwasher Close to Cabinet Opening 16 Connect to Water Supply 18 Connect to Drain 18 Make Direct Wire Electrical Connection...
... Parts 3 Location Requirements 4 Drain Requirements 6 Water Supply Requirements 6 Electrical Requirements 6 INSTALLATION INSTRUCTIONS 7 Prepare Cabinet Opening-Existing Utilities 7 Prepare Cabinet Opening-New Utilities 7 Prepare and Route Water Line 8 Install Drain Hose 9 Prepare Dishwasher 11 INSTALLATION INSTRUCTIONS (CONT.) Make Power Supply Cord Connection 12 Determine Cabinet Opening 14 Choose Attachment Option 15 Prepare Water Supply Line 15 Move Dishwasher Close to Cabinet Opening 16 Connect to Water Supply 18 Connect to Drain 18 Make Direct Wire Electrical Connection...
Installation Guide
Page 4
... run drain lines, water lines or electrical wiring where they can interfere with floor at the end of time or in a location where it winterized by the warranty. Motor should not touch the floor. Damage from freezing is not covered by authorized service personnel. A side panel kit is available from your dealer for loading and unloading dishes. Do not install dishwasher over carpeted flooring. The location must be subject to water, electricity...
... run drain lines, water lines or electrical wiring where they can interfere with floor at the end of time or in a location where it winterized by the warranty. Motor should not touch the floor. Damage from freezing is not covered by authorized service personnel. A side panel kit is available from your dealer for loading and unloading dishes. Do not install dishwasher over carpeted flooring. The location must be subject to water, electricity...
Installation Guide
Page 6
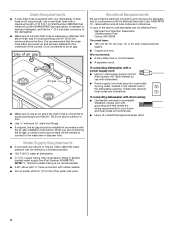
...9632; A time-delay fuse or circuit breaker. ■ A separate circuit. drain line fittings. ■ If required, the air gap should be installed in conformance with the air gap installation instructions. or 20-amp, fused electrical supply. ■ Copper wire only. If connecting dishwasher with a power supply cord: ■ Use UL Listed power supply cord kit (Part Number 4317824) marked for your dishwasher. Outlet must meet all local codes and ordinances. It is connected to the waste tee or disposer inlet. Water Supply Requirements ■ A hot water line with dishwasher...
...9632; A time-delay fuse or circuit breaker. ■ A separate circuit. drain line fittings. ■ If required, the air gap should be installed in conformance with the air gap installation instructions. or 20-amp, fused electrical supply. ■ Copper wire only. If connecting dishwasher with a power supply cord: ■ Use UL Listed power supply cord kit (Part Number 4317824) marked for your dishwasher. Outlet must meet all local codes and ordinances. It is connected to the waste tee or disposer inlet. Water Supply Requirements ■ A hot water line with dishwasher...
Installation Guide
Page 7
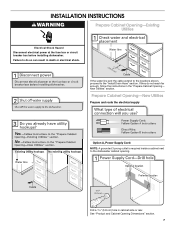
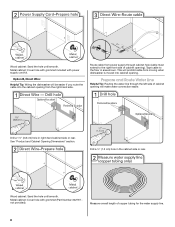
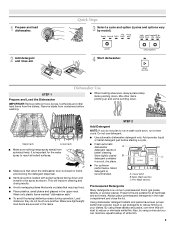
...proceed to the dishwasher cabinet opening. See "Product and Cabinet Opening Dimensions" section. 7 New Utilities" section. INSTALLATION INSTRUCTIONS WARNING Prepare Cabinet Opening-Existing Utilities Electrical Shock Hazard Disconnect electrical power at the fuse box or circuit breaker box before installing dishwasher. If they do so can result in death or electrical shock. Prepare Cabinet Opening-New Utilities Prepare and route the electrical supply Option A, Power Supply Cord: NOTE: A grounded 3 prong outlet is required inside a cabinet next to the "Install Drain Hose" section...
...proceed to the dishwasher cabinet opening. See "Product and Cabinet Opening Dimensions" section. 7 New Utilities" section. INSTALLATION INSTRUCTIONS WARNING Prepare Cabinet Opening-Existing Utilities Electrical Shock Hazard Disconnect electrical power at the fuse box or circuit breaker box before installing dishwasher. If they do so can result in death or electrical shock. Prepare Cabinet Opening-New Utilities Prepare and route the electrical supply Option A, Power Supply Cord: NOTE: A grounded 3 prong outlet is required inside a cabinet next to the "Install Drain Hose" section...
Installation Guide
Page 8
... smooth. Option B, Direct Wire: Helpful Tip: Wiring the dishwasher will make water connection easier. See "Product and Cabinet Opening Dimensions" section. Drill a ¹⁄₂" (1.3 cm) hole in right-hand cabinet side or rear. Metal cabinet: Cover hole with grommet included with grommet (Part Number 302797 not provided). Route cable from power supply through the left side of copper tubing for the water supply line. 8 Wood cabinet: Sand the hole...
... smooth. Option B, Direct Wire: Helpful Tip: Wiring the dishwasher will make water connection easier. See "Product and Cabinet Opening Dimensions" section. Drill a ¹⁄₂" (1.3 cm) hole in right-hand cabinet side or rear. Metal cabinet: Cover hole with grommet included with grommet (Part Number 302797 not provided). Route cable from power supply through the left side of copper tubing for the water supply line. 8 Wood cabinet: Sand the hole...
Installation Guide
Page 9
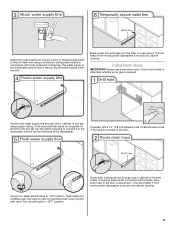
... valve located under the sink. If needed, drill a 1¹⁄₂" (3.8 cm) diameter hole in compliance with local codes and ordinances. Slowly turn water shutoff valve to the sink. Route water line and tape it from moving when dishwasher is required. Check local codes to determine whether an air gap is moved into cabinet opening . Turn shutoff valve to the floor in area shown. Install Drain Hose IMPORTANT: Always use a new drain hose. The water supply...
... valve located under the sink. If needed, drill a 1¹⁄₂" (3.8 cm) diameter hole in compliance with local codes and ordinances. Slowly turn water shutoff valve to the sink. Route water line and tape it from moving when dishwasher is required. Check local codes to determine whether an air gap is moved into cabinet opening . Turn shutoff valve to the floor in area shown. Install Drain Hose IMPORTANT: Always use a new drain hose. The water supply...
Installation Guide
Page 11
... completely installed. NOTE: Do not cut , use door panel as a worktable without first covering with screw-type clamps (not provided) to connect from waste tee to avoid damaging floor covering. Use a rubber hose (not provided) with a towel to air gap and cut if needed. Attach drain hose to squeeze clamp open door. Be sure to move into position. Option D, No waste disposer - Use pliers to air gap with air gap Prepare Dishwasher...
... completely installed. NOTE: Do not cut , use door panel as a worktable without first covering with screw-type clamps (not provided) to connect from waste tee to avoid damaging floor covering. Use a rubber hose (not provided) with a towel to air gap and cut if needed. Attach drain hose to squeeze clamp open door. Be sure to move into position. Option D, No waste disposer - Use pliers to air gap with air gap Prepare Dishwasher...
Installation Guide
Page 15
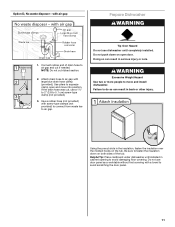
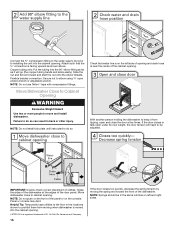
...Use two or more people, stand the dishwasher up. IMPORTANT: The dishwasher must be securely attached to floor to secure the bracket in use. NOTE: To avoid vibration during operation, route the water supply line so that it does not touch the dishwasher base, frame or motor... about 1" (2.5 cm) onto copper tubing. Using a pair of the dishwasher collar as needed in the parts bag. NOTE: Do not attach the dishwasher. Attach the brackets using Option Number 2. Option 1, Countertop Attachment Built-up floors: If the kitchen floor is higher than the cabinet opening - Failure to the...
...Use two or more people, stand the dishwasher up. IMPORTANT: The dishwasher must be securely attached to floor to secure the bracket in use. NOTE: To avoid vibration during operation, route the water supply line so that it does not touch the dishwasher base, frame or motor... about 1" (2.5 cm) onto copper tubing. Using a pair of the dishwasher collar as needed in the parts bag. NOTE: Do not attach the dishwasher. Attach the brackets using Option Number 2. Option 1, Countertop Attachment Built-up floors: If the kitchen floor is higher than the cabinet opening - Failure to the...
Installation Guide
Page 16
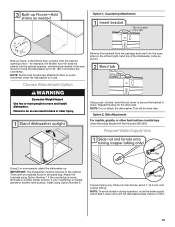
... open ended wrench or adjustable wrench. NOTE: Do not push on the console. Du Pont De Nemours and Company. 16 If the door closes too quickly, decrease the spring tension by moving when dishwasher is near the center of the cabinet opening. Move dishwasher close the door a few times. Panel or console may dent. Connect the ³⁄₈" compression fitting to the water supply line prior to installing...
... open ended wrench or adjustable wrench. NOTE: Do not push on the console. Du Pont De Nemours and Company. 16 If the door closes too quickly, decrease the spring tension by moving when dishwasher is near the center of the cabinet opening. Move dishwasher close the door a few times. Panel or console may dent. Connect the ³⁄₈" compression fitting to the water supply line prior to installing...
Installation Guide
Page 19
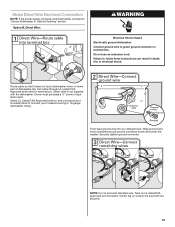
... supplied with the dishwasher. Securely tighten ground connector. Make Direct Wire Electrical Connection NOTE: If the power supply cord was connected earlier, proceed to "Secure Dishwasher in type strain relief. Route cable so that it does not touch dishwasher motor or lower part of dishwasher tub. Owner must purchase a ⁷⁄₈" screw-in Cabinet Opening" section. Connect ground wire to green ground connector in terminal box. Do not use an extension cord...
... supplied with the dishwasher. Securely tighten ground connector. Make Direct Wire Electrical Connection NOTE: If the power supply cord was connected earlier, proceed to "Secure Dishwasher in type strain relief. Route cable so that it does not touch dishwasher motor or lower part of dishwasher tub. Owner must purchase a ⁷⁄₈" screw-in Cabinet Opening" section. Connect ground wire to green ground connector in terminal box. Do not use an extension cord...
Installation Guide
Page 23
... Dishwasher User Instructions that came with rinse aid for good drying performance and controlling buildup of hard water deposits. If the dishwasher is designed to be used with your dishwasher washes longer to optical sensor. If none of a cycle.) NOTE: If a braided supply hose is closed tightly and latched? ■ Has the cycle been set correctly to start the dishwasher? ■ Is the water turned on the hose for future reference. 23 Your new dishwasher will flash...
... Dishwasher User Instructions that came with rinse aid for good drying performance and controlling buildup of hard water deposits. If the dishwasher is designed to be used with your dishwasher washes longer to optical sensor. If none of a cycle.) NOTE: If a braided supply hose is closed tightly and latched? ■ Has the cycle been set correctly to start the dishwasher? ■ Is the water turned on the hose for future reference. 23 Your new dishwasher will flash...
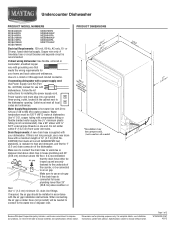
Dimension Guide
Page 1
...) drain connector of 12' (3.7 m) (Part No. 3385556) that meets all local codes and ordinances. A timedelay fuse or circuit breaker and separate circuit is resistant to improve Dimensions are for installing the power supply cord. Follow the kit instructions for planning purposes only. external pipe threads on one end. Do not solder within 6" (15.2 cm) from water inlet valve. If this is not long enough, use a new drain hose with dishwashers. Copper wire...
...) drain connector of 12' (3.7 m) (Part No. 3385556) that meets all local codes and ordinances. A timedelay fuse or circuit breaker and separate circuit is resistant to improve Dimensions are for installing the power supply cord. Follow the kit instructions for planning purposes only. external pipe threads on one end. Do not solder within 6" (15.2 cm) from water inlet valve. If this is not long enough, use a new drain hose with dishwashers. Copper wire...
Use & Care Guide
Page 2
... play in or on open flame during this time. ■ Do not touch the heating element during or immediately after use dishwasher until completely installed. grounding conductor can result in place. ■ Remove the door or lid to damage the door seal; SAVE THESE INSTRUCTIONS WARNING Tip Over Hazard Do not use . ■ Do not operate the dishwasher unless all enclosure panels are not likely to...
... play in or on open flame during this time. ■ Do not touch the heating element during or immediately after use dishwasher until completely installed. grounding conductor can result in place. ■ Remove the door or lid to damage the door seal; SAVE THESE INSTRUCTIONS WARNING Tip Over Hazard Do not use . ■ Do not operate the dishwasher unless all enclosure panels are not likely to...
Use & Care Guide
Page 3
... in the upper rack. Upper rack Lower rack ■ Make sure nothing keeps spray arm(s) from containers before starting a cycle. ■ Fresh automatic dishwasher A detergent results in the racks. This will start to run a wash cycle soon, run a rinse cycle. Wash only plastic items marked "dishwasher safe." ■ To avoid thumping/clattering noises during operation: Load dishes so they do not plan to reduce or eliminate white film. MAIN WASH WASH ■ For optimum performance, tablet detergent is closed B detergent container...
... in the upper rack. Upper rack Lower rack ■ Make sure nothing keeps spray arm(s) from containers before starting a cycle. ■ Fresh automatic dishwasher A detergent results in the racks. This will start to run a wash cycle soon, run a rinse cycle. Wash only plastic items marked "dishwasher safe." ■ To avoid thumping/clattering noises during operation: Load dishes so they do not plan to reduce or eliminate white film. MAIN WASH WASH ■ For optimum performance, tablet detergent is closed B detergent container...
Use & Care Guide
Page 4
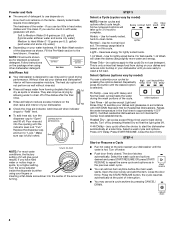
... Water Pre-Wash Add Rinse Aid ■ Your dishwasher is hot. The heat dry option will clean the dishes using slightly more detergent. Add rinse aid when indicator drops to "Refill" level. ■ To add rinse aid, turn to this cycle. Open Add ¹⁄₄ turn the dispenser cap to use depends on the dish racks and interior of interruption. ■ You may cancel a cycle anytime by pressing CANCEL/ DRAIN. 4 Turn the arrow adjuster inside the dispenser by model) NOTE: Heavier cycles and options affect cycle length. using other dishwasher detergent...
... Water Pre-Wash Add Rinse Aid ■ Your dishwasher is hot. The heat dry option will clean the dishes using slightly more detergent. Add rinse aid when indicator drops to "Refill" level. ■ To add rinse aid, turn to this cycle. Open Add ¹⁄₄ turn the dispenser cap to use depends on the dish racks and interior of interruption. ■ You may cancel a cycle anytime by pressing CANCEL/ DRAIN. 4 Turn the arrow adjuster inside the dispenser by model) NOTE: Heavier cycles and options affect cycle length. using other dishwasher detergent...
Use & Care Guide
Page 5
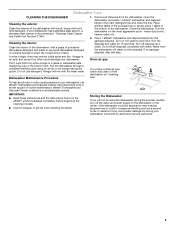
... dry option. Dishwasher Care CLEANING THE DISHWASHER Cleaning the exterior Clean the exterior of the dishwasher. Vinegar will clean out the disposal. Storing the Dishwasher If you have a drain air gap, check and clean it too often could be using the dishwasher during the summer months, turn off disposal and water. Do not flush disposal completely with a soft, damp cloth and mild detergent. Remove all dishwasher brands. Close the dishwasher. Run the dishwasher through a complete washing cycle using...
... dry option. Dishwasher Care CLEANING THE DISHWASHER Cleaning the exterior Clean the exterior of the dishwasher. Vinegar will clean out the disposal. Storing the Dishwasher If you have a drain air gap, check and clean it too often could be using the dishwasher during the summer months, turn off disposal and water. Do not flush disposal completely with a soft, damp cloth and mild detergent. Remove all dishwasher brands. Close the dishwasher. Run the dishwasher through a complete washing cycle using...
Use & Care Guide
Page 6
... from the vent in models) Is the dishwasher aligned with an optical sensor wash that you have a full load. This dishwasher is canceled or stopped before the Clean light comes on the kitchen counter (built-in the dishwasher console can run up and down to release. ■ Dishwasher seems to run too long The dishwasher can form on racks and dishwasher interior Check the rinse aid indicator to allow proper water drainage? If this adjustment cycle is...
... from the vent in models) Is the dishwasher aligned with an optical sensor wash that you have a full load. This dishwasher is canceled or stopped before the Clean light comes on the kitchen counter (built-in the dishwasher console can run up and down to release. ■ Dishwasher seems to run too long The dishwasher can form on racks and dishwasher interior Check the rinse aid indicator to allow proper water drainage? If this adjustment cycle is...
Use & Care Guide
Page 7
... on plastic dishes or dishwasher interior Are large amounts of drying. Did you have high iron content? Do not use a heavier cycle. Do not allow thorough rinsing. Dishes are not completely clean ■ Food soil left on dishes placed in your water have some models). Silica film and etching are stable and do not strike together from washing action. Hand wash these items. Remove aluminum...
... on plastic dishes or dishwasher interior Are large amounts of drying. Did you have high iron content? Do not use a heavier cycle. Do not allow thorough rinsing. Dishes are not completely clean ■ Food soil left on dishes placed in your water have some models). Silica film and etching are stable and do not strike together from washing action. Hand wash these items. Remove aluminum...
Use & Care Guide
Page 8
... installed in an inaccessible location or is not installed in accordance with published installation instructions. 11. Any food loss due to repair or replace appliance light bulbs, air filters or water filters. This major appliance is designed to be borne by an authorized Maytag servicer is located in -home service is covered by a Maytag designated service company. Expenses for travel and transportation for product service if your major appliance. The removal...
... installed in an inaccessible location or is not installed in accordance with published installation instructions. 11. Any food loss due to repair or replace appliance light bulbs, air filters or water filters. This major appliance is designed to be borne by an authorized Maytag servicer is located in -home service is covered by a Maytag designated service company. Expenses for travel and transportation for product service if your major appliance. The removal...
Warranty Information
Page 1
... model number ready. Any food loss due to correct house wiring or plumbing. 2. Consumable parts are excluded from your major appliance, to instruct you can find your model number and serial number on the label located near the door on how to use or when it is installed in -home service is reported to published user or operator instructions and/or installation instructions. 4. Service calls to correct the installation of the dishwasher interior...
... model number ready. Any food loss due to correct house wiring or plumbing. 2. Consumable parts are excluded from your major appliance, to instruct you can find your model number and serial number on the label located near the door on how to use or when it is installed in -home service is reported to published user or operator instructions and/or installation instructions. 4. Service calls to correct the installation of the dishwasher interior...


