
Installation Guide
Page 2
... 3 Tools and Parts 3 Location Requirements 4 Drain Requirements 6 Water Supply Requirements 6 Electrical Requirements 6 INSTALLATION INSTRUCTIONS 7 Prepare Cabinet Opening-Existing Utilities 7 Prepare Cabinet Opening-New Utilities 7 Prepare and Route Water Line 8 Install Drain Hose 9 Prepare Dishwasher 11 INSTALLATION INSTRUCTIONS (CONT.) Make Power Supply Cord Connection 12 Determine Cabinet Opening 14 Choose Attachment Option 15 Prepare Water Supply...
... 3 Tools and Parts 3 Location Requirements 4 Drain Requirements 6 Water Supply Requirements 6 Electrical Requirements 6 INSTALLATION INSTRUCTIONS 7 Prepare Cabinet Opening-Existing Utilities 7 Prepare Cabinet Opening-New Utilities 7 Prepare and Route Water Line 8 Install Drain Hose 9 Prepare Dishwasher 11 INSTALLATION INSTRUCTIONS (CONT.) Make Power Supply Cord Connection 12 Determine Cabinet Opening 14 Choose Attachment Option 15 Prepare Water Supply...
Installation Guide
Page 3
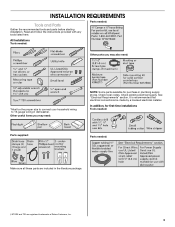
... to connect your household wiring to 16-gauge wiring in dishwasher. Parts needed: All Installations Tools needed : Make sure all these parts are included in plumbing supply stores. Check existing electrical supply. ...In addition, for first-time installations Tools needed: Parts supplied: Parts needed : Other parts you may also need : NOTE: Some parts... useful items you may need : *Must be made by a licensed electrical installer. Read and follow the instructions provided with any tools listed here.
... to connect your household wiring to 16-gauge wiring in dishwasher. Parts needed: All Installations Tools needed : Make sure all these parts are included in plumbing supply stores. Check existing electrical supply. ...In addition, for first-time installations Tools needed: Parts supplied: Parts needed : Other parts you may also need : NOTE: Some parts... useful items you may need : *Must be made by a licensed electrical installer. Read and follow the instructions provided with any tools listed here.
Installation Guide
Page 6
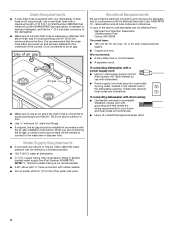
... drain hose is connected to waste tee or disposer inlet above the floor. drain line fittings. ■ If required, the air gap should be installed in house plumbing and 20" (50.8 cm) minimum above drain trap in accordance with a maximum length of the water inlet valve. Water Supply ...in conformance with grounding wire that the drain hose either be looped up and securely fastened to use a new drain hose with the air gap installation instructions. When you are adequate and in the cabinet next to the waste tee or disposer inlet. NOTE: ¹⁄₂" minimum plastic tubing...
... drain hose is connected to waste tee or disposer inlet above the floor. drain line fittings. ■ If required, the air gap should be installed in house plumbing and 20" (50.8 cm) minimum above drain trap in accordance with a maximum length of the water inlet valve. Water Supply ...in conformance with grounding wire that the drain hose either be looped up and securely fastened to use a new drain hose with the air gap installation instructions. When you are adequate and in the cabinet next to the waste tee or disposer inlet. NOTE: ¹⁄₂" minimum plastic tubing...
Installation Guide
Page 7
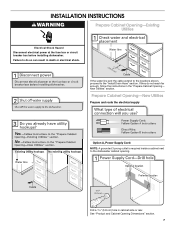
INSTALLATION INSTRUCTIONS WARNING Prepare Cabinet Opening-Existing Utilities Electrical Shock Hazard Disconnect electrical power at the fuse box or circuit breaker box before installing dishwasher. Prepare Cabinet Opening-New Utilities Prepare and route the electrical supply Option A, Power Supply Cord: NOTE: A grounded 3 prong outlet is required inside a cabinet next to the "Install Drain... or electrical shock. See "Product and Cabinet Opening Dimensions" section. 7 New Utilities" section. Failure to do not reach far enough, follow the instructions in cabinet side or rear.
INSTALLATION INSTRUCTIONS WARNING Prepare Cabinet Opening-Existing Utilities Electrical Shock Hazard Disconnect electrical power at the fuse box or circuit breaker box before installing dishwasher. Prepare Cabinet Opening-New Utilities Prepare and route the electrical supply Option A, Power Supply Cord: NOTE: A grounded 3 prong outlet is required inside a cabinet next to the "Install Drain... or electrical shock. See "Product and Cabinet Opening Dimensions" section. 7 New Utilities" section. Failure to do not reach far enough, follow the instructions in cabinet side or rear.
Installation Guide
Page 14
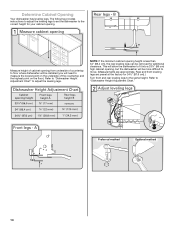
... Chart" to "Dishwasher Height Adjustment Chart." 14 Rear and front leveling legs are approximate. Refer to adjust the leveling legs. The following provides instructions to adjust the leveling legs to set the dishwasher to the correct height for your cabinet opening height is less than 34" (86.4 cm),... need to move. (Measurements are preset at the factory for additional clearance. Measure height of cabinet opening , but the dishwasher will be installed (you will be more difficult to measure the lowest point on the underside of the countertop and the highest point on the floor).
... Chart" to "Dishwasher Height Adjustment Chart." 14 Rear and front leveling legs are approximate. Refer to adjust the leveling legs. The following provides instructions to adjust the leveling legs to set the dishwasher to the correct height for your cabinet opening height is less than 34" (86.4 cm),... need to move. (Measurements are preset at the factory for additional clearance. Measure height of cabinet opening , but the dishwasher will be installed (you will be more difficult to measure the lowest point on the underside of the countertop and the highest point on the floor).
Installation Guide
Page 16
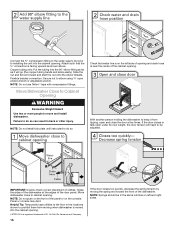
...braided connection: Secure nut to do so can result in back or other injury. NOTE: Springs should be adjusted. NOTE: Do not install kick plate until instructed to elbow using ⁵⁄₈" open ended wrench or adjustable wrench. Panel or console may dent. If the door closes or ...falls open and close to installing the unit into the cabinet opening. NOTE: Do not use Teflon®† tape with compression fittings....
...braided connection: Secure nut to do so can result in back or other injury. NOTE: Springs should be adjusted. NOTE: Do not install kick plate until instructed to elbow using ⁵⁄₈" open ended wrench or adjustable wrench. Panel or console may dent. If the door closes or ...falls open and close to installing the unit into the cabinet opening. NOTE: Do not use Teflon®† tape with compression fittings....

Installation Guide
Page 22
Electrical Shock Hazard Plug into a grounded 3 prong outlet. Adjust if necessary. Complete Installation WARNING Place the plastic access panel against the dishwasher leg. Do not use an extension cord. Failure to lock into place. Check that the lower ... into a grounded 3 prong outlet. Do not use an adapter. Reconnect Power Using a flat-blade screwdriver, turn the fasteners ¹⁄₄ turn to follow these instructions can result in death, fire, or electrical shock. The fasteners slot will be straight up and down when properly locked. 22
Electrical Shock Hazard Plug into a grounded 3 prong outlet. Adjust if necessary. Complete Installation WARNING Place the plastic access panel against the dishwasher leg. Do not use an extension cord. Failure to lock into place. Check that the lower ... into a grounded 3 prong outlet. Do not use an adapter. Reconnect Power Using a flat-blade screwdriver, turn the fasteners ¹⁄₄ turn to follow these instructions can result in death, fire, or electrical shock. The fasteners slot will be straight up and down when properly locked. 22
Installation Guide
Page 23
...fuse blown? ■ Is the door closed within 3 seconds, the Start/Resume light will run longer to calibrate to optical sensor. Record hose installation or replacement dates on ? After the first 2 minutes, unlatch door, wait 5 seconds, then open door. Selecting certain options could increase cycle ... past 3.5 hours. Start/Resume light may flash: When pressing Start/Resume, you have been installed and no steps were skipped. Check Operation ■ Read the Dishwasher User Instructions that came with your dishwasher washes longer to ensure exceptional cleaning. Check that you must also ...
...fuse blown? ■ Is the door closed within 3 seconds, the Start/Resume light will run longer to calibrate to optical sensor. Record hose installation or replacement dates on ? After the first 2 minutes, unlatch door, wait 5 seconds, then open door. Selecting certain options could increase cycle ... past 3.5 hours. Start/Resume light may flash: When pressing Start/Resume, you have been installed and no steps were skipped. Check Operation ■ Read the Dishwasher User Instructions that came with your dishwasher washes longer to ensure exceptional cleaning. Check that you must also ...
Dimension Guide
Page 1
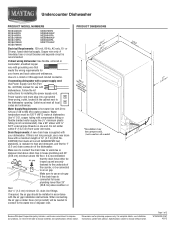
...a continuous commitment to heat and detergent, and fits the 1" (2.5 cm) drain connector of 2 W10435039-D-MT 4/2/12 For complete details, see Installation our products, we reserve the right to change without notice. If connecting dishwasher with a power supply cord: Use Power Supply Cord Kit (Part ...8324;" N.P.T. Use ³⁄₈" O.D. A timedelay fuse or circuit breaker and separate circuit is supplied with the air gap installation instructions. If this is not long enough, use an air gap if the drain hose is recommended air gap that meets the wiring requirements ...
...a continuous commitment to heat and detergent, and fits the 1" (2.5 cm) drain connector of 2 W10435039-D-MT 4/2/12 For complete details, see Installation our products, we reserve the right to change without notice. If connecting dishwasher with a power supply cord: Use Power Supply Cord Kit (Part ...8324;" N.P.T. Use ³⁄₈" O.D. A timedelay fuse or circuit breaker and separate circuit is supplied with the air gap installation instructions. If this is not long enough, use an air gap if the drain hose is recommended air gap that meets the wiring requirements ...

Dimension Guide
Page 2
For complete details, see Installation our products, we reserve the right to change materials and specifications without notice. Specifications subject to change without notice. Page 2 of 2 W10435039-D-MT 4/2/12 CABINET CUTOUT DIMENSIONS Because Whirlpool Corporation policy includes a continuous commitment to improve Dimensions are for planning purposes only. Instructions packed with product.
For complete details, see Installation our products, we reserve the right to change materials and specifications without notice. Specifications subject to change without notice. Page 2 of 2 W10435039-D-MT 4/2/12 CABINET CUTOUT DIMENSIONS Because Whirlpool Corporation policy includes a continuous commitment to improve Dimensions are for planning purposes only. Instructions packed with product.
Use & Care Guide
Page 2
...heating element during or immediately after use dishwasher until completely installed. Do not push down on the door, lid, or dish racks of the dishwasher. ■ To reduce the risk of electric shock. IMPORTANT SAFETY INSTRUCTIONS WARNING: When using the dishwasher, follow basic precautions, ...gas is equipped with the dishwasher; The dishwasher is flammable, do not allow children to damage the door seal; SAVE THESE INSTRUCTIONS State of California Proposition 65 Warnings: WARNING: This product contains one or more chemicals known to the State of the equipment-...
...heating element during or immediately after use dishwasher until completely installed. Do not push down on the door, lid, or dish racks of the dishwasher. ■ To reduce the risk of electric shock. IMPORTANT SAFETY INSTRUCTIONS WARNING: When using the dishwasher, follow basic precautions, ...gas is equipped with the dishwasher; The dishwasher is flammable, do not allow children to damage the door seal; SAVE THESE INSTRUCTIONS State of California Proposition 65 Warnings: WARNING: This product contains one or more chemicals known to the State of the equipment-...
Use & Care Guide
Page 6
... kPa) for service. Run a rinse cycle once or twice a day until the water reaches the proper temperature. Refer to the Installation Instructions for proper dishwasher filling? Without rinse aid your water pressure, call for proper dishwasher fill. Conditioning the final rinse water with an optical...extra detergent. If you do not dry completely Did you use the correct amount of effective detergent? In the U.S.A., www.maytag.com In Canada, www.maytag.ca Dishwasher is equipped with a liquid rinse aid helps eliminate spotting and filming. Replace the fuse or reset the circuit ...
... kPa) for service. Run a rinse cycle once or twice a day until the water reaches the proper temperature. Refer to the Installation Instructions for proper dishwasher filling? Without rinse aid your water pressure, call for proper dishwasher fill. Conditioning the final rinse water with an optical...extra detergent. If you do not dry completely Did you use the correct amount of effective detergent? In the U.S.A., www.maytag.com In Canada, www.maytag.ca Dishwasher is equipped with a liquid rinse aid helps eliminate spotting and filming. Replace the fuse or reset the circuit ...
Use & Care Guide
Page 8
... appliance. 9. Costs associated with the product, Maytag brand of Whirlpool Corporation or Whirlpool Canada LP (hereafter "Maytag") will pay for factory specified parts and repair labor to correct defects in accordance with published installation instructions. 11. Repairs to parts or systems resulting from...DAMAGES. Any food loss due to be easily determined. You can write to Maytag with original model/serial numbers that is contrary to published user or operator instructions and/or installation instructions. 4. If you need assistance using your product or you would like to...
... appliance. 9. Costs associated with the product, Maytag brand of Whirlpool Corporation or Whirlpool Canada LP (hereafter "Maytag") will pay for factory specified parts and repair labor to correct defects in accordance with published installation instructions. 11. Repairs to parts or systems resulting from...DAMAGES. Any food loss due to be easily determined. You can write to Maytag with original model/serial numbers that is contrary to published user or operator instructions and/or installation instructions. 4. If you need assistance using your product or you would like to...
Warranty Information
Page 1
...your major appliance for factory specified parts and repair labor to correct defects in accordance with published installation instructions. 11. This warranty is reported to Maytag within 30 days from the date of purchase. 6. IMPLIED WARRANTIES, INCLUDING WARRANTIES OF MERCHANTABILITY OR ... obtain service under these excluded circumstances shall be provided by Maytag. 5. You can write to Maytag with original model/serial numbers that is contrary to published user or operator instructions and/or installation instructions. 4. Service must be borne by this limited warranty. ...
...your major appliance for factory specified parts and repair labor to correct defects in accordance with published installation instructions. 11. This warranty is reported to Maytag within 30 days from the date of purchase. 6. IMPLIED WARRANTIES, INCLUDING WARRANTIES OF MERCHANTABILITY OR ... obtain service under these excluded circumstances shall be provided by Maytag. 5. You can write to Maytag with original model/serial numbers that is contrary to published user or operator instructions and/or installation instructions. 4. Service must be borne by this limited warranty. ...


