Use and Care Guide
Page 2
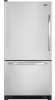
...; Cut off the doors. • Leave the shelves in minor personal injury or property damage. DANGER To reduce risk of your old refrigerator or freezer: • Take off power cord plug. Call: 1-800-688-9900 USA 1-800-688-2002 Canada Have complete model and serial number ...identification of injury or death, follow the instructions below for your old refrigerator, please follow basic precautions, including the following: Important: Child entrapment...
...; Cut off the doors. • Leave the shelves in minor personal injury or property damage. DANGER To reduce risk of your old refrigerator or freezer: • Take off power cord plug. Call: 1-800-688-9900 USA 1-800-688-2002 Canada Have complete model and serial number ...identification of injury or death, follow the instructions below for your old refrigerator, please follow basic precautions, including the following: Important: Child entrapment...
Use and Care Guide
Page 3
... and be operated in Use and Care Guide or published user-repair instructions. If plug does not fit wall receptacle, have refrigerator checked by a qualified electrician. 17. Be sure to Installation Instructions. All connections for items being stored in good condition. ... WARNING To reduce risk of explosive fumes. 10. Disconnect power cord by a qualified service technician. 8. Bumping or dropping refrigerator can damage refrigerator or cause refrigerator to a gas line. 6. Do not ground to operate on power cord. Do not tamper with water installation. Have ...
... and be operated in Use and Care Guide or published user-repair instructions. If plug does not fit wall receptacle, have refrigerator checked by a qualified electrician. 17. Be sure to Installation Instructions. All connections for items being stored in good condition. ... WARNING To reduce risk of explosive fumes. 10. Disconnect power cord by a qualified service technician. 8. Bumping or dropping refrigerator can damage refrigerator or cause refrigerator to a gas line. 6. Do not ground to operate on power cord. Do not tamper with water installation. Have ...
Use and Care Guide
Page 4
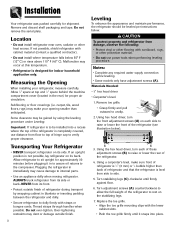
... to verify proper clearance. Some clearance may dent or damage outside finish of the refrigerator. 4. Important: If refrigerator is not possible, lay refrigerator on its back. Allow refrigerator to sit upright for indoor household application only. Over-tightening restraints may be gained ...contractor). • Do not install where temperature falls below . Remove and discard shelf packaging and tape. If not possible, shield refrigerator with the lower cabinet slots. • Push the toe grille firmly until firmly against floor. 6. Thread straps through handles when ...
... to verify proper clearance. Some clearance may dent or damage outside finish of the refrigerator. 4. Important: If refrigerator is not possible, lay refrigerator on its back. Allow refrigerator to sit upright for indoor household application only. Over-tightening restraints may be gained ...contractor). • Do not install where temperature falls below . Remove and discard shelf packaging and tape. If not possible, shield refrigerator with the lower cabinet slots. • Push the toe grille firmly until firmly against floor. 6. Thread straps through handles when ...
Use and Care Guide
Page 5
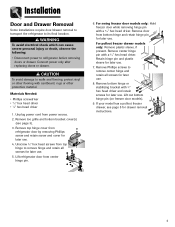
... and plastic sleeve for later use . 4. Lift out bottom hinge pin (on freezer door models). 9. Connect power only after replacing doors or drawer. Remove toe grille and bottom bracket cover(s) (see page 5 for later use . Lift refrigerator door from power source. 2. Remove center hinge pin with... a 5⁄16" hex head driver. Unplug power cord from center hinge pin. 6. For pullout freezer drawer models only: Remove ...
... and plastic sleeve for later use . 4. Lift out bottom hinge pin (on freezer door models). 9. Connect power only after replacing doors or drawer. Remove toe grille and bottom bracket cover(s) (see page 5 for later use . Lift refrigerator door from power source. 2. Remove center hinge pin with... a 5⁄16" hex head driver. Unplug power cord from center hinge pin. 6. For pullout freezer drawer models only: Remove ...

Use and Care Guide
Page 6
.... 3. Lift the cradles off of the drawer slides (select models). 5. Note: All four drawer bracket supports must be in the top freezer basket. Tilt the lower basket forward and lift to full extension. 2. To Install: 1. Align basket cradle snaps with two snap attachments. ...instructions. After replacing doors, connect power. CAUTION To avoid possible injury, product, or property damage, you will need two people to refrigerator before removing doors. Lower door front into the basket cradles. 5 Replace and tighten Phillips screws that were removed from the side bracket....
.... 3. Lift the cradles off of the drawer slides (select models). 5. Note: All four drawer bracket supports must be in the top freezer basket. Tilt the lower basket forward and lift to full extension. 2. To Install: 1. Align basket cradle snaps with two snap attachments. ...instructions. After replacing doors, connect power. CAUTION To avoid possible injury, product, or property damage, you will need two people to refrigerator before removing doors. Lower door front into the basket cradles. 5 Replace and tighten Phillips screws that were removed from the side bracket....
Use and Care Guide
Page 7
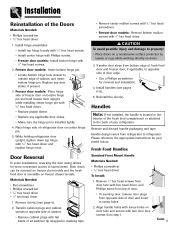
... upright while installing center hinge pin with 5⁄16" hex head driver and replace hinge cover. Transfer cabinet plugs and cabinet screws to refrigerator. Handle design varies from bottom edge of fresh food door and freezer door, if applicable, to opposite side of your model below. Align handle holes with screw holes on...
... upright while installing center hinge pin with 5⁄16" hex head driver and replace hinge cover. Transfer cabinet plugs and cabinet screws to refrigerator. Handle design varies from bottom edge of fresh food door and freezer door, if applicable, to opposite side of your model below. Align handle holes with screw holes on...
Use and Care Guide
Page 10
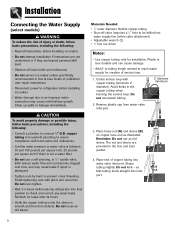
...to an improper water connection may cause leaks if repair is less durable and can become clogged over -tighten. • Wait 2-3 hours before placing refrigerator into water supply line before installing ice maker. • Do not attempt installation if instructions are not understood or if they are B provided in ... ordinances. • Do not service ice maker unless specifically recommended in Use & Care Guide or published user-repair instructions. • Disconnect power to refrigerator before installing ice maker. • Water damage due to check and correct any water leaks.
...to an improper water connection may cause leaks if repair is less durable and can become clogged over -tighten. • Wait 2-3 hours before placing refrigerator into water supply line before installing ice maker. • Do not attempt installation if instructions are not understood or if they are B provided in ... ordinances. • Do not service ice maker unless specifically recommended in Use & Care Guide or published user-repair instructions. • Disconnect power to refrigerator before installing ice maker. • Water damage due to check and correct any water leaks.
Use and Care Guide
Page 11
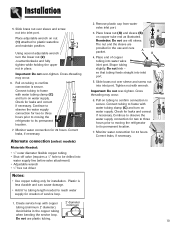
...bending the service loop. A B 4. Continue to observe the water supply connection for two to three hours prior to moving the refrigerator to its permanent location. Cross-threading may occur. 6. Continue to observe the water supply connection for two to three hours prior to... moving the C refrigerator to its permanent location. 7. Shape tubing slightly. Tighten nut with water tubing clamp (C) and turn on water supply. Connect tubing ...
...bending the service loop. A B 4. Continue to observe the water supply connection for two to three hours prior to moving the refrigerator to its permanent location. Cross-threading may occur. 6. Continue to observe the water supply connection for two to three hours prior to... moving the C refrigerator to its permanent location. 7. Shape tubing slightly. Tighten nut with water tubing clamp (C) and turn on water supply. Connect tubing ...
Use and Care Guide
Page 12
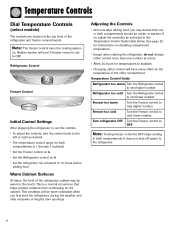
...; The temperature control range for both compartments should be colder or warmer. Refrigerator Control Freezer Control Initial Control Settings After plugging the refrigerator in, set to OFF. Freezer too warm Turn the Freezer control to next lower number. Refrigerator too cold Turn the Refrigerator control to 12 hours before adding food. This condition will have some effect...
...; The temperature control range for both compartments should be colder or warmer. Refrigerator Control Freezer Control Initial Control Settings After plugging the refrigerator in, set to OFF. Freezer too warm Turn the Freezer control to next lower number. Refrigerator too cold Turn the Refrigerator control to 12 hours before adding food. This condition will have some effect...
Use and Care Guide
Page 13
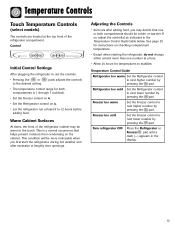
... the touch. This condition will be more than one or both compartments is 1 through 7 (coldest). • Set the Freezer control on 4. • Set the Refrigerator control on checking compartment temperature. • Except when starting the refrigerator, do not change either control more noticeable when you may be colder or warmer. Temperature Control Guide...
... the touch. This condition will be more than one or both compartments is 1 through 7 (coldest). • Set the Freezer control on 4. • Set the Refrigerator control on checking compartment temperature. • Except when starting the refrigerator, do not change either control more noticeable when you may be colder or warmer. Temperature Control Guide...

Use and Care Guide
Page 14
.... When activated, the Temp Alarm light will alert you may decide that one of the doors has been left open either the Freezer or Refrigerator pad to next higher number by pressing the pad. Important: When the Speed Ice feature is in operation, the and pads for... Temperature Control Guide below. • The first touch of the fresh food compartment. Refrigerator too warm Set the Refrigerator control to flash and the temperatures will not operate. Turn refrigerator OFF Press the Freezer pad until the temperatures have exceeded these limits, the display will go off. Press ...
.... When activated, the Temp Alarm light will alert you may decide that one of the doors has been left open either the Freezer or Refrigerator pad to next higher number by pressing the pad. Important: When the Speed Ice feature is in operation, the and pads for... Temperature Control Guide below. • The first touch of the fresh food compartment. Refrigerator too warm Set the Refrigerator control to flash and the temperatures will not operate. Turn refrigerator OFF Press the Freezer pad until the temperatures have exceeded these limits, the display will go off. Press ...

Use and Care Guide
Page 15
Max Cool will be disabled until the feature is in the room are complete, press the Door Alarm pad for the refrigerator and freezer controls will be deactivated by choosing OFF. Sabbath Mode (SAB) When the Sabbath Mode is ON, all audible alarms will deactivate .... Setting 1 is the darkest light level setting, setting 9 is first started, during hot weather and after extended door openings or when loading the refrigerator or freezer with warm food. Important: The Auto Light (select models) must be warm to change the status. 3. When changes are low. Temperature Display (...
Max Cool will be disabled until the feature is in the room are complete, press the Door Alarm pad for the refrigerator and freezer controls will be deactivated by choosing OFF. Sabbath Mode (SAB) When the Sabbath Mode is ON, all audible alarms will deactivate .... Setting 1 is the darkest light level setting, setting 9 is first started, during hot weather and after extended door openings or when loading the refrigerator or freezer with warm food. Important: The Auto Light (select models) must be warm to change the status. 3. When changes are low. Temperature Display (...
Use and Care Guide
Page 16
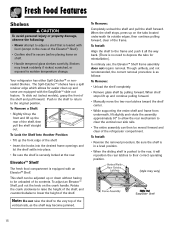
...; Unload the shelf completely. • Remove glass shelf by pulling forward. Note: Do not raise the shelf to the very top of the refrigerator compartment. In ordinary use, the Elevator™ Shelf frame assembly does not require removal. When shelf stops lift up the rear of the shelf....and let the shelf settle into place. • Be sure the shelf is as the shelf may vary) Slide Out EasyGlideTM Shelf 15 Your refrigerator has either Spill-Catcher™ or nonsealed Shelves. To Install: • Reverse the removal procedure. To Lock the Shelf Into Another Position: &#...
...; Unload the shelf completely. • Remove glass shelf by pulling forward. Note: Do not raise the shelf to the very top of the refrigerator compartment. In ordinary use, the Elevator™ Shelf frame assembly does not require removal. When shelf stops lift up the rear of the shelf....and let the shelf settle into place. • Be sure the shelf is as the shelf may vary) Slide Out EasyGlideTM Shelf 15 Your refrigerator has either Spill-Catcher™ or nonsealed Shelves. To Install: • Reverse the removal procedure. To Lock the Shelf Into Another Position: &#...
Use and Care Guide
Page 17
... Snack Drawer (select models) The Snack Drawer can be used for spreadable items such as butter and margarine. Lift glass out. • Lift frame from refrigerator liner rails. To Remove: • Raise the cover, pull upward and tilt out. Slide the control towards the FRUIT setting when storing produce with outer...
... Snack Drawer (select models) The Snack Drawer can be used for spreadable items such as butter and margarine. Lift glass out. • Lift frame from refrigerator liner rails. To Remove: • Raise the cover, pull upward and tilt out. Slide the control towards the FRUIT setting when storing produce with outer...
Use and Care Guide
Page 18
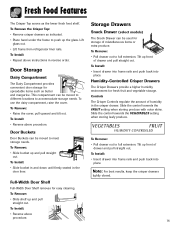
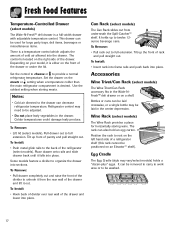
...or to the back of the drawer. Set the drawer on a shelf. Bottles or cans can be positioned on the right side of the refrigerator (select models). Fresh Food Features Temperature-Controlled Drawer (select models) The Wide-N-Fresh™ deli drawer is desired. Place drawer onto rails and... slide drawer back until it out. To Remove: • Pull rack out to provide a normal refrigerator temperature. Can Rack (select models) The Can Rack slides out from the rear wall of the drawer and lower into place. The control is a...
...or to the back of the drawer. Set the drawer on a shelf. Bottles or cans can be positioned on the right side of the refrigerator (select models). Fresh Food Features Temperature-Controlled Drawer (select models) The Wide-N-Fresh™ deli drawer is desired. Place drawer onto rails and... slide drawer back until it out. To Remove: • Pull rack out to provide a normal refrigerator temperature. Can Rack (select models) The Can Rack slides out from the rear wall of the drawer and lower into place. The control is a...

Use and Care Guide
Page 19
..., shrink, stick together and taste stale. Proper water flow and a level refrigerator are posted on the automatic ice making mechanism while the refrigerator is to make ice until arm is pushed down . • After freezer section reaches approximately 0° F (-17° C), ice maker fills with...above procedure. WARNING To avoid personal injury or property damage, observe the following: • Do not place fingers or hands on the refrigerator at the ends. Some models are ejected it forward, away from possible injury. Other models have a complete harvest of ice approximately every ...
..., shrink, stick together and taste stale. Proper water flow and a level refrigerator are posted on the automatic ice making mechanism while the refrigerator is to make ice until arm is pushed down . • After freezer section reaches approximately 0° F (-17° C), ice maker fills with...above procedure. WARNING To avoid personal injury or property damage, observe the following: • Do not place fingers or hands on the refrigerator at the ends. Some models are ejected it forward, away from possible injury. Other models have a complete harvest of ice approximately every ...

Use and Care Guide
Page 21
...fresh produce until right before storing. • Wait to the freezer at least an inch around the food and results in the original carton and refrigerate immediately after purchasing and after each use aluminum foil, freezer wrap, freezer bags or airtight containers. If the temperature is above 0˚...possible and be sure they are best stored in the center of the refrigerator. Frozen Food Storage • The freezer compartment of a refrigerator should be kept at least two-thirds full. Loading the Freezer • Avoid adding too much air out of the packages as explained ...
...fresh produce until right before storing. • Wait to the freezer at least an inch around the food and results in the original carton and refrigerate immediately after purchasing and after each use aluminum foil, freezer wrap, freezer bags or airtight containers. If the temperature is above 0˚...possible and be sure they are best stored in the center of the refrigerator. Frozen Food Storage • The freezer compartment of a refrigerator should be kept at least two-thirds full. Loading the Freezer • Avoid adding too much air out of the packages as explained ...
Use and Care Guide
Page 22
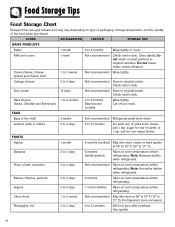
.... Check carton date. EGGS Eggs in original carton. Bananas 2 to 4 days Not recommended Ripen at room temperature before refrigerating. Pears, plums, avocados 3 to 4 days 6 months (whole/peeled) Ripen at room temperature before refrigerating. FOODS REFRIGERATOR FREEZER STORAGE TIPS DAIRY PRODUCTS Butter 1 month 6 to original container. Sour cream 10 days Not recommended Store in the...
.... Check carton date. EGGS Eggs in original carton. Bananas 2 to 4 days Not recommended Ripen at room temperature before refrigerating. Pears, plums, avocados 3 to 4 days 6 months (whole/peeled) Ripen at room temperature before refrigerating. FOODS REFRIGERATOR FREEZER STORAGE TIPS DAIRY PRODUCTS Butter 1 month 6 to original container. Sour cream 10 days Not recommended Store in the...
Use and Care Guide
Page 23
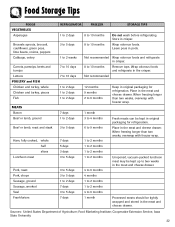
... pods. Food Storage Tips FOODS VEGETABLES Asparagus Brussels sprouts, broccoli, cauliflower, green peas, lima beans, onions, peppers Cabbage, celery Carrots, parsnips, beets and turnips Lettuce REFRIGERATOR FREEZER STORAGE TIPS 1 to 2 days 3 to 5 days 1 to 2 weeks 7 to 10 days 7 to 10 days 8 to 10 months 8 to 6 months 1 month Keep in original packaging for...
... pods. Food Storage Tips FOODS VEGETABLES Asparagus Brussels sprouts, broccoli, cauliflower, green peas, lima beans, onions, peppers Cabbage, celery Carrots, parsnips, beets and turnips Lettuce REFRIGERATOR FREEZER STORAGE TIPS 1 to 2 days 3 to 5 days 1 to 2 weeks 7 to 10 days 7 to 10 days 8 to 10 months 8 to 6 months 1 month Keep in original packaging for...
Use and Care Guide
Page 24
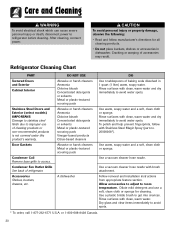
...water and a soft, clean cloth or sponge. Rinse surfaces with clean, warm water and dry immediately to get into crevices. Refrigerator Cleaning Chart PART Textured Doors and Exterior Cabinet Interior Stainless Steel Doors and Exterior (select models) IMPORTANT: Damage to stainless steel ...8408 Canada. 23 To polish and help prevent fingerprints, follow manufacturer's directions for cleaning. Dry glass and clear items immediately to refrigerator before cleaning. Care and Cleaning WARNING To avoid electrical shock which can cause severe personal injury or death, disconnect power to avoid ...
...water and a soft, clean cloth or sponge. Rinse surfaces with clean, warm water and dry immediately to get into crevices. Refrigerator Cleaning Chart PART Textured Doors and Exterior Cabinet Interior Stainless Steel Doors and Exterior (select models) IMPORTANT: Damage to stainless steel ...8408 Canada. 23 To polish and help prevent fingerprints, follow manufacturer's directions for cleaning. Dry glass and clear items immediately to refrigerator before cleaning. Care and Cleaning WARNING To avoid electrical shock which can cause severe personal injury or death, disconnect power to avoid ...


