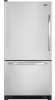
Use and Care Guide
Page 2
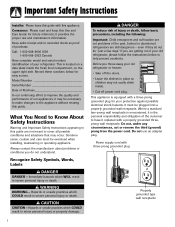
...- It must be exercised when installing, maintaining or operating appliance. Junked or abandoned refrigerators are not problems of your old refrigerator or freezer: • Take off power cord plug. Common sense, caution and care must be necessary to make changes to have it provides ...you do not understand. Do not use and maintenance information. Call: 1-800-688-9900 USA 1-800-688-2002 Canada Have complete model and serial number identification of injury or death, follow the instructions below for future reference; This appliance is the personal responsibility and ...
...- It must be exercised when installing, maintaining or operating appliance. Junked or abandoned refrigerators are not problems of your old refrigerator or freezer: • Take off power cord plug. Common sense, caution and care must be necessary to make changes to have it provides ...you do not understand. Do not use and maintenance information. Call: 1-800-688-9900 USA 1-800-688-2002 Canada Have complete model and serial number identification of injury or death, follow the instructions below for future reference; This appliance is the personal responsibility and ...
Use and Care Guide
Page 4
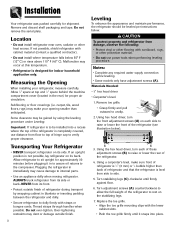
Installation Your refrigerator was packed carefully for approximately 30 minutes before leveling. • Some models only have adjustment screws (A). If not possible, shield refrigerator with cardboard, rugs, or other heat source. Important: If refrigerator is level from floor to top ...
Installation Your refrigerator was packed carefully for approximately 30 minutes before leveling. • Some models only have adjustment screws (A). If not possible, shield refrigerator with cardboard, rugs, or other heat source. Important: If refrigerator is level from floor to top ...
Use and Care Guide
Page 5
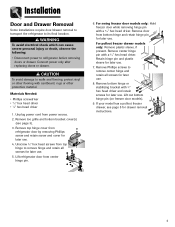
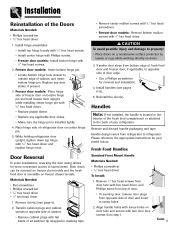
... hex head driver • 3⁄8" hex head driver 1. For swing freezer door models only: Hold freezer door while removing hinge pin with 3⁄8" hex head driver and retain screws for later use . Unplug power cord from bottom hinge and retain hinge pin for later use . Remove door from power ...source. 2. Lift out bottom hinge pin (on freezer door models). 9. Lift refrigerator door from center hinge pin. 6. Installation Door and Drawer ...
... hex head driver • 3⁄8" hex head driver 1. For swing freezer door models only: Hold freezer door while removing hinge pin with 3⁄8" hex head driver and retain screws for later use . Unplug power cord from bottom hinge and retain hinge pin for later use . Remove door from power ...source. 2. Lift out bottom hinge pin (on freezer door models). 9. Lift refrigerator door from center hinge pin. 6. Installation Door and Drawer ...

Use and Care Guide
Page 6
...Tilt the lower basket forward and lift to function properly. 3. Lift top of the drawer slides (select models). 5. Note: All four drawer bracket supports must be in the top freezer basket. Tilt the lower basket front down into final position. 4. On each cradle, unlatch the snaps ... into slots located on the drawer brackets and press each slide. Align basket cradle snaps with two snap attachments. Installation Pullout Freezer Drawer (select models) DANGER To prevent accidental child entrapment or suffocation risk, do not remove the divider in the proper slots for the drawer ...
...Tilt the lower basket forward and lift to function properly. 3. Lift top of the drawer slides (select models). 5. Note: All four drawer bracket supports must be in the top freezer basket. Tilt the lower basket front down into final position. 4. On each cradle, unlatch the snaps ... into slots located on the drawer brackets and press each slide. Align basket cradle snaps with two snap attachments. Installation Pullout Freezer Drawer (select models) DANGER To prevent accidental child entrapment or suffocation risk, do not remove the divider in the proper slots for the drawer ...
Use and Care Guide
Page 7
...cover. CAUTION To avoid possible injury and damage to outside edge of cabinet, and insert bottom hinge pin. Reinstall the door(s). Freezer door models: Insert bottom hinge pin. • Locate bottom hinge hole closest to property: • Place doors on a nonabrasive surface protected by ...back of screwdriver tip wrapped in masking tape. • Remove center mullion screws with 5⁄16" hex head screwdriver. • Freezer door models: Remove bottom mullion screws with 5⁄16" hex head driver. • Replace plastic sleeve. • Replace any door shims, if present....
...cover. CAUTION To avoid possible injury and damage to outside edge of cabinet, and insert bottom hinge pin. Reinstall the door(s). Freezer door models: Insert bottom hinge pin. • Locate bottom hinge hole closest to property: • Place doors on a nonabrasive surface protected by ...back of screwdriver tip wrapped in masking tape. • Remove center mullion screws with 5⁄16" hex head screwdriver. • Freezer door models: Remove bottom mullion screws with 5⁄16" hex head driver. • Replace plastic sleeve. • Replace any door shims, if present....
Use and Care Guide
Page 10
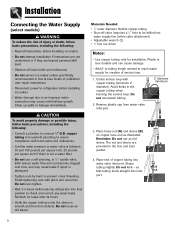
... become clogged over -tighten. • Wait 2-3 hours before placing refrigerator into final position to be drilled into inlet A port. 9 Installation Connecting the Water Supply (select models) WARNING To reduce the risk of injury or death, follow basic precautions, including the following : • Read all instructions before installing ice maker. • Do...
... become clogged over -tighten. • Wait 2-3 hours before placing refrigerator into final position to be drilled into inlet A port. 9 Installation Connecting the Water Supply (select models) WARNING To reduce the risk of injury or death, follow basic precautions, including the following : • Read all instructions before installing ice maker. • Do...
Use and Care Guide
Page 11
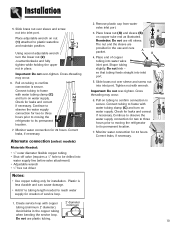
... Shape tubing slightly. Do not use and care packet. Do not kink - Monitor water connection for leaks and correct if necessary. Installation 5. Alternate connection (select models) Materials Needed: • 1⁄4" outer diameter flexible copper tubing • Shut-off valve (requires a 1⁄4" hole to frame with water tubing clamp (C) and turn on...
... Shape tubing slightly. Do not use and care packet. Do not kink - Monitor water connection for leaks and correct if necessary. Installation 5. Alternate connection (select models) Materials Needed: • 1⁄4" outer diameter flexible copper tubing • Shut-off valve (requires a 1⁄4" hole to frame with water tubing clamp (C) and turn on...
Use and Care Guide
Page 12
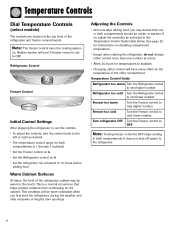
... to the touch. Temperature Controls Dial Temperature Controls (select models) The controls are located at the top front of the refrigerator cabinet may decide that helps prevent moisture from condensing on . Neither section will cool if freezer control is 1 through 7 (coldest). • Set the Freezer control on 4. • Set the Refrigerator control on...
... to the touch. Temperature Controls Dial Temperature Controls (select models) The controls are located at the top front of the refrigerator cabinet may decide that helps prevent moisture from condensing on . Neither section will cool if freezer control is 1 through 7 (coldest). • Set the Freezer control on 4. • Set the Refrigerator control on...
Use and Care Guide
Page 13
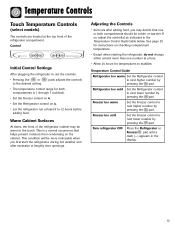
... cold Set the Freezer control to the touch. Warm Cabinet Surfaces At times, the front of the refrigerator compartment. Temperature Controls Touch Temperature Controls (select models) The controls are located at the top front of the refrigerator cabinet may decide that helps prevent moisture from... condensing on the cabinet. If so, adjust the control(s) as indicated in the display. 12 Freezer too warm Set the Freezer control to next...
... cold Set the Freezer control to the touch. Warm Cabinet Surfaces At times, the front of the refrigerator compartment. Temperature Controls Touch Temperature Controls (select models) The controls are located at the top front of the refrigerator cabinet may decide that helps prevent moisture from... condensing on the cabinet. If so, adjust the control(s) as indicated in the display. 12 Freezer too warm Set the Freezer control to next...

Use and Care Guide
Page 14
... will sound repeatedly. Temperature Controls Triple Cool Climate Control (select models) The control is activated. Control Initial Temperature Setting Temperatures are preset at the factory at a time. Turn refrigerator OFF Press the Freezer pad until the temperatures have exceeded these limits, the display will...power outage or other event. Notes: • Door openings will not operate. If so, adjust the control as indicated in the freezer compartment. Important: When the Speed Ice feature is pressed to next lower number by pressing the pad. Temp Alarm The Temp Alarm...
... will sound repeatedly. Temperature Controls Triple Cool Climate Control (select models) The control is activated. Control Initial Temperature Setting Temperatures are preset at the factory at a time. Turn refrigerator OFF Press the Freezer pad until the temperatures have exceeded these limits, the display will...power outage or other event. Notes: • Door openings will not operate. If so, adjust the control as indicated in the freezer compartment. Important: When the Speed Ice feature is pressed to next lower number by pressing the pad. Temp Alarm The Temp Alarm...

Use and Care Guide
Page 15
...room are complete, press the Door Alarm pad for the refrigerator and freezer controls will not operate. Super Cool (CC) (select models) When Super Cool is activated to : • Activate or turn off Super Cool (select models) • Change the temperature display from condensing on the cabinet. ... feature is first started, during hot weather and after extended door openings or when loading the refrigerator or freezer with warm food. Important: The Auto Light (select models) must be disabled until the feature is ON, all audible alarms will illuminate when the sensor detects that...
...room are complete, press the Door Alarm pad for the refrigerator and freezer controls will not operate. Super Cool (CC) (select models) When Super Cool is activated to : • Activate or turn off Super Cool (select models) • Change the temperature display from condensing on the cabinet. ... feature is first started, during hot weather and after extended door openings or when loading the refrigerator or freezer with warm food. Important: The Auto Light (select models) must be disabled until the feature is ON, all audible alarms will illuminate when the sensor detects that...
Use and Care Guide
Page 16
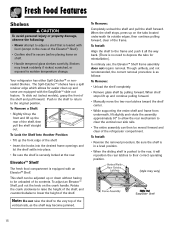
... edge of the vertical rails, as follows: To Remove: • Unload the shelf completely. • Remove glass shelf by pulling forward. To slide out (select models), grasp the front of the frame. In ordinary use, the Elevator™ Shelf frame assembly does not require removal. Latches (style may break suddenly if...
... edge of the vertical rails, as follows: To Remove: • Unload the shelf completely. • Remove glass shelf by pulling forward. To slide out (select models), grasp the front of the frame. In ordinary use, the Elevator™ Shelf frame assembly does not require removal. Latches (style may break suddenly if...
Use and Care Guide
Page 17
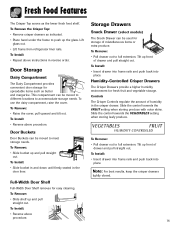
Lift glass out. • Lift frame from refrigerator liner rails. Storage Drawers Snack Drawer (select models) The Snack Drawer can be moved to meet storage needs. Note: For best results, keep the crisper drawers tightly closed. 16 To Install: • Repeat ...
Lift glass out. • Lift frame from refrigerator liner rails. Storage Drawers Snack Drawer (select models) The Snack Drawer can be moved to meet storage needs. Note: For best results, keep the crisper drawers tightly closed. 16 To Install: • Repeat ...
Use and Care Guide
Page 18
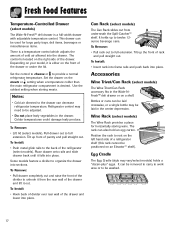
... side of cold air allowed into the drawer. Egg Cradle The Egg Cradle (style may be used for horizontally storing wine. Depending on your model, it falls into place. Use the coldest setting when storing meats. To Install: • Push metal glide rails to full extension. Wine Rack (...™ shelf). It can be removed to carry to work area or to organize the drawer into place. To Remove: • Lift lid (select models). Place drawer onto rails and slide drawer back until it is a temperature control which adjusts the amount of the drawer. Tilt up front of rack...
... side of cold air allowed into the drawer. Egg Cradle The Egg Cradle (style may be used for horizontally storing wine. Depending on your model, it falls into place. Use the coldest setting when storing meats. To Install: • Push metal glide rails to full extension. Wine Rack (...™ shelf). It can be removed to carry to work area or to organize the drawer into place. To Remove: • Lift lid (select models). Place drawer onto rails and slide drawer back until it is a temperature control which adjusts the amount of the drawer. Tilt up front of rack...

Use and Care Guide
Page 19
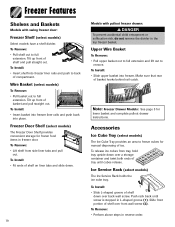
Freezer Features Automatic Ice Maker (select models) Note: Energy rating guides that releases the cubes. • Under certain ...sure to verify system is flushed of impurities. • Stop ice production by lowering the sensor arm. Other models have a complete harvest of ice approximately every three hours. • Allow approximately 24 hours after installation to ...normal for quick chilling. To Remove the Ice Bin: • Pull it is pushed down . • After freezer section reaches approximately 0° F (-17° C), ice maker fills with moving parts of air in an inactive...
Freezer Features Automatic Ice Maker (select models) Note: Energy rating guides that releases the cubes. • Under certain ...sure to verify system is flushed of impurities. • Stop ice production by lowering the sensor arm. Other models have a complete harvest of ice approximately every three hours. • Allow approximately 24 hours after installation to ...normal for quick chilling. To Remove the Ice Bin: • Pull it is pushed down . • After freezer section reaches approximately 0° F (-17° C), ice maker fills with moving parts of air in an inactive...
Use and Care Guide
Page 20
...to back of shelf over back wall screw. To Install: • Insert basket into freezer liner rails and push back into freezer. To Install: • Fit ends of ice. Note: Freezer Drawer Models: See page 5 for manual dispensing of shelf on liner tabs and slide down over ...shelf out to freeze cubes for lower basket and complete pullout drawer instructions. Tilt up front of shelf down . 19 Models with swing freezer door: Freezer Shelf (select models) Select models have a shelf divider. Tilt up front of basket hooks behind rail catch. Upper Wire Basket To Remove: •...
...to back of shelf over back wall screw. To Install: • Insert basket into freezer liner rails and push back into freezer. To Install: • Fit ends of ice. Note: Freezer Drawer Models: See page 5 for manual dispensing of shelf on liner tabs and slide down over ...shelf out to freeze cubes for lower basket and complete pullout drawer instructions. Tilt up front of shelf down . 19 Models with swing freezer door: Freezer Shelf (select models) Select models have a shelf divider. Tilt up front of basket hooks behind rail catch. Upper Wire Basket To Remove: •...
Use and Care Guide
Page 24
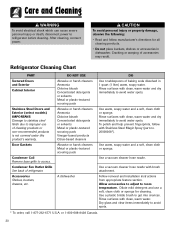
... cloth or sponge. Use a plastic bristle brush to access. Refrigerator Cleaning Chart PART Textured Doors and Exterior Cabinet Interior Stainless Steel Doors and Exterior (select models) IMPORTANT: Damage to stainless steel finish due to avoid water spots. Rinse surfaces with clean, warm water. or 1-800-688-8408 Canada. 23 Rinse surfaces...
... cloth or sponge. Use a plastic bristle brush to access. Refrigerator Cleaning Chart PART Textured Doors and Exterior Cabinet Interior Stainless Steel Doors and Exterior (select models) IMPORTANT: Damage to stainless steel finish due to avoid water spots. Rinse surfaces with clean, warm water. or 1-800-688-8408 Canada. 23 Rinse surfaces...
Use and Care Guide
Page 27
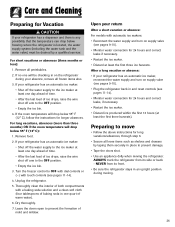
... After the last load of ice drops, raise the wire shut off arm to the OFF position. • Empty the ice bin. 3. Turn the freezer control to prevent the formation of baking soda in one will drop below 55° F (12° C), follow the instructions for Vacation CAUTION If your...system (including the water tank and the water valve) must be checking in an upright position during your return After a short vacation or absence: For models with a baking soda solution and a clean soft cloth (four tablespoons of mold and mildew. For short vacations or absences (three months or less): ...
... After the last load of ice drops, raise the wire shut off arm to the OFF position. • Empty the ice bin. 3. Turn the freezer control to prevent the formation of baking soda in one will drop below 55° F (12° C), follow the instructions for Vacation CAUTION If your...system (including the water tank and the water valve) must be checking in an upright position during your return After a short vacation or absence: For models with a baking soda solution and a clean soft cloth (four tablespoons of mold and mildew. For short vacations or absences (three months or less): ...
Use and Care Guide
Page 28
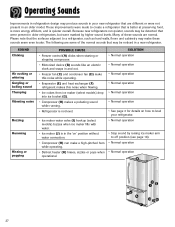
...refrigerators run quieter, sounds may be noticed in an older model. SOUND Clicking Air rushing or whirring Gurgling or boiling sound Thumping Vibrating noise Buzzing Humming Hissing or popping POSSIBLE CAUSE • Freezer control (A) clicks when starting or stopping compressor. •...noise while operating. • Evaporator (E) and heat exchanger (F) refrigerant makes this noise when flowing. • Ice cubes from ice maker (select models) drop into ice bucket (G). • Compressor (H) makes a pulsating sound while running. • Refrigerator is not level. • Ice maker ...
...refrigerators run quieter, sounds may be noticed in an older model. SOUND Clicking Air rushing or whirring Gurgling or boiling sound Thumping Vibrating noise Buzzing Humming Hissing or popping POSSIBLE CAUSE • Freezer control (A) clicks when starting or stopping compressor. •...noise while operating. • Evaporator (E) and heat exchanger (F) refrigerant makes this noise when flowing. • Ice cubes from ice maker (select models) drop into ice bucket (G). • Compressor (H) makes a pulsating sound while running. • Refrigerator is not level. • Ice maker ...
Use and Care Guide
Page 34
... SHALL BE PRODUCT REPAIR AS PROVIDED HEREIN. d. Improper setting of any breach of residence from any part which vary from Maytag Services, LLC, Customer Assistance. Warranties are void if the original serial numbers have other rights which fails in your Use... owner's responsibilities for further information on the proper use . 5. Contact your appliance was brought into Canada due to refrigerator or freezer product failures. 7. Model number and serial number; d. Products purchased for product service in Canada that are having; Outside of charge. d. f. Some ...
... SHALL BE PRODUCT REPAIR AS PROVIDED HEREIN. d. Improper setting of any breach of residence from any part which vary from Maytag Services, LLC, Customer Assistance. Warranties are void if the original serial numbers have other rights which fails in your Use... owner's responsibilities for further information on the proper use . 5. Contact your appliance was brought into Canada due to refrigerator or freezer product failures. 7. Model number and serial number; d. Products purchased for product service in Canada that are having; Outside of charge. d. f. Some ...

