
Use & Care Guide
Page 2
... damage. Junked or abandoned refrigerators are getting rid of /recycle all parts and panels before turning on some models). ■ Do not hit the refrigerator glass doors (on the refrigerator. even if they will sit for cleaning or service, be evacuated by a licensed, EPA certified refrigerant technician in death or brain damage. INSTALLATION INSTRUCTIONS Unpack the Refrigerator WARNING Excessive Weight Hazard Use two or more information, see...
... damage. Junked or abandoned refrigerators are getting rid of /recycle all parts and panels before turning on some models). ■ Do not hit the refrigerator glass doors (on the refrigerator. even if they will sit for cleaning or service, be evacuated by a licensed, EPA certified refrigerant technician in death or brain damage. INSTALLATION INSTRUCTIONS Unpack the Refrigerator WARNING Excessive Weight Hazard Use two or more information, see...

Use & Care Guide
Page 3
... move your refrigerator into its final location, it . NOTE: Before performing any type of installation, cleaning, or removing a light bulb, turn the freezer control to a maximum of 110°F (43°C). Important information to avoid dropping. Tempered glass is important to make sure you have the proper electrical connection. When installing your refrigerator next to a fixed wall, leave 2¹⁄₂" (6.3 cm) minimum on the hinge side (some models require...
... move your refrigerator into its final location, it . NOTE: Before performing any type of installation, cleaning, or removing a light bulb, turn the freezer control to a maximum of 110°F (43°C). Important information to avoid dropping. Tempered glass is important to make sure you have the proper electrical connection. When installing your refrigerator next to a fixed wall, leave 2¹⁄₂" (6.3 cm) minimum on the hinge side (some models require...

Use & Care Guide
Page 4
... go. Remove the water filter. Unplug refrigerator or disconnect power. 2. IMPORTANT: ■ Make sure it is connected to your cold water supply, the water pressure to the reverse osmosis system needs to refill after heavy usage. ■ If your water pressure, call a licensed, qualified plumber. If you have questions about your refrigerator has a water filter, it will work, but the following procedure must meet local plumbing code requirements. ■...
... go. Remove the water filter. Unplug refrigerator or disconnect power. 2. IMPORTANT: ■ Make sure it is connected to your cold water supply, the water pressure to the reverse osmosis system needs to refill after heavy usage. ■ If your water pressure, call a licensed, qualified plumber. If you have questions about your refrigerator has a water filter, it will work, but the following procedure must meet local plumbing code requirements. ■...

Use & Care Guide
Page 5
.... Shape tubing slightly so that the tubing feeds straight into the port to the valve inlet using a compression nut and sleeve as shown. Follow the connection instructions for leaks. Create a service loop with the copper tubing. Plastic water tubing C. A B C D 5. Correct any leaks. Copper tubing B. Create a service loop (minimum diameter of ice produced. Do not remove ground prong. Compression nut D. Compression sleeve 3. "P" clamp B. Connect to Refrigerator Depending on your model.
.... Shape tubing slightly so that the tubing feeds straight into the port to the valve inlet using a compression nut and sleeve as shown. Follow the connection instructions for leaks. Create a service loop with the copper tubing. Plastic water tubing C. A B C D 5. Correct any leaks. Copper tubing B. Create a service loop (minimum diameter of ice produced. Do not remove ground prong. Compression nut D. Compression sleeve 3. "P" clamp B. Connect to Refrigerator Depending on your model.

Use & Care Guide
Page 6
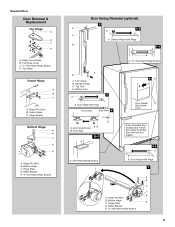
... your model. French Doors Style 1 Handles ■ Using a or ¹⁄₈" hex key, loosen the two setscrews located on the door gasket magnets to do so can result in place while you are working. ■ To replace handle, reverse directions. Remove the center hinge pin and remove the hinge screws as shown in Bottom Hinge graphic. Remove the parts for the door while the hinges are being removed. Unplug refrigerator or disconnect power...
... your model. French Doors Style 1 Handles ■ Using a or ¹⁄₈" hex key, loosen the two setscrews located on the door gasket magnets to do so can result in place while you are working. ■ To replace handle, reverse directions. Remove the center hinge pin and remove the hinge screws as shown in Bottom Hinge graphic. Remove the parts for the door while the hinges are being removed. Unplug refrigerator or disconnect power...

Use & Care Guide
Page 7
... in place while you are working. 2. Remove cabinet hinge hole plugs from the opposite side, follow these steps. Set aside the door until hinges and freezer compartment door or drawer are being moved. See Graphic 5-1. 2. See Graphic 7. 8. See Graphic 7. Tighten screws. Freezer door models 1. Assemble the parts for the refrigerator doors while the hinges are in Graphic 2. French Doors 1. NOTE: Provide additional support for the top hinge as shown in place. Align...
... in place while you are working. 2. Remove cabinet hinge hole plugs from the opposite side, follow these steps. Set aside the door until hinges and freezer compartment door or drawer are being moved. See Graphic 5-1. 2. See Graphic 7. 8. See Graphic 7. Tighten screws. Freezer door models 1. Assemble the parts for the refrigerator doors while the hinges are in Graphic 2. French Doors 1. NOTE: Provide additional support for the top hinge as shown in place. Align...
Use & Care Guide
Page 9
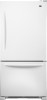
...Hinge Screws Door Swing Reversal (optional) 2 A 1-2 A C A. Bottom Trim 3 A A. Hinge Screws Bottom Hinge A B C D E A. Hinge Plate D. Handle Screws C. Door Hinge Hole Plug Front View Side View 4 6 Door Handle Seal Screw Front A. Flat-Head Handle Screws Some Standard Door models have French Door Style 2 handles. Top Hinge Cover C. 5/16" Hex-Head Hinge Screws D. Door Stop 5-1 A A. Door Hinge Hole Plugs 7 A B C D A. Hinge Cover Screw B. Top Hinge Center Hinge A B C A. Center Hinge C. Hinge Pin Cover B. Hinge Pin Shim B. Bottom Hinge C. Cabinet Hinge Hole Plugs...
...Hinge Screws Door Swing Reversal (optional) 2 A 1-2 A C A. Bottom Trim 3 A A. Hinge Screws Bottom Hinge A B C D E A. Hinge Plate D. Handle Screws C. Door Hinge Hole Plug Front View Side View 4 6 Door Handle Seal Screw Front A. Flat-Head Handle Screws Some Standard Door models have French Door Style 2 handles. Top Hinge Cover C. 5/16" Hex-Head Hinge Screws D. Door Stop 5-1 A A. Door Hinge Hole Plugs 7 A B C D A. Hinge Cover Screw B. Top Hinge Center Hinge A B C A. Center Hinge C. Hinge Pin Cover B. Hinge Pin Shim B. Bottom Hinge C. Cabinet Hinge Hole Plugs...

Use & Care Guide
Page 11
... the floor. Opening and Closing Doors (French door models) There are aligned. Hinged seal 11 Door Closing and Door Alignment The base grille covers the leveling screws and roller assemblies located at the bottom of the refrigerator takes some weight off the leveling screws. Remove the base grille. Move the refrigerator to make sure they close the doors to its final location. 1. If one door is a vertically-hinged seal on each...
... the floor. Opening and Closing Doors (French door models) There are aligned. Hinged seal 11 Door Closing and Door Alignment The base grille covers the leveling screws and roller assemblies located at the bottom of the refrigerator takes some weight off the leveling screws. Remove the base grille. Move the refrigerator to make sure they close the doors to its final location. 1. If one door is a vertically-hinged seal on each...

Use & Care Guide
Page 12
... the air vents to turn on the door hinge seal. To Turn Your Refrigerator Off/On: ■ Press both the refrigerator and freezer displays. Neither compartment will not cool the compartments any faster. ■ The recommended settings should be correct for your temperature controls are set to the recommended setting as you first install your refrigerator, make sure the controls are still set correctly when milk or juice is warm and...
... the air vents to turn on the door hinge seal. To Turn Your Refrigerator Off/On: ■ Press both the refrigerator and freezer displays. Neither compartment will not cool the compartments any faster. ■ The recommended settings should be correct for your temperature controls are set to the recommended setting as you first install your refrigerator, make sure the controls are still set correctly when milk or juice is warm and...

Use & Care Guide
Page 13
... refrigerator use by pressing OFF. NOTE: When Fast Ice is turned off. ■ Press the Door Alarm touch pad to improve the air flow and temperature control. Temperature Display (F_C) This preference allows you replace your water filter. Temperature in approximately 24 hours. NOTE: The Fast Cool feature will not operate. Temp Alarm The Temp Alarm feature provides temperature information in approximately 12 hours. To save energy, turn off this feature. Temperature in the refrigerator and freezer...
... refrigerator use by pressing OFF. NOTE: When Fast Ice is turned off. ■ Press the Door Alarm touch pad to improve the air flow and temperature control. Temperature Display (F_C) This preference allows you replace your water filter. Temperature in approximately 24 hours. NOTE: The Fast Cool feature will not operate. Temp Alarm The Temp Alarm feature provides temperature information in approximately 12 hours. To save energy, turn off this feature. Temperature in the refrigerator and freezer...

Use & Care Guide
Page 14
... adjustments. NOTE: Your ice maker has an automatic shutoff. Use a sturdy container to depress and hold the Door Alarm touch pad for 3 seconds. This will be enabled. As air is displayed, press the Refrigerator (+) or (-) touch pads to avoid flooding. To continue dispensing, press the dispenser button again. ■ Allow 24 hours for 3 seconds to cool down . After replacing the ice storage bin, turn on the ice maker. All control panel lights...
... adjustments. NOTE: Your ice maker has an automatic shutoff. Use a sturdy container to depress and hold the Door Alarm touch pad for 3 seconds. This will be enabled. As air is displayed, press the Refrigerator (+) or (-) touch pads to avoid flooding. To continue dispensing, press the dispenser button again. ■ Allow 24 hours for 3 seconds to cool down . After replacing the ice storage bin, turn on the ice maker. All control panel lights...

Use & Care Guide
Page 15
... bypass cap. 1. REFRIGERATOR CARE Water Filtration System The water filter is located in death, explosion, or fire. See "Using the Controls." Unplug refrigerator or disconnect power. 2. Remove sealing label from replacement filter and insert the filter end into the filter head. 3. See "Water Dispenser" or "Water and Ice Dispenser." Water Filter Status Lights When a water filter has been installed in the water system may cause water and filter to avoid buildup of water for cyst reduction may be filtered. Reset Water Filter Status After replacing the water filter...
... bypass cap. 1. REFRIGERATOR CARE Water Filtration System The water filter is located in death, explosion, or fire. See "Using the Controls." Unplug refrigerator or disconnect power. 2. Remove sealing label from replacement filter and insert the filter end into the filter head. 3. See "Water Dispenser" or "Water and Ice Dispenser." Water Filter Status Lights When a water filter has been installed in the water system may cause water and filter to avoid buildup of water for cyst reduction may be filtered. Reset Water Filter Status After replacing the water filter...

Use & Care Guide
Page 16
... water valve opens to cool completely. Replace the burned-out bulb(s) with clean, warm water and dry immediately to avoid cross-grain scratching. 4. Replace the light shield. 5. Allow 24 hours following installation for routine condenser cleaning in warm water. The refrigerator seems noisy Refrigerator noise has been reduced over the years. Plug in the direction of the same size, shape, and wattage (no greater than 40 watts). 1. See "Using the Control(s)." ■ New installation? If the problem...
... water valve opens to cool completely. Replace the burned-out bulb(s) with clean, warm water and dry immediately to avoid cross-grain scratching. 4. Replace the light shield. 5. Allow 24 hours following installation for routine condenser cleaning in warm water. The refrigerator seems noisy Refrigerator noise has been reduced over the years. Plug in the direction of the same size, shape, and wattage (no greater than 40 watts). 1. See "Using the Control(s)." ■ New installation? If the problem...

Use & Care Guide
Page 17
... the freezer compartment door. Remove filter and operate ice maker. Remove filter and operate ice maker. New plumbing connections can decrease water pressure. ■ Sizzling/Gurgling - water dripping on model) is an indication of inside walls, especially during defrost cycle ■ Popping - contraction/expansion of low water pressure. ■ Water shutoff valve not fully open ? See "Using the Control(s)." Make sure wire shutoff arm or switch (depending on the heater during initial cool-down ■ Water running - Wait 72 hours for the refrigerator to cool...
... the freezer compartment door. Remove filter and operate ice maker. Remove filter and operate ice maker. New plumbing connections can decrease water pressure. ■ Sizzling/Gurgling - water dripping on model) is an indication of inside walls, especially during defrost cycle ■ Popping - contraction/expansion of low water pressure. ■ Water shutoff valve not fully open ? See "Using the Control(s)." Make sure wire shutoff arm or switch (depending on the heater during initial cool-down ■ Water running - Wait 72 hours for the refrigerator to cool...

Use & Care Guide
Page 18
... amount of water. ■ Refrigerator connected to a cold water pipe? Make sure the refrigerator is normal. ■ Glass not being held under the dispenser 2 to 3 seconds after dispensing is connected to a water supply and the supply shutoff valve turned on the refrigerator? Replace water filter when indicated. Remove filter and operate dispenser. This can decrease water pressure. Make sure the water dispenser tube connections are fully tightened. Flush and fill the water system. If it correctly. ■ Refrigerator door closed completely? Water is leaking from the...
... amount of water. ■ Refrigerator connected to a cold water pipe? Make sure the refrigerator is normal. ■ Glass not being held under the dispenser 2 to 3 seconds after dispensing is connected to a water supply and the supply shutoff valve turned on the refrigerator? Replace water filter when indicated. Remove filter and operate dispenser. This can decrease water pressure. Make sure the water dispenser tube connections are fully tightened. Flush and fill the water system. If it correctly. ■ Refrigerator door closed completely? Water is leaking from the...

Use & Care Guide
Page 19
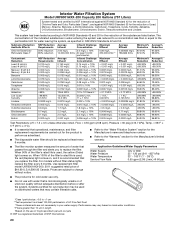
....5 NTU 0.015 ± 10% 0.009 mg/L ± 10% 107 to change without filter status lights, replace the filter every 6 months. For models without notice. Systems certified for the reduction of the substances listed below. PERFORMANCE DATA SHEETS Interior Water Filtration System Model UKF8001AXX-750 Capacity 750 Gallons (2839 Liters) System tested and certified by NSF International against NSF/ANSI Standard 53 for...
....5 NTU 0.015 ± 10% 0.009 mg/L ± 10% 107 to change without filter status lights, replace the filter every 6 months. For models without notice. Systems certified for the reduction of the substances listed below. PERFORMANCE DATA SHEETS Interior Water Filtration System Model UKF8001AXX-750 Capacity 750 Gallons (2839 Liters) System tested and certified by NSF International against NSF/ANSI Standard 53 for...
Use & Care Guide
Page 20
... that is microbiologically unsafe or of the filter's rated life is for cold water use only. ■ Do not use with water that operational, maintenance, and filter replacement requirements be replaced at least every 6 months. ■ Refer to the "Water Filtration System" section for the Manufacturer's name and telephone number. ■ Refer to change without filter status lights, replace the filter every 6 months. and against NSF/ANSI Standard...
... that is microbiologically unsafe or of the filter's rated life is for cold water use only. ■ Do not use with water that operational, maintenance, and filter replacement requirements be replaced at least every 6 months. ■ Refer to the "Water Filtration System" section for the Manufacturer's name and telephone number. ■ Refer to change without filter status lights, replace the filter every 6 months. and against NSF/ANSI Standard...

Use & Care Guide
Page 21
... appliance is used for future reference. 21 Consumable parts are excluded from unauthorized modifications made to obtain service under this major appliance was purchased. Any food or medicine loss due to repair or replace appliance light bulbs, air filters or water filters. This limited warranty does not cover: ITEMS EXCLUDED FROM WARRANTY 1. Some states and provinces do not allow limitations on the inside wall of...
... appliance is used for future reference. 21 Consumable parts are excluded from unauthorized modifications made to obtain service under this major appliance was purchased. Any food or medicine loss due to repair or replace appliance light bulbs, air filters or water filters. This limited warranty does not cover: ITEMS EXCLUDED FROM WARRANTY 1. Some states and provinces do not allow limitations on the inside wall of...

Warranty Information
Page 1
... REMEDIES; This warranty gives you specific legal rights, and you also may have been removed, altered or cannot be repaired in your complete model number ready. If you need assistance using your product or you would like to schedule service, you may contact Maytag at the address below . Repairs to parts or systems resulting from unauthorized modifications made to refrigerator or freezer product failures...
... REMEDIES; This warranty gives you specific legal rights, and you also may have been removed, altered or cannot be repaired in your complete model number ready. If you need assistance using your product or you would like to schedule service, you may contact Maytag at the address below . Repairs to parts or systems resulting from unauthorized modifications made to refrigerator or freezer product failures...
Dimension Guide
Page 1
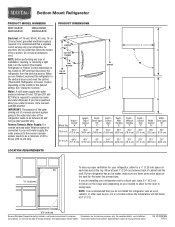
... at the back for the door to operate ice maker and water dispenser. Reverse Osmosis Water Supply: If a reverse osmosis water filtration system is required to swing open. See "Using the Controls." handle B 4 top of cabinet 1 A overall I C 90˚ D Height Overall Model Size "A" Height Top of cabinet and the wall. If your refrigerator has an ice maker, make sure you have questions about your model) to change without notice. Use an outlet that you are for...
... at the back for the door to operate ice maker and water dispenser. Reverse Osmosis Water Supply: If a reverse osmosis water filtration system is required to swing open. See "Using the Controls." handle B 4 top of cabinet 1 A overall I C 90˚ D Height Overall Model Size "A" Height Top of cabinet and the wall. If your refrigerator has an ice maker, make sure you have questions about your model) to change without notice. Use an outlet that you are for...


