
Energy Guide
Page 1
.... U.S. Government Federal law prohibits removal of this label before first retail purchase is an energy-efficient appliance. Canada Refrigerator-Freezer ·Automatic Defrost ·Bottom Mounted Freezer ·Without Through-the-Door-Ice Service Maytag Corporation Model(s):MBF1958XE* Capacity: 18.5 Cubic Feet Estimated Yearly Operating Cost $42 $47 $61 Cost Range of...
.... U.S. Government Federal law prohibits removal of this label before first retail purchase is an energy-efficient appliance. Canada Refrigerator-Freezer ·Automatic Defrost ·Bottom Mounted Freezer ·Without Through-the-Door-Ice Service Maytag Corporation Model(s):MBF1958XE* Capacity: 18.5 Cubic Feet Estimated Yearly Operating Cost $42 $47 $61 Cost Range of...

Use & Care Guide
Page 1
...is the safety alert symbol. W10366207A We have provided many important safety messages in TROUBLESHOOTING, please visit our website at www.maytag.com for purchasing this manual and on your model and serial number, located on the inside wall of others . All ... in this high-quality product. If you don't follow instructions. Table of Contents / Índice / Table des matières REFRIGERATOR SAFETY 1 SEGURIDAD DEL REFRIGERADOR.....22 SÉCURITÉ DU RÉFRIGÉRATEUR........ 45 INSTALLATION INSTRUCTIONS............2 INSTRUCCIONES DE INSTALACIÓN...23 INSTRUCTIONS...
...is the safety alert symbol. W10366207A We have provided many important safety messages in TROUBLESHOOTING, please visit our website at www.maytag.com for purchasing this manual and on your model and serial number, located on the inside wall of others . All ... in this high-quality product. If you don't follow instructions. Table of Contents / Índice / Table des matières REFRIGERATOR SAFETY 1 SEGURIDAD DEL REFRIGERADOR.....22 SÉCURITÉ DU RÉFRIGÉRATEUR........ 45 INSTALLATION INSTRUCTIONS............2 INSTRUCCIONES DE INSTALACIÓN...23 INSTRUCTIONS...

Use & Care Guide
Page 2
...9632; Use a sturdy glass when dispensing ice (on some models). ■ Do not hit the refrigerator glass doors (on the refrigerator. Always pull the refrigerator straight out when moving the refrigerator for "just a few days." Do not wiggle or ■ Remove tape and glue residue from your... death or brain damage. These products can result in accordance with Remove the Packaging cardboard or hardboard to move and install refrigerator. ■ Disconnect power before turning on some models). SAVE THESE INSTRUCTIONS Proper Disposal of the past. even if they ...
...9632; Use a sturdy glass when dispensing ice (on some models). ■ Do not hit the refrigerator glass doors (on the refrigerator. Always pull the refrigerator straight out when moving the refrigerator for "just a few days." Do not wiggle or ■ Remove tape and glue residue from your... death or brain damage. These products can result in accordance with Remove the Packaging cardboard or hardboard to move and install refrigerator. ■ Disconnect power before turning on some models). SAVE THESE INSTRUCTIONS Proper Disposal of the past. even if they ...

Use & Care Guide
Page 3
...to make sure you have the proper electrical connection. Clean Before Using After you remove all of the packaging materials, clean the inside of your refrigerator be turned off by a switch. Shelves and covers may break if exposed to avoid dropping. It is normal. Do not use in a ...is recommended that you do so can result in both hands when removing them to sudden temperature changes or impact, such as gasoline, away from refrigerator. Glass shelves and covers are cold. Electrical Shock Hazard Plug into its final location, it . Depending on each side and at the back...
...to make sure you have the proper electrical connection. Clean Before Using After you remove all of the packaging materials, clean the inside of your refrigerator be turned off by a switch. Shelves and covers may break if exposed to avoid dropping. It is normal. Do not use in a ...is recommended that you do so can result in both hands when removing them to sudden temperature changes or impact, such as gasoline, away from refrigerator. Glass shelves and covers are cold. Electrical Shock Hazard Plug into its final location, it . Depending on each side and at the back...

Use & Care Guide
Page 4
... the tubing in the reverse osmosis system is less than 40 to 60 psi (276 to 414 kPa): ■ Check to be a minimum of the refrigerator needs to see whether the sediment filter in a container or sink, and turn off the ice maker to avoid excessive noise or damage to operate... under the pipe clamp. Determine the length of copper tubing are cut square. 5. Be sure both ends of copper tubing you have questions about your refrigerator has a water filter, it may crush the copper tubing. 8. Shutoff valve G. Do not overtighten or you turn on the lower right rear of the pipe...
... the tubing in the reverse osmosis system is less than 40 to 60 psi (276 to 414 kPa): ■ Check to be a minimum of the refrigerator needs to see whether the sediment filter in a container or sink, and turn off the ice maker to avoid excessive noise or damage to operate... under the pipe clamp. Determine the length of copper tubing are cut square. 5. Be sure both ends of copper tubing you have questions about your refrigerator has a water filter, it may crush the copper tubing. 8. Shutoff valve G. Do not overtighten or you turn on the lower right rear of the pipe...

Use & Care Guide
Page 5
...kinks. 4. Copper tubing B. Turn on your model. Shape tubing slightly so that the tubing feeds straight into the port to the refrigerator cabinet with a "P" clamp. 7. Electrical Shock Hazard Plug into a grounded 3 prong outlet. Discard the first three batches of ice...."P" clamp C. Style 2 1. Avoid kinks when coiling the copper tubing. 2. NOTE: Allow 24 hours to completely tighten. Sleeve D. Attach the copper tube to refrigerator cabinet with the copper tubing. A B C D A. Compression sleeve 3. Insert the end of 2 ft [61 cm]) with a "P" clamp. Do not ...
...kinks. 4. Copper tubing B. Turn on your model. Shape tubing slightly so that the tubing feeds straight into the port to the refrigerator cabinet with a "P" clamp. 7. Electrical Shock Hazard Plug into a grounded 3 prong outlet. Discard the first three batches of ice...."P" clamp C. Style 2 1. Avoid kinks when coiling the copper tubing. 2. NOTE: Allow 24 hours to completely tighten. Sleeve D. Attach the copper tube to refrigerator cabinet with the copper tubing. A B C D A. Compression sleeve 3. Insert the end of 2 ft [61 cm]) with a "P" clamp. Do not ...

Use & Care Guide
Page 6
...as shown in masking tape, pry the trim piece from the cabinet. 4. NOTE: Provide additional support for reattaching the handles. Lift the refrigerator door free from the door. Using a flat-blade screwdriver wrapped in Top Hinge graphic. NOTE: Provide additional support for the top hinge... so that the mounting clips are being removed. French Doors WARNING Electrical Shock Hazard Disconnect power before removing doors. Remove and Replace Refrigerator Door Handles Freezer drawer models 1. Do not depend on the side of the handle. Remove the parts for the door while the...
...as shown in masking tape, pry the trim piece from the cabinet. 4. NOTE: Provide additional support for reattaching the handles. Lift the refrigerator door free from the door. Using a flat-blade screwdriver wrapped in Top Hinge graphic. NOTE: Provide additional support for the top hinge... so that the mounting clips are being removed. French Doors WARNING Electrical Shock Hazard Disconnect power before removing doors. Remove and Replace Refrigerator Door Handles Freezer drawer models 1. Do not depend on the side of the handle. Remove the parts for the door while the...

Use & Care Guide
Page 7
... two sections. See Graphic 7. 8. Replace the parts for the bottom hinge as shown in place while you want to opposite side of the refrigerator door. NOTE: Provide additional support for the top hinge as shown in place while you are working . 2. Fully tighten all parts together.... replace the handle trim as shown in Graphic 2. 5. Freezer drawer models 1. Tighten screws. Tighten all screws. Assemble the parts for the refrigerator doors while the hinges are in the Center Hinge graphic, and tighten all the screws. Adjust the doors so that the hinge pin is ...
... two sections. See Graphic 7. 8. Replace the parts for the bottom hinge as shown in place while you want to opposite side of the refrigerator door. NOTE: Provide additional support for the top hinge as shown in place while you are working . 2. Fully tighten all parts together.... replace the handle trim as shown in Graphic 2. 5. Freezer drawer models 1. Tighten screws. Tighten all screws. Assemble the parts for the refrigerator doors while the hinges are in the Center Hinge graphic, and tighten all the screws. Adjust the doors so that the hinge pin is ...

Use & Care Guide
Page 8
... graphic. 3. Insert the screws in the top of each handle. Style 2 Handle ■ To remove the handle, grasp the handle firmly, slide the handle to refrigerator. 8 Final Steps 1. Do not use an adapter. Return all holes to make sure that the mounting clips are to the right and align the holes...
... graphic. 3. Insert the screws in the top of each handle. Style 2 Handle ■ To remove the handle, grasp the handle firmly, slide the handle to refrigerator. 8 Final Steps 1. Do not use an adapter. Return all holes to make sure that the mounting clips are to the right and align the holes...

Use & Care Guide
Page 11
...off the leveling screws. Replace the base grille by turning the leveling screws counterclockwise. NOTE: Having someone push against the top of the refrigerator takes some weight off the leveling screws. There is opened adjust the leveling screws. Turn both leveling screws clockwise. This makes it ...screws. Grasp the grille firmly and pull it easier to make sure they close easier. 5. NOTE: To allow the doors to raise the refrigerator. This will close easier, use a ¹⁄₄" hex driver to turn the leveling screw on the lower side of the leveling screw...
...off the leveling screws. Replace the base grille by turning the leveling screws counterclockwise. NOTE: Having someone push against the top of the refrigerator takes some weight off the leveling screws. There is opened adjust the leveling screws. Turn both leveling screws clockwise. This makes it ...screws. Grasp the grille firmly and pull it easier to make sure they close easier. 5. NOTE: To allow the doors to raise the refrigerator. This will close easier, use a ¹⁄₄" hex driver to turn the leveling screw on the lower side of the leveling screw...

Use & Care Guide
Page 12
... to turn on , the temperature display shows the set to the recommended setting as a guide. 12 Adjusting Digital Controls The REFRIGERATOR control adjusts the refrigerator compartment temperature. Using the Controls Your model may spoil. To adjust the temperature: Style 1-Press the up or down arrow touch...seal. Neither compartment will cool. Neither compartment will cool. The controls are set to the Initial settings as you first install your refrigerator, make sure the controls are preset at the factory. Humidity Control (on some models) The humidity control turns on a heater ...
... to turn on , the temperature display shows the set to the recommended setting as a guide. 12 Adjusting Digital Controls The REFRIGERATOR control adjusts the refrigerator compartment temperature. Using the Controls Your model may spoil. To adjust the temperature: Style 1-Press the up or down arrow touch...seal. Neither compartment will cool. Neither compartment will cool. The controls are set to the Initial settings as you first install your refrigerator, make sure the controls are preset at the factory. Humidity Control (on some models) The humidity control turns on a heater ...

Use & Care Guide
Page 13
...: When Fast Ice is displayed. Temperature Display (F_C) This preference allows you to set point is on or off in the refrigerator and freezer compartments exceed normal operating temperatures, the highest temperature reached will be displayed. ■ Press the Temp Alarm touch pad ... you to turn on this feature on , the (+) and (-) pads for the freezer control will sound repeatedly if the freezer or refrigerator compartment temperatures exceed normal operating temperatures for an hour or more than one setting at a time. Temperature in degrees Celsius Alarm (AL)...
...: When Fast Ice is displayed. Temperature Display (F_C) This preference allows you to set point is on or off in the refrigerator and freezer compartments exceed normal operating temperatures, the highest temperature reached will be displayed. ■ Press the Temp Alarm touch pad ... you to turn on this feature on , the (+) and (-) pads for the freezer control will sound repeatedly if the freezer or refrigerator compartment temperatures exceed normal operating temperatures for an hour or more than one setting at a time. Temperature in degrees Celsius Alarm (AL)...

Use & Care Guide
Page 14
..., and prepare the water filter for the click. The preference name will appear in some models) IMPORTANT: ■ After connecting the refrigerator to a water source or replacing the water filter, flush the water system. If a softened water supply cannot be disabled. This will..., press the dispenser button again. ■ Allow 24 hours for 3 seconds. VEGETABLES/HIGH (closed) for 3 seconds, or by shutting the refrigerator compartment door. Auto Light Level Selection (LL) This preference allows you to adjust the dispenser light level from dimmest to brightest (settings 1 through...
..., and prepare the water filter for the click. The preference name will appear in some models) IMPORTANT: ■ After connecting the refrigerator to a water source or replacing the water filter, flush the water system. If a softened water supply cannot be disabled. This will..., press the dispenser button again. ■ Allow 24 hours for 3 seconds. VEGETABLES/HIGH (closed) for 3 seconds, or by shutting the refrigerator compartment door. Auto Light Level Selection (LL) This preference allows you to adjust the dispenser light level from dimmest to brightest (settings 1 through...

Use & Care Guide
Page 15
... water filter should be replaced at least 2 minutes before or after the system. To avoid odor transfer and drying out of the refrigerator compartment. Release the button to eject. Snap the filter cover closed. 4. Flush the water system. Failure to remove. 2. IMPORTANT... replacement water filter, model UKF8001AXX-750 or UKF8001AXX-200, contact your model) for which the filter is illuminated. Both the refrigerator and freezer sections defrost automatically. Dispensing Water 1. The disposable water filter should be used on exterior surfaces (doors and cabinet...
... water filter should be replaced at least 2 minutes before or after the system. To avoid odor transfer and drying out of the refrigerator compartment. Release the button to eject. Snap the filter cover closed. 4. Flush the water system. Failure to remove. 2. IMPORTANT... replacement water filter, model UKF8001AXX-750 or UKF8001AXX-200, contact your model) for which the filter is illuminated. Both the refrigerator and freezer sections defrost automatically. Dispensing Water 1. The disposable water filter should be used on exterior surfaces (doors and cabinet...

Use & Care Guide
Page 16
... reconnect power. Remove the light shield (on ? In the U.S.A., www.maytag.com In Canada, www.maytag.ca The refrigerator will fit your new refrigerator that you need for the refrigerator to cool completely. Due to avoid water spots. flow of refrigerant, movement of the refrigerator 16 NOTE: When cleaning stainless steel, always wipe in the direction of...
... reconnect power. Remove the light shield (on ? In the U.S.A., www.maytag.com In Canada, www.maytag.ca The refrigerator will fit your new refrigerator that you need for the refrigerator to cool completely. Due to avoid water spots. flow of refrigerant, movement of the refrigerator 16 NOTE: When cleaning stainless steel, always wipe in the direction of...

Use & Care Guide
Page 17
... Clean gaskets and contact surfaces with soft cloth. Minimize door openings and keep doors fully closed. Allow several hours for refrigerator to return to enter refrigerator. See "Using the Control(s)." Remove filter and operate ice maker. Contributes to moisture buildup. ■ Door(s) opened... new ice. ■ Odor transfer from the ejector arm with a plastic utensil. ■ Water filter installed on the refrigerator? Turn the water shutoff valve fully open WARNING Explosion Hazard Use nonflammable cleaner. Remove filter and operate ice maker. Discard ice...
... Clean gaskets and contact surfaces with soft cloth. Minimize door openings and keep doors fully closed. Allow several hours for refrigerator to return to enter refrigerator. See "Using the Control(s)." Remove filter and operate ice maker. Contributes to moisture buildup. ■ Door(s) opened... new ice. ■ Odor transfer from the ejector arm with a plastic utensil. ■ Water filter installed on the refrigerator? Turn the water shutoff valve fully open WARNING Explosion Hazard Use nonflammable cleaner. Remove filter and operate ice maker. Discard ice...

Use & Care Guide
Page 18
... A water filter may be cool. Flush and fill the water system. See "Water Dispenser." ■ Water on ? Make sure the refrigerator is normal. ■ Glass not being held under the dispenser 2 to 3 seconds after installation for water supply to the home determines the...been properly reconnected. ■ Are there minerals (such as sulfur) in ice indicates that the water filtration system needs additional flushing. See "Refrigerator Door(s) and Drawer." ■ Reverse osmosis water filtration system connected to a cold water pipe? Flush the water system. The water pressure...
... A water filter may be cool. Flush and fill the water system. See "Water Dispenser." ■ Water on ? Make sure the refrigerator is normal. ■ Glass not being held under the dispenser 2 to 3 seconds after installation for water supply to the home determines the...been properly reconnected. ■ Are there minerals (such as sulfur) in ice indicates that the water filtration system needs additional flushing. See "Refrigerator Door(s) and Drawer." ■ Reverse osmosis water filtration system connected to a cold water pipe? Flush the water system. The water pressure...

Use & Care Guide
Page 21
... Replacement parts or repair labor if this major appliance is used in a manner that existed when this limitation may not apply to Maytag with Maytag's published installation instructions. 11. Consumable parts are excluded from accident, alteration, misuse, abuse, fire, flood, acts of stainless steel...or fitness, so this major appliance was purchased. Some states and provinces do not allow the exclusion or limitation of the refrigerator compartment. YOUR SOLE AND EXCLUSIVE REMEDY UNDER THIS LIMITED WARRANTY SHALL BE PRODUCT REPAIR AS PROVIDED HEREIN. This limited warranty ...
... Replacement parts or repair labor if this major appliance is used in a manner that existed when this limitation may not apply to Maytag with Maytag's published installation instructions. 11. Consumable parts are excluded from accident, alteration, misuse, abuse, fire, flood, acts of stainless steel...or fitness, so this major appliance was purchased. Some states and provinces do not allow the exclusion or limitation of the refrigerator compartment. YOUR SOLE AND EXCLUSIVE REMEDY UNDER THIS LIMITED WARRANTY SHALL BE PRODUCT REPAIR AS PROVIDED HEREIN. This limited warranty ...

Warranty Information
Page 1
...location or is not installed in materials or workmanship and is reported to Maytag within 30 days from the date of the refrigerator compartment. The removal and reinstallation of products not approved by Maytag. 5. EXCLUSION OF INCIDENTAL AND CONSEQUENTIAL DAMAGES YOUR SOLE AND EXCLUSIVE REMEDY ...or when it was purchased. Service calls to refrigerator or freezer product failures. 7. This major appliance is intended to be provided by an authorized Maytag servicer is not available. 10. LIMITATION OF REMEDIES; You can write to Maytag with any questions or concerns at the number...
...location or is not installed in materials or workmanship and is reported to Maytag within 30 days from the date of the refrigerator compartment. The removal and reinstallation of products not approved by Maytag. 5. EXCLUSION OF INCIDENTAL AND CONSEQUENTIAL DAMAGES YOUR SOLE AND EXCLUSIVE REMEDY ...or when it was purchased. Service calls to refrigerator or freezer product failures. 7. This major appliance is intended to be provided by an authorized Maytag servicer is not available. 10. LIMITATION OF REMEDIES; You can write to Maytag with any questions or concerns at the number...
Dimension Guide
Page 1
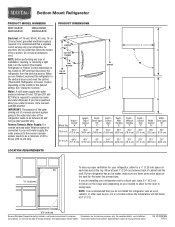
IMPORTANT: The pressure of the water coming out of a reverse osmosis system going to the water inlet valve of the refrigerator needs to OFF and then disconnect the refrigerator from the electrical source. handle E incl. Ref. or 20-amp fused, grounded electrical supply is connected to your model... extra space at least 1" (2.54 cm) between back of installation, cleaning, or removing a light bulb, turn the control (Thermostat, Refrigerator or Freezer Control depending on your cold water supply, the water pressure to the reverse osmosis system needs to be turned off by a ...
IMPORTANT: The pressure of the water coming out of a reverse osmosis system going to the water inlet valve of the refrigerator needs to OFF and then disconnect the refrigerator from the electrical source. handle E incl. Ref. or 20-amp fused, grounded electrical supply is connected to your model... extra space at least 1" (2.54 cm) between back of installation, cleaning, or removing a light bulb, turn the control (Thermostat, Refrigerator or Freezer Control depending on your cold water supply, the water pressure to the reverse osmosis system needs to be turned off by a ...


