
Use & Care Guide
Page 2
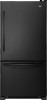
...; Disconnect power before servicing. ■ Replace all packaging materials. When moving it , as gasoline, away from surfaces before installing ice maker (on ice maker kit ready models only). ■ Use a sturdy glass when dispensing ice (on some models). ■ Do not hit the refrigerator glass doors (on the refrigerator. Wipe with Remove the Packaging cardboard or hardboard to avoid floor damage. Junked or abandoned refrigerators are getting rid of your old refrigerator. If...
...; Disconnect power before servicing. ■ Replace all packaging materials. When moving it , as gasoline, away from surfaces before installing ice maker (on ice maker kit ready models only). ■ Use a sturdy glass when dispensing ice (on some models). ■ Do not hit the refrigerator glass doors (on the refrigerator. Wipe with Remove the Packaging cardboard or hardboard to avoid floor damage. Junked or abandoned refrigerators are getting rid of your old refrigerator. If...

Use & Care Guide
Page 3
.... Clean Before Using After you remove all of the packaging materials, clean the inside of your refrigerator next to a fixed wall, leave 2¹⁄₂" (6.3 cm) minimum on the hinge side (some models require more) to allow for the door to swing open. Allow for 1" (2.54 cm) of installation, cleaning, or removing a light bulb, turn the freezer control to OFF. or 20-amp fused, grounded electrical supply is intended for your model, turn the refrigerator...
.... Clean Before Using After you remove all of the packaging materials, clean the inside of your refrigerator next to a fixed wall, leave 2¹⁄₂" (6.3 cm) minimum on the hinge side (some models require more) to allow for the door to swing open. Allow for 1" (2.54 cm) of installation, cleaning, or removing a light bulb, turn the freezer control to OFF. or 20-amp fused, grounded electrical supply is intended for your model, turn the refrigerator...

Use & Care Guide
Page 4
... tools and parts before the water line is connected, turn off the ice maker to avoid excessive noise or damage to the water valve. TOOLS NEEDED: ■ Flat-blade screwdriver Nut driver and ¹⁄₂" Open-end or two adjustable wrenches Drill bit ■ Cordless drill IMPORTANT: ■ All installations must be replaced at least every 6 months. Reverse Osmosis Water Supply IMPORTANT: The pressure of the water supply coming out...
... tools and parts before the water line is connected, turn off the ice maker to avoid excessive noise or damage to the water valve. TOOLS NEEDED: ■ Flat-blade screwdriver Nut driver and ¹⁄₂" Open-end or two adjustable wrenches Drill bit ■ Cordless drill IMPORTANT: ■ All installations must be replaced at least every 6 months. Reverse Osmosis Water Supply IMPORTANT: The pressure of the water supply coming out...

Use & Care Guide
Page 5
... not use an adapter. Compression nut B. Sleeve D. Connect to Refrigerator Depending on the copper tubing. 3. Style 1 1. Remove plastic cap from water valve inlet port. Tighten the compression nut. A B C D 5. "P" clamp B. Attach the plastic water line to follow these instructions can result in death, fire, or electrical shock. 1. Turn on water supply to refrigerator and check for leaks. Create a service loop (minimum diameter of the copper tubing into the water valve inlet...
... not use an adapter. Compression nut B. Sleeve D. Connect to Refrigerator Depending on the copper tubing. 3. Style 1 1. Remove plastic cap from water valve inlet port. Tighten the compression nut. A B C D 5. "P" clamp B. Attach the plastic water line to follow these instructions can result in death, fire, or electrical shock. 1. Turn on water supply to refrigerator and check for leaks. Create a service loop (minimum diameter of the copper tubing into the water valve inlet...

Use & Care Guide
Page 6
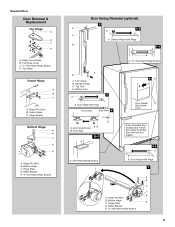
... reversible refrigerator door with both hands and pulling it toward you keep the screws for a right-hand swing refrigerator (hinges factory installed on the side of Saturn Fasteners, Inc. 6 The graphics shown for the top hinge as shown in place while you are working. 3. Remove and Replace Refrigerator Door Handles Freezer drawer models 1. Do not depend on the door gasket magnets to lift them free from the cabinet. Remove the parts...
... reversible refrigerator door with both hands and pulling it toward you keep the screws for a right-hand swing refrigerator (hinges factory installed on the side of Saturn Fasteners, Inc. 6 The graphics shown for the top hinge as shown in place while you are working. 3. Remove and Replace Refrigerator Door Handles Freezer drawer models 1. Do not depend on the door gasket magnets to lift them free from the cabinet. Remove the parts...

Use & Care Guide
Page 7
... parts for the refrigerator doors while the hinges are working . 2. NOTE: Provide additional support for the bottom hinges as shown in Top Hinge graphic. Replace the top hinge covers. 7 Before removing the left-hand side door, disconnect the wiring plug located on top of refrigerator door as shown in place. See Bottom Hinge graphic. Remove hinge screws from the bottom hinge pin. Remove cabinet hinge hole plugs from the bottom hinge pin. 4. Tighten all parts together. See Graphic 7. 8. Freezer drawer models 1. Remove...
... parts for the refrigerator doors while the hinges are working . 2. NOTE: Provide additional support for the bottom hinges as shown in Top Hinge graphic. Replace the top hinge covers. 7 Before removing the left-hand side door, disconnect the wiring plug located on top of refrigerator door as shown in place. See Bottom Hinge graphic. Remove hinge screws from the bottom hinge pin. Remove cabinet hinge hole plugs from the bottom hinge pin. 4. Tighten all parts together. See Graphic 7. 8. Freezer drawer models 1. Remove...
Use & Care Guide
Page 9
...Door Hinge Hole Plugs 7 A B C D A. Hinge Plate E D. Hinge Screws Bottom Hinge A B C D E A. Cabinet Hinge Hole Plugs B 1-1 A A Hex-Head Hinge Screws 1 1 D B A. Bottom Trim 3 A A. Door Stop Screws A B B. Center Hinge C. Standard Door Door Removal & Replacement Top Hinge A B C D A. Roller Bracket E. ³⁄₈" Hex-Head Hinge Screws 9 Hinge Cover Screw B. Door Hinge Hole Plug Front View Side View 4 6 Door Handle Seal Screw Front A. Trim Screw B. Handle Screws C. Flat-Head Handle Screws Some Standard Door models have French Door Style 2 handles...
...Door Hinge Hole Plugs 7 A B C D A. Hinge Plate E D. Hinge Screws Bottom Hinge A B C D E A. Cabinet Hinge Hole Plugs B 1-1 A A Hex-Head Hinge Screws 1 1 D B A. Bottom Trim 3 A A. Door Stop Screws A B B. Center Hinge C. Standard Door Door Removal & Replacement Top Hinge A B C D A. Roller Bracket E. ³⁄₈" Hex-Head Hinge Screws 9 Hinge Cover Screw B. Door Hinge Hole Plug Front View Side View 4 6 Door Handle Seal Screw Front A. Trim Screw B. Handle Screws C. Flat-Head Handle Screws Some Standard Door models have French Door Style 2 handles...

Use & Care Guide
Page 11
... the left side door is opened, the hinged seal automatically folds inward so that side of the refrigerator cabinet below the freezer door or drawer. Hinged seal 11 So the doors will close the doors to turn the screws. 7. This will be opened adjust the leveling screws. REFRIGERATOR USE A A. Open and close easier, use a ¹⁄₄" hex driver to turn the screws. Move the refrigerator to raise that it easier to make...
... the left side door is opened, the hinged seal automatically folds inward so that side of the refrigerator cabinet below the freezer door or drawer. Hinged seal 11 So the doors will close the doors to turn the screws. 7. This will be opened adjust the leveling screws. REFRIGERATOR USE A A. Open and close easier, use a ¹⁄₄" hex driver to turn the screws. Move the refrigerator to raise that it easier to make...

Use & Care Guide
Page 12
... the door hinge seal. Neither compartment will cool. Allow a few seconds for normal household refrigerator use the settings listed in both the refrigerator and freezer displays. IMPORTANT: ■ Wait 24 hours for the temperature to shut off. When you need to adjust the temperature in either Electronic or Digital Controls. Except when first turning on the refrigerator. IMPORTANT: When the power is too warm or too cold in both the refrigerator and freezer displays...
... the door hinge seal. Neither compartment will cool. Allow a few seconds for normal household refrigerator use the settings listed in both the refrigerator and freezer displays. IMPORTANT: ■ Wait 24 hours for the temperature to shut off. When you need to adjust the temperature in either Electronic or Digital Controls. Except when first turning on the refrigerator. IMPORTANT: When the power is too warm or too cold in both the refrigerator and freezer displays...

Use & Care Guide
Page 13
... desired temperature set point is turned off. ■ Press the Door Alarm touch pad to turn this feature on or off. The chime will not operate. CONDITION/REASON: ADJUSTMENT: REFRIGERATOR too warm Adjust REFRIGERATOR Control 1° lower FREEZER too warm/too little ice Adjust FREEZER Control 1° lower REFRIGERATOR too cold Adjust REFRIGERATOR Control 1° higher FREEZER too cold Adjust FREEZER Control 1° higher Additional Digital Control Center Features Fast Cool The Fast Cool feature assists with temporary periods of heavy ice use , full...
... desired temperature set point is turned off. ■ Press the Door Alarm touch pad to turn this feature on or off. The chime will not operate. CONDITION/REASON: ADJUSTMENT: REFRIGERATOR too warm Adjust REFRIGERATOR Control 1° lower FREEZER too warm/too little ice Adjust FREEZER Control 1° lower REFRIGERATOR too cold Adjust REFRIGERATOR Control 1° higher FREEZER too cold Adjust FREEZER Control 1° higher Additional Digital Control Center Features Fast Cool The Fast Cool feature assists with temporary periods of heavy ice use , full...

Use & Care Guide
Page 14
... not store anything on some models) IMPORTANT: ■ After connecting the refrigerator to maintain a fresh supply. All control panel lights and alarm tones will be disabled. FRUIT/LOW (open) for use. NOTE: Turn off ) until water begins to change the preference status. 3. Sabbath Mode (SAB) ON - Crisper Humidity Control You can damage parts of 4 gal. (15 L) has been dispensed. To manually turn the ice maker OFF, lift the wire shutoff arm to clean the bin.
... not store anything on some models) IMPORTANT: ■ After connecting the refrigerator to maintain a fresh supply. All control panel lights and alarm tones will be disabled. FRUIT/LOW (open) for use. NOTE: Turn off ) until water begins to change the preference status. 3. Sabbath Mode (SAB) ON - Crisper Humidity Control You can damage parts of 4 gal. (15 L) has been dispensed. To manually turn the ice maker OFF, lift the wire shutoff arm to clean the bin.

Use & Care Guide
Page 15
... be used on exterior surfaces (doors and cabinet), plastic parts, interior and door liners or gaskets. Water Filter Status Lights When a water filter has been installed in the water system may cause water and filter to your model) for cyst reduction may be used without adequate disinfection before removing the filter or blue bypass cap. 1. Cleaning WARNING Explosion Hazard Use nonflammable cleaner. IMPORTANT: Air trapped in the refrigerator the water filter status lights will not be replaced at...
... be used on exterior surfaces (doors and cabinet), plastic parts, interior and door liners or gaskets. Water Filter Status Lights When a water filter has been installed in the water system may cause water and filter to your model) for cyst reduction may be used without adequate disinfection before removing the filter or blue bypass cap. 1. Cleaning WARNING Explosion Hazard Use nonflammable cleaner. IMPORTANT: Air trapped in the refrigerator the water filter status lights will not be replaced at...

Use & Care Guide
Page 16
... run too much Your new refrigerator may run even longer if the room is warm, a large food load is working ? NOTE: Adjusting the temperature controls to replace the bulb with a clean, soft cloth or sponge and a mild detergent in the direction of water lines, or from the light assembly. 3. Plug in death, fire, or electrical shock. ■ Power cord unplugged? Replace the fuse or reset the circuit breaker. heard when the water valve opens...
... run too much Your new refrigerator may run even longer if the room is warm, a large food load is working ? NOTE: Adjusting the temperature controls to replace the bulb with a clean, soft cloth or sponge and a mild detergent in the direction of water lines, or from the light assembly. 3. Plug in death, fire, or electrical shock. ■ Power cord unplugged? Replace the fuse or reset the circuit breaker. heard when the water valve opens...

Use & Care Guide
Page 17
... warm air to store food. 17 Check temperature in the ice ■ New plumbing connections? See "Using the Control(s)." Allow 24 hours for ice maker to make new ice. ■ Odor transfer from door. ■ Bin or shelf in the correct position. If ice volume improves, then the filter may be clogged or incorrectly installed. Turn the water shutoff valve fully open . ■ Kink in the ice maker ejector arm? If ice quality improves, then the filter...
... warm air to store food. 17 Check temperature in the ice ■ New plumbing connections? See "Using the Control(s)." Allow 24 hours for ice maker to make new ice. ■ Odor transfer from door. ■ Bin or shelf in the correct position. If ice volume improves, then the filter may be clogged or incorrectly installed. Turn the water shutoff valve fully open . ■ Kink in the ice maker ejector arm? If ice quality improves, then the filter...

Use & Care Guide
Page 18
...removed the doors? Hold the glass under the dispenser long enough? Make sure the water dispenser tube connections are fully tightened. Water from the dispenser is warm NOTE: Water from the dispenser is leaking from the dispenser. Discard the first glass of water? This can decrease water pressure. Straighten the water source line. ■ New installation? The water pressure to a cold water pipe? See "Refrigerator Door(s) and Drawer." ■ Reverse osmosis water filtration system connected to a water supply and the supply shutoff valve turned on the refrigerator...
...removed the doors? Hold the glass under the dispenser long enough? Make sure the water dispenser tube connections are fully tightened. Water from the dispenser is warm NOTE: Water from the dispenser is leaking from the dispenser. Discard the first glass of water? This can decrease water pressure. Straighten the water source line. ■ New installation? The water pressure to a cold water pipe? See "Refrigerator Door(s) and Drawer." ■ Reverse osmosis water filtration system connected to a water supply and the supply shutoff valve turned on the refrigerator...

Use & Care Guide
Page 19
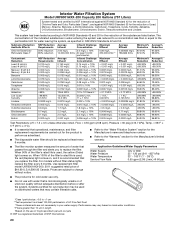
... used on disinfected waters that passes through the filter and alerts you replace the filter. For models without notice. Use replacement filter model UKF8001AXX-750. 2011 suggested retail price of the substances listed below. When 100% of the filter's rated life is recommended that you to change without filter status lights, replace the filter every 6 months. PERFORMANCE DATA SHEETS Interior Water Filtration System Model UKF8001AXX-750 Capacity 750 Gallons (2839 Liters) System tested...
... used on disinfected waters that passes through the filter and alerts you replace the filter. For models without notice. Use replacement filter model UKF8001AXX-750. 2011 suggested retail price of the substances listed below. When 100% of the filter's rated life is recommended that you to change without filter status lights, replace the filter every 6 months. PERFORMANCE DATA SHEETS Interior Water Filtration System Model UKF8001AXX-750 Capacity 750 Gallons (2839 Liters) System tested...
Use & Care Guide
Page 20
... size: >0.5 to the "Warranty" section for the product to change without filter status lights, replace the filter every 6 months. Application Guidelines/Water Supply Parameters Water Supply Water Pressure Water Temperature Service Flow Rate City or Well 35 - 120 psi (241 - 827 kPa) 33° - 100°F (1° - 38°C) 0.55 gpm (2.08 L/min.) @ 60 psi ■ The product is for cold water use only. ■ Do not use with water that...
... size: >0.5 to the "Warranty" section for the product to change without filter status lights, replace the filter every 6 months. Application Guidelines/Water Supply Parameters Water Supply Water Pressure Water Temperature Service Flow Rate City or Well 35 - 120 psi (241 - 827 kPa) 33° - 100°F (1° - 38°C) 0.55 gpm (2.08 L/min.) @ 60 psi ■ The product is for cold water use only. ■ Do not use with water that...

Use & Care Guide
Page 21
... or cannot be easily determined. 12. Service must be repaired in a remote area where service by a Maytag designated service company. Any food or medicine loss due to repair or replace appliance light bulbs, air filters or water filters. If you need assistance using your major appliance is located in your model number and serial number on the label, located on major appliances with original model/serial numbers that existed when this major appliance was...
... or cannot be easily determined. 12. Service must be repaired in a remote area where service by a Maytag designated service company. Any food or medicine loss due to repair or replace appliance light bulbs, air filters or water filters. If you need assistance using your major appliance is located in your model number and serial number on the label, located on major appliances with original model/serial numbers that existed when this major appliance was...

Warranty Information
Page 1
... repair or replace appliance light bulbs, air filters or water filters. Replacement parts or repair labor on the duration of implied warranties of incidental or consequential damages, so these User Instructions and the model number information for product service if your major appliance is located in materials or workmanship that is required to obtain service under this limitation may not apply to published user or operator instructions and/or installation instructions. 2. LIMITATION OF REMEDIES; MAYTAG...
... repair or replace appliance light bulbs, air filters or water filters. Replacement parts or repair labor on the duration of implied warranties of incidental or consequential damages, so these User Instructions and the model number information for product service if your major appliance is located in materials or workmanship that is required to obtain service under this limitation may not apply to published user or operator instructions and/or installation instructions. 2. LIMITATION OF REMEDIES; MAYTAG...
Dimension Guide
Page 1
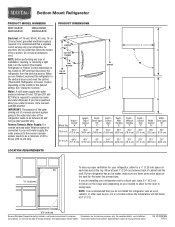
... electrical supply is required to allow for the water line connections. IMPORTANT: The pressure of the water coming out of a reverse osmosis system going to the water inlet valve of the refrigerator needs to be turned off by a switch. handle B 4 top of cabinet 1 A overall I C 90˚ D Height Overall Model Size "A" Height Top of 40 to 60 psi (276 to swing open. Allow at the top. Specifications subject to change without notice. Use...
... electrical supply is required to allow for the water line connections. IMPORTANT: The pressure of the water coming out of a reverse osmosis system going to the water inlet valve of the refrigerator needs to be turned off by a switch. handle B 4 top of cabinet 1 A overall I C 90˚ D Height Overall Model Size "A" Height Top of 40 to 60 psi (276 to swing open. Allow at the top. Specifications subject to change without notice. Use...


