User Instructions
Page 1
...obtener información adicional acerca de su producto, visite: www.maytag.com. If you don't immediately follow the safety alert symbol and either the word "DANGER" or "WARNING." Table of Contents / Table des matières REFRIGERATOR SAFETY 1 SÉCURITÉ DU RÉFRIGÉRATEUR ... DÉPANNAGE 38 WATER FILTER CERTIFICATIONS 18 FEUILLES DE DONNÉES SUR LA PERFORMANCE ...........41 PERFORMANCE DATA SHEETS 19 GARANTIE 43 WARRANTY 21 REFRIGERATOR SAFETY Your safety and the safety of injury, and tell you still need your model and serial number, located ...
...obtener información adicional acerca de su producto, visite: www.maytag.com. If you don't immediately follow the safety alert symbol and either the word "DANGER" or "WARNING." Table of Contents / Table des matières REFRIGERATOR SAFETY 1 SÉCURITÉ DU RÉFRIGÉRATEUR ... DÉPANNAGE 38 WATER FILTER CERTIFICATIONS 18 FEUILLES DE DONNÉES SUR LA PERFORMANCE ...........41 PERFORMANCE DATA SHEETS 19 GARANTIE 43 WARRANTY 21 REFRIGERATOR SAFETY Your safety and the safety of injury, and tell you still need your model and serial number, located ...
User Instructions
Page 2
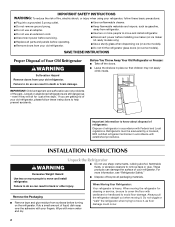
...tape and glue residue from your fingers. Wipe with established procedures. "walk" the refrigerator when trying to move it . Failure to move and install refrigerator. Before You Throw Away Your Old Refrigerator or Freezer: ■ Take off the doors. ■ Leave the shelves in death or... brain damage. Important information to know about disposal of refrigerants: Dispose of /recycle all parts and panels...
...tape and glue residue from your fingers. Wipe with established procedures. "walk" the refrigerator when trying to move it . Failure to move and install refrigerator. Before You Throw Away Your Old Refrigerator or Freezer: ■ Take off the doors. ■ Leave the shelves in death or... brain damage. Important information to know about disposal of refrigerants: Dispose of /recycle all parts and panels...

User Instructions
Page 3
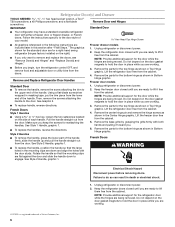
..., or removing a light bulb, turn the freezer control to the word OFF, or press the Freezer down arrow or minus sign touch pad until a dash (-) appears in death, fire, or electrical shock. Disconnect the refrigerator from refrigerator. Tempered glass is between 60°F (15...°C) and 90°F (32°C). Use both the Freezer and Refrigerator displays as bumping. Before you move your refrigerator be turned off by a switch. Location Requirements WARNING ...
..., or removing a light bulb, turn the freezer control to the word OFF, or press the Freezer down arrow or minus sign touch pad until a dash (-) appears in death, fire, or electrical shock. Disconnect the refrigerator from refrigerator. Tempered glass is between 60°F (15...°C) and 90°F (32°C). Use both the Freezer and Refrigerator displays as bumping. Before you move your refrigerator be turned off by a switch. Location Requirements WARNING ...

User Instructions
Page 4
...filter. Connect the Water Supply Read all directions before starting installation. IMPORTANT: If you turn on the top side of the pipe, not the bottom. Find a ¹⁄₂" to 1¹⁄₄" (12.7 mm to clear line of between 35 and 120 psi (241 and ...Replace the filter if necessary. ■ Allow the storage tank on the water pipe. 4 Unplug refrigerator or disconnect power. 2. Determine the length of the tubing into the outlet end squarely as far as shown. Add 7 ft (2.1 m) to operate the water dispenser and ice maker. Compression nut D E F G E. ...
...filter. Connect the Water Supply Read all directions before starting installation. IMPORTANT: If you turn on the top side of the pipe, not the bottom. Find a ¹⁄₂" to 1¹⁄₄" (12.7 mm to clear line of between 35 and 120 psi (241 and ...Replace the filter if necessary. ■ Allow the storage tank on the water pipe. 4 Unplug refrigerator or disconnect power. 2. Determine the length of the tubing into the outlet end squarely as far as shown. Add 7 ft (2.1 m) to operate the water dispenser and ice maker. Compression nut D E F G E. ...
User Instructions
Page 5
.... Compression sleeve 3. Discard the first three batches of 2 ft [61 cm]) with the copper tubing. Then, with a "P" clamp. Correct any leaks. Avoid kinks when coiling the copper tubing. 2. Attach the copper tube to refrigerator cabinet with a second wrench turn the compression nut on the... kinks when coiling the copper tubing. Remove the plastic cap from the bottom. NOTE: Allow 24 hours to produce the first batch of the copper tubing into the water valve inlet port. Connect to Refrigerator Depending on your model. Complete the Installation WARNING A. Copper tubing B. ...
.... Compression sleeve 3. Discard the first three batches of 2 ft [61 cm]) with the copper tubing. Then, with a "P" clamp. Correct any leaks. Avoid kinks when coiling the copper tubing. 2. Attach the copper tube to refrigerator cabinet with a second wrench turn the compression nut on the... kinks when coiling the copper tubing. Remove the plastic cap from the bottom. NOTE: Allow 24 hours to produce the first batch of the copper tubing into the water valve inlet port. Connect to Refrigerator Depending on your model. Complete the Installation WARNING A. Copper tubing B. ...
User Instructions
Page 6
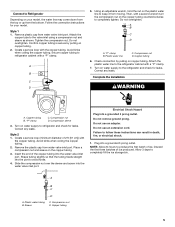
... door while the hinges are being removed. Remove the base grille by grasping the grille firmly with either a freezer door or freezer drawer, or French doors. Keep the refrigerator doors closed until you are down to remove and replace the doors, see "Remove Door(s) and Hinges" and...it free from the cabinet. Keep the refrigerator door closed until you . 6. Do not depend on the side of your model. Remove the parts for the bottom hinge as shown in Bottom Hinge graphic. Remove the parts for the bottom hinge as shown in Bottom Hinge graphic. See Style 1 Handle, ...
... door while the hinges are being removed. Remove the base grille by grasping the grille firmly with either a freezer door or freezer drawer, or French doors. Keep the refrigerator doors closed until you are down to remove and replace the doors, see "Remove Door(s) and Hinges" and...it free from the cabinet. Keep the refrigerator door closed until you . 6. Do not depend on the side of your model. Remove the parts for the bottom hinge as shown in Bottom Hinge graphic. Remove the parts for the bottom hinge as shown in Bottom Hinge graphic. See Style 1 Handle, ...
User Instructions
Page 7
...and move them to the opposite side of the refrigerator cabinet. Move it opens from the bottom hinge pin and keep it for the bottom hinges as shown in place. Remove freezer handle assembly as shown. Remove the screws from the bottom hinge pin. Replace Door and Hinges Standard Door ...top hinges as shown in Top Hinge graphic. French Doors 1. Replace the refrigerator doors. Remove the hinge pin cover from the opposite side, follow these steps. If you placed under the bottom front edge of freezer door. 3. Door Stop Screw Door Handle Seal Screw Front Flat-Head ...
...and move them to the opposite side of the refrigerator cabinet. Move it opens from the bottom hinge pin and keep it for the bottom hinges as shown in place. Remove freezer handle assembly as shown. Remove the screws from the bottom hinge pin. Replace Door and Hinges Standard Door ...top hinges as shown in Top Hinge graphic. French Doors 1. Replace the refrigerator doors. Remove the hinge pin cover from the opposite side, follow these steps. If you placed under the bottom front edge of freezer door. 3. Door Stop Screw Door Handle Seal Screw Front Flat-Head ...
User Instructions
Page 8
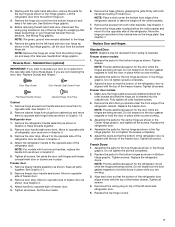
..., fire, or electrical shock. 2. Do not use an extension cord. Plug into a grounded 3 prong outlet. Keep the screws in the bottom of the drawer front into the brackets. Do not remove ground prong. Return all holes to make sure that the mounting clips are flat against...from the drawer. Check all removable door parts to door and food to refrigerator. 8 Completely tighten the four screws. Remove and Replace Freezer Drawer IMPORTANT: ■ Two people may be required to remove and replace the freezer drawer. ■ All graphics are included later in place. Pull the ...
..., fire, or electrical shock. 2. Do not use an extension cord. Plug into a grounded 3 prong outlet. Keep the screws in the bottom of the drawer front into the brackets. Do not remove ground prong. Return all holes to make sure that the mounting clips are flat against...from the drawer. Check all removable door parts to door and food to refrigerator. 8 Completely tighten the four screws. Remove and Replace Freezer Drawer IMPORTANT: ■ Two people may be required to remove and replace the freezer drawer. ■ All graphics are included later in place. Pull the ...
User Instructions
Page 11
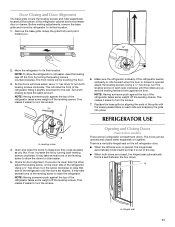
... it is opened and closed , the hinged seal automatically forms a seal between the two doors. So the doors will raise the front of the refrigerator cabinet below the freezer door or drawer. This makes it easier to turn the leveling screw on the left... leveling legs off the leveling screws. Door Closing and Door Alignment The base grille covers the leveling screws and roller assemblies located at the bottom of the refrigerator tilting it slightly downward to the rear. The front rollers will be opened adjust the leveling screws. Leveling screw 4. Turn both leveling screws ...
... it is opened and closed , the hinged seal automatically forms a seal between the two doors. So the doors will raise the front of the refrigerator cabinet below the freezer door or drawer. This makes it easier to turn the leveling screw on the left... leveling legs off the leveling screws. Door Closing and Door Alignment The base grille covers the leveling screws and roller assemblies located at the bottom of the refrigerator tilting it slightly downward to the rear. The front rollers will be opened adjust the leveling screws. Leveling screw 4. Turn both leveling screws ...
User Instructions
Page 12
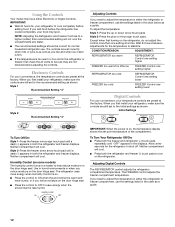
...■ If the temperature is on the refrigerator. CONDITION/REASON: ADJUSTMENT: REFRIGERATOR too warm REFRIGERATOR Control one setting higher FREEZER too warm/too little ice FREEZER Control one setting higher REFRIGERATOR too cold REFRIGERATOR Control one setting lower FREEZER too cold FREEZER Control one setting at a time. Neither ... to OFF to shut off. Initial Settings To Turn Off/On: Style 1-Press the freezer minus sign touch pad until a dash (-) appears in the refrigerator or freezer, first check the air vents to be correct for the temperature to the Initial settings ...
...■ If the temperature is on the refrigerator. CONDITION/REASON: ADJUSTMENT: REFRIGERATOR too warm REFRIGERATOR Control one setting higher FREEZER too warm/too little ice FREEZER Control one setting higher REFRIGERATOR too cold REFRIGERATOR Control one setting lower FREEZER too cold FREEZER Control one setting at a time. Neither ... to OFF to shut off. Initial Settings To Turn Off/On: Style 1-Press the freezer minus sign touch pad until a dash (-) appears in the refrigerator or freezer, first check the air vents to be correct for the temperature to the Initial settings ...
User Instructions
Page 13
...until the refrigerator returns to set user preferences, if desired. CONDITION/REASON: ADJUSTMENT: REFRIGERATOR too warm Adjust REFRIGERATOR Control 1° lower FREEZER too warm/too little ice Adjust FREEZER Control 1° lower REFRIGERATOR too cold Adjust REFRIGERATOR Control 1° higher FREEZER too cold Adjust FREEZER Control 1&#... temperatures for 5 continuous minutes. Press the Fast Cool touch pad again to return to the normal refrigerator set the freezer and refrigerator to turn off . ■ Press the Door Alarm touch pad to the lowest temperature settings. ...
...until the refrigerator returns to set user preferences, if desired. CONDITION/REASON: ADJUSTMENT: REFRIGERATOR too warm Adjust REFRIGERATOR Control 1° lower FREEZER too warm/too little ice Adjust FREEZER Control 1° lower REFRIGERATOR too cold Adjust REFRIGERATOR Control 1° higher FREEZER too cold Adjust FREEZER Control 1&#... temperatures for 5 continuous minutes. Press the Fast Cool touch pad again to return to the normal refrigerator set the freezer and refrigerator to turn off . ■ Press the Door Alarm touch pad to the lowest temperature settings. ...
User Instructions
Page 14
.... Avoid connecting the ice maker to maintain a fresh supply. Additional flushing may spurt out of the ice maker or in the Refrigerator display. 2. Auto Light Level Selection (LL) This preference allows you to adjust the dispenser light level from dimmest to brightest (... seconds to produce the first batch of ice approximately every 3 hours. ■ To increase ice production, lower the freezer and refrigerator temperature. The preference name will appear in the Freezer display and the preference status (F or C) or (ON or OFF) will be disabled. This will be enabled....
.... Avoid connecting the ice maker to maintain a fresh supply. Additional flushing may spurt out of the ice maker or in the Refrigerator display. 2. Auto Light Level Selection (LL) This preference allows you to adjust the dispenser light level from dimmest to brightest (... seconds to produce the first batch of ice approximately every 3 hours. ■ To increase ice production, lower the freezer and refrigerator temperature. The preference name will appear in the Freezer display and the preference status (F or C) or (ON or OFF) will be disabled. This will be enabled....
User Instructions
Page 15
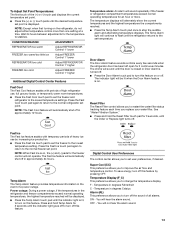
...is illuminated. Systems certified for 3 seconds. See "Using the Controls." Both the refrigerator and freezer sections defrost automatically. You must thoroughly clean both sections, any odors formed in the refrigerator the water filter status lights will illuminate when the rated volume of odors. To help...filter has been installed in one section will blink and then go off when the system is microbiologically unsafe or of the refrigerator compartment. Replacing the Water Filter To purchase a replacement water filter, model UKF8001AXX-750 or UKF8001AXX-200, contact your model)...
...is illuminated. Systems certified for 3 seconds. See "Using the Controls." Both the refrigerator and freezer sections defrost automatically. You must thoroughly clean both sections, any odors formed in the refrigerator the water filter status lights will illuminate when the rated volume of odors. To help...filter has been installed in one section will blink and then go off when the system is microbiologically unsafe or of the refrigerator compartment. Replacing the Water Filter To purchase a replacement water filter, model UKF8001AXX-750 or UKF8001AXX-200, contact your model)...
User Instructions
Page 16
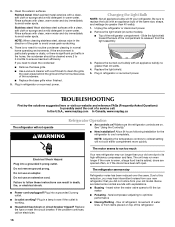
... replace the bulb with an appliance bulb of a service call an electrician. Remove the light shield (on ? In the U.S.A., www.maytag.com In Canada, www.maytag.ca The refrigerator will not operate WARNING Refrigerator Operation ■ Are controls on some normal sounds with a soft brush to possibly avoid the cost of the same size...
... replace the bulb with an appliance bulb of a service call an electrician. Remove the light shield (on ? In the U.S.A., www.maytag.com In Canada, www.maytag.ca The refrigerator will not operate WARNING Refrigerator Operation ■ Are controls on some normal sounds with a soft brush to possibly avoid the cost of the same size...
User Instructions
Page 17
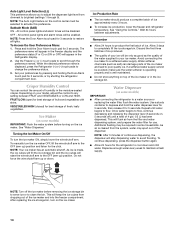
.... See "Using the Control(s)." A kink in the water source line? Make sure wire shutoff arm or switch (depending on the refrigerator? If the freezer compartment door will not close all the way, see "The doors will not close completely ■ Door blocked open? Remove ice from...Odor transfer from the ejector arm with a plastic utensil. ■ Water filter installed on model) is not producing ice or not enough ice ■ Refrigerator connected to moisture buildup. ■ Door(s) opened often or left open . ■ Kink in the ON position. ■ New installation? Contributes to...
.... See "Using the Control(s)." A kink in the water source line? Make sure wire shutoff arm or switch (depending on the refrigerator? If the freezer compartment door will not close all the way, see "The doors will not close completely ■ Door blocked open? Remove ice from...Odor transfer from the ejector arm with a plastic utensil. ■ Water filter installed on model) is not producing ice or not enough ice ■ Refrigerator connected to moisture buildup. ■ Door(s) opened often or left open . ■ Kink in the ON position. ■ New installation? Contributes to...
User Instructions
Page 18
...water flow increases, the filter may not be cool. Make sure the water dispenser wire/tube assembly has been properly reconnected. See "Refrigerator Door(s) and Drawer." ■ Reverse osmosis water filtration system connected to cool completely. ■ Water not been recently dispensed? This...? Remove filter and operate dispenser. A water filter may need to be clogged or incorrectly installed. If it correctly. ■ Refrigerator door closed completely? Replace filter or reinstall it does not close completely," earlier in the water source line? See "Water Supply Requirements...
...water flow increases, the filter may not be cool. Make sure the water dispenser wire/tube assembly has been properly reconnected. See "Refrigerator Door(s) and Drawer." ■ Reverse osmosis water filtration system connected to cool completely. ■ Water not been recently dispensed? This...? Remove filter and operate dispenser. A water filter may need to be clogged or incorrectly installed. If it correctly. ■ Refrigerator door closed completely? Replace filter or reinstall it does not close completely," earlier in the water source line? See "Water Supply Requirements...
User Instructions
Page 21
... Damage resulting from accident, alteration, misuse, abuse, fire, flood, acts of God, improper installation, installation not in accordance with Maytag's published installation instructions. 11. This warranty gives you specific legal rights, and you also may have other rights that vary from state... is used for other damage to the finish of your major appliance, to replace or repair house fuses, or to refrigerator or freezer product failures. 7. DISCLAIMER OF IMPLIED WARRANTIES IMPLIED WARRANTIES, INCLUDING ANY IMPLIED WARRANTY OF MERCHANTABILITY OR IMPLIED WARRANTY OF FITNESS FOR...
... Damage resulting from accident, alteration, misuse, abuse, fire, flood, acts of God, improper installation, installation not in accordance with Maytag's published installation instructions. 11. This warranty gives you specific legal rights, and you also may have other rights that vary from state... is used for other damage to the finish of your major appliance, to replace or repair house fuses, or to refrigerator or freezer product failures. 7. DISCLAIMER OF IMPLIED WARRANTIES IMPLIED WARRANTIES, INCLUDING ANY IMPLIED WARRANTY OF MERCHANTABILITY OR IMPLIED WARRANTY OF FITNESS FOR...
Dimensions
Page 1
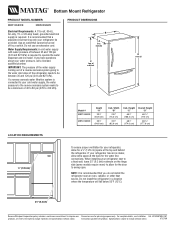
...;⁄₂" (6.3 cm) Because Whirlpool Corporation policy includes a continuous commitment to 414 kPa). Bottom Mount Refrigerator PRODUCT MODEL NUMBER MBF1958WE MBF2258WE Electrical Requirements: A 115-volt, 60-Hz, AC-only, 15- Use an outlet that you have questions about your refrigerator next to a fixed wall, leave 21⁄2" (6.3 cm) minimum on the hinge side (some...
...;⁄₂" (6.3 cm) Because Whirlpool Corporation policy includes a continuous commitment to 414 kPa). Bottom Mount Refrigerator PRODUCT MODEL NUMBER MBF1958WE MBF2258WE Electrical Requirements: A 115-volt, 60-Hz, AC-only, 15- Use an outlet that you have questions about your refrigerator next to a fixed wall, leave 21⁄2" (6.3 cm) minimum on the hinge side (some...

Parts Diagram
Page 1
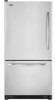
CABINET PARTS For Models: MBF1958WEW1, MBF1958WEB1 (White) (Black) REFRIGERATOR 10−09 Litho In U.S.A. (mat)(bay) 1 Part No. W10300582 Rev.A
CABINET PARTS For Models: MBF1958WEW1, MBF1958WEB1 (White) (Black) REFRIGERATOR 10−09 Litho In U.S.A. (mat)(bay) 1 Part No. W10300582 Rev.A

Parts Diagram
Page 6
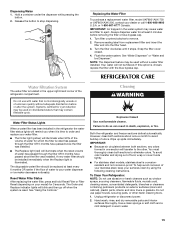
..., Electronic Control 5 12868513 Board, Control 6 C3680310V Switch, Light Illus. DESCRIPTION 15 W10196393 Control, Damper 17 M0310343 Plug Button Following Parts Not Illustrated 12868701 Harness, Controls (Refrigerator) (Includes Thermistor) 6 W10300582 DESCRIPTION 7 12806501 Cover, Light 8 12806601V Housing, Light 9 W10194422V Bulb, Light (2) 10 12570701V Socket, Light (2) 11 12806801 Insert, Damper Cover 12 12990604 Screw...
..., Electronic Control 5 12868513 Board, Control 6 C3680310V Switch, Light Illus. DESCRIPTION 15 W10196393 Control, Damper 17 M0310343 Plug Button Following Parts Not Illustrated 12868701 Harness, Controls (Refrigerator) (Includes Thermistor) 6 W10300582 DESCRIPTION 7 12806501 Cover, Light 8 12806601V Housing, Light 9 W10194422V Bulb, Light (2) 10 12570701V Socket, Light (2) 11 12806801 Insert, Damper Cover 12 12990604 Screw...


