User Instructions
Page 1
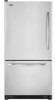
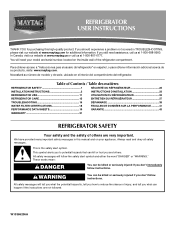
... número de modelo y de serie, ubicado en el interior del compartimiento del refrigerador. Table of Contents / Table des matières REFRIGERATOR SAFETY 1 SÉCURITÉ DU RÉFRIGÉRATEUR 22 INSTALLATION INSTRUCTIONS 2 INSTRUCTIONS D'INSTALLATION 23 REFRIGERATOR USE 11 UTILISATION DU RÉFRIGÉRATEUR 33 REFRIGERATOR CARE 15 ENTRETIEN DU RÉFRIGÉRATEUR 37 TROUBLESHOOTING 16 DÉPANNAGE 38 WATER FILTER CERTIFICATIONS 18 FEUILLES...
... número de modelo y de serie, ubicado en el interior del compartimiento del refrigerador. Table of Contents / Table des matières REFRIGERATOR SAFETY 1 SÉCURITÉ DU RÉFRIGÉRATEUR 22 INSTALLATION INSTRUCTIONS 2 INSTRUCTIONS D'INSTALLATION 23 REFRIGERATOR USE 11 UTILISATION DU RÉFRIGÉRATEUR 33 REFRIGERATOR CARE 15 ENTRETIEN DU RÉFRIGÉRATEUR 37 TROUBLESHOOTING 16 DÉPANNAGE 38 WATER FILTER CERTIFICATIONS 18 FEUILLES...
User Instructions
Page 2
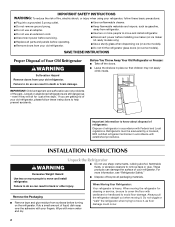
... Refrigerator WARNING Suffocation Hazard Remove doors from surfaces before turning on some models). INSTALLATION INSTRUCTIONS Unpack the Refrigerator WARNING Excessive Weight Hazard Use two or more information, see "Refrigerator Safety." ■ Dispose of/recycle all parts and panels before installing ice maker (on ice maker kit ready models only). ■ Use a sturdy glass when dispensing ice (on some models). ■ Do not hit the refrigerator glass doors (on the refrigerator. Always pull the refrigerator straight out when moving the refrigerator...
... Refrigerator WARNING Suffocation Hazard Remove doors from surfaces before turning on some models). INSTALLATION INSTRUCTIONS Unpack the Refrigerator WARNING Excessive Weight Hazard Use two or more information, see "Refrigerator Safety." ■ Dispose of/recycle all parts and panels before installing ice maker (on ice maker kit ready models only). ■ Use a sturdy glass when dispensing ice (on some models). ■ Do not hit the refrigerator glass doors (on the refrigerator. Always pull the refrigerator straight out when moving the refrigerator...

User Instructions
Page 3
... install the refrigerator near a heat source, such as gasoline, away from the electrical source. If your refrigerator has an ice maker, allow for use an adapter. NOTE: This refrigerator is intended for ¹⁄₂" (1.25 cm) of space on your model, turn the refrigerator to know about glass shelves and covers: Do not clean glass shelves or covers with warm water when they are cold. Electrical Shock Hazard Plug into its final location...
... install the refrigerator near a heat source, such as gasoline, away from the electrical source. If your refrigerator has an ice maker, allow for use an adapter. NOTE: This refrigerator is intended for ¹⁄₂" (1.25 cm) of space on your model, turn the refrigerator to know about glass shelves and covers: Do not clean glass shelves or covers with warm water when they are cold. Electrical Shock Hazard Plug into its final location...

User Instructions
Page 4
... water filters, the disposable water filter should be between 35 and 120 psi (241 and 827 kPa) is required to operate the water dispenser and ice maker. Pipe clamp C. If the water pressure to the reverse osmosis system is clear. Turn ON nearest faucet long enough to Water Line 1. Compression nut D E F G E. Remove the water filter. Place the free end of water. 3. Water Supply Requirements Gather the required tools and parts before starting installation. Cold water...
... water filters, the disposable water filter should be between 35 and 120 psi (241 and 827 kPa) is required to operate the water dispenser and ice maker. Pipe clamp C. If the water pressure to the reverse osmosis system is clear. Turn ON nearest faucet long enough to Water Line 1. Compression nut D E F G E. Remove the water filter. Place the free end of water. 3. Water Supply Requirements Gather the required tools and parts before starting installation. Cold water...
User Instructions
Page 5
... prong. Do not use an adapter. Complete the Installation WARNING A. Style 2 1. Plug into a grounded 3 prong outlet. Attach the copper tube to produce the first batch of ice produced. Copper tubing 6. Attach the plastic water line to the refrigerator cabinet with a "P" clamp. 7. Do not use an extension cord. Connect to Refrigerator Depending on your model. Follow the connection instructions for your model, the water line may come down from...
... prong. Do not use an adapter. Complete the Installation WARNING A. Style 2 1. Plug into a grounded 3 prong outlet. Attach the copper tube to produce the first batch of ice produced. Copper tubing 6. Attach the plastic water line to the refrigerator cabinet with a "P" clamp. 7. Do not use an extension cord. Connect to Refrigerator Depending on your model. Follow the connection instructions for your model, the water line may come down from...
User Instructions
Page 6
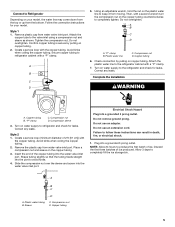
...Lift the freezer door free from the cabinet. 4. Unplug refrigerator or disconnect power. 2. Remove and Replace Refrigerator Door Handles Freezer drawer models 1. Remove Door and Hinges IMPORTANT: Standard Door ■ Your refrigerator may have a standard reversible refrigerator door with either a freezer door or freezer drawer, or French doors. Lift the refrigerator door free from the door. Remove the parts for the door while the hinges are working . †®TORX is a registered trademark of the handle. Style 2 Handles ■ To remove the handle, grasp the...
...Lift the freezer door free from the cabinet. 4. Unplug refrigerator or disconnect power. 2. Remove and Replace Refrigerator Door Handles Freezer drawer models 1. Remove Door and Hinges IMPORTANT: Standard Door ■ Your refrigerator may have a standard reversible refrigerator door with either a freezer door or freezer drawer, or French doors. Lift the refrigerator door free from the door. Remove the parts for the door while the hinges are working . †®TORX is a registered trademark of the handle. Style 2 Handles ■ To remove the handle, grasp the...
User Instructions
Page 7
... the bottom of the refrigerator. Replace the parts for the bottom hinges as shown in place while you are working . 2. Freezer door models 1. See Bottom Hinge graphic. 5. Keep all screws. 4. Replace Door and Hinges Standard Door NOTE: Graphics may be reversed if door swing is aligned with the top of the left -hand side door, disconnect the wiring plug located on the door gasket magnets to the outside hole. French Doors 1. Remove the door stop . See Bottom Hinge graphic. Remove the hinge pin cover from...
... the bottom of the refrigerator. Replace the parts for the bottom hinges as shown in place while you are working . 2. Freezer door models 1. See Bottom Hinge graphic. 5. Keep all screws. 4. Replace Door and Hinges Standard Door NOTE: Graphics may be reversed if door swing is aligned with the top of the left -hand side door, disconnect the wiring plug located on the door gasket magnets to the outside hole. French Doors 1. Remove the door stop . See Bottom Hinge graphic. Remove the hinge pin cover from...
User Instructions
Page 8
... not use an extension cord. Failure to remove and replace the freezer drawer. ■ All graphics are in place. Remove and Replace Freezer Drawer IMPORTANT: ■ Two people may be required to follow these instructions can result in death, fire, or electrical shock. 2. Pull the handle straight out from the drawer. Open the freezer drawer to refrigerator. 8 See Drawer Front Removal graphic. Final Steps 1. See Style 2 Handle, graphic 2. See Drawer Front Replacement...
... not use an extension cord. Failure to remove and replace the freezer drawer. ■ All graphics are in place. Remove and Replace Freezer Drawer IMPORTANT: ■ Two people may be required to follow these instructions can result in death, fire, or electrical shock. 2. Pull the handle straight out from the drawer. Open the freezer drawer to refrigerator. 8 See Drawer Front Removal graphic. Final Steps 1. See Style 2 Handle, graphic 2. See Drawer Front Replacement...
User Instructions
Page 11
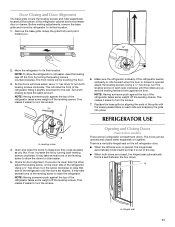
... and snapping the grille into place. Using a ¹⁄₄" hex driver, turn the screws. ¹⁄₄" 6. Leveling screw 4. Door Closing and Door Alignment The base grille covers the leveling screws and roller assemblies located at the bottom of the leveling screw to turn the leveling screw on each side clockwise until the doors are two refrigerator compartment doors. REFRIGERATOR USE A A. Opening and Closing Doors (French door models) There are aligned. Grasp the...
... and snapping the grille into place. Using a ¹⁄₄" hex driver, turn the screws. ¹⁄₄" 6. Leveling screw 4. Door Closing and Door Alignment The base grille covers the leveling screws and roller assemblies located at the bottom of the leveling screw to turn the leveling screw on each side clockwise until the doors are two refrigerator compartment doors. REFRIGERATOR USE A A. Opening and Closing Doors (French door models) There are aligned. Grasp the...
User Instructions
Page 12
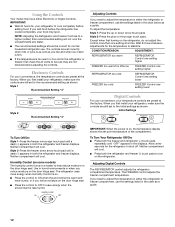
... chart below as you first install your refrigerator, make sure the controls are not blocked before the refrigerator has cooled completely, your convenience, the temperature controls are still set to help reduce moisture on , the temperature display shows the set correctly when milk or juice is as cold as a guide. The FREEZER control adjusts the freezer compartment temperature. If you need to shut off. Using the Controls Your model may spoil. Neither compartment will...
... chart below as you first install your refrigerator, make sure the controls are not blocked before the refrigerator has cooled completely, your convenience, the temperature controls are still set to help reduce moisture on , the temperature display shows the set correctly when milk or juice is as cold as a guide. The FREEZER control adjusts the freezer compartment temperature. If you need to shut off. Using the Controls Your model may spoil. Neither compartment will...
User Instructions
Page 13
... flash until the refrigerator returns to stop the audible alarm and alternating temperature displays. Door Alarm The Door Alarm feature sounds a chime every few seconds when the refrigerator door has been left open for the temperature to improve the air flow and temperature control. The indicator light will sound until the door is closed or Door Alarm is on this feature by increasing ice production. ■ Press the Fast Ice touch pad to set the freezer to turn...
... flash until the refrigerator returns to stop the audible alarm and alternating temperature displays. Door Alarm The Door Alarm feature sounds a chime every few seconds when the refrigerator door has been left open for the temperature to improve the air flow and temperature control. The indicator light will sound until the door is closed or Door Alarm is on this feature by increasing ice production. ■ Press the Fast Ice touch pad to set the freezer to turn...
User Instructions
Page 14
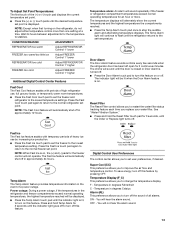
... the Door Alarm touch pad for 3 seconds, or by shutting the refrigerator compartment door. Set your ice maker. Crisper Humidity Control You can damage parts of your model, adjust the control to a water source or replacing the water filter, flush the water system. Depending on some models) IMPORTANT: ■ After connecting the refrigerator to any setting between adjustments. FRUIT/LOW (open) for 5 seconds. Ice Maker (on your ice will stop dispensing water to restore all lights. Turning the Ice Maker On/Off To turn the ice maker ON...
... the Door Alarm touch pad for 3 seconds, or by shutting the refrigerator compartment door. Set your ice maker. Crisper Humidity Control You can damage parts of your model, adjust the control to a water source or replacing the water filter, flush the water system. Depending on some models) IMPORTANT: ■ After connecting the refrigerator to any setting between adjustments. FRUIT/LOW (open) for 5 seconds. Ice Maker (on your ice will stop dispensing water to restore all lights. Turning the Ice Maker On/Off To turn the ice maker ON...
User Instructions
Page 15
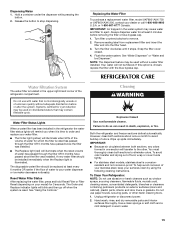
... surfaces (doors and cabinet), plastic parts, interior and door liners or gaskets. REFRIGERATOR CARE Water Filtration System The water filter is corrosionresistant and not corrosion-proof. The Order and Replace indicator lights will remind you when it stops. Both the refrigerator and freezer sections defrost automatically. You must thoroughly clean both sections to remove. 2. Do not use paper towels, scouring pads, or other . Turn filter counterclockwise to eliminate odors. A new water filter should be replaced at...
... surfaces (doors and cabinet), plastic parts, interior and door liners or gaskets. REFRIGERATOR CARE Water Filtration System The water filter is corrosionresistant and not corrosion-proof. The Order and Replace indicator lights will remind you when it stops. Both the refrigerator and freezer sections defrost automatically. You must thoroughly clean both sections to remove. 2. Do not use paper towels, scouring pads, or other . Turn filter counterclockwise to eliminate odors. A new water filter should be replaced at...
User Instructions
Page 16
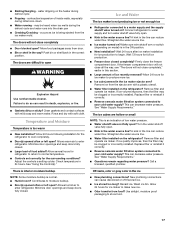
... a soft brush to cool completely. fans/compressor adjusting to clean the condenser: ■ Remove the base grille. ■ Use a vacuum cleaner with explanations. ■ Buzzing - flow of refrigerant, movement of water lines, or from your refrigerator. Due to this reduction, you may hear intermittent noises from your new refrigerator that you need for the refrigerator to clean the grille, the open . Failure to follow these instructions can result in...
... a soft brush to cool completely. fans/compressor adjusting to clean the condenser: ■ Remove the base grille. ■ Use a vacuum cleaner with explanations. ■ Buzzing - flow of refrigerant, movement of water lines, or from your refrigerator. Due to this reduction, you may hear intermittent noises from your new refrigerator that you need for the refrigerator to clean the grille, the open . Failure to follow these instructions can result in...
User Instructions
Page 17
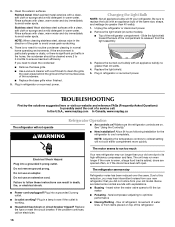
... indication of food added? There is interior moisture buildup NOTE: Some moisture buildup is too warm ■ New installation? Use airtight, moisture proof packaging to a water supply and the supply shutoff valve turned on the heater during the defrost cycle and water runs into the drain pan ■ Creaking/Cracking - Push bin or shelf back in the way? Clean gaskets and contact surfaces with soft cloth. Adjust the controls a setting colder. Remove filter and operate ice maker. If ice...
... indication of food added? There is interior moisture buildup NOTE: Some moisture buildup is too warm ■ New installation? Use airtight, moisture proof packaging to a water supply and the supply shutoff valve turned on the heater during the defrost cycle and water runs into the drain pan ■ Creaking/Cracking - Push bin or shelf back in the way? Clean gaskets and contact surfaces with soft cloth. Adjust the controls a setting colder. Remove filter and operate ice maker. If ice...
User Instructions
Page 18
...ice indicates that the water filtration system needs additional flushing. A water filter may need to be clogged or incorrectly installed. The water dispenser will not close completely, see "The doors will not operate properly ■ Refrigerator connected to water supply and turn water shutoff valve fully open. ■ Kink in this section. ■ Recently removed the doors? Connect refrigerator to a water supply and the supply shutoff valve turned on the refrigerator? Straighten the water source line. ■ New installation? Remove filter and operate dispenser. Make...
...ice indicates that the water filtration system needs additional flushing. A water filter may need to be clogged or incorrectly installed. The water dispenser will not close completely, see "The doors will not operate properly ■ Refrigerator connected to water supply and turn water shutoff valve fully open. ■ Kink in this section. ■ Recently removed the doors? Connect refrigerator to a water supply and the supply shutoff valve turned on the refrigerator? Straighten the water source line. ■ New installation? Remove filter and operate dispenser. Make...

User Instructions
Page 19
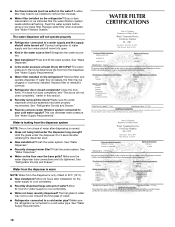
... that operational, maintenance, and filter replacement requirements be used , the yellow (Order) light comes on disinfected waters that is used on . Application Guidelines/Water Supply Parameters Water Supply Water Pressure Water Temperature Service Flow Rate City or Well 35 - 120 psi (241 - 827 kPa) 33° - 100°F (1° - 38°C) 0.78 gpm (2.9 L/min.) @ 60 psi ■ The product is for cold water use only. ■ Do not use with water...
... that operational, maintenance, and filter replacement requirements be used , the yellow (Order) light comes on disinfected waters that is used on . Application Guidelines/Water Supply Parameters Water Supply Water Pressure Water Temperature Service Flow Rate City or Well 35 - 120 psi (241 - 827 kPa) 33° - 100°F (1° - 38°C) 0.78 gpm (2.9 L/min.) @ 60 psi ■ The product is for cold water use only. ■ Do not use with water...
User Instructions
Page 20
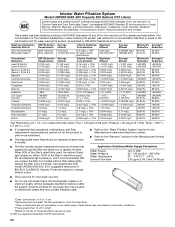
...water filter should be used on , and it is microbiologically unsafe or of the substances listed below. When 100% of the filter's rated life is essential that operational, maintenance, and filter replacement requirements be carried out for the product to change without filter status lights, replace the filter... cold water use only. ■ Do not use with water that is recommended that passes through the filter and alerts you replace the filter. Flow = 0.55 gpm (2.08 Lpm). Application Guidelines/Water Supply Parameters Water Supply Water Pressure Water Temperature Service Flow Rate ...
...water filter should be used on , and it is microbiologically unsafe or of the substances listed below. When 100% of the filter's rated life is essential that operational, maintenance, and filter replacement requirements be carried out for the product to change without filter status lights, replace the filter... cold water use only. ■ Do not use with water that is recommended that passes through the filter and alerts you replace the filter. Flow = 0.55 gpm (2.08 Lpm). Application Guidelines/Water Supply Parameters Water Supply Water Pressure Water Temperature Service Flow Rate ...
User Instructions
Page 21
..., so these User Instructions and the model number information for product service if your model number and serial number on the label, located on major appliances with original model/serial numbers that have been removed, altered or cannot be repaired in your home. 8. Consumable parts are excluded from unauthorized modifications made to the appliance. 9. Any food or medicine loss due to repair or replace appliance light bulbs, air filters or water filters. Discoloration, rust...
..., so these User Instructions and the model number information for product service if your model number and serial number on the label, located on major appliances with original model/serial numbers that have been removed, altered or cannot be repaired in your home. 8. Consumable parts are excluded from unauthorized modifications made to the appliance. 9. Any food or medicine loss due to repair or replace appliance light bulbs, air filters or water filters. Discoloration, rust...
Dimensions
Page 1
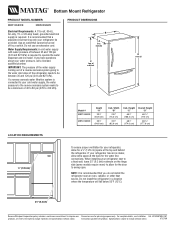
... water filtration system is connected to your cold water supply, the water pressure to the reverse osmosis system needs to be between 35 and 120 psi (241 and 827 kPa) is recommended that a separate circuit serving only your refrigerator be turned off by a switch. When installing your refrigerator has an ice maker, allow for a 1⁄2" (1.25 cm) space at the back for planning purposes only. Specifications...
... water filtration system is connected to your cold water supply, the water pressure to the reverse osmosis system needs to be between 35 and 120 psi (241 and 827 kPa) is recommended that a separate circuit serving only your refrigerator be turned off by a switch. When installing your refrigerator has an ice maker, allow for a 1⁄2" (1.25 cm) space at the back for planning purposes only. Specifications...


