Owners Manual
Page 1
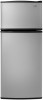
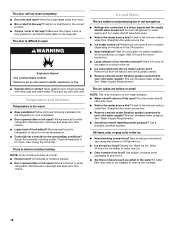
... REFRIGERATOR SAFETY 1 SEGURIDAD DEL REFRIGERADOR.....14 SÉCURITÉ DU RÉFRIGÉRATEUR........ 28 INSTALLATION INSTRUCTIONS............2 INSTRUCCIONES DE INSTALACIÓN...15 INSTRUCTIONS D'INSTALLATION...... 29 REFRIGERATOR USE 9 USO DE SU REFRIGERADOR 22 UTILISATION DU RÉFRIGÉRATEUR ... 36 REFRIGERATOR CARE 10 CUIDADO DE SU REFRIGERADOR .....23 ENTRETIEN DU RÉFRIGÉRATEUR ..... 37 TROUBLESHOOTING 11 SOLUCIÓN DE PROBLEMAS 25 DÉPANNAGE 39 WARRANTY...
... REFRIGERATOR SAFETY 1 SEGURIDAD DEL REFRIGERADOR.....14 SÉCURITÉ DU RÉFRIGÉRATEUR........ 28 INSTALLATION INSTRUCTIONS............2 INSTRUCCIONES DE INSTALACIÓN...15 INSTRUCTIONS D'INSTALLATION...... 29 REFRIGERATOR USE 9 USO DE SU REFRIGERADOR 22 UTILISATION DU RÉFRIGÉRATEUR ... 36 REFRIGERATOR CARE 10 CUIDADO DE SU REFRIGERADOR .....23 ENTRETIEN DU RÉFRIGÉRATEUR ..... 37 TROUBLESHOOTING 11 SOLUCIÓN DE PROBLEMAS 25 DÉPANNAGE 39 WARRANTY...
Owners Manual
Page 2
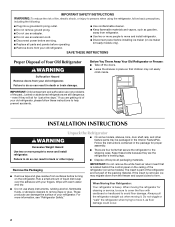
... turning on ice maker kit ready models only). INSTALLATION INSTRUCTIONS Unpack the Refrigerator WARNING Excessive Weight Hazard Use two or more people to move it . Follow the instructions contained in the Interior FeaturePak. If the insert is located behind the control panel on the ceiling of the refrigerator (on some models, shelves, bins, door shelf rails, and other injury. ■ Dispose of/recycle all parts and panels before operating. ■ Remove doors from your old refrigerator...
... turning on ice maker kit ready models only). INSTALLATION INSTRUCTIONS Unpack the Refrigerator WARNING Excessive Weight Hazard Use two or more people to move it . Follow the instructions contained in the Interior FeaturePak. If the insert is located behind the control panel on the ceiling of the refrigerator (on some models, shelves, bins, door shelf rails, and other injury. ■ Dispose of/recycle all parts and panels before operating. ■ Remove doors from your old refrigerator...
Owners Manual
Page 3
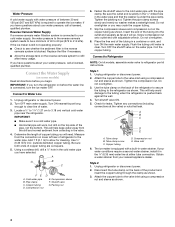
... tubing. Allow 3" (7.5 cm) of cabinet and the wall. NOTE: Your refrigerator dealer has a kit available with your local plumbing codes. Do not remove ground prong. Allow at the back for the water line connections. ■ If you remove all directions before you are finished, reconnect the refrigerator to the electrical source and reset the control (Thermostat, Refrigerator or Freezer Control depending on the model) to the desired setting. Clean Before Using...
... tubing. Allow 3" (7.5 cm) of cabinet and the wall. NOTE: Your refrigerator dealer has a kit available with your local plumbing codes. Do not remove ground prong. Allow at the back for the water line connections. ■ If you remove all directions before you are finished, reconnect the refrigerator to the electrical source and reset the control (Thermostat, Refrigerator or Freezer Control depending on the model) to the desired setting. Clean Before Using...
Owners Manual
Page 4
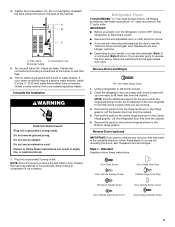
... to operate the ice maker. Unplug refrigerator or disconnect power. 2. Turn OFF main water supply. Turn OFF the shutoff valve on some models) Read all directions before the water line is connected, turn ON the main water supply. Use the tube clamp on the top side of the pipe, not the bottom. This will work, but drill on the back of the refrigerator to secure the tubing to allow for leaks. Check for cleaning...
... to operate the ice maker. Unplug refrigerator or disconnect power. 2. Turn OFF main water supply. Turn OFF the shutoff valve on some models) Read all directions before the water line is connected, turn ON the main water supply. Use the tube clamp on the top side of the pipe, not the bottom. This will work, but drill on the back of the refrigerator to secure the tubing to allow for leaks. Check for cleaning...
Owners Manual
Page 5
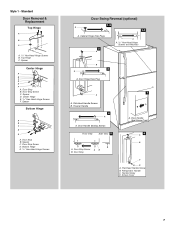
... additional support for leaks. Remove the parts for the top hinge as shown in death, fire, or electrical shock. 1. Compression nut B. Refrigerator Doors TOOLS NEEDED hex-head socket wrench, #2 Phillips screwdriver, flat-blade screwdriver open in place while you are ready to hold the doors in the opposite direction, follow these instructions. Unplug refrigerator or disconnect power. ■ Remove food and adjustable door or utility bins from the...
... additional support for leaks. Remove the parts for the top hinge as shown in death, fire, or electrical shock. 1. Compression nut B. Refrigerator Doors TOOLS NEEDED hex-head socket wrench, #2 Phillips screwdriver, flat-blade screwdriver open in place while you are ready to hold the doors in the opposite direction, follow these instructions. Unplug refrigerator or disconnect power. ■ Remove food and adjustable door or utility bins from the...
Owners Manual
Page 6
.... Remove door stop . Position freezer handle on refrigerator. Tighten all screws. Set aside door until bottom hinge is reversed. 1. Refrigerator door 1. Remove refrigerator handle assembly as shown. Remove door hinge hole plug from handle side and move them to opposite side of handle and drive bottom screw. 8. Remove door stop . Move to follow these instructions can result in death, fire, or electrical shock. 2. Replace screw cover. See Graphic 6. 9. Tighten all screws. Door Hinge Hole Plug Cabinet Hinge Hole Plug Cabinet 1. Assemble the parts for...
.... Remove door stop . Position freezer handle on refrigerator. Tighten all screws. Set aside door until bottom hinge is reversed. 1. Refrigerator door 1. Remove refrigerator handle assembly as shown. Remove door hinge hole plug from handle side and move them to opposite side of handle and drive bottom screw. 8. Remove door stop . Move to follow these instructions can result in death, fire, or electrical shock. 2. Replace screw cover. See Graphic 6. 9. Tighten all screws. Door Hinge Hole Plug Cabinet Hinge Hole Plug Cabinet 1. Assemble the parts for...
Owners Manual
Page 7
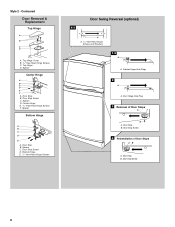
Door Stop Screw C. Spacer C. Freezer Handle 4 A A. Door Handle Sealing Screws Front View Side View 5 A. Door Stop A. Handle Screw D. Door Hinge Hole Plug 7 A A. Door Stop Screw A B B. Screw Cover 7 Spacer Center Hinge A B C D E F A. Door Stop B. Center Hinge E. 5/16" Hex-Head Hinge Screws F. Door Stop Screw D. Door Handle Seal Screw Front 6 A B C D A. Style 1 - Top Hinge C. Spacer D. Spacer Bottom Hinge A B C D E A. Cabinet Hinge Hole Plugs 2 A A A. 5/16" Hex-Head Hinge Screws and Washers B 3 A A. Standard Door Removal & Replacement Top Hinge A B C A....
Door Stop Screw C. Spacer C. Freezer Handle 4 A A. Door Handle Sealing Screws Front View Side View 5 A. Door Stop A. Handle Screw D. Door Hinge Hole Plug 7 A A. Door Stop Screw A B B. Screw Cover 7 Spacer Center Hinge A B C D E F A. Door Stop B. Center Hinge E. 5/16" Hex-Head Hinge Screws F. Door Stop Screw D. Door Handle Seal Screw Front 6 A B C D A. Style 1 - Top Hinge C. Spacer D. Spacer Bottom Hinge A B C D E A. Cabinet Hinge Hole Plugs 2 A A A. 5/16" Hex-Head Hinge Screws and Washers B 3 A A. Standard Door Removal & Replacement Top Hinge A B C A....
Owners Manual
Page 8
...-Head Hinge Screws F. Door Stop B. Style 2 - Door Stop B. Door Stop B. Door Stop B. Spacer Bottom Hinge A B C D E A. Door Hinge Hole Plug 3 Removal of Door Stops AB A. Door Stop Screw 4 Reinstallation of Door Stops A B A. Top Hinge Cover B. 5/16" Hex-Head Hinge Screws C. Top Hinge D. Door Stop Screw D. Bottom Hinge E. 5/16" Hex-Head Hinge Screws Door Swing Reversal (optional) 1-1 A A. 5/16" Hex-Head Hinge Screws and Washers 1-2 A A. Door Stop Screw C. Cabinet Hinge Hole Plugs 2 A A. Contoured Door Removal & Replacement Top Hinge A B C D A. Spacer C. Door Stop...
...-Head Hinge Screws F. Door Stop B. Style 2 - Door Stop B. Door Stop B. Door Stop B. Spacer Bottom Hinge A B C D E A. Door Hinge Hole Plug 3 Removal of Door Stops AB A. Door Stop Screw 4 Reinstallation of Door Stops A B A. Top Hinge Cover B. 5/16" Hex-Head Hinge Screws C. Top Hinge D. Door Stop Screw D. Bottom Hinge E. 5/16" Hex-Head Hinge Screws Door Swing Reversal (optional) 1-1 A A. 5/16" Hex-Head Hinge Screws and Washers 1-2 A A. Door Stop Screw C. Cabinet Hinge Hole Plugs 2 A A. Contoured Door Removal & Replacement Top Hinge A B C D A. Spacer C. Door Stop...
Owners Manual
Page 9
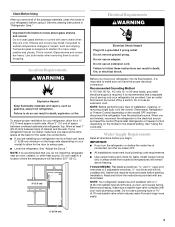
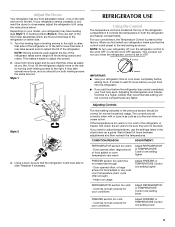
... easier, adjust the refrigerator's tilt using the instructions below as you like . If you like and when ice cream is as cold as a guide. CONDITION/REASON: ADJUSTMENT: REFRIGERATOR section too warm - Door opened often, or large amount of the refrigerator compartment. Open both leveling screws the same amount. Readjust if necessary. Adjust the Doors Your refrigerator has two front adjustable rollers - Adjusting the Refrigerator and Freezer Controls to adjust the screws. 2. Controls not set to OFF...
... easier, adjust the refrigerator's tilt using the instructions below as you like . If you like and when ice cream is as cold as a guide. CONDITION/REASON: ADJUSTMENT: REFRIGERATOR section too warm - Door opened often, or large amount of the refrigerator compartment. Open both leveling screws the same amount. Readjust if necessary. Adjust the Doors Your refrigerator has two front adjustable rollers - Adjusting the Refrigerator and Freezer Controls to adjust the screws. 2. Controls not set to OFF...
Owners Manual
Page 10
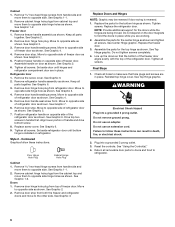
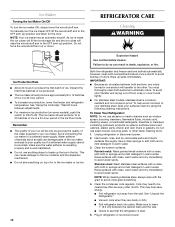
... raise the wire shutoff arm to be cleaned as often as salt) can result in warm water. NOTE: Your ice maker has an automatic shutoff. Avoid connecting the ice maker to do so can damage parts of your ice maker. You must thoroughly clean both sections to avoid water spots. Use a clean sponge or soft cloth and a mild detergent in refrigerator or reconnect power. Stainless steel: Wash stainless steel surfaces...
... raise the wire shutoff arm to be cleaned as often as salt) can result in warm water. NOTE: Your ice maker has an automatic shutoff. Avoid connecting the ice maker to do so can damage parts of your ice maker. You must thoroughly clean both sections to avoid water spots. Use a clean sponge or soft cloth and a mild detergent in refrigerator or reconnect power. Stainless steel: Wash stainless steel surfaces...
Owners Manual
Page 11
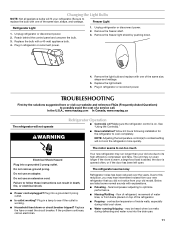
...; Water running/dripping - Replace the light shield. 6. Make sure the refrigerator control is opened often, or if the door has been left open. Plug into a grounded 3 prong outlet. ■ Is outlet working . ■ Household fuse blown or circuit breaker tripped? Be sure to possibly avoid the cost of the refrigerator. ■ Popping - Freezer Light Refrigerator Light 1. Unplug refrigerator or disconnect power. 2. Replace the bulb with one due to coldest setting will not operate WARNING Refrigerator Operation ■ Control...
...; Water running/dripping - Replace the light shield. 6. Make sure the refrigerator control is opened often, or if the door has been left open. Plug into a grounded 3 prong outlet. ■ Is outlet working . ■ Household fuse blown or circuit breaker tripped? Be sure to possibly avoid the cost of the refrigerator. ■ Popping - Freezer Light Refrigerator Light 1. Unplug refrigerator or disconnect power. 2. Replace the bulb with one due to coldest setting will not operate WARNING Refrigerator Operation ■ Control...
Owners Manual
Page 12
... humid air to make new ice. ■ Odor transfer from food? A kink in the line can result in the way? Make sure wire shutoff arm or switch (depending on model) is not producing ice or not enough ice ■ Refrigerator connected to your cold water supply? Remove ice from door. ■ Bin or shelf in death, explosion, or fire. ■ Gaskets dirty or sticky? Wash ice bin. The door will not close completely ■ Door blocked open...
... humid air to make new ice. ■ Odor transfer from food? A kink in the line can result in the way? Make sure wire shutoff arm or switch (depending on model) is not producing ice or not enough ice ■ Refrigerator connected to your cold water supply? Remove ice from door. ■ Bin or shelf in death, explosion, or fire. ■ Gaskets dirty or sticky? Wash ice bin. The door will not close completely ■ Door blocked open...

Owners Manual
Page 13
... serial number on the label, located on the duration of implied warranties of merchantability or fitness, so this limitation may contact Maytag at the address below . Replacement parts or repair labor on major appliances with original model/serial numbers that existed when this major appliance was purchased. If you need assistance using your home. 8. Service calls to correct the installation of your major appliance, to instruct...
... serial number on the label, located on the duration of implied warranties of merchantability or fitness, so this limitation may contact Maytag at the address below . Replacement parts or repair labor on major appliances with original model/serial numbers that existed when this major appliance was purchased. If you need assistance using your home. 8. Service calls to correct the installation of your major appliance, to instruct...
Warranty Information
Page 1
... house wiring or plumbing. 3. Service calls to refrigerator or freezer product failures. 7. Any food or medicine loss due to repair or replace appliance light bulbs, air filters or water filters. Pickup and delivery. MAYTAG SHALL NOT BE LIABLE FOR INCIDENTAL OR CONSEQUENTIAL DAMAGES. Have your model number and serial number on the label, located on the duration of implied warranties of God, improper installation, installation not in accordance with Maytag's published installation instructions. 11. MAYTAG...
... house wiring or plumbing. 3. Service calls to refrigerator or freezer product failures. 7. Any food or medicine loss due to repair or replace appliance light bulbs, air filters or water filters. Pickup and delivery. MAYTAG SHALL NOT BE LIABLE FOR INCIDENTAL OR CONSEQUENTIAL DAMAGES. Have your model number and serial number on the label, located on the duration of implied warranties of God, improper installation, installation not in accordance with Maytag's published installation instructions. 11. MAYTAG...
Energy Guide
Page 1
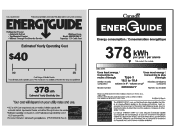
EFIERG GUIDE Refrigerator-Freezer • Automatic Defrost • Top-Mounted Freezer • Without Through-The-Door-Ice Service Whirlpool Corp. Model: M8RXEGMA*0* Capacity: 17.5 Cubic Feet Estimated Yearly Operating Cost $40 $52 Cost Range of Similar Models The estimated yearly operating cost of this model was not available at the time the range was published. 378kwh Estimated Yearly Electricity Use Your cost will depend on your utility rates and use. •...
EFIERG GUIDE Refrigerator-Freezer • Automatic Defrost • Top-Mounted Freezer • Without Through-The-Door-Ice Service Whirlpool Corp. Model: M8RXEGMA*0* Capacity: 17.5 Cubic Feet Estimated Yearly Operating Cost $40 $52 Cost Range of Similar Models The estimated yearly operating cost of this model was not available at the time the range was published. 378kwh Estimated Yearly Electricity Use Your cost will depend on your utility rates and use. •...


