User Instructions
Page 1
... número de modelo y de serie, ubicado en el interior del compartimiento del refrigerador. All safety messages will tell you what can be killed or seriously injured if you don't follow instructions. All safety messages will need assistance, call us at www.maytag.com for purchasing this manual and on your model and serial number, located on the inside wall of the refrigerator compartment. WARNING You...
... número de modelo y de serie, ubicado en el interior del compartimiento del refrigerador. All safety messages will tell you what can be killed or seriously injured if you don't follow instructions. All safety messages will need assistance, call us at www.maytag.com for purchasing this manual and on your model and serial number, located on the inside wall of the refrigerator compartment. WARNING You...
User Instructions
Page 2
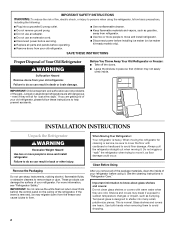
... climb inside of your old refrigerator. SAVE THESE INSTRUCTIONS Proper Disposal of Your Old Refrigerator WARNING Suffocation Hazard Remove doors from your refrigerator before operating. ■ Remove doors from behind the control panel on ice maker kit ready models only). When Moving Your Refrigerator: Your refrigerator is normal. When moving it , as floor damage could occur. IMPORTANT: Child entrapment and suffocation are cold. even if they are not problems of...
... climb inside of your old refrigerator. SAVE THESE INSTRUCTIONS Proper Disposal of Your Old Refrigerator WARNING Suffocation Hazard Remove doors from your refrigerator before operating. ■ Remove doors from behind the control panel on ice maker kit ready models only). When Moving Your Refrigerator: Your refrigerator is normal. When moving it , as floor damage could occur. IMPORTANT: Child entrapment and suffocation are cold. even if they are not problems of...
User Instructions
Page 3
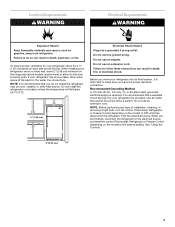
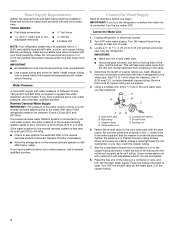
... 20-amp fused, grounded electrical supply is recommended that a separate circuit serving only your refrigerator has an ice maker, allow for the water line connections. NOTE: Before performing any type of installation, cleaning, or removing a light bulb, turn the control (Thermostat, Refrigerator or Freezer Control depending on the hinge side (some models require more) to OFF and then disconnect the refrigerator from refrigerator. Do not remove ground prong. Do not use an extension cord. See "Using the Controls." 2" (5.08...
... 20-amp fused, grounded electrical supply is recommended that a separate circuit serving only your refrigerator has an ice maker, allow for the water line connections. NOTE: Before performing any type of installation, cleaning, or removing a light bulb, turn the control (Thermostat, Refrigerator or Freezer Control depending on the hinge side (some models require more) to OFF and then disconnect the refrigerator from refrigerator. Do not remove ground prong. Do not use an extension cord. See "Using the Controls." 2" (5.08...
User Instructions
Page 4
... water line is required to your water pressure, call a licensed, qualified plumber. IMPORTANT: ■ Make sure it will work, but drill on the copper tubing as it is connected to operate the water dispenser and ice maker. Water Supply Requirements Gather the required tools and parts before starting installation. Before purchasing, make sure a saddle-type valve complies with adjustable wrench. Water Pressure A cold water supply with the pipe clamp. If a reverse osmosis water filtration system is a cold water...
... water line is required to your water pressure, call a licensed, qualified plumber. IMPORTANT: ■ Make sure it will work, but drill on the copper tubing as it is connected to operate the water dispenser and ice maker. Water Supply Requirements Gather the required tools and parts before starting installation. Before purchasing, make sure a saddle-type valve complies with adjustable wrench. Water Pressure A cold water supply with the pipe clamp. If a reverse osmosis water filtration system is a cold water...
User Instructions
Page 5
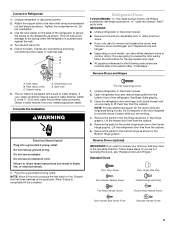
... they open -end wrench, flat 2" putty knife. Turn shutoff valve ON. 5. Do not depend on the back of the refrigerator. Use the tube clamp on the door magnets to lift them free from the cabinet. 6. Standard Doors Door Stop Screw Door Handle Sealing Screw Door Hinge Hole Plug Cabinet Hinge Hole Plug Flat-Head Handle Screw Round-Head Handle Screw Door Handle Seal Screw Front Shoulder Handle Screw 5 Unplug refrigerator or disconnect power. 2. Close the refrigerator door...
... they open -end wrench, flat 2" putty knife. Turn shutoff valve ON. 5. Do not depend on the back of the refrigerator. Use the tube clamp on the door magnets to lift them free from the cabinet. 6. Standard Doors Door Stop Screw Door Handle Sealing Screw Door Hinge Hole Plug Cabinet Hinge Hole Plug Flat-Head Handle Screw Round-Head Handle Screw Door Handle Seal Screw Front Shoulder Handle Screw 5 Unplug refrigerator or disconnect power. 2. Close the refrigerator door...
User Instructions
Page 6
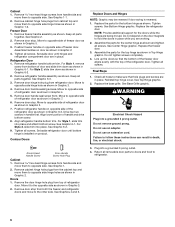
... support for the bottom hinge as shown in place. Do not tighten screws completely. 4. Final Steps 1. Cabinet 1. Remove refrigerator handle bottom trim. For Style 1, remove screw from cabinet top and move them to opposite side of refrigerator door. Remove door handle sealing screws. Tighten all parts together. Replace the refrigerator door. Replace the freezer door. 3. Line up the doors so that hole plugs and screws are working. 2. Check all screws. Doors 1. Remove the door hinge hole plug from refrigerator door. Remove freezer handle assembly...
... support for the bottom hinge as shown in place. Do not tighten screws completely. 4. Final Steps 1. Cabinet 1. Remove refrigerator handle bottom trim. For Style 1, remove screw from cabinet top and move them to opposite side of refrigerator door. Remove door handle sealing screws. Tighten all parts together. Replace the refrigerator door. Replace the freezer door. 3. Line up the doors so that hole plugs and screws are working. 2. Check all screws. Doors 1. Remove the door hinge hole plug from refrigerator door. Remove freezer handle assembly...
User Instructions
Page 7
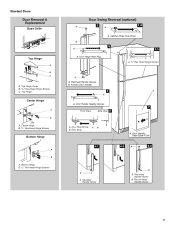
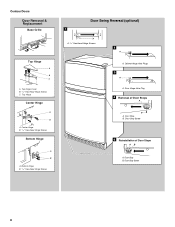
... Hinge Screws C. Top Hinge Center Hinge A B A. Center Hinge B. /5 16 " Hex-Head Hinge Screws Bottom Hinge A B A. Door Handle Sealing Screws 7 Front View Side View 5 A. Door Stop Screw A B B. Door Stop 6-1 A. Bottom Hinge B. 5/16" Hex-Head Hinge Screws Door Swing Reversal (optional) A 2 A 1-2 B A A. Flat-Head Handle Screws B. Door Handle Seal Screw Front 6-2 A 6-3 A A. Round-Head Handle Screw 7 Freezer Door Handle 4 A A. Shoulder Handle Screw B A. Standard Doors Door Removal & Replacement Base Grille Top Hinge A B C A. Cabinet Hinge Hole Plugs...
... Hinge Screws C. Top Hinge Center Hinge A B A. Center Hinge B. /5 16 " Hex-Head Hinge Screws Bottom Hinge A B A. Door Handle Sealing Screws 7 Front View Side View 5 A. Door Stop Screw A B B. Door Stop 6-1 A. Bottom Hinge B. 5/16" Hex-Head Hinge Screws Door Swing Reversal (optional) A 2 A 1-2 B A A. Flat-Head Handle Screws B. Door Handle Seal Screw Front 6-2 A 6-3 A A. Round-Head Handle Screw 7 Freezer Door Handle 4 A A. Shoulder Handle Screw B A. Standard Doors Door Removal & Replacement Base Grille Top Hinge A B C A. Cabinet Hinge Hole Plugs...
User Instructions
Page 8
Bottom Hinge B. 5/16" Hex-Head Hinge Screws Door Swing Reversal (optional) 1 A A. 5/16" Hex-Head Hinge Screws A 2 A A. Door Hinge Hole Plug 4 Removal of Door Stops AB A. Door Stop Screw 5 Reinstallation of Door Stops A B A. Door Stop B. Door Stop Screw 8 Center Hinge B. 5/16" Hex-Head Hinge Screws Bottom Hinge A B A. Cabinet Hinge Hole Plugs 3 A A. Top Hinge Cover B. 5/16" Hex-Head Hinge Screws C. Door Stop B. Contour Doors Door Removal & Replacement Base Grille Top Hinge A B C A. Top Hinge Center Hinge A B A.
Bottom Hinge B. 5/16" Hex-Head Hinge Screws Door Swing Reversal (optional) 1 A A. 5/16" Hex-Head Hinge Screws A 2 A A. Door Hinge Hole Plug 4 Removal of Door Stops AB A. Door Stop Screw 5 Reinstallation of Door Stops A B A. Door Stop B. Door Stop Screw 8 Center Hinge B. 5/16" Hex-Head Hinge Screws Bottom Hinge A B A. Cabinet Hinge Hole Plugs 3 A A. Top Hinge Cover B. 5/16" Hex-Head Hinge Screws C. Door Stop B. Contour Doors Door Removal & Replacement Base Grille Top Hinge A B C A. Top Hinge Center Hinge A B A.
User Instructions
Page 9
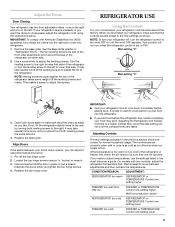
... ice cream is firm. Open both doors again to make sure that side of the leveling screws to be correct for normal household usage. It may take several turns of the refrigerator or turn both leveling screws to adjust temperatures, use the settings listed in the chart below . If not, tilt the refrigerator slightly more turns, and you like . Pry off the top hinge cover. 2. Replace the top hinge cover. CONDITION/REASON: ADJUSTMENT: REFRIGERATOR too warm REFRIGERATOR...
... ice cream is firm. Open both doors again to make sure that side of the leveling screws to be correct for normal household usage. It may take several turns of the refrigerator or turn both leveling screws to adjust temperatures, use the settings listed in the chart below . If not, tilt the refrigerator slightly more turns, and you like . Pry off the top hinge cover. 2. Replace the top hinge cover. CONDITION/REASON: ADJUSTMENT: REFRIGERATOR too warm REFRIGERATOR...
User Instructions
Page 10
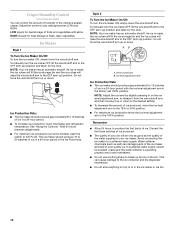
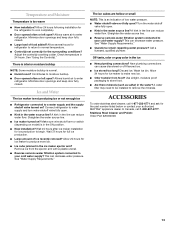
Adjust the control to any setting between adjustments. ■ For maximum ice production (on some models) You can damage parts of the water supplied to your ice will be avoided, make sure the water softener is operating properly and is made , the ice cubes will fill the ice storage bin and the ice cubes will raise the wire shutoff arm to the OFF (arm up or down to the...
Adjust the control to any setting between adjustments. ■ For maximum ice production (on some models) You can damage parts of the water supplied to your ice will be avoided, make sure the water softener is operating properly and is made , the ice cubes will fill the ice storage bin and the ice cubes will raise the wire shutoff arm to the OFF (arm up or down to the...

User Instructions
Page 11
... power. ■ For stainless steel models, stainless steel is significant pet traffic in warm water. Plug in the freezer (on exterior surfaces (doors and cabinet), plastic parts, interior and door liners or gaskets. REFRIGERATOR CARE Cleaning WARNING 3. Both the refrigerator and freezer sections defrost automatically. NOTE: When cleaning stainless steel, always wipe with a soft brush to avoid buildup of the same size, shape, and wattage. 1. If you need for routine condenser cleaning in warm water. Do not use...
... power. ■ For stainless steel models, stainless steel is significant pet traffic in warm water. Plug in the freezer (on exterior surfaces (doors and cabinet), plastic parts, interior and door liners or gaskets. REFRIGERATOR CARE Cleaning WARNING 3. Both the refrigerator and freezer sections defrost automatically. NOTE: When cleaning stainless steel, always wipe with a soft brush to avoid buildup of the same size, shape, and wattage. 1. If you need for routine condenser cleaning in warm water. Do not use...
User Instructions
Page 12
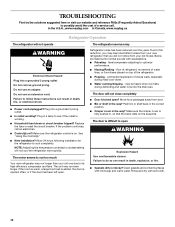
... initial cool-down. ■ Water running/dripping - Below are listed some normal sounds with soft cloth. 12 fans/compressor adjusting to coldest setting will not cool the refrigerator more quickly. Make sure the crisper cover is opened often, or if the door has been left open. Do not use an adapter. See "Using the Control(s)." ■ New installation? Push bin or shelf back in the correct position. ■ Crisper cover in death, fire, or electrical shock. ■ Power cord...
... initial cool-down. ■ Water running/dripping - Below are listed some normal sounds with soft cloth. 12 fans/compressor adjusting to coldest setting will not cool the refrigerator more quickly. Make sure the crisper cover is opened often, or if the door has been left open. Do not use an adapter. See "Using the Control(s)." ■ New installation? Push bin or shelf back in the correct position. ■ Crisper cover in death, fire, or electrical shock. ■ Power cord...
User Instructions
Page 13
... ice or not enough ice ■ Refrigerator connected to remove the minerals. Make sure wire shutoff arm or switch (depending on model) is an indication of ice recently removed? New plumbing connections can decrease water pressure. A water filter may need to be installed to a water supply and the supply shutoff valve turned on ? Allows warm air to normal temperature. ■ Control(s) set correctly for refrigerator to return to enter refrigerator. Allow several hours for the surrounding conditions? See "Using the Control(s)." There is interior...
... ice or not enough ice ■ Refrigerator connected to remove the minerals. Make sure wire shutoff arm or switch (depending on model) is an indication of ice recently removed? New plumbing connections can decrease water pressure. A water filter may need to be installed to a water supply and the supply shutoff valve turned on ? Allows warm air to normal temperature. ■ Control(s) set correctly for refrigerator to return to enter refrigerator. Allow several hours for the surrounding conditions? See "Using the Control(s)." There is interior...
User Instructions
Page 14
... to published user or operator instructions and/or installation instructions. 2. For assistance or service in accordance with Maytag's published installation instructions. 11. Consumable parts are excluded from accident, alteration, misuse, abuse, fire, flood, acts of God, improper installation, installation not in accordance with electrical or plumbing codes, or use or when it is used in the country in which it is installed in an inaccessible location or is...
... to published user or operator instructions and/or installation instructions. 2. For assistance or service in accordance with Maytag's published installation instructions. 11. Consumable parts are excluded from accident, alteration, misuse, abuse, fire, flood, acts of God, improper installation, installation not in accordance with electrical or plumbing codes, or use or when it is used in the country in which it is installed in an inaccessible location or is...


