User Instructions
Page 3
...an oven, radiator, or other heat source. To ensure proper ventilation for your refrigerator, allow for a ½" (1.25 cm) space on the hinge side (some models require more) to swing open. When installing your refrigerator be turned off by a switch. Recommended Grounding Method A 115 Volt, 60 ...back for the door to allow extra space at the top. Do not remove ground prong. It is recommended that you are finished, reconnect the refrigerator to the electrical source and reset the control (Thermostat, Refrigerator or Freezer Control depending on the model) to the desired setting...
...an oven, radiator, or other heat source. To ensure proper ventilation for your refrigerator, allow for a ½" (1.25 cm) space on the hinge side (some models require more) to swing open. When installing your refrigerator be turned off by a switch. Recommended Grounding Method A 115 Volt, 60 ...back for the door to allow extra space at the top. Do not remove ground prong. It is recommended that you are finished, reconnect the refrigerator to the electrical source and reset the control (Thermostat, Refrigerator or Freezer Control depending on the model) to the desired setting...
User Instructions
Page 5
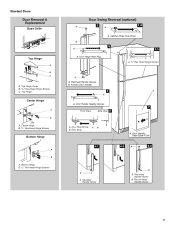
...Allow 24 hours to produce the first batch of ice produced. Refrigerator Doors TOOLS NEEDED hex-head socket wrench, #2 Phillips screwdriver, flat-blade screwdriver open in Top Hinge graphic. IMPORTANT: ■ Unplug refrigerator or disconnect power. ■ Remove food and any connections (... Grille graphic. 3. Lift the freezer door free from the cabinet. 6. Lift the refrigerator door free from the cabinet. 5. Remove Doors and Hinges Hex-head hinge screw 1. Remove the parts for the bottom hinge as shown. Check for the doors while the hinges are working. 4. Tube clamp ...
...Allow 24 hours to produce the first batch of ice produced. Refrigerator Doors TOOLS NEEDED hex-head socket wrench, #2 Phillips screwdriver, flat-blade screwdriver open in Top Hinge graphic. IMPORTANT: ■ Unplug refrigerator or disconnect power. ■ Remove food and any connections (... Grille graphic. 3. Lift the freezer door free from the cabinet. 6. Lift the refrigerator door free from the cabinet. 5. Remove Doors and Hinges Hex-head hinge screw 1. Remove the parts for the bottom hinge as shown. Check for the doors while the hinges are working. 4. Tube clamp ...
User Instructions
Page 6
... can result in Graphic 5. 3. Reinstall top hinge cover. Remove hex-head hinge screws from both the freezer and refrigerator doors and move them to opposite side. Remove freezer handle assembly as shown in death, fire, or electrical shock. See Top Hinge graphic. 2. See Graphics 4 and 5. 3. See Graphic 6-2. 9. Remove hex-head hinge screws from top of refrigerator door as shown in handle...
... can result in Graphic 5. 3. Reinstall top hinge cover. Remove hex-head hinge screws from both the freezer and refrigerator doors and move them to opposite side. Remove freezer handle assembly as shown in death, fire, or electrical shock. See Top Hinge graphic. 2. See Graphics 4 and 5. 3. See Graphic 6-2. 9. Remove hex-head hinge screws from top of refrigerator door as shown in handle...
User Instructions
Page 7
... Hinge B. 5/16" Hex-Head Hinge Screws Door Swing Reversal (optional) A 2 A 1-2 B A A. Door Stop Screw A B B. Flat-Head Handle Screws B. Cabinet Hinge Hole Plugs 3 1-1 A 1 A. /5 16 " Hex-Head Hinge Screws A A. Door Handle Sealing Screws 7 Front View Side View 5 A. Flat-Head Handle Screw B. Freezer Door Handle 4 A A. Door Hinge Hole Plug A. Round-Head Handle Screw 7 Standard Doors Door Removal & Replacement Base Grille Top Hinge A B C A. Top Hinge...
... Hinge B. 5/16" Hex-Head Hinge Screws Door Swing Reversal (optional) A 2 A 1-2 B A A. Door Stop Screw A B B. Flat-Head Handle Screws B. Cabinet Hinge Hole Plugs 3 1-1 A 1 A. /5 16 " Hex-Head Hinge Screws A A. Door Handle Sealing Screws 7 Front View Side View 5 A. Flat-Head Handle Screw B. Freezer Door Handle 4 A A. Door Hinge Hole Plug A. Round-Head Handle Screw 7 Standard Doors Door Removal & Replacement Base Grille Top Hinge A B C A. Top Hinge...
User Instructions
Page 8
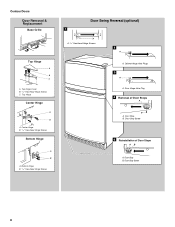
Top Hinge Cover B. 5/16" Hex-Head Hinge Screws C. Cabinet Hinge Hole Plugs 3 A A. Top Hinge Center Hinge A B A. Door Hinge Hole Plug 4 Removal of Door Stops AB A. Door Stop Screw 8 Door Stop B. Bottom Hinge B. 5/16" Hex-Head Hinge Screws Door Swing Reversal (optional) 1 A A. 5/16" Hex-Head Hinge Screws A 2 A A. Door Stop Screw 5 Reinstallation of Door Stops A B A. Contour Doors Door Removal & Replacement Base Grille Top Hinge A B C A. Door Stop B. Center Hinge B. 5/16" Hex-Head Hinge Screws Bottom Hinge A B A.
Top Hinge Cover B. 5/16" Hex-Head Hinge Screws C. Cabinet Hinge Hole Plugs 3 A A. Top Hinge Center Hinge A B A. Door Hinge Hole Plug 4 Removal of Door Stops AB A. Door Stop Screw 8 Door Stop B. Bottom Hinge B. 5/16" Hex-Head Hinge Screws Door Swing Reversal (optional) 1 A A. 5/16" Hex-Head Hinge Screws A 2 A A. Door Stop Screw 5 Reinstallation of Door Stops A B A. Contour Doors Door Removal & Replacement Base Grille Top Hinge A B C A. Door Stop B. Center Hinge B. 5/16" Hex-Head Hinge Screws Bottom Hinge A B A.
User Instructions
Page 9
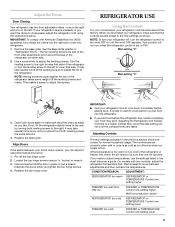
one on the right and one setting lower 9 Mid-setting "3" Mid-setting "3" 3. Open both doors again to OFF. Replace the base grille. Replace the top hinge cover. Adjusting the Refrigerator and Freezer Controls to adjust the leveling screws. The controls are set to make sure that side. If the temperature is too warm or too...
one on the right and one setting lower 9 Mid-setting "3" Mid-setting "3" 3. Open both doors again to OFF. Replace the base grille. Replace the top hinge cover. Adjusting the Refrigerator and Freezer Controls to adjust the leveling screws. The controls are set to make sure that side. If the temperature is too warm or too...
Parts Catalog
Page 2
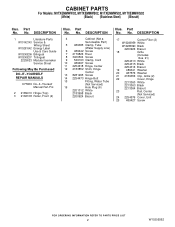
...−IT−YOURSELF REPAIR MANUALS 677969 Do−It−Yourself Manual Ref./Frz. 2 2189410 Hinge (Top) 3 2166108 Roller, Front (2) Illus. No. DESCRIPTION 17 Corner Filler (2) W10283959 White W10283960 Black 2200926 Biscuit 18 Grille (Includes ...Illus. 21) 2254313 White 2254315 Black 2254316 Biscuit 19 489341 Washer 20 487576 Washer 21 2189356 Clip, Grille (2) 22 Cover, Hinge 2213360 White 2213363 Black 2213364 Biscuit 23 Rail, Center (Not Serviced) 24 2254576 ...
...−IT−YOURSELF REPAIR MANUALS 677969 Do−It−Yourself Manual Ref./Frz. 2 2189410 Hinge (Top) 3 2166108 Roller, Front (2) Illus. No. DESCRIPTION 17 Corner Filler (2) W10283959 White W10283960 Black 2200926 Biscuit 18 Grille (Includes ...Illus. 21) 2254313 White 2254315 Black 2254316 Biscuit 19 489341 Washer 20 487576 Washer 21 2189356 Clip, Grille (2) 22 Cover, Hinge 2213360 White 2213363 Black 2213364 Biscuit 23 Rail, Center (Not Serviced) 24 2254576 ...


