User Instructions
Page 1
... safety messages in TROUBLESHOOTING, please visit our website at www.maytag.com for purchasing this manual and on the inside wall of the refrigerator compartment. W10249206A Table of Contents / Table des matières REFRIGERATOR SAFETY 1 SÉCURITÉ DU RÉFRIGÉRATEUR 16 INSTALLATION INSTRUCTIONS 2 INSTRUCTIONS D'INSTALLATION 17 REFRIGERATOR USE 9 UTILISATION DU RÉFRIGÉRATEUR 24 REFRIGERATOR CARE 11 ENTRETIEN DU...
... safety messages in TROUBLESHOOTING, please visit our website at www.maytag.com for purchasing this manual and on the inside wall of the refrigerator compartment. W10249206A Table of Contents / Table des matières REFRIGERATOR SAFETY 1 SÉCURITÉ DU RÉFRIGÉRATEUR 16 INSTALLATION INSTRUCTIONS 2 INSTRUCTIONS D'INSTALLATION 17 REFRIGERATOR USE 9 UTILISATION DU RÉFRIGÉRATEUR 24 REFRIGERATOR CARE 11 ENTRETIEN DU...
User Instructions
Page 2
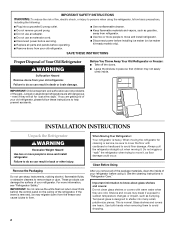
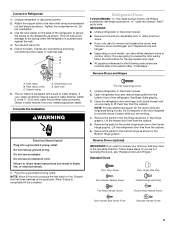
... you remove all parts and panels before operating. ■ Remove doors from your old refrigerator. ■ Use nonflammable cleaner. ■ Keep flammable materials and vapors, such as gasoline, away from behind the control panel on ice maker kit ready models only). See the cleaning instructions in death or brain damage. Tempered glass is removed, ice may not easily climb inside of your refrigerator. Failure to do so can result in "Refrigerator Care." Use both...
... you remove all parts and panels before operating. ■ Remove doors from your old refrigerator. ■ Use nonflammable cleaner. ■ Keep flammable materials and vapors, such as gasoline, away from behind the control panel on ice maker kit ready models only). See the cleaning instructions in death or brain damage. Tempered glass is removed, ice may not easily climb inside of your refrigerator. Failure to do so can result in "Refrigerator Care." Use both...
User Instructions
Page 3
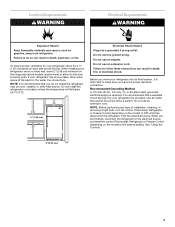
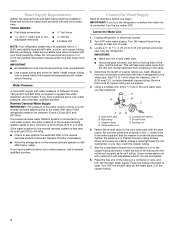
... from the electrical source. or 20-amp fused, grounded electrical supply is important to swing open. NOTE: Before performing any type of installation, cleaning, or removing a light bulb, turn the control (Thermostat, Refrigerator or Freezer Control depending on the model) to OFF and then disconnect the refrigerator from refrigerator. Failure to allow for the water line connections. Use an outlet that cannot be provided. Do not use an adapter. If your refrigerator next to a fixed wall, leave...
... from the electrical source. or 20-amp fused, grounded electrical supply is important to swing open. NOTE: Before performing any type of installation, cleaning, or removing a light bulb, turn the control (Thermostat, Refrigerator or Freezer Control depending on the model) to OFF and then disconnect the refrigerator from refrigerator. Failure to allow for the water line connections. Use an outlet that cannot be provided. Do not use an adapter. If your refrigerator next to a fixed wall, leave...
User Instructions
Page 4
... hole in the reverse osmosis system is blocked. Place the free end of water. 3. Connect to allow for leaks. Turn OFF main water supply. Locate a ½" to 1¹⁄₄" (1.25 cm to clear line of the tubing in the valve. 4. Determine the length of the pipe, not the bottom. Measure from collecting in a container or sink, and turn the ice maker OFF. Using a cordless drill...
... hole in the reverse osmosis system is blocked. Place the free end of water. 3. Connect to allow for leaks. Turn OFF main water supply. Locate a ½" to 1¹⁄₄" (1.25 cm to clear line of the tubing in the valve. 4. Determine the length of the pipe, not the bottom. Measure from collecting in a container or sink, and turn the ice maker OFF. Using a cordless drill...
User Instructions
Page 5
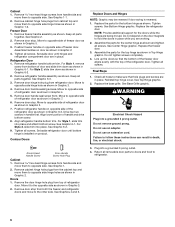
... they open -end wrench, flat 2" putty knife. Tube clamp B. Standard Doors Door Stop Screw Door Handle Sealing Screw Door Hinge Hole Plug Cabinet Hinge Hole Plug Flat-Head Handle Screw Round-Head Handle Screw Door Handle Seal Screw Front Shoulder Handle Screw 5 Failure to lift them free from doors. ■ If you are working. 4. IMPORTANT: ■ Unplug refrigerator or disconnect power. ■ Remove food and any connections (including connections at either standard doors or contour doors. Use the tube...
... they open -end wrench, flat 2" putty knife. Tube clamp B. Standard Doors Door Stop Screw Door Handle Sealing Screw Door Hinge Hole Plug Cabinet Hinge Hole Plug Flat-Head Handle Screw Round-Head Handle Screw Door Handle Seal Screw Front Shoulder Handle Screw 5 Failure to lift them free from doors. ■ If you are working. 4. IMPORTANT: ■ Unplug refrigerator or disconnect power. ■ Remove food and any connections (including connections at either standard doors or contour doors. Use the tube...
User Instructions
Page 6
... may be reversed if door swing is installed on opposite side of refrigerator door. Replace the parts for the center hinge as shown in Graphic 2. See Bottom Hinge graphic. Replace the refrigerator door. Do not depend on the door magnets to the other side. Replace the freezer door. 3. Assemble the parts for the doors while the hinges are working. 2. Do not tighten screws completely. 4. Final Steps 1. Check all parts together. Reinstall top hinge cover. Replace the...
... may be reversed if door swing is installed on opposite side of refrigerator door. Replace the parts for the center hinge as shown in Graphic 2. See Bottom Hinge graphic. Replace the refrigerator door. Do not depend on the door magnets to the other side. Replace the freezer door. 3. Assemble the parts for the doors while the hinges are working. 2. Do not tighten screws completely. 4. Final Steps 1. Check all parts together. Reinstall top hinge cover. Replace the...
User Instructions
Page 7
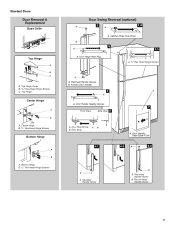
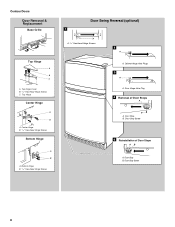
... Door Swing Reversal (optional) A 2 A 1-2 B A A. Door Handle Seal Screw Front 6-2 A 6-3 A A. Shoulder Handle Screw B A. Cabinet Hinge Hole Plugs 3 1-1 A 1 A. /5 16 " Hex-Head Hinge Screws A A. Door Stop Screw A B B. Top Hinge Cover B. /5 16 " Hex-Head Hinge Screws C. Center Hinge B. /5 16 " Hex-Head Hinge Screws Bottom Hinge A B A. Freezer Door Handle 4 A A. Door Stop 6-1 A. Flat-Head Handle Screw B. Round-Head Handle Screw 7 Door Hinge Hole Plug A. Flat-Head Handle Screws B. Door Handle Sealing Screws 7 Front View Side View...
... Door Swing Reversal (optional) A 2 A 1-2 B A A. Door Handle Seal Screw Front 6-2 A 6-3 A A. Shoulder Handle Screw B A. Cabinet Hinge Hole Plugs 3 1-1 A 1 A. /5 16 " Hex-Head Hinge Screws A A. Door Stop Screw A B B. Top Hinge Cover B. /5 16 " Hex-Head Hinge Screws C. Center Hinge B. /5 16 " Hex-Head Hinge Screws Bottom Hinge A B A. Freezer Door Handle 4 A A. Door Stop 6-1 A. Flat-Head Handle Screw B. Round-Head Handle Screw 7 Door Hinge Hole Plug A. Flat-Head Handle Screws B. Door Handle Sealing Screws 7 Front View Side View...
User Instructions
Page 8
Center Hinge B. 5/16" Hex-Head Hinge Screws Bottom Hinge A B A. Door Stop Screw 5 Reinstallation of Door Stops A B A. Door Stop Screw 8 Bottom Hinge B. 5/16" Hex-Head Hinge Screws Door Swing Reversal (optional) 1 A A. 5/16" Hex-Head Hinge Screws A 2 A A. Cabinet Hinge Hole Plugs 3 A A. Contour Doors Door Removal & Replacement Base Grille Top Hinge A B C A. Top Hinge Cover B. 5/16" Hex-Head Hinge Screws C. Door Stop B. Door Stop B. Top Hinge Center Hinge A B A. Door Hinge Hole Plug 4 Removal of Door Stops AB A.
Center Hinge B. 5/16" Hex-Head Hinge Screws Bottom Hinge A B A. Door Stop Screw 5 Reinstallation of Door Stops A B A. Door Stop Screw 8 Bottom Hinge B. 5/16" Hex-Head Hinge Screws Door Swing Reversal (optional) 1 A A. 5/16" Hex-Head Hinge Screws A 2 A A. Cabinet Hinge Hole Plugs 3 A A. Contour Doors Door Removal & Replacement Base Grille Top Hinge A B C A. Top Hinge Cover B. 5/16" Hex-Head Hinge Screws C. Door Stop B. Door Stop B. Top Hinge Center Hinge A B A. Door Hinge Hole Plug 4 Removal of Door Stops AB A.
User Instructions
Page 9
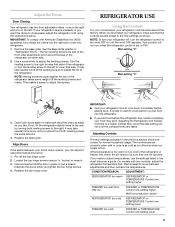
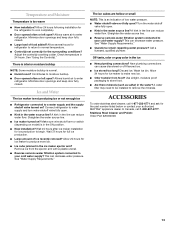
... to the mid-settings as a guide. If your refrigerator, make sure that side. When you first install your refrigerator seems unsteady or you like and when ice cream is as cold as you need to adjust the leveling screws. Replace the base grille. This makes it using the instructions below as shown. Open both leveling screws the same amount. 4. The controls are still preset to adjust the screws. Wait...
... to the mid-settings as a guide. If your refrigerator, make sure that side. When you first install your refrigerator seems unsteady or you like and when ice cream is as cold as you need to adjust the leveling screws. Replace the base grille. This makes it using the instructions below as shown. Open both leveling screws the same amount. 4. The controls are still preset to adjust the screws. Wait...
User Instructions
Page 10
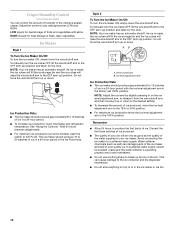
.... Ice level adjustment arm Ice Production Rate: ■ The ice maker should produce approximately 8 to 12 batches of ice in a 24-hour period. ■ To increase ice production, lower the freezer and refrigerator temperature. Avoid connecting the ice maker to the OFF (arm up ) position. Crisper Humidity Control (on some models) You can control the amount of humidity in the moisture-sealed crisper. Ice Maker Style 1 To Turn the Ice Maker On/Off: To turn the ice maker...
.... Ice level adjustment arm Ice Production Rate: ■ The ice maker should produce approximately 8 to 12 batches of ice in a 24-hour period. ■ To increase ice production, lower the freezer and refrigerator temperature. Avoid connecting the ice maker to the OFF (arm up ) position. Crisper Humidity Control (on some models) You can control the amount of humidity in the moisture-sealed crisper. Ice Maker Style 1 To Turn the Ice Maker On/Off: To turn the ice maker...

User Instructions
Page 11
... bulb of the same size, shape, and wattage. 1. REFRIGERATOR CARE Cleaning WARNING 3. Failure to eliminate odors. IMPORTANT: ■ Because air circulates between both sections about once a month to avoid water spots. You must thoroughly clean both sections to do so can result in the freezer (on exterior surfaces (doors and cabinet), plastic parts, interior and door liners or gaskets. Plug in refrigerator or reconnect power. ■ For stainless steel models, stainless...
... bulb of the same size, shape, and wattage. 1. REFRIGERATOR CARE Cleaning WARNING 3. Failure to eliminate odors. IMPORTANT: ■ Because air circulates between both sections about once a month to avoid water spots. You must thoroughly clean both sections to do so can result in the freezer (on exterior surfaces (doors and cabinet), plastic parts, interior and door liners or gaskets. Plug in refrigerator or reconnect power. ■ For stainless steel models, stainless...
User Instructions
Page 12
...; Water running/dripping - flow of refrigerant, movement of water lines, or from door. ■ Bin or shelf in the way? The door is opened often, or if the door has been left open ? Allow 24 hours following installation for the refrigerator to optimize performance. ■ Hissing/Rattling - Plug into the drain pan. NOTE: Adjusting the temperature control(s) to coldest setting will not cool the refrigerator more quickly. contraction/expansion of inside walls, especially during defrosting and water runs into...
...; Water running/dripping - flow of refrigerant, movement of water lines, or from door. ■ Bin or shelf in the way? The door is opened often, or if the door has been left open ? Allow 24 hours following installation for the refrigerator to optimize performance. ■ Hissing/Rattling - Plug into the drain pan. NOTE: Adjusting the temperature control(s) to coldest setting will not cool the refrigerator more quickly. contraction/expansion of inside walls, especially during defrosting and water runs into...
User Instructions
Page 13
...; Ice cube jammed in the water source line? This can decrease water pressure. Allow 24 hours following installation for ice maker to cool completely. ■ Door opened often or left open . ■ Kink in the ice maker ejector arm? There is interior moisture buildup NOTE: Some moisture buildup is not producing ice or not enough ice ■ Refrigerator connected to normal temperature. ■ Control(s) set correctly for the part number listed below or contact your cold water supply?
...; Ice cube jammed in the water source line? This can decrease water pressure. Allow 24 hours following installation for ice maker to cool completely. ■ Door opened often or left open . ■ Kink in the ice maker ejector arm? There is interior moisture buildup NOTE: Some moisture buildup is not producing ice or not enough ice ■ Refrigerator connected to normal temperature. ■ Control(s) set correctly for the part number listed below or contact your cold water supply?
User Instructions
Page 14
... inside wall of the refrigerator compartment. ITEMS EXCLUDED FROM WARRANTY This limited warranty does not cover: 1. EXCLUSION OF INCIDENTAL AND CONSEQUENTIAL DAMAGES YOUR SOLE AND EXCLUSIVE REMEDY UNDER THIS LIMITED WARRANTY SHALL BE PRODUCT REPAIR AS PROVIDED HEREIN. This warranty gives you specific legal rights, and you on major appliances with electrical or plumbing codes, or use your model number and serial number on the label, located...
... inside wall of the refrigerator compartment. ITEMS EXCLUDED FROM WARRANTY This limited warranty does not cover: 1. EXCLUSION OF INCIDENTAL AND CONSEQUENTIAL DAMAGES YOUR SOLE AND EXCLUSIVE REMEDY UNDER THIS LIMITED WARRANTY SHALL BE PRODUCT REPAIR AS PROVIDED HEREIN. This warranty gives you specific legal rights, and you on major appliances with electrical or plumbing codes, or use your model number and serial number on the label, located...
Parts Catalog
Page 2
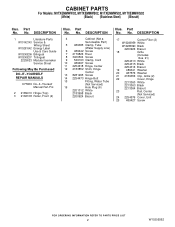
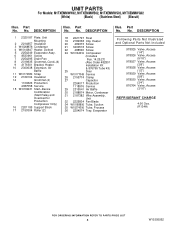
... 15 Fitting, Water Tube (Not Serviced) 16 Hole Plug (6) 2201012 White 2183998 Black 2200924 Biscuit Illus. No. No. DESCRIPTION 1 Literature Parts W10142143 Service & Wiring Sheet W10251542 Energy Label Use & Care Guide W10249206 Bilingual W10249207 Trilingual 2225623 Modular Icemaker Service Sheet Following May Be Purchased DO−IT−YOURSELF REPAIR MANUALS 677969 Do−It−Yourself Manual Ref./Frz. 2 2189410 Hinge (Top) 3 2166108 Roller, Front (2) Illus. Part No. Part No. DESCRIPTION...
... 15 Fitting, Water Tube (Not Serviced) 16 Hole Plug (6) 2201012 White 2183998 Black 2200924 Biscuit Illus. No. No. DESCRIPTION 1 Literature Parts W10142143 Service & Wiring Sheet W10251542 Energy Label Use & Care Guide W10249206 Bilingual W10249207 Trilingual 2225623 Modular Icemaker Service Sheet Following May Be Purchased DO−IT−YOURSELF REPAIR MANUALS 677969 Do−It−Yourself Manual Ref./Frz. 2 2189410 Hinge (Top) 3 2166108 Roller, Front (2) Illus. Part No. Part No. DESCRIPTION...
Parts Catalog
Page 6
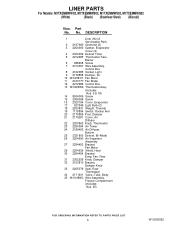
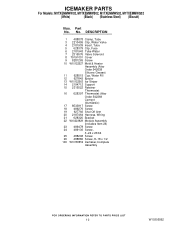
... Gasket, Evaporator Cover (2) 4 2304099 Defrost Timer 5 2212485 Thermostat Tube Barrier 6 488208 Screw 7 2310057 Wire Assembly, Control Box 8 2162085 Socket, Light 9 2179858 Damper, Air 10 W10208121 Fan Motor 11 2163777 Fan Blade 12 2212982 Control Box 13 W10225856 Thermostat Assy. (Includes Illus. 5 & 18) 14 8534009 Screw 15 2304099 Screw 16 2320194 Cover, Evaporator 17 527949 Light Bulb (2) 18 2200831 Weight, Thermal 19 1118894 Switch, Rocker Arm 20 2179859 Post, Damper 21 2176281 Cover, Air Diffuser...
... Gasket, Evaporator Cover (2) 4 2304099 Defrost Timer 5 2212485 Thermostat Tube Barrier 6 488208 Screw 7 2310057 Wire Assembly, Control Box 8 2162085 Socket, Light 9 2179858 Damper, Air 10 W10208121 Fan Motor 11 2163777 Fan Blade 12 2212982 Control Box 13 W10225856 Thermostat Assy. (Includes Illus. 5 & 18) 14 8534009 Screw 15 2304099 Screw 16 2320194 Cover, Evaporator 17 527949 Light Bulb (2) 18 2200831 Weight, Thermal 19 1118894 Switch, Rocker Arm 20 2179859 Post, Damper 21 2176281 Cover, Air Diffuser...
Parts Catalog
Page 8
... Screw 21 3400518 Screw 22 488500 Screw 24 W10164016 Compressor (Includes Illus. 14,25,27) (Also Order 482801 Installation Kit & 876765 Tube Kit) 25 Drier W10177049 Service 26 2155774 Clamp 27 Capacitor 2264017 Production 1118576 Service 29 2315541 Air Baffle 30 2188874 Motor, Condenser 31 2187382 Wire Assembly, Unit 32 2225834 Fan Blade 34 W10189806 Tube, Suction 35 W10274306 Tube, Process 36 2254574 Tray, Evaporator Following Parts Not...
... Screw 21 3400518 Screw 22 488500 Screw 24 W10164016 Compressor (Includes Illus. 14,25,27) (Also Order 482801 Installation Kit & 876765 Tube Kit) 25 Drier W10177049 Service 26 2155774 Clamp 27 Capacitor 2264017 Production 1118576 Service 29 2315541 Air Baffle 30 2188874 Motor, Condenser 31 2187382 Wire Assembly, Unit 32 2225834 Fan Blade 34 W10189806 Tube, Suction 35 W10274306 Tube, Process 36 2254574 Tray, Evaporator Following Parts Not...
Parts Catalog
Page 10
... Tube Water 7 2315576 Valve Solenoid 8 79191001 Cover 9 8281265 Screw 10 W10122527 Mold & Heater Assembly (Also Order 542638 Silicone Grease) 11 628515 Cup, Water Fill 12 627843 Ejector 13 W10122563 Ice Striper 14 2194712 Support 15 2315522 Retainer Thermostat 16 628397 Thermostat (Also Order 542369 Cement Alumilastic) 17 8533917 Screw 18 489276 Screw 19 627792 Shut Off Arm 20 2187464 Harness, Wiring 21 628320...
... Tube Water 7 2315576 Valve Solenoid 8 79191001 Cover 9 8281265 Screw 10 W10122527 Mold & Heater Assembly (Also Order 542638 Silicone Grease) 11 628515 Cup, Water Fill 12 627843 Ejector 13 W10122563 Ice Striper 14 2194712 Support 15 2315522 Retainer Thermostat 16 628397 Thermostat (Also Order 542369 Cement Alumilastic) 17 8533917 Screw 18 489276 Screw 19 627792 Shut Off Arm 20 2187464 Harness, Wiring 21 628320...
Parts Catalog
Page 11
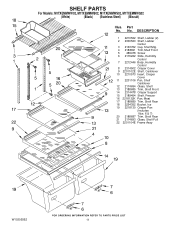
... Body, Humidity Control 8 2314502 Crisper Cover 9 2201102E Shelf, Cantilever 10 2210573 Insert, Crisper Cover 11 2201106 Pan, Shelf Cantilever 12 2174694 Glass, Shelf 13 2188685 Trim, Shelf Front 14 2314478 Crisper Support 15 2189454 Shelf, Freezer 16 2218132K Pan, Meat 17 2188689 Trim, Shelf Rear 18 2254352 Bucket, Ice 19 2218130 Crisper Pan (Includes Illus. 6 & 7) 20 2188687 Trim, Shelf Rear 21 2174693 Glass, Shelf Full 22 2201104E Frame Assy W10305562 11 SHELF PARTS For Models: M1TXEMMWW02, M1TXEMMWB02...
... Body, Humidity Control 8 2314502 Crisper Cover 9 2201102E Shelf, Cantilever 10 2210573 Insert, Crisper Cover 11 2201106 Pan, Shelf Cantilever 12 2174694 Glass, Shelf 13 2188685 Trim, Shelf Front 14 2314478 Crisper Support 15 2189454 Shelf, Freezer 16 2218132K Pan, Meat 17 2188689 Trim, Shelf Rear 18 2254352 Bucket, Ice 19 2218130 Crisper Pan (Includes Illus. 6 & 7) 20 2188687 Trim, Shelf Rear 21 2174693 Glass, Shelf Full 22 2201104E Frame Assy W10305562 11 SHELF PARTS For Models: M1TXEMMWW02, M1TXEMMWB02...
Parts Catalog
Page 12
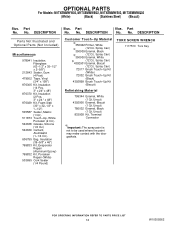
...") 799833 Kit, Evaporator Repair (Aluminum Epoxy) 799832 Kit, Porcelain Repair (White) 503695 Cork Sealer (1/4 Pound) Illus. OPTIONAL PARTS For Models: M1TXEMMWW02, M1TXEMMWB02, M1TXEMMWS02, M1TXEMMWQ02 (White) (Black) (Stainless Steel) (Biscuit) Illus. Part No. ...Kit (White) 72032 Brush Touch−Up Kit (Black) 4392899 Brush Touch−Up Kit (Biscuit) Refinishing Material 799344 Enamel, White (1 Qt. Uncut) 833938 Kit, Terminal Connector TORX SCREW WRENCH 1117510 Torx Key Important: The spray paint is not to be used where the paint may make contact with the door gaskets...
...") 799833 Kit, Evaporator Repair (Aluminum Epoxy) 799832 Kit, Porcelain Repair (White) 503695 Cork Sealer (1/4 Pound) Illus. OPTIONAL PARTS For Models: M1TXEMMWW02, M1TXEMMWB02, M1TXEMMWS02, M1TXEMMWQ02 (White) (Black) (Stainless Steel) (Biscuit) Illus. Part No. ...Kit (White) 72032 Brush Touch−Up Kit (Black) 4392899 Brush Touch−Up Kit (Biscuit) Refinishing Material 799344 Enamel, White (1 Qt. Uncut) 833938 Kit, Terminal Connector TORX SCREW WRENCH 1117510 Torx Key Important: The spray paint is not to be used where the paint may make contact with the door gaskets...


