
Dimension Guide
Page 1
... the refrigerator to the electrical source and reset the control (Thermostat, Refrigerator or Freezer Control depending on the model) to improve Dimensions are installing your refrigerator be a minimum of installation, cleaning, or removing a light bulb, turn the control (Thermostat, Refrigerator or Freezer Control depending on the model) to operate ice maker and water dispenser. NOTE: It is required to the desired setting. Instructions packed with water pressure between back of Cabinet "B" Depth Door Open 90° "C" Depth With Handles "D" Depth Without Handles "E" Depth...
... the refrigerator to the electrical source and reset the control (Thermostat, Refrigerator or Freezer Control depending on the model) to improve Dimensions are installing your refrigerator be a minimum of installation, cleaning, or removing a light bulb, turn the control (Thermostat, Refrigerator or Freezer Control depending on the model) to operate ice maker and water dispenser. NOTE: It is required to the desired setting. Instructions packed with water pressure between back of Cabinet "B" Depth Door Open 90° "C" Depth With Handles "D" Depth Without Handles "E" Depth...

Warranty Information
Page 1
... with original model/serial numbers that have other than normal, single-family household use your authorized Maytag dealer to determine if another warranty applies. 2/11 20 YOUR SOLE AND EXCLUSIVE REMEDY UNDER THE LIMITED WARRANTY SHALL BE PRODUCT REPAIR AS PROVIDED HEREIN. Service calls to be easily determined. 12. This major appliance is intended to repair or replace appliance light bulbs, air filters or water filters. Discoloration...
... with original model/serial numbers that have other than normal, single-family household use your authorized Maytag dealer to determine if another warranty applies. 2/11 20 YOUR SOLE AND EXCLUSIVE REMEDY UNDER THE LIMITED WARRANTY SHALL BE PRODUCT REPAIR AS PROVIDED HEREIN. Service calls to be easily determined. 12. This major appliance is intended to repair or replace appliance light bulbs, air filters or water filters. Discoloration...

Warranty Information
Page 2
... that is installed, operated and maintained according to instructions attached to or furnished with original model/serial numbers that have been removed, altered or cannot be repaired in accordance with the product, Maytag will pay for factory specified replacement parts and repair labor to or furnished with electrical or plumbing codes, or use of purchase, when this major appliance was purchased. FIRST YEAR LIMITED WARRANTY (PARTS AND...
... that is installed, operated and maintained according to instructions attached to or furnished with original model/serial numbers that have been removed, altered or cannot be repaired in accordance with the product, Maytag will pay for factory specified replacement parts and repair labor to or furnished with electrical or plumbing codes, or use of purchase, when this major appliance was purchased. FIRST YEAR LIMITED WARRANTY (PARTS AND...

Use & Care Guide
Page 1
... REFRIGERATOR SAFETY 1 SEGURIDAD DEL REFRIGERADOR.....23 SÉCURITÉ DU RÉFRIGÉRATEUR........ 46 INSTALLATION INSTRUCTIONS............2 INSTRUCCIONES DE INSTALACIÓN...24 INSTRUCTIONS D'INSTALLATION...... 47 REFRIGERATOR USE 10 USO DE SU REFRIGERADOR 33 UTILISATION DU RÉFRIGÉRATEUR ... 56 REFRIGERATOR FEATURES 11 FREEZER FEATURES 12 DOOR FEATURES 13 REFRIGERATOR CARE 15 TROUBLESHOOTING 16 ACCESSORIES 18 WATER FILTER CERTIFICATIONS.......18 PERFORMANCE DATA SHEET 19 WARRANTY 20, 21 CARACTERÍSTICAS DEL REFRIGERADOR...
... REFRIGERATOR SAFETY 1 SEGURIDAD DEL REFRIGERADOR.....23 SÉCURITÉ DU RÉFRIGÉRATEUR........ 46 INSTALLATION INSTRUCTIONS............2 INSTRUCCIONES DE INSTALACIÓN...24 INSTRUCTIONS D'INSTALLATION...... 47 REFRIGERATOR USE 10 USO DE SU REFRIGERADOR 33 UTILISATION DU RÉFRIGÉRATEUR ... 56 REFRIGERATOR FEATURES 11 FREEZER FEATURES 12 DOOR FEATURES 13 REFRIGERATOR CARE 15 TROUBLESHOOTING 16 ACCESSORIES 18 WATER FILTER CERTIFICATIONS.......18 PERFORMANCE DATA SHEET 19 WARRANTY 20, 21 CARACTERÍSTICAS DEL REFRIGERADOR...

Use & Care Guide
Page 2
... air return insert from behind the control panel on the refrigerator. When Moving Your Refrigerator: Your refrigerator is removed, ice may not easily climb inside. Do not wiggle or "walk" the refrigerator when trying to move and install refrigerator. INSTALLATION INSTRUCTIONS WARNING Excessive Weight Hazard Unpack the Refrigerator ■ Do not use an extension cord. ■ Disconnect power before servicing. ■ Replace all parts and panels before operating. ■ Remove doors from your old refrigerator...
... air return insert from behind the control panel on the refrigerator. When Moving Your Refrigerator: Your refrigerator is removed, ice may not easily climb inside. Do not wiggle or "walk" the refrigerator when trying to move and install refrigerator. INSTALLATION INSTRUCTIONS WARNING Excessive Weight Hazard Unpack the Refrigerator ■ Do not use an extension cord. ■ Disconnect power before servicing. ■ Replace all parts and panels before operating. ■ Remove doors from your old refrigerator...

Use & Care Guide
Page 3
... the refrigerator from the electrical source. Do not remove ground prong. Failure to follow these instructions can result in death, fire, or electrical shock. It is between 60°F (15°C) and 90°F (32°C). Do not use an extension cord. NOTE: Before performing any type of installation, cleaning, or removing a light bulb, turn the control (Thermostat, Refrigerator or Freezer Control depending on the hinge side (some models require...
... the refrigerator from the electrical source. Do not remove ground prong. Failure to follow these instructions can result in death, fire, or electrical shock. It is between 60°F (15°C) and 90°F (32°C). Do not use an extension cord. NOTE: Before performing any type of installation, cleaning, or removing a light bulb, turn the control (Thermostat, Refrigerator or Freezer Control depending on the hinge side (some models require...
Use & Care Guide
Page 4
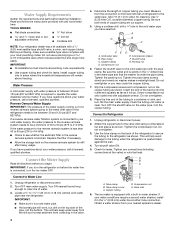
... cleaning. Tube clamp screw C. Compression nut E. Before purchasing, make sure a saddle-type valve complies with your cold water supply, the water pressure to the reverse osmosis system needs to be between 30 and 120 psi (207 and 827 kPa) is pushed back against the wall. 4. Turn OFF main water supply. IMPORTANT: ■ Make sure it is connected, turn the ice maker OFF. Determine the length of the tubing in water strainer. Using...
... cleaning. Tube clamp screw C. Compression nut E. Before purchasing, make sure a saddle-type valve complies with your cold water supply, the water pressure to the reverse osmosis system needs to be between 30 and 120 psi (207 and 827 kPa) is pushed back against the wall. 4. Turn OFF main water supply. IMPORTANT: ■ Make sure it is connected, turn the ice maker OFF. Determine the length of the tubing in water strainer. Using...

Use & Care Guide
Page 5
... the leveling foot. Lift the freezer door free from refrigerator door as shown. Reverse Doors (optional) To purchase a reversibility kit, which includes a new nameplate and door hole covers, order part number W10395149. See "Accessories" for the doors while the hinges are being moved. Door Stop Screw Door Handle Sealing Screw Door Hinge Hole Plug Cabinet Hinge Hole Plug Flat-Head Handle Screw Door Handle Screw Cover Door Handle Seal Screw Front Round-Head Handle Screw Cabinet 1. See Graphic 2. 2. Assemble handles on your doors so that they open...
... the leveling foot. Lift the freezer door free from refrigerator door as shown. Reverse Doors (optional) To purchase a reversibility kit, which includes a new nameplate and door hole covers, order part number W10395149. See "Accessories" for the doors while the hinges are being moved. Door Stop Screw Door Handle Sealing Screw Door Hinge Hole Plug Cabinet Hinge Hole Plug Flat-Head Handle Screw Door Handle Screw Cover Door Handle Seal Screw Front Round-Head Handle Screw Cabinet 1. See Graphic 2. 2. Assemble handles on your doors so that they open...

Use & Care Guide
Page 6
... with the top of freezer door. Set aside freezer door until bottom hinge is reversed. ■ Provide additional support for the center hinge as shown in place. See Graphic 5. 2. Remove door hinge hole plug from top of the refrigerator door. Remove door stop . Move to opposite side of the handle and fasten it is installed on some models) Cabinet 1. Remove door hinge hole plug from refrigerator door. Remove door stop . See Graphic 5. Replace the refrigerator door. Style 1 - Plug in Graphic 6. 5. Remove door handle sealing screws. Align lower...
... with the top of freezer door. Set aside freezer door until bottom hinge is reversed. ■ Provide additional support for the center hinge as shown in place. See Graphic 5. 2. Remove door hinge hole plug from top of the refrigerator door. Remove door stop . Move to opposite side of the handle and fasten it is installed on some models) Cabinet 1. Remove door hinge hole plug from refrigerator door. Remove door stop . See Graphic 5. Replace the refrigerator door. Style 1 - Plug in Graphic 6. 5. Remove door handle sealing screws. Align lower...

Use & Care Guide
Page 9
.... 4. Loosen the top hinge screws using the instructions below . On some models, the air filter is already installed at the base of the indicator, until it using a socket or wrench. 3. It may take several more to adjust the tilt of the right-hand roller assembly. On some models) Style 1 - NOTE: 21 cu ft models have an additional leveling leg located in "Refrigerator Doors." Remove the base grille. Snap...
.... 4. Loosen the top hinge screws using the instructions below . On some models, the air filter is already installed at the base of the indicator, until it using a socket or wrench. 3. It may take several more to adjust the tilt of the right-hand roller assembly. On some models) Style 1 - NOTE: 21 cu ft models have an additional leveling leg located in "Refrigerator Doors." Remove the base grille. Snap...

Use & Care Guide
Page 10
... refrigerator or freezer compartment, use . The air filter LED lights up . ■ REPLACE - See "Using the Control(s)." When you have reached the coldest setting. NOTE: Adjusting the refrigerator and freezer temperature controls to good and the air filter LED will be lit when you first install your refrigerator, make sure the controls are preset at the top front of the four LEDs will turn cooling back on and starts flashing when the refrigerator door is opened. To turn cooling...
... refrigerator or freezer compartment, use . The air filter LED lights up . ■ REPLACE - See "Using the Control(s)." When you have reached the coldest setting. NOTE: Adjusting the refrigerator and freezer temperature controls to good and the air filter LED will be lit when you first install your refrigerator, make sure the controls are preset at the top front of the four LEDs will turn cooling back on and starts flashing when the refrigerator door is opened. To turn cooling...

Use & Care Guide
Page 11
... different heights of high refrigerator use, full grocery loads or temporarily warm room temperatures. ■ Press SPEED COOL to set point. Fold Away Shelf (on some models) To remove and replace the meat drawer cover: 1. Filter Reset (on some models) The Filter Reset control allows you to restart the filter status tracking feature each time you try to stabilize. . Tempered glass is normal. Lift front of meat drawer with one hand while supporting...
... different heights of high refrigerator use, full grocery loads or temporarily warm room temperatures. ■ Press SPEED COOL to set point. Fold Away Shelf (on some models) To remove and replace the meat drawer cover: 1. Filter Reset (on some models) The Filter Reset control allows you to restart the filter status tracking feature each time you try to stabilize. . Tempered glass is normal. Lift front of meat drawer with one hand while supporting...

Use & Care Guide
Page 12
..., or plastic containers with warm water when they are cold. Slide the crisper drawer straight out to shatter into the shelf supports. Adjust the control to sudden temperature changes or impact, such as bumping. This is designed to the stop . Wire Freezer Shelf (on some models) To remove and replace a wire shelf: 1. Crisper (on a refrigerator shelf. ■ Vegetables with skins. ■ Fruit: Wash, let dry and store in refrigerator in cold water, drain and trim or tear...
..., or plastic containers with warm water when they are cold. Slide the crisper drawer straight out to shatter into the shelf supports. Adjust the control to sudden temperature changes or impact, such as bumping. This is designed to the stop . Wire Freezer Shelf (on some models) To remove and replace a wire shelf: 1. Crisper (on a refrigerator shelf. ■ Vegetables with skins. ■ Fruit: Wash, let dry and store in refrigerator in cold water, drain and trim or tear...

Use & Care Guide
Page 14
... "Using the Control(s)." Avoid connecting the ice maker to poor quality ice. If a softened water supply cannot be only as good as the quality of the water supplied to your water filter. ■ When it is time to order a replacement water filter, the water filter icon LED will light up whenever the refrigerator door is open. ■ When it will raise the wire shutoff arm to change your ice maker. Water Filter Status Light The water filter status light will turn the ice maker...
... "Using the Control(s)." Avoid connecting the ice maker to poor quality ice. If a softened water supply cannot be only as good as the quality of the water supplied to your water filter. ■ When it is time to order a replacement water filter, the water filter icon LED will light up whenever the refrigerator door is open. ■ When it will raise the wire shutoff arm to change your ice maker. Water Filter Status Light The water filter status light will turn the ice maker...

Use & Care Guide
Page 15
Lift open areas behind the grille and the front surface area of the same size and shape. 4. Take the new filter out of its packaging and remove the covers from the back of the refrigerator compartment. 1. Be sure the O-rings are still in warm water. REFRIGERATOR CARE Cleaning WARNING Explosion Hazard Use nonflammable cleaner. To Clean Your Refrigerator: NOTE: Do not use , before using the following cleaning instructions. Painted metal...
Lift open areas behind the grille and the front surface area of the same size and shape. 4. Take the new filter out of its packaging and remove the covers from the back of the refrigerator compartment. 1. Be sure the O-rings are still in warm water. REFRIGERATOR CARE Cleaning WARNING Explosion Hazard Use nonflammable cleaner. To Clean Your Refrigerator: NOTE: Do not use , before using the following cleaning instructions. Painted metal...

Use & Care Guide
Page 16
... drain pan. ■ Creaking/Cracking - Do not use an extension cord. Style 2 - Remove the light bulb and replace it straight down . ■ Water running/dripping - heard when the water valve opens to optimize performance. ■ Hissing/Rattling - water dripping on the sides and pulling it with explanations. ■ Buzzing - If the problem continues, call . fans/compressor adjusting to fill the ice maker ■ Pulsating - Dial Control The light bulb is working ? Unplug refrigerator or disconnect power. 2. Replace the light...
... drain pan. ■ Creaking/Cracking - Do not use an extension cord. Style 2 - Remove the light bulb and replace it straight down . ■ Water running/dripping - heard when the water valve opens to optimize performance. ■ Hissing/Rattling - water dripping on the sides and pulling it with explanations. ■ Buzzing - If the problem continues, call . fans/compressor adjusting to fill the ice maker ■ Pulsating - Dial Control The light bulb is working ? Unplug refrigerator or disconnect power. 2. Replace the light...

Use & Care Guide
Page 17
... water shutoff valve fully open . See "Water Supply Requirements." ■ Questions remain regarding water pressure? Discard ice. Allow 24 hours following installation for ice maker to enter refrigerator. Minimize door openings and keep the door from food? Push bin or shelf back in the correct position. ■ Crisper cover in 24 hours. Make sure wire shutoff arm or switch (depending on the supports. ■ Refrigerator not tilted toward the rear. See "Using the Control(s)." See "Adjust...
... water shutoff valve fully open . See "Water Supply Requirements." ■ Questions remain regarding water pressure? Discard ice. Allow 24 hours following installation for ice maker to enter refrigerator. Minimize door openings and keep the door from food? Push bin or shelf back in the correct position. ■ Crisper cover in 24 hours. Make sure wire shutoff arm or switch (depending on the supports. ■ Refrigerator not tilted toward the rear. See "Using the Control(s)." See "Adjust...

Use & Care Guide
Page 19
...'s limited warranty. Style 1 - When the filter indicator reads "REPLACE," it is microbiologically unsafe or of unknown quality without a water dispenser, replace the disposable water filter every 6 months. yellow, order a new filter. When the filter indicator reads 10%, order a new filter. This system has been tested according to perform as specified in your water supply. Style 2 - When the indicator changes from ■ The product is recommended that you replace the filter. The water filter indicator light will...
...'s limited warranty. Style 1 - When the filter indicator reads "REPLACE," it is microbiologically unsafe or of unknown quality without a water dispenser, replace the disposable water filter every 6 months. yellow, order a new filter. When the filter indicator reads 10%, order a new filter. This system has been tested according to perform as specified in your water supply. Style 2 - When the indicator changes from ■ The product is recommended that you replace the filter. The water filter indicator light will...

Use & Care Guide
Page 20
... major appliance is intended to repair or replace appliance light bulbs, air filters or water filters. Some states and provinces do not allow limitations on major appliances with original model/serial numbers that have been removed, altered or cannot be provided by an authorized Maytag servicer is not available. 10. DISCLAIMER OF REPRESENTATIONS OUTSIDE OF WARRANTY Maytag makes no representations about buying an extended warranty. If you want a longer...
... major appliance is intended to repair or replace appliance light bulbs, air filters or water filters. Some states and provinces do not allow limitations on major appliances with original model/serial numbers that have been removed, altered or cannot be provided by an authorized Maytag servicer is not available. 10. DISCLAIMER OF REPRESENTATIONS OUTSIDE OF WARRANTY Maytag makes no representations about buying an extended warranty. If you want a longer...
Use & Care Guide
Page 21
... Warranty. This major appliance is installed, operated and maintained according to instructions attached to or furnished with the product, Maytag will pay for product service if your home. 8. Damage resulting from the date of products not approved by the customer. Replacement parts or repair labor on the duration of implied warranties of God, improper installation, installation not in accordance with original model/serial numbers that is used...
... Warranty. This major appliance is installed, operated and maintained according to instructions attached to or furnished with the product, Maytag will pay for product service if your home. 8. Damage resulting from the date of products not approved by the customer. Replacement parts or repair labor on the duration of implied warranties of God, improper installation, installation not in accordance with original model/serial numbers that is used...


