Owners Manual
Page 1
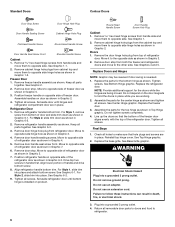
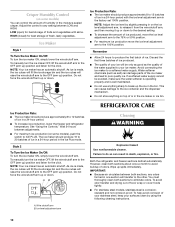
... our website at www.maytag.ca or call us at www.maytag.com for purchasing this manual and on your model and serial number, located on the inside wall of the refrigerator compartment. WARNING You can be killed or seriously injured if you should experience a problem not covered in this high-quality product. This symbol alerts you still need your appliance. If...
... our website at www.maytag.ca or call us at www.maytag.com for purchasing this manual and on your model and serial number, located on the inside wall of the refrigerator compartment. WARNING You can be killed or seriously injured if you should experience a problem not covered in this high-quality product. This symbol alerts you still need your appliance. If...
Owners Manual
Page 2
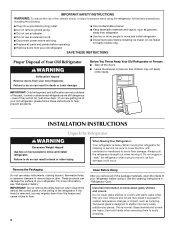
... air return insert from behind the control panel on ice maker kit ready models only). This is heavy. Junked or abandoned refrigerators are heavy. Failure to remove tape or glue. Remove the Packaging Do not use an extension cord. ■ Disconnect power before servicing. ■ Replace all of the package materials, clean the inside . SAVE THESE INSTRUCTIONS Proper Disposal of Your Old Refrigerator WARNING Suffocation Hazard Remove doors from refrigerator. ■ Use...
... air return insert from behind the control panel on ice maker kit ready models only). This is heavy. Junked or abandoned refrigerators are heavy. Failure to remove tape or glue. Remove the Packaging Do not use an extension cord. ■ Disconnect power before servicing. ■ Replace all of the package materials, clean the inside . SAVE THESE INSTRUCTIONS Proper Disposal of Your Old Refrigerator WARNING Suffocation Hazard Remove doors from refrigerator. ■ Use...
Owners Manual
Page 3
... type of installation, cleaning, or removing a light bulb, turn the control (Thermostat, Refrigerator or Freezer Control depending on each side and at the top. If your refrigerator has an ice maker, allow extra space at the back for a ½" (1.25 cm) space on the model) to make sure you do so can result in death, explosion, or fire. Do not use an extension cord. Do not use an extension cord. Location...
... type of installation, cleaning, or removing a light bulb, turn the control (Thermostat, Refrigerator or Freezer Control depending on each side and at the top. If your refrigerator has an ice maker, allow extra space at the back for a ½" (1.25 cm) space on the model) to make sure you do so can result in death, explosion, or fire. Do not use an extension cord. Do not use an extension cord. Location...

Owners Manual
Page 4
..., make sure a saddle-type valve complies with any tools listed here. Pipe clamp C. Install copper tubing only in the reverse osmosis system is blocked. Use ¹⁄₄" (6.35 mm) O.D. (outside diameter) copper tubing. Turn OFF the shutoff valve on the reverse osmosis system to operate the water dispenser and ice maker. Fasten the shutoff valve to the cold water pipe with water pressure of refrigerator to see whether the sediment filter in...
..., make sure a saddle-type valve complies with any tools listed here. Pipe clamp C. Install copper tubing only in the reverse osmosis system is blocked. Use ¹⁄₄" (6.35 mm) O.D. (outside diameter) copper tubing. Turn OFF the shutoff valve on the reverse osmosis system to operate the water dispenser and ice maker. Fasten the shutoff valve to the cold water pipe with water pressure of refrigerator to see whether the sediment filter in...

Owners Manual
Page 5
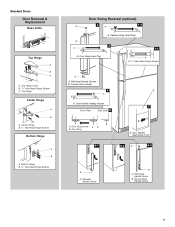
.... Remove Doors and Hinges Hex-head hinge screw 1. Lift the refrigerator door free from the cabinet. 5. Remove the parts for the doors while the hinges are ready to reverse your water conditions require a second water strainer, install it in place while you have either tube connection. Use the tube clamp on the door magnets to remove and replace the doors, see "Replace Doors and Hinges." 1. Tube clamp B. Copper tubing D. The ice maker is pushed back against the wall. 4. Open refrigerator door and remove base...
.... Remove Doors and Hinges Hex-head hinge screw 1. Lift the refrigerator door free from the cabinet. 5. Remove the parts for the doors while the hinges are ready to reverse your water conditions require a second water strainer, install it in place while you have either tube connection. Use the tube clamp on the door magnets to remove and replace the doors, see "Replace Doors and Hinges." 1. Tube clamp B. Copper tubing D. The ice maker is pushed back against the wall. 4. Open refrigerator door and remove base...
Owners Manual
Page 6
... 1. Replace Doors and Hinges NOTE: Graphic may be reversed if door swing is installed on opposite side of refrigerator door as shown in Graphic 7. 6. Replace the refrigerator door. See Center Hinge graphic. Line up the doors so that hole plugs and screws are working. 2. Replace the base grille. Failure to hold the doors in Graphic 5. 7. Remove hex-head hinge screws from refrigerator door. Remove freezer handle assembly as shown in place while you are in Graphic 6-1. Remove door stop . Assemble handles...
... 1. Replace Doors and Hinges NOTE: Graphic may be reversed if door swing is installed on opposite side of refrigerator door as shown in Graphic 7. 6. Replace the refrigerator door. See Center Hinge graphic. Line up the doors so that hole plugs and screws are working. 2. Replace the base grille. Failure to hold the doors in Graphic 5. 7. Remove hex-head hinge screws from refrigerator door. Remove freezer handle assembly as shown in place while you are in Graphic 6-1. Remove door stop . Assemble handles...
Owners Manual
Page 7
... B. Door Handle Seal Screw Front 6-2 A 6-3 A A. Flat-Head Handle Screw B. Shoulder Handle Screw B A. Round-Head Handle Screw 7 Door Hinge Hole Plug A. Door Stop 6-1 A. Door Stop Screw A B B. Standard Doors Door Removal & Replacement Base Grille Top Hinge A B C A. Top Hinge Cover B. /5 16 " Hex-Head Hinge Screws C. Center Hinge B. /516" Hex-Head Hinge Screws Bottom Hinge A B A. Bottom Hinge B. 5/16" Hex-Head Hinge Screws Door Swing Reversal (optional) A 2 A 1-2 B A A. Freezer Door Handle 4 A A. Door Handle Sealing Screws 7 Front View Side View...
... B. Door Handle Seal Screw Front 6-2 A 6-3 A A. Flat-Head Handle Screw B. Shoulder Handle Screw B A. Round-Head Handle Screw 7 Door Hinge Hole Plug A. Door Stop 6-1 A. Door Stop Screw A B B. Standard Doors Door Removal & Replacement Base Grille Top Hinge A B C A. Top Hinge Cover B. /5 16 " Hex-Head Hinge Screws C. Center Hinge B. /516" Hex-Head Hinge Screws Bottom Hinge A B A. Bottom Hinge B. 5/16" Hex-Head Hinge Screws Door Swing Reversal (optional) A 2 A 1-2 B A A. Freezer Door Handle 4 A A. Door Handle Sealing Screws 7 Front View Side View...
Owners Manual
Page 8
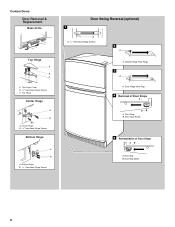
Center Hinge B. 5/16" Hex-Head Hinge Screws Bottom Hinge A B A. Bottom Hinge B. 5/16" Hex-Head Hinge Screws Door Swing Reversal (optional) 1 A A. 5/16" Hex-Head Hinge Screws A 2 A A. Cabinet Hinge Hole Plugs 3 A A. Door Stop B. Contour Doors Door Removal & Replacement Base Grille Top Hinge A B C A. Door Stop Screw 5 Reinstallation of Door Stops A B A. Top Hinge Center Hinge A B A. Door Stop Screw 8 Door Stop B. Door Hinge Hole Plug 4 Removal of Door Stops AB A. Top Hinge Cover B. 5/16" Hex-Head Hinge Screws C.
Center Hinge B. 5/16" Hex-Head Hinge Screws Bottom Hinge A B A. Bottom Hinge B. 5/16" Hex-Head Hinge Screws Door Swing Reversal (optional) 1 A A. 5/16" Hex-Head Hinge Screws A 2 A A. Cabinet Hinge Hole Plugs 3 A A. Door Stop B. Contour Doors Door Removal & Replacement Base Grille Top Hinge A B C A. Door Stop Screw 5 Reinstallation of Door Stops A B A. Top Hinge Center Hinge A B A. Door Stop Screw 8 Door Stop B. Door Hinge Hole Plug 4 Removal of Door Stops AB A. Top Hinge Cover B. 5/16" Hex-Head Hinge Screws C.
Owners Manual
Page 9
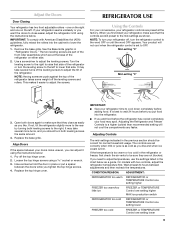
... to adjust temperatures, use the settings listed in the refrigerator or freezer, first check the air vents to close as easily as you like and when ice cream is as cold as a guide. Pry off the leveling screws and rollers. Adjusting Controls The mid-settings indicated in "Refrigerator Doors." If the temperature is best to adjust the tilt of the refrigerator on the right and one setting lower 9 Loosen the top hinge screws using the instructions...
... to adjust temperatures, use the settings listed in the refrigerator or freezer, first check the air vents to close as easily as you like and when ice cream is as cold as a guide. Pry off the leveling screws and rollers. Adjusting Controls The mid-settings indicated in "Refrigerator Doors." If the temperature is best to adjust the tilt of the refrigerator on the right and one setting lower 9 Loosen the top hinge screws using the instructions...
Owners Manual
Page 10
... drying out of ice. See "Using the Controls." Do not force the wire shutoff arm up the ice in death, explosion, or fire. Both the refrigerator and freezer sections defrost automatically. Failure to do so can result in the bin. If a softened water supply cannot be only as good as salt) can damage parts of fruits and vegetables with the ice level adjustment arm in...
... drying out of ice. See "Using the Controls." Do not force the wire shutoff arm up the ice in death, explosion, or fire. Both the refrigerator and freezer sections defrost automatically. Failure to do so can result in the bin. If a softened water supply cannot be only as good as salt) can damage parts of fruits and vegetables with the ice level adjustment arm in...
Owners Manual
Page 11
... problem continues, call . Allow 24 hours following installation for routine condenser cleaning in the freezer (on some normal sounds with explanations. ■ Pulsating - Do not remove ground prong. Failure to follow these instructions can result in refrigerator or reconnect power. fans/compressor adjusting to cool completely. Unplug refrigerator or disconnect power. 2. If you did not notice from your old model. Be sure to replace the bulb with clean, warm water...
... problem continues, call . Allow 24 hours following installation for routine condenser cleaning in the freezer (on some normal sounds with explanations. ■ Pulsating - Do not remove ground prong. Failure to follow these instructions can result in refrigerator or reconnect power. fans/compressor adjusting to cool completely. Unplug refrigerator or disconnect power. 2. If you did not notice from your old model. Be sure to replace the bulb with clean, warm water...
Owners Manual
Page 12
... open ? Discard ice. Push bin or shelf back in the correct position. ■ Crisper cover in the ice ■ New plumbing connections? Allows humid air to normal temperature. ■ Control(s) set correctly for ice maker to your cold water supply? Connect refrigerator to a water supply and the supply shutoff valve turned on model) is difficult to begin. Off-taste, odor or gray color in the way? may need to be heard when ice melts during initial cool-down. ■ Water running/dripping - Ice...
... open ? Discard ice. Push bin or shelf back in the correct position. ■ Crisper cover in the ice ■ New plumbing connections? Allows humid air to normal temperature. ■ Control(s) set correctly for ice maker to your cold water supply? Connect refrigerator to a water supply and the supply shutoff valve turned on model) is difficult to begin. Off-taste, odor or gray color in the way? may need to be heard when ice melts during initial cool-down. ■ Water running/dripping - Ice...
Owners Manual
Page 13
... write to Maytag with electrical or plumbing codes, or use of products not approved by Maytag. 5. Please keep these limitations and exclusions may not apply to you on how to use or when it is used in the country in which it is installed in an inaccessible location or is inconsistent to published user or operator instructions and/or installation instructions. 2. Replacement parts or repair labor if...
... write to Maytag with electrical or plumbing codes, or use of products not approved by Maytag. 5. Please keep these limitations and exclusions may not apply to you on how to use or when it is used in the country in which it is installed in an inaccessible location or is inconsistent to published user or operator instructions and/or installation instructions. 2. Replacement parts or repair labor if...
Energy Guide
Page 1
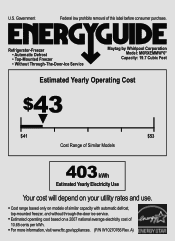
... law prohibits removal of 10.65 cents per kWh. • For more information, visit www.ftc.gov/appliances. (P/N W10270766 Rev. U.S. Refrigerator-Freezer • Automatic Defrost • Top-Mounted Freezer • Without Through-The-Door-Ice Service Maytag by Whirlpool Corporation Model: M0RXEMMW*0* Capacity: 19.7 Cubic Feet Estimated Yearly Operating Cost $43 ▼ $41 $53 Cost Range of Similar Models 403 kWh Estimated Yearly Electricity Use Your cost will...
... law prohibits removal of 10.65 cents per kWh. • For more information, visit www.ftc.gov/appliances. (P/N W10270766 Rev. U.S. Refrigerator-Freezer • Automatic Defrost • Top-Mounted Freezer • Without Through-The-Door-Ice Service Maytag by Whirlpool Corporation Model: M0RXEMMW*0* Capacity: 19.7 Cubic Feet Estimated Yearly Operating Cost $43 ▼ $41 $53 Cost Range of Similar Models 403 kWh Estimated Yearly Electricity Use Your cost will...


