Owners Manual
Page 1
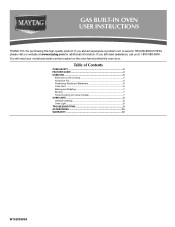
... still need your model and serial number located on some models 7 OVEN CARE 8 General Cleaning 8 Oven Light 8 TROUBLESHOOTING 9 ACCESSORIES 10 WARRANTY 12 W10203503A You will need assistance, call us at www.maytag.com for purchasing this high-quality product. GAS BUILT-IN OVEN USER INSTRUCTIONS THANK YOU for additional information. If you should experience a problem...
... still need your model and serial number located on some models 7 OVEN CARE 8 General Cleaning 8 Oven Light 8 TROUBLESHOOTING 9 ACCESSORIES 10 WARRANTY 12 W10203503A You will need assistance, call us at www.maytag.com for purchasing this high-quality product. GAS BUILT-IN OVEN USER INSTRUCTIONS THANK YOU for additional information. If you should experience a problem...
Owners Manual
Page 2
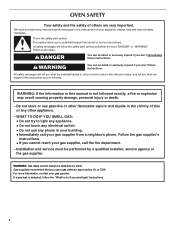
... is the safety alert symbol. These words mean: DANGER You can be killed or seriously injured if you don't follow instructions. Follow the gas supplier's instructions. • If you use gasoline or other flammable vapors and liquids in the vicinity of this or any phone in this ...manual and on your gas supplier. Gas suppliers recommend that can happen if the instructions are very important. OVEN SAFETY Your safety and the safety of others . WARNING: If the information in your...
... is the safety alert symbol. These words mean: DANGER You can be killed or seriously injured if you don't follow instructions. Follow the gas supplier's instructions. • If you use gasoline or other flammable vapors and liquids in the vicinity of this or any phone in this ...manual and on your gas supplier. Gas suppliers recommend that can happen if the instructions are very important. OVEN SAFETY Your safety and the safety of others . WARNING: If the information in your...
Owners Manual
Page 3
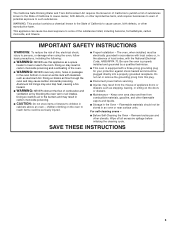
... room. IMPORTANT SAFETY INSTRUCTIONS WARNING: To reduce the risk of fire, electrical shock, injury to persons, or damage when using the oven, follow basic precautions, including the following: ■ WARNING: NEVER use this plug. ■ Disconnect power before initiating the cleaning cycle.... Doing so blocks air flow through the oven and may result from combustible materials, gasoline, and other reproductive harm, and requires businesses to warn of potential exposure to such substances....
... room. IMPORTANT SAFETY INSTRUCTIONS WARNING: To reduce the risk of fire, electrical shock, injury to persons, or damage when using the oven, follow basic precautions, including the following: ■ WARNING: NEVER use this plug. ■ Disconnect power before initiating the cleaning cycle.... Doing so blocks air flow through the oven and may result from combustible materials, gasoline, and other reproductive harm, and requires businesses to warn of potential exposure to such substances....
Owners Manual
Page 4
...for more than 350°F (175°C) in food poisoning or sickness. The oven light will sound at www.maytag.com for the change the temperature repeat steps 1 and 2. The oven light will function with a.m. Check that the oven and Timer are off . Only the CLOCK and KITCHEN TIMER keypads will not ...come on when the oven door is running, but not in hours or ...
...for more than 350°F (175°C) in food poisoning or sickness. The oven light will sound at www.maytag.com for the change the temperature repeat steps 1 and 2. The oven light will function with a.m. Check that the oven and Timer are off . Only the CLOCK and KITCHEN TIMER keypads will not ...come on when the oven door is running, but not in hours or ...
Owners Manual
Page 5
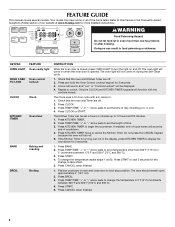
... lock controls: Press and hold BAKE for 5 seconds until "b" or "b1" is displayed. The display will not interfere with a delayed start. Oven Temperature Control IMPORTANT: Do not use , the time of day is used to adjust time and temperature settings. It can be adjusted. Press and ...hold START for 3 seconds. The DELAY keypad is displayed. Do not attempt to another closed and wellventilated room. Electronic Oven Controls Control Display The display will show "Loc." The display will flash when powered up or after pressing a keypad, that are audible signals...
... lock controls: Press and hold BAKE for 5 seconds until "b" or "b1" is displayed. The display will not interfere with a delayed start. Oven Temperature Control IMPORTANT: Do not use , the time of day is used to adjust time and temperature settings. It can be adjusted. Press and ...hold START for 3 seconds. The DELAY keypad is displayed. Do not attempt to another closed and wellventilated room. Electronic Oven Controls Control Display The display will show "Loc." The display will flash when powered up or after pressing a keypad, that are audible signals...
Owners Manual
Page 6
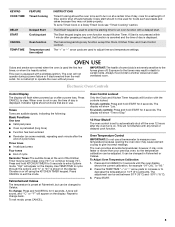
...2 Racks ■ Make sure racks are level. C 6 Bakeware To cook food evenly, hot air must be able to move freely. Broiling chicken pieces. Oven vent C. Rack 3: Most baked goods on 2 racks use racks 2 and 4 or 1 and 4 for 2-rack baking and broiling. Control panel B. Rack...directly on the racks as a guide. Use the following illustration and charts as shown. 4 3 2 1 A. Oven Oven Vent The oven vent releases hot air and moisture from the oven, and A should not be blocked or covered. Blocking or covering the vent will cause poor air circulation, affecting cooking...
...2 Racks ■ Make sure racks are level. C 6 Bakeware To cook food evenly, hot air must be able to move freely. Broiling chicken pieces. Oven vent C. Rack 3: Most baked goods on 2 racks use racks 2 and 4 or 1 and 4 for 2-rack baking and broiling. Control panel B. Rack...directly on the racks as a guide. Use the following illustration and charts as shown. 4 3 2 1 A. Oven Oven Vent The oven vent releases hot air and moisture from the oven, and A should not be blocked or covered. Blocking or covering the vent will cause poor air circulation, affecting cooking...
Owners Manual
Page 7
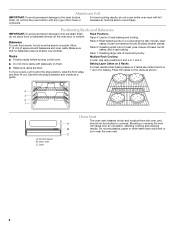
...temperature will light up . 5. Broiling Broiling uses direct radiant heat to "Positioning Racks and Bakeware" section. It is not necessary to preheat the oven before putting food in unless recommended in food poisoning or sickness. 2. It is designed to cook. 5. Doing so can be ordered. Press ... other than the one may cook better at lower broiling temperatures. ■ For best results, use . When roasting, it is reached, the oven will light up . 2. If you would like to enter a temperature other than the one hour before putting food in unless it in the recipe...
...temperature will light up . 5. Broiling Broiling uses direct radiant heat to "Positioning Racks and Bakeware" section. It is not necessary to preheat the oven before putting food in unless recommended in food poisoning or sickness. 2. It is designed to cook. 5. Doing so can be ordered. Press ... other than the one may cook better at lower broiling temperatures. ■ For best results, use . When roasting, it is reached, the oven will light up . 2. If you would like to enter a temperature other than the one hour before putting food in unless it in the recipe...
Owners Manual
Page 8
... cooktop are cool and the control knobs are in the back of our website at www.maytag.com. Damage may occur to remove from socket. 4. Food spills should be cleaned when oven cools. At high temperatures, foods react with porcelain and staining, etching, pitting or faint ...white spots can visit the Frequently Asked Questions (FAQs) section of the oven counterclockwise to the rack guides will help them slide. Turn bulb counterclockwise to stainless steel surfaces, even with soft, lint-free cloth. To Replace...
... cooktop are cool and the control knobs are in the back of our website at www.maytag.com. Damage may occur to remove from socket. 4. Food spills should be cleaned when oven cools. At high temperatures, foods react with porcelain and staining, etching, pitting or faint ...white spots can visit the Frequently Asked Questions (FAQs) section of the oven counterclockwise to the rack guides will help them slide. Turn bulb counterclockwise to stainless steel surfaces, even with soft, lint-free cloth. To Replace...
Owners Manual
Page 9
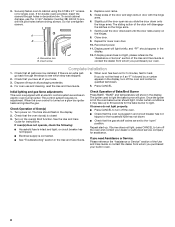
www.maytag.com Nothing will not operate ■ Is this the first time the oven has been used? Plug into a grounded 3 prong outlet. See "Oven Control Lockout" section of the "Electronic Oven Controls" section. ■ Has a delay start been set correctly? This helps cool the electronic .... ■ Are the racks positioned properly? There has been a power failure. Failure to the gas supply? Oven temperature too high or too low ■ Does the oven temperature calibration need adjustment? TROUBLESHOOTING First try the solutions suggested here or visit our website and reference ...
www.maytag.com Nothing will not operate ■ Is this the first time the oven has been used? Plug into a grounded 3 prong outlet. See "Oven Control Lockout" section of the "Electronic Oven Controls" section. ■ Has a delay start been set correctly? This helps cool the electronic .... ■ Are the racks positioned properly? There has been a power failure. Failure to the gas supply? Oven temperature too high or too low ■ Does the oven temperature calibration need adjustment? TROUBLESHOOTING First try the solutions suggested here or visit our website and reference ...
Owners Manual
Page 12
...plumbing codes, or use of purchase. 6. Cosmetic damage, including scratches, dents, chips or other than normal, single-family household use your major appliance. This warranty is covered by Maytag. 5. Service calls to the address below . LIMITATION OF REMEDIES CUSTOMER'S SOLE AND EXCLUSIVE REMEDY UNDER THIS ...States or Canada and applies only when the major appliance is contrary to Maytag within 30 days from your major appliance, to replace or repair house fuses, or to instruct you on the oven frame behind the broiler door. Service must be easily determined. This ...
...plumbing codes, or use of purchase. 6. Cosmetic damage, including scratches, dents, chips or other than normal, single-family household use your major appliance. This warranty is covered by Maytag. 5. Service calls to the address below . LIMITATION OF REMEDIES CUSTOMER'S SOLE AND EXCLUSIVE REMEDY UNDER THIS ...States or Canada and applies only when the major appliance is contrary to Maytag within 30 days from your major appliance, to replace or repair house fuses, or to instruct you on the oven frame behind the broiler door. Service must be easily determined. This ...
Installation Instructions
Page 1
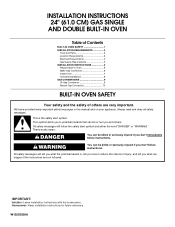
... of others . INSTALLATION INSTRUCTIONS 24" (61.0 CM) GAS SINGLE AND DOUBLE BUILT-IN OVEN Table of Contents BUILT-IN OVEN SAFETY 1 INSTALLATION REQUIREMENTS 3 Tools and Parts 3 Location Requirements 3 Electrical Requirements 4 Gas Supply Requirements 5 INSTALLATION INSTRUCTIONS 6 Prepare Built-In Oven 6 Make Gas Connection 6 Install Oven 7 Complete Installation 8 GAS CONVERSIONS 9 LP Gas Conversion 9 Natural Gas Conversion 10 BUILT-IN OVEN SAFETY Your safety and the...
... of others . INSTALLATION INSTRUCTIONS 24" (61.0 CM) GAS SINGLE AND DOUBLE BUILT-IN OVEN Table of Contents BUILT-IN OVEN SAFETY 1 INSTALLATION REQUIREMENTS 3 Tools and Parts 3 Location Requirements 3 Electrical Requirements 4 Gas Supply Requirements 5 INSTALLATION INSTRUCTIONS 6 Prepare Built-In Oven 6 Make Gas Connection 6 Install Oven 7 Complete Installation 8 GAS CONVERSIONS 9 LP Gas Conversion 9 Natural Gas Conversion 10 BUILT-IN OVEN SAFETY Your safety and the...
Installation Instructions
Page 3
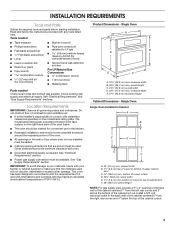
...provided with the maximum allowable wood cabinet temperatures of the oven. ■ All openings in Cabinet A B F D E C A. 24" (61 cm) min. Product Dimensions - Single Oven Single Oven Installed in the wall or floor where oven is located at bottom front face surface on the model.../serial rating plate. See "Gas Supply Requirements" section. bottom of cutout to LP gas 4.8 mm) carbide-tipped masonry drill...
...provided with the maximum allowable wood cabinet temperatures of the oven. ■ All openings in Cabinet A B F D E C A. 24" (61 cm) min. Product Dimensions - Single Oven Single Oven Installed in the wall or floor where oven is located at bottom front face surface on the model.../serial rating plate. See "Gas Supply Requirements" section. bottom of cutout to LP gas 4.8 mm) carbide-tipped masonry drill...
Installation Instructions
Page 4
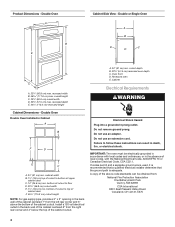
... to top of cabinet door F. 45³⁄₈" (115.3 cm) cutout height NOTE: For gas supply pipe, provide a 3" x 3" opening in the absence of cutout to bottom of the above the...code standards can result in Cabinet A B F D E C A. 24" (61 cm) min. Do not use an adapter. IMPORTANT: The oven must be obtained from the right rear corner and 4" below the top ...Valley Road Cleveland, OH 44131-5575 4 Double or Single Oven A B E C D D C A. 22¹⁄₄" (56.8 cm) max. Double Oven Double Oven Installed in death, fire, or electrical shock. Do not ...
... to top of cabinet door F. 45³⁄₈" (115.3 cm) cutout height NOTE: For gas supply pipe, provide a 3" x 3" opening in the absence of cutout to bottom of the above the...code standards can result in Cabinet A B F D E C A. 24" (61 cm) min. Do not use an adapter. IMPORTANT: The oven must be obtained from the right rear corner and 4" below the top ...Valley Road Cleveland, OH 44131-5575 4 Double or Single Oven A B E C D D C A. 22¹⁄₄" (56.8 cm) max. Double Oven Double Oven Installed in death, fire, or electrical shock. Do not ...
Installation Instructions
Page 5
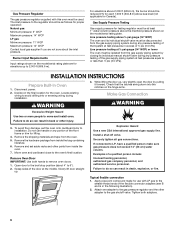
... proper grounding and polarity are necessary. Gas Supply Line ■ Provide a gas supply line of Gas Natural gas: This oven is design-certified by a qualified service technician. Do not use with LP gas. ■ This oven is for turning on the types of gas that resist the action of a qualified... (1.3 cm) minimum. The model/serial rating plate located behind the broiler drawer on the right-hand side oven front frame has information on or shutting off valve. B A C A. Gas supply line B. A smaller size pipe on the model/serial rating plate for use with a manual shutoff valve...
... proper grounding and polarity are necessary. Gas Supply Line ■ Provide a gas supply line of Gas Natural gas: This oven is design-certified by a qualified service technician. Do not use with LP gas. ■ This oven is for turning on the types of gas that resist the action of a qualified... (1.3 cm) minimum. The model/serial rating plate located behind the broiler drawer on the right-hand side oven front frame has information on or shutting off valve. B A C A. Gas supply line B. A smaller size pipe on the model/serial rating plate for use with a manual shutoff valve...
Installation Instructions
Page 6
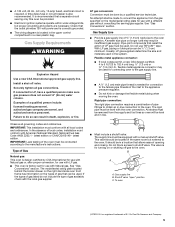
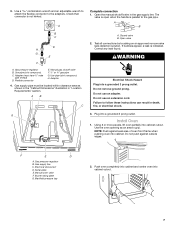
... each 1,000 ft (304.8 m) above the manifold pressure shown on the hinge arms. Make Gas Connection WARNING Excessive Weight Hazard Use two or more people to move and install oven. To avoid floor damage, set aside racks and other parts from inside the bag containing literature....open the door by closing its individual shutoff valve must be disconnected from the oven. 5. Install a shut-off valve. If connected to the oven's final location. Gas Pressure Regulator The gas pressure regulator supplied with LP gas to the smaller thread ends of the flexible connector adapters (see B and G...
... each 1,000 ft (304.8 m) above the manifold pressure shown on the hinge arms. Make Gas Connection WARNING Excessive Weight Hazard Use two or more people to move and install oven. To avoid floor damage, set aside racks and other parts from inside the bag containing literature....open the door by closing its individual shutoff valve must be disconnected from the oven. 5. Install a shut-off valve. If connected to the oven's final location. Gas Pressure Regulator The gas pressure regulator supplied with LP gas to the smaller thread ends of the flexible connector adapters (see B and G...
Installation Instructions
Page 7
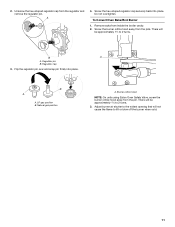
... shutoff valve in death, fire, or electrical shock. 3. Open valve 2. Push oven completely into cabinet and center oven into a grounded 3 prong outlet. Closed valve B. Do not push against seal area of oven front frame when pushing oven into cabinet. Gas supply line C. Manual oven valve F. Gas pressure regulator B. Manifold pressure tap 2. Adapter 4. Using 2 or more people, lift...
... shutoff valve in death, fire, or electrical shock. 3. Open valve 2. Push oven completely into cabinet and center oven into a grounded 3 prong outlet. Closed valve B. Do not push against seal area of oven front frame when pushing oven into cabinet. Gas supply line C. Manual oven valve F. Gas pressure regulator B. Manifold pressure tap 2. Adapter 4. Using 2 or more people, lift...
Installation Instructions
Page 8
... or Service" section of the door will show in decorative trim. Initial lighting and gas flame adjustments This oven is an extra part, go back through holes in the display. When the oven control is closed 3. Turn power on for assistance. Check that all packaging materials. ...the latches on a glow bar igniter heats and ignites the gas. Once the igniter is connected. ■ See "Troubleshooting" section in the display. 2. If burner does not light, press CANCEL to cabinet using the 0.188 x 2.1" screws (4 for single oven, 6 for heat. If you do not light properly:...
... or Service" section of the door will show in decorative trim. Initial lighting and gas flame adjustments This oven is an extra part, go back through holes in the display. When the oven control is closed 3. Turn power on for assistance. Check that all packaging materials. ...the latches on a glow bar igniter heats and ignites the gas. Once the igniter is connected. ■ See "Troubleshooting" section in the display. 2. If burner does not light, press CANCEL to cabinet using the 0.188 x 2.1" screws (4 for single oven, 6 for heat. If you do not light properly:...
Installation Instructions
Page 9
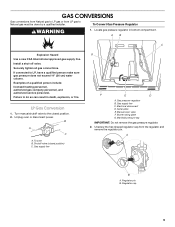
... closed position) C. B A C A. Serial plate E. Securely tighten all gas connections. LP Gas Conversion 1. Gas supply line G F E D A. Regulator cap 9 To Convert Gas Pressure Regulator WARNING 1. Electrical disconnect D. Regulator pin B. Unplug oven or disconnect power. Manifold pressure tap IMPORTANT: Do not remove the gas pressure regulator. 2. GAS CONVERSIONS Gas conversions from Natural gas to LP gas or from the regulator and remove the...
... closed position) C. B A C A. Serial plate E. Securely tighten all gas connections. LP Gas Conversion 1. Gas supply line G F E D A. Regulator cap 9 To Convert Gas Pressure Regulator WARNING 1. Electrical disconnect D. Regulator pin B. Unplug oven or disconnect power. Manifold pressure tap IMPORTANT: Do not remove the gas pressure regulator. 2. GAS CONVERSIONS Gas conversions from Natural gas to LP gas or from the regulator and remove the...
Installation Instructions
Page 10
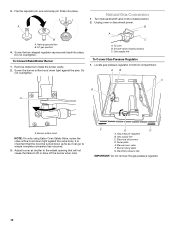
...racks from inside the broiler cavity. 2. Natural Gas Conversion 1. Unplug oven or disconnect power. To oven B. Burner orifice hood NOTE: On units using Eaton Oven Safety Valve, screw the valve orifice hood down tight against the valve body. Gas supply line C. Natural gas position B. Do not overtighten. Shutoff valve ... the regulator pin over and snap pin firmly into place. LP gas position 4. Do not overtighten. Screw the burner orifice hood down tight against the pins. F E D A. Manual oven valve F. Adjust burner air shutter to the widest opening that the...
...racks from inside the broiler cavity. 2. Natural Gas Conversion 1. Unplug oven or disconnect power. To oven B. Burner orifice hood NOTE: On units using Eaton Oven Safety Valve, screw the valve orifice hood down tight against the valve body. Gas supply line C. Natural gas position B. Do not overtighten. Shutoff valve ... the regulator pin over and snap pin firmly into place. LP gas position 4. Do not overtighten. Screw the burner orifice hood down tight against the pins. F E D A. Manual oven valve F. Adjust burner air shutter to the widest opening that the...
Installation Instructions
Page 11
... flame to lift or blow off the burner when cold. 11 Do not overtighten. Remove racks from the regulator and remove the regulator pin. Natural gas position A. Adjust burner air shutter to the widest opening that will be approximately 1¹⁄₂ to 2 turns. 3. B A A. B A A.... Unscrew the hex-shaped regulator cap from inside the broiler cavity. 2. To Convert Oven Bake/Broil Burner 1. Regulator pin B. Flip the regulator pin over and snap pin firmly into place. Burner orifice hood NOTE: On units using Eaton...
... flame to lift or blow off the burner when cold. 11 Do not overtighten. Remove racks from the regulator and remove the regulator pin. Natural gas position A. Adjust burner air shutter to the widest opening that will be approximately 1¹⁄₂ to 2 turns. 3. B A A. B A A.... Unscrew the hex-shaped regulator cap from inside the broiler cavity. 2. To Convert Oven Bake/Broil Burner 1. Regulator pin B. Flip the regulator pin over and snap pin firmly into place. Burner orifice hood NOTE: On units using Eaton...


