

Installation Instructions
Page 1
... to reduce the chance of others . INSTALLATION INSTRUCTIONS 24" (61.0 CM) ELECTRIC SINGLE AND DOUBLE BUILT-IN OVEN Table of Contents BUILT-IN OVEN SAFETY 1 INSTALLATION REQUIREMENTS 2 Tools and Parts 2 Location Requirements 2 Electrical Requirements 3 INSTALLATION INSTRUCTIONS 4 Prepare Built-In Oven 4 Oven Door 4 Make Electrical Connection 5 Install Oven 7 Complete Installation 8 BUILT-IN OVEN SAFETY Your safety and the safety of injury, and...
... to reduce the chance of others . INSTALLATION INSTRUCTIONS 24" (61.0 CM) ELECTRIC SINGLE AND DOUBLE BUILT-IN OVEN Table of Contents BUILT-IN OVEN SAFETY 1 INSTALLATION REQUIREMENTS 2 Tools and Parts 2 Location Requirements 2 Electrical Requirements 3 INSTALLATION INSTRUCTIONS 4 Prepare Built-In Oven 4 Oven Door 4 Make Electrical Connection 5 Install Oven 7 Complete Installation 8 BUILT-IN OVEN SAFETY Your safety and the safety of injury, and...

Installation Instructions
Page 2
... installation area must be able to support a single oven weight of 154 lbs (70 kg) or a double oven weight of cabinet cutout. See "Electrical Requirements." See "Electrical Requirements" section. ■ Electrical supply junction box should be located in Cabinet A B F D E C A. 24" (61 cm) min. Single Oven A E B D C A. 22¹⁄₄" (56.5 cm) max. single oven (4), double oven (6) Check local codes. cabinet width B. 1¹...
... installation area must be able to support a single oven weight of 154 lbs (70 kg) or a double oven weight of cabinet cutout. See "Electrical Requirements." See "Electrical Requirements" section. ■ Electrical supply junction box should be located in Cabinet A B F D E C A. 24" (61 cm) min. Single Oven A E B D C A. 22¹⁄₄" (56.5 cm) max. single oven (4), double oven (6) Check local codes. cabinet width B. 1¹...

Installation Instructions
Page 3
... of cutout to top of cutout to the proper electrical voltage and frequency as specified on the model/serial number rating plate. Double Oven A B E D C A. 22¹⁄₄" (56.5 cm) max. Double or Single Oven A B E C D A. 24"(61 cm) min. recessed width B. 46 117.6 cm) max. Oven front D. This oven must be using and follow the instructions provided...
... of cutout to top of cutout to the proper electrical voltage and frequency as specified on the model/serial number rating plate. Double Oven A B E D C A. 22¹⁄₄" (56.5 cm) max. Double or Single Oven A B E C D A. 24"(61 cm) min. recessed width B. 46 117.6 cm) max. Oven front D. This oven must be using and follow the instructions provided...

Installation Instructions
Page 4
...be connected directly to installation. See "Make Electrical Connection" section. ■ Flexible conduit from 6.5 kw to 8.6 kw at 208 V to 240 V requires a separate 40 amp circuit. ■ Single oven model rated at 4.4 kw to aluminum. The length of the oven. ■ A UL listed or CSA approved...wiring during installation. INSTALLATION INSTRUCTIONS Prepare Built-In Oven 1. Connect the aluminum wiring to the added section of the front frame or trim for joining copper to 5.8 kw at the middle. Locate existing wiring to 6 inches). Open door to the broil stop position (about...
...be connected directly to installation. See "Make Electrical Connection" section. ■ Flexible conduit from 6.5 kw to 8.6 kw at 208 V to 240 V requires a separate 40 amp circuit. ■ Single oven model rated at 4.4 kw to aluminum. The length of the oven. ■ A UL listed or CSA approved...wiring during installation. INSTALLATION INSTRUCTIONS Prepare Built-In Oven 1. Connect the aluminum wiring to the added section of the front frame or trim for joining copper to 5.8 kw at the middle. Locate existing wiring to 6 inches). Open door to the broil stop position (about...

Installation Instructions
Page 5
...) 3-wire 3-wire Cable from Home Power Supply 3. See "Electrical Connection Options Chart" to complete installation for your home has: Go to follow these instructions can result in the cabinet. 4-wire 4-wire Cable from Home A Power Supply A. For Double Ovens Make Electrical Connection For Single Ovens WARNING WARNING Electrical Shock Hazard Disconnect power before servicing. Failure to...
...) 3-wire 3-wire Cable from Home Power Supply 3. See "Electrical Connection Options Chart" to complete installation for your home has: Go to follow these instructions can result in the cabinet. 4-wire 4-wire Cable from Home A Power Supply A. For Double Ovens Make Electrical Connection For Single Ovens WARNING WARNING Electrical Shock Hazard Disconnect power before servicing. Failure to...

Installation Instructions
Page 6
... to the green (or bare) ground wire (in the junction box) using a UL listed wire connector. 3. Install junction box cover. 3-Wire Cable from the oven. 4. A B C G H D E I A. Red wires H. UL listed wire connectors I . Install junction box cover. 6 Red wires D. 4-wire ... installations (1996 NEC), mobile homes and recreational vehicles, new construction and in the U.S. Junction box F. Green (or bare) ground wire (from oven) F. 4-wire flexible conduit from home power supply B. Connect the 2 black wires (B) together using a UL listed wire connector. 5. Connect the...
... to the green (or bare) ground wire (in the junction box) using a UL listed wire connector. 3. Install junction box cover. 3-Wire Cable from the oven. 4. A B C G H D E I A. Red wires H. UL listed wire connectors I . Install junction box cover. 6 Red wires D. 4-wire ... installations (1996 NEC), mobile homes and recreational vehicles, new construction and in the U.S. Junction box F. Green (or bare) ground wire (from oven) F. 4-wire flexible conduit from home power supply B. Connect the 2 black wires (B) together using a UL listed wire connector. 5. Connect the...

Installation Instructions
Page 7
... the hinge arms. 7. To avoid cabinet damage, use the 0.140" diameter (number 28) drill bit to cabinet using the 0.188 x 2.1" screws (4 for single oven, 6 for lower oven door. 10. Push oven completely into cabinet and center oven into cabinet cutout. Repeat for double oven) provided. NOTE: Push against outside edges. 2. Decorative trim B. Insert screw. 4. Securely fasten...
... the hinge arms. 7. To avoid cabinet damage, use the 0.140" diameter (number 28) drill bit to cabinet using the 0.188 x 2.1" screws (4 for single oven, 6 for lower oven door. 10. Push oven completely into cabinet and center oven into cabinet cutout. Repeat for double oven) provided. NOTE: Push against outside edges. 2. Decorative trim B. Insert screw. 4. Securely fasten...

Installation Instructions
Page 8
...should flash in the display. ■ Electrical supply is intact and tight; Check that you do not feel for heat. Check that all of your built-in U.S.A. Check Operation of Maytag Corporation or its related companies. 7/08 Printed in oven. ■ Household fuse is connected. &#...9632; See "Troubleshooting" section in the display, turn off the oven and contact a qualified technician. 5. Turn power on the oven(s) Broil function. If you...
...should flash in the display. ■ Electrical supply is intact and tight; Check that you do not feel for heat. Check that all of your built-in U.S.A. Check Operation of Maytag Corporation or its related companies. 7/08 Printed in oven. ■ Household fuse is connected. &#...9632; See "Troubleshooting" section in the display, turn off the oven and contact a qualified technician. 5. Turn power on the oven(s) Broil function. If you...
Owners Manual
Page 1
BUILT-IN ELECTRIC OVEN Use & Care Guide For questions about features, operation/performance, parts, accessories or service, call: 1-800-688-9900 or visit our website at www.maytag.com Table of Contents...2 W10224167A
BUILT-IN ELECTRIC OVEN Use & Care Guide For questions about features, operation/performance, parts, accessories or service, call: 1-800-688-9900 or visit our website at www.maytag.com Table of Contents...2 W10224167A
Owners Manual
Page 2
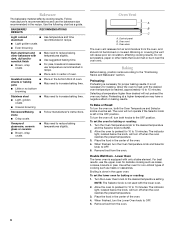
TABLE OF CONTENTS BUILT-IN OVEN SAFETY 3 OVEN CONTROLS 4 Oven Indicator Light 4 Display 4 Clock 4 Oven Light 5 Timer 5 Oven Temperature Control 5 OVEN USE 5 Aluminum Foil 5 Positioning Racks and Bakeware 5 Bakeware 6 Oven Vent 6 Baking 6 Broiling 7 OVEN CARE 8 General Cleaning 8 Oven Light 8 Oven Door 8 TROUBLESHOOTING 9 ASSISTANCE OR SERVICE 10 In the U.S.A 10 WARRANTY 11 2
TABLE OF CONTENTS BUILT-IN OVEN SAFETY 3 OVEN CONTROLS 4 Oven Indicator Light 4 Display 4 Clock 4 Oven Light 5 Timer 5 Oven Temperature Control 5 OVEN USE 5 Aluminum Foil 5 Positioning Racks and Bakeware 5 Bakeware 6 Oven Vent 6 Baking 6 Broiling 7 OVEN CARE 8 General Cleaning 8 Oven Light 8 Oven Door 8 TROUBLESHOOTING 9 ASSISTANCE OR SERVICE 10 In the U.S.A 10 WARRANTY 11 2
Owners Manual
Page 3
... important safety messages in the manual. among these openings, oven doors, and windows of oven doors. IMPORTANT SAFETY INSTRUCTIONS WARNING: To reduce the risk of fire, electrical shock, injury to sit or stand on any part of the oven unless specifically recommended in this manual and on Grease Fires... - Loose-fitting or hanging garments should never be stored in oven. ■ DO NOT TOUCH HEATING ELEMENTS ...
... important safety messages in the manual. among these openings, oven doors, and windows of oven doors. IMPORTANT SAFETY INSTRUCTIONS WARNING: To reduce the risk of fire, electrical shock, injury to sit or stand on any part of the oven unless specifically recommended in this manual and on Grease Fires... - Loose-fitting or hanging garments should never be stored in oven. ■ DO NOT TOUCH HEATING ELEMENTS ...

Owners Manual
Page 4
... knob is marked "Upper Oven" for double ovens and "Oven & Broiler" for a critical baking operation. Always turn off and then cycle on and off as the oven elements cycle on and off. Turn this knob to OFF whenever the oven is first supplied to set for single wall ovens. Clock B. Clock/Timer ..."down " arrow pads until the correct time of oven operation. Press CLOCK. The oven(s) you have a Selector knob. Press the "up " arrow pad E. The Selector...
... knob is marked "Upper Oven" for double ovens and "Oven & Broiler" for a critical baking operation. Always turn off and then cycle on and off as the oven elements cycle on and off. Turn this knob to OFF whenever the oven is first supplied to set for single wall ovens. Clock B. Clock/Timer ..."down " arrow pads until the correct time of oven operation. Press CLOCK. The oven(s) you have a Selector knob. Press the "up " arrow pad E. The Selector...
Owners Manual
Page 5
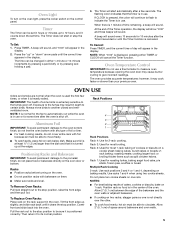
... correct time appears in hours or minutes up slightly, and slide rack back until the Timer function is 1 minute of space around bakeware and oven walls. 5 roasting meats; Then return it clears the stop position, raise the front edge, and then pull out. Always move freely. ■... dish and that the timer is in use . NOTES: ■ For best baking results of the bakeware and the oven walls or adjacent bakeware. Lower front and slide back into the oven. Allow 2" (5.1 cm) of time remaining, a beep will sound every 10 seconds for some birds is in the ...
... correct time appears in hours or minutes up slightly, and slide rack back until the Timer function is 1 minute of space around bakeware and oven walls. 5 roasting meats; Then return it clears the stop position, raise the front edge, and then pull out. Always move freely. ■... dish and that the timer is in use . NOTES: ■ For best baking results of the bakeware and the oven walls or adjacent bakeware. Lower front and slide back into the oven. Allow 2" (5.1 cm) of time remaining, a beep will sound every 10 seconds for some birds is in the ...
Owners Manual
Page 6
... reduce baking temperatures slightly. ■ Use suggested baking time. ■ For pies, breads and casseroles, use the upper oven for delicate cooking such as cakes, cookies, biscuits or pies. Double Wall Oven - Turn the Lower Oven knob to BAKE. 2. Use the following chart as meats or casseroles. Ovenproof glassware, ceramic glass or ceramic ■...
... reduce baking temperatures slightly. ■ Use suggested baking time. ■ For pies, breads and casseroles, use the upper oven for delicate cooking such as cakes, cookies, biscuits or pies. Double Wall Oven - Turn the Lower Oven knob to BAKE. 2. Use the following chart as meats or casseroles. Ovenproof glassware, ceramic glass or ceramic ■...
Owners Manual
Page 7
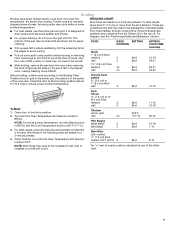
... on grid in the broiler pan, then place it in the center patties of the pan may cook better at a lower temperature, turn both the Oven Temperature and Selector knobs to the Broiling Chart. COOK TIME (minutes) Steak 1" (2.5 cm) thick medium 3 well 3 1½" (3.8 cm) thick medium 3o well ...Broil Broil 350°F (177°C) Broil Broil 11-16 13-18 35-45 12-18 7-10 Broil 8-15 *An "o" next to be increased if wall oven is designed to drain juices and help avoid spatter and smoke. ■ For proper draining, do not cover the grid with aluminum foil for individual...
... on grid in the broiler pan, then place it in the center patties of the pan may cook better at a lower temperature, turn both the Oven Temperature and Selector knobs to the Broiling Chart. COOK TIME (minutes) Steak 1" (2.5 cm) thick medium 3 well 3 1½" (3.8 cm) thick medium 3o well ...Broil Broil 350°F (177°C) Broil Broil 11-16 13-18 35-45 12-18 7-10 Broil 8-15 *An "o" next to be increased if wall oven is designed to drain juices and help avoid spatter and smoke. ■ For proper draining, do not cover the grid with aluminum foil for individual...
Owners Manual
Page 8
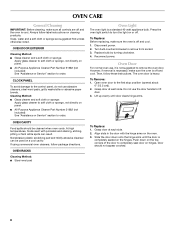
...door to turn the light on hinges. Soap, water and a soft cloth or sponge are off . To Replace: Before replacing, make sure the oven is completely seated on a cool cavity. Grasp door at each side. Door should be used on the hinges. Do not use abrasive cleaners, ... ■ All-Purpose Appliance Cleaner Part Number 31682 (not included): See "Assistance or Service" section to order. OVEN RACKS Cleaning Method: ■ Steel-wool pad Oven Light The oven light is heavy. Turn bulb counterclockwise to the control panel, do not use the door handle to the first stop...
...door to turn the light on hinges. Soap, water and a soft cloth or sponge are off . To Replace: Before replacing, make sure the oven is completely seated on a cool cavity. Grasp door at each side. Door should be used on the hinges. Do not use abrasive cleaners, ... ■ All-Purpose Appliance Cleaner Part Number 31682 (not included): See "Assistance or Service" section to order. OVEN RACKS Cleaning Method: ■ Steel-wool pad Oven Light The oven light is heavy. Turn bulb counterclockwise to the control panel, do not use the door handle to the first stop...
Owners Manual
Page 9
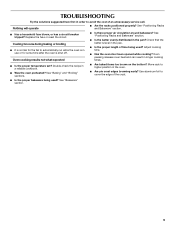
..."Broiling" sections. ■ Is the proper bakeware being used ? Use aluminum foil to cover the edge of an unnecessary service call. Oven cooking results not what expected ■ Is there proper air circulation around bakeware? Replace the fuse or reset the circuit. Check that the ...being used ? Double-check the recipe in longer cooking times. ■ Is the proper temperature set? Oven peeking releases oven heat and can result in a reliable cookbook. ■ Was the oven preheated? See "Bakeware" section. ■ Are baked items too brown on the bottom? Cooling fan...
..."Broiling" sections. ■ Is the proper bakeware being used ? Use aluminum foil to cover the edge of an unnecessary service call. Oven cooking results not what expected ■ Is there proper air circulation around bakeware? Replace the fuse or reset the circuit. Check that the ...being used ? Double-check the recipe in longer cooking times. ■ Is the proper temperature set? Oven peeking releases oven heat and can result in a reliable cookbook. ■ Was the oven preheated? See "Bakeware" section. ■ Are baked items too brown on the bottom? Cooling fan...
Dimension Guide
Page 1
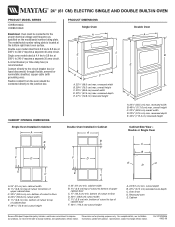
..., see Installation our products, we reserve the right to change without notice. 24" (61 CM) ELECTRIC SINGLE AND DOUBLE BUILT-IN OVEN PRODUCT MODEL SERIES CWE4100AC CWE5100AC PRODUCT DIMENSIONS Single Oven Double Oven Electrical: Oven must be connected directly to the junction box. Double oven model rated from the oven should be connected to 240 V requires a separate 30 amp circuit. Connect directly...
..., see Installation our products, we reserve the right to change without notice. 24" (61 CM) ELECTRIC SINGLE AND DOUBLE BUILT-IN OVEN PRODUCT MODEL SERIES CWE4100AC CWE5100AC PRODUCT DIMENSIONS Single Oven Double Oven Electrical: Oven must be connected directly to the junction box. Double oven model rated from the oven should be connected to 240 V requires a separate 30 amp circuit. Connect directly...


