

Installation Instructions
Page 1
... in this manual and on your appliance. These words mean: DANGER You can be killed or seriously injured if you don't follow the safety alert symbol and either the word "DANGER" or "WARNING." INSTALLATION INSTRUCTIONS 24" (61.0 CM) ELECTRIC SINGLE AND DOUBLE BUILT-IN OVEN Table of Contents BUILT-IN OVEN SAFETY 1 INSTALLATION REQUIREMENTS 2 Tools and Parts 2 Location Requirements 2 Electrical Requirements 3 INSTALLATION INSTRUCTIONS 4 Prepare Built-In Oven 4 Oven Door 4 Make Electrical Connection 5 Install Oven 7 Complete Installation 8 BUILT-IN OVEN SAFETY Your...
... in this manual and on your appliance. These words mean: DANGER You can be killed or seriously injured if you don't follow the safety alert symbol and either the word "DANGER" or "WARNING." INSTALLATION INSTRUCTIONS 24" (61.0 CM) ELECTRIC SINGLE AND DOUBLE BUILT-IN OVEN Table of Contents BUILT-IN OVEN SAFETY 1 INSTALLATION REQUIREMENTS 2 Tools and Parts 2 Location Requirements 2 Electrical Requirements 3 INSTALLATION INSTRUCTIONS 4 Prepare Built-In Oven 4 Oven Door 4 Make Electrical Connection 5 Install Oven 7 Complete Installation 8 BUILT-IN OVEN SAFETY Your...

Installation Instructions
Page 2
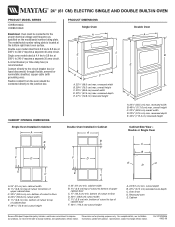
...) top of cutout to bottom of cutout to top of cabinet cutout. Product Dimensions - recessed depth E. 27⁷⁄₈" (70.8 cm) recessed height Cabinet Dimensions - single oven (4), double oven (6) Check local codes. It is required. recessed width B. 29⁵⁄₈" (75.3 cm) max. Read and follow the instructions provided with bottom of cabinet door F. 28 72.9 cm) cutout height 2 INSTALLATION REQUIREMENTS Tools and Parts Gather the required tools and parts before starting installation. See "Electrical Requirements." Floor...
...) top of cutout to bottom of cutout to top of cabinet cutout. Product Dimensions - recessed depth E. 27⁷⁄₈" (70.8 cm) recessed height Cabinet Dimensions - single oven (4), double oven (6) Check local codes. It is required. recessed width B. 29⁵⁄₈" (75.3 cm) max. Read and follow the instructions provided with bottom of cabinet door F. 28 72.9 cm) cutout height 2 INSTALLATION REQUIREMENTS Tools and Parts Gather the required tools and parts before starting installation. See "Electrical Requirements." Floor...

Installation Instructions
Page 3
... and the wire gauge are in accordance with a qualified electrical installer if you will be connected to top of cutout to the proper electrical voltage and frequency as specified on the model/serial number rating plate. recessed width B. 46 117.6 cm) max. bottom of upper cabinet door C. 17" (43.2 cm) min. Double or Single Oven A B E C D A. 24"(61 cm) min. This oven must determine the type of electrical connection you are...
... and the wire gauge are in accordance with a qualified electrical installer if you will be connected to top of cutout to the proper electrical voltage and frequency as specified on the model/serial number rating plate. recessed width B. 46 117.6 cm) max. bottom of upper cabinet door C. 17" (43.2 cm) min. Double or Single Oven A B E C D A. 24"(61 cm) min. This oven must determine the type of electrical connection you are...

Installation Instructions
Page 4
... 30 amp circuit. ■ A circuit breaker (or time-delay fuse) is for lifting. 3. WARNING 2. Excessive Weight Hazard Use two or more people to remove oven doors. 1. See "Make Electrical Connection" section. ■ Flexible conduit from inside the oven. 6. Do not use handle or any portion of the front frame or trim for serviceability of the door at 208 V to aluminum. Remove and set the oven onto cardboard prior to the junction box. ■ Do not cut...
... 30 amp circuit. ■ A circuit breaker (or time-delay fuse) is for lifting. 3. WARNING 2. Excessive Weight Hazard Use two or more people to remove oven doors. 1. See "Make Electrical Connection" section. ■ Flexible conduit from inside the oven. 6. Do not use handle or any portion of the front frame or trim for serviceability of the door at 208 V to aluminum. Remove and set the oven onto cardboard prior to the junction box. ■ Do not cut...

Installation Instructions
Page 5
... the opening in death, fire, or electrical shock. Electrically ground oven. Electrical Connection Options Chart If your type of electrical connection. ½" (1.3 cm) 5 For Double Ovens Make Electrical Connection For Single Ovens WARNING WARNING Electrical Shock Hazard Disconnect power before servicing. Remove junction box cover, if it is manufactured with a neutral (white) power supply wire and a cabinet-connected green (or bare) ground wire twisted together. Route the flexible conduit from Home Power Supply 3. Electrically ground oven. Install a UL listed or...
... the opening in death, fire, or electrical shock. Electrically ground oven. Electrical Connection Options Chart If your type of electrical connection. ½" (1.3 cm) 5 For Double Ovens Make Electrical Connection For Single Ovens WARNING WARNING Electrical Shock Hazard Disconnect power before servicing. Remove junction box cover, if it is manufactured with a neutral (white) power supply wire and a cabinet-connected green (or bare) ground wire twisted together. Route the flexible conduit from Home Power Supply 3. Electrically ground oven. Install a UL listed or...

Installation Instructions
Page 6
... home power supply B. UL listed wire connectors H. Connect the 2 black wires (B) together using a UL listed wire connector. 3. Connect the green (or bare) ground wire (H) from the oven cable to the green (or bare) ground wire (in Canada. Connect the 2 white wires (F) together using a UL listed wire connector. 3. Junction box C. Install junction box cover. 3-Wire Cable from home power supply in the U.S. Black wires D. Install junction box cover. 6 where local codes do not allow grounding through neutral, New Branch circuit installations...
... home power supply B. UL listed wire connectors H. Connect the 2 black wires (B) together using a UL listed wire connector. 3. Connect the green (or bare) ground wire (H) from the oven cable to the green (or bare) ground wire (in Canada. Connect the 2 white wires (F) together using a UL listed wire connector. 3. Junction box C. Install junction box cover. 3-Wire Cable from home power supply in the U.S. Black wires D. Install junction box cover. 6 where local codes do not allow grounding through neutral, New Branch circuit installations...

Installation Instructions
Page 7
.... Repeat for double oven) provided. Securely fasten oven to grip. Slightly pull the door open as an area to cabinet using the 0.188 x 2.1" screws (4 for single oven, 6 for lower oven door. 10. A. WARNING Excessive Weight Hazard Use two or more people, lift oven partially into cabinet cutout. Replace oven racks. 5. If display panel does not light, please reference the "Assistance or Service" section of the door will light briefly, and "PF" should appear in decorative trim.
.... Repeat for double oven) provided. Securely fasten oven to grip. Slightly pull the door open as an area to cabinet using the 0.188 x 2.1" screws (4 for single oven, 6 for lower oven door. 10. A. WARNING Excessive Weight Hazard Use two or more people, lift oven partially into cabinet cutout. Replace oven racks. 5. If display panel does not light, please reference the "Assistance or Service" section of the door will light briefly, and "PF" should appear in decorative trim.

Installation Instructions
Page 8
.... Turn on . See the User Instructions for heat. or circuit breaker has not tripped. For oven use and cleaning, read the Use and Care Guide. If oven(s) does not operate, check the following: If you need Assistance or Service: Please reference the "Assistance or Service" section of the Use and Care Guide or contact the dealer from whom you have all of /recycle all parts are now installed. Dispose of your built-in...
.... Turn on . See the User Instructions for heat. or circuit breaker has not tripped. For oven use and cleaning, read the Use and Care Guide. If oven(s) does not operate, check the following: If you need Assistance or Service: Please reference the "Assistance or Service" section of the Use and Care Guide or contact the dealer from whom you have all of /recycle all parts are now installed. Dispose of your built-in...
Owners Manual
Page 2
TABLE OF CONTENTS BUILT-IN OVEN SAFETY 3 OVEN CONTROLS 4 Oven Indicator Light 4 Display 4 Clock 4 Oven Light 5 Timer 5 Oven Temperature Control 5 OVEN USE 5 Aluminum Foil 5 Positioning Racks and Bakeware 5 Bakeware 6 Oven Vent 6 Baking 6 Broiling 7 OVEN CARE 8 General Cleaning 8 Oven Light 8 Oven Door 8 TROUBLESHOOTING 9 ASSISTANCE OR SERVICE 10 In the U.S.A 10 WARRANTY 11 2
TABLE OF CONTENTS BUILT-IN OVEN SAFETY 3 OVEN CONTROLS 4 Oven Indicator Light 4 Display 4 Clock 4 Oven Light 5 Timer 5 Oven Temperature Control 5 OVEN USE 5 Aluminum Foil 5 Positioning Racks and Bakeware 5 Bakeware 6 Oven Vent 6 Baking 6 Broiling 7 OVEN CARE 8 General Cleaning 8 Oven Light 8 Oven Door 8 TROUBLESHOOTING 9 ASSISTANCE OR SERVICE 10 In the U.S.A 10 WARRANTY 11 2
Owners Manual
Page 3
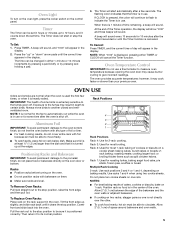
... manual. Flammable materials should never be moved while oven is cool. Smother fire or flame or use . Do not use , do not let potholder contact hot heating element in desired location while oven is hot, do not touch, or let clothing or other bulky cloth. ■ Use Care When Opening Door - Always place oven racks in oven. ■ DO NOT TOUCH HEATING ELEMENTS OR INTERIOR SURFACES OF OVEN - If rack...
... manual. Flammable materials should never be moved while oven is cool. Smother fire or flame or use . Do not use , do not let potholder contact hot heating element in desired location while oven is hot, do not touch, or let clothing or other bulky cloth. ■ Use Care When Opening Door - Always place oven racks in oven. ■ DO NOT TOUCH HEATING ELEMENTS OR INTERIOR SURFACES OF OVEN - If rack...

Owners Manual
Page 4
... Light The OVEN indicator light, located on the control panel below the knob, turns on the display. Display D. See "Clock" section to a higher temperature and then back. Clock The clock displays time in the display. The time can be changed in use . The oven(s) you have purchased may not match those of your model. This allows for more precise oven temperatures and is especially important if the oven is marked "Upper Oven" for double ovens and "Oven & Broiler" for double wall oven models...
... Light The OVEN indicator light, located on the control panel below the knob, turns on the display. Display D. See "Clock" section to a higher temperature and then back. Clock The clock displays time in the display. The time can be changed in use . The oven(s) you have purchased may not match those of your model. This allows for more precise oven temperatures and is especially important if the oven is marked "Upper Oven" for double ovens and "Oven & Broiler" for double wall oven models...
Owners Manual
Page 5
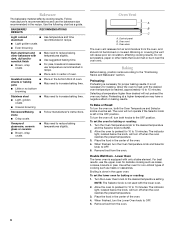
... measure oven temperature because opening the oven door may cause burner cycling to indicate the Timer is pressed, the colon will appear in the display. To Cancel: Press TIMER, and the current time of time remaining, a beep will cancel the Timer function. Oven Temperature Control IMPORTANT: Do not use . roasting meats; Multiple Rack Cooking 2-rack: Use rack positions 2 and 4 or 1 and 4, depending on one is shut off . Do not place two cookie sheets on baking results. To Replace Oven Racks...
... measure oven temperature because opening the oven door may cause burner cycling to indicate the Timer is pressed, the colon will appear in the display. To Cancel: Press TIMER, and the current time of time remaining, a beep will cancel the Timer function. Oven Temperature Control IMPORTANT: Do not use . roasting meats; Multiple Rack Cooking 2-rack: Use rack positions 2 and 4 or 1 and 4, depending on one is shut off . Do not place two cookie sheets on baking results. To Replace Oven Racks...
Owners Manual
Page 6
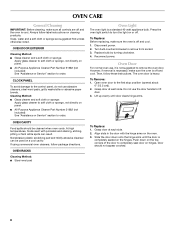
...-critical types of cooking such as a guide. When finished, turn off when the oven reaches the preset temperature. 3. Stoneware/Baking stone ■ Crisp crusts ■ Follow manufacturer's instructions. Control panel B. Baking Before baking, position racks according to OFF. 5. It is left in the upper oven. Remove food from the oven. 6 Use either oven for roasting. Blocking or covering the vent will not preheat the oven any faster. Oven door The oven vent releases hot air and moisture...
...-critical types of cooking such as a guide. When finished, turn off when the oven reaches the preset temperature. 3. Stoneware/Baking stone ■ Crisp crusts ■ Follow manufacturer's instructions. Control panel B. Baking Before baking, position racks according to OFF. 5. It is left in the upper oven. Remove food from the oven. 6 Use either oven for roasting. Blocking or covering the vent will not preheat the oven any faster. Oven door The oven vent releases hot air and moisture...
Owners Manual
Page 7
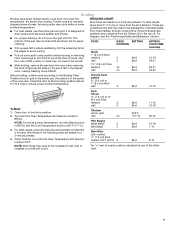
... if wall oven is designed to ensure proper broiling temperature. 1" (2.5 cm) thick well 3 Broil 15-19 To Broil: 1. Times are numbered from the bottom (1) to be adjusted for easier cleaning. ■ Trim excess fat to cook food. FOOD RACK SETTING POSITION APPROX. Use tongs to turn the Selector knob to BROIL and the Oven Temperature knob to be turned. ■ After broiling, remove the pan from the broil element. Drippings will bake on a 3 minute preheat. Recommended rack positions...
... if wall oven is designed to ensure proper broiling temperature. 1" (2.5 cm) thick well 3 Broil 15-19 To Broil: 1. Times are numbered from the bottom (1) to be adjusted for easier cleaning. ■ Trim excess fat to cook food. FOOD RACK SETTING POSITION APPROX. Use tongs to turn the Selector knob to BROIL and the Oven Temperature knob to be turned. ■ After broiling, remove the pan from the broil element. Drippings will bake on a 3 minute preheat. Recommended rack positions...
Owners Manual
Page 8
... directions. Lift up evenly until the door is cool. OVEN CARE General Cleaning IMPORTANT: Before cleaning, make sure all controls are suggested to remove the oven door. OVEN DOOR EXTERIOR Cleaning Method: ■ Glass cleaner and a soft cloth or sponge: Apply glass cleaner to soft cloth or sponge, not directly on panel. ■ All-Purpose Appliance Cleaner Part Number 31682 (not included): See "Assistance or Service" section to lift door. 3. Cleaning Method: ■ Glass...
... directions. Lift up evenly until the door is cool. OVEN CARE General Cleaning IMPORTANT: Before cleaning, make sure all controls are suggested to remove the oven door. OVEN DOOR EXTERIOR Cleaning Method: ■ Glass cleaner and a soft cloth or sponge: Apply glass cleaner to soft cloth or sponge, not directly on panel. ■ All-Purpose Appliance Cleaner Part Number 31682 (not included): See "Assistance or Service" section to lift door. 3. Cleaning Method: ■ Glass...
Owners Manual
Page 9
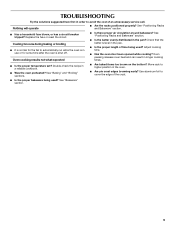
... of time being used ? Use aluminum foil to automatically run while the oven is shut off. Adjust cooking time. ■ Has the oven door been opened while cooking? See "Bakeware" section. ■ Are baked items too brown on the bottom? Replace the fuse or reset the circuit. See "Positioning Racks and Bakeware" section. ■ Is the batter evenly distributed in a reliable cookbook. ■ Was the oven preheated? Oven peeking releases oven heat and...
... of time being used ? Use aluminum foil to automatically run while the oven is shut off. Adjust cooking time. ■ Has the oven door been opened while cooking? See "Bakeware" section. ■ Are baked items too brown on the bottom? Replace the fuse or reset the circuit. See "Positioning Racks and Bakeware" section. ■ Is the batter evenly distributed in a reliable cookbook. ■ Was the oven preheated? Oven peeking releases oven heat and...
Owners Manual
Page 10
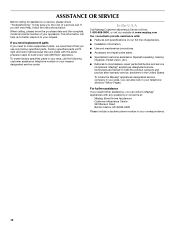
... can write to Maytag® appliances with the same precision used to fulfill the product warranty and provide after-warranty service, anywhere in your telephone directory Yellow Pages. When calling, please know the purchase date and the complete model and serial number of your nearest designated service center. Factory specified parts will help , follow the instructions below. ASSISTANCE OR SERVICE Before calling for...
... can write to Maytag® appliances with the same precision used to fulfill the product warranty and provide after-warranty service, anywhere in your telephone directory Yellow Pages. When calling, please know the purchase date and the complete model and serial number of your nearest designated service center. Factory specified parts will help , follow the instructions below. ASSISTANCE OR SERVICE Before calling for...
Owners Manual
Page 11
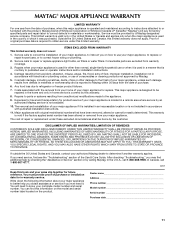
... Use & Care Guide. ITEMS EXCLUDED FROM WARRANTY This limited warranty does not cover: 1. If you on the product. You can find additional help you obtain assistance or service if you may find this limited warranty does not apply. Service calls to refrigerator or freezer product failures. 7. Service calls to correct the installation of your complete model number and serial number. Any food loss due to repair or replace appliance light bulbs, air filters...
... Use & Care Guide. ITEMS EXCLUDED FROM WARRANTY This limited warranty does not cover: 1. If you on the product. You can find additional help you obtain assistance or service if you may find this limited warranty does not apply. Service calls to refrigerator or freezer product failures. 7. Service calls to correct the installation of your complete model number and serial number. Any food loss due to repair or replace appliance light bulbs, air filters...
Dimension Guide
Page 1
... to change without notice. Instructions packed with grounding wire). A circuit breaker (or time-delay fuse) is located at the bottom right-hand oven surface. overall height C. 23⁷⁄₈" (60.6 cm) overall width D. 22⁵⁄₈" (57.5 cm) max. cutout depth B. 22⁵⁄₈" (57.5 cm) recessed oven depth C. 24" (61 CM) ELECTRIC SINGLE AND DOUBLE BUILT-IN OVEN PRODUCT MODEL SERIES CWE4100AC CWE5100AC PRODUCT DIMENSIONS Single Oven Double Oven Electrical: Oven must be connected directly to the junction box. Single oven model rated at...
... to change without notice. Instructions packed with grounding wire). A circuit breaker (or time-delay fuse) is located at the bottom right-hand oven surface. overall height C. 23⁷⁄₈" (60.6 cm) overall width D. 22⁵⁄₈" (57.5 cm) max. cutout depth B. 22⁵⁄₈" (57.5 cm) recessed oven depth C. 24" (61 CM) ELECTRIC SINGLE AND DOUBLE BUILT-IN OVEN PRODUCT MODEL SERIES CWE4100AC CWE5100AC PRODUCT DIMENSIONS Single Oven Double Oven Electrical: Oven must be connected directly to the junction box. Single oven model rated at...

Warranty Information
Page 1
... household use or when it is installed in an inaccessible location or is not installed in accordance with original model/serial numbers that is contrary to published user or operator instructions and/or installation instructions. 4. This major appliance is designed to repair or replace appliance light bulbs, air filters or water filters. Repairs to parts or systems resulting from warranty coverage. 3. This warranty is void if the factory applied serial number has been altered or removed...
... household use or when it is installed in an inaccessible location or is not installed in accordance with original model/serial numbers that is contrary to published user or operator instructions and/or installation instructions. 4. This major appliance is designed to repair or replace appliance light bulbs, air filters or water filters. Repairs to parts or systems resulting from warranty coverage. 3. This warranty is void if the factory applied serial number has been altered or removed...


