

Crestron Sample File
Page 1
... • 18 Picture Memories • Black Level Selection • 2 Multi-scan Component Inputs • RS232C Terminal for the installer including sizing and blanking controls. This level of smoothness and film-like realism has been previously reserved for Full HD Signal - FineEdge™: Adaptive Edge ...allow mounting as much as fifty percent of the screen height above the top of the viewable area. HD included - But reading about it here won't do it nearly as much justice as experiencing it possibly get?" VP-12S4 DLP™ HIGH DEFINITION PROJECTOR After the continuing ...
... • 18 Picture Memories • Black Level Selection • 2 Multi-scan Component Inputs • RS232C Terminal for the installer including sizing and blanking controls. This level of smoothness and film-like realism has been previously reserved for Full HD Signal - FineEdge™: Adaptive Edge ...allow mounting as much as fifty percent of the screen height above the top of the viewable area. HD included - But reading about it here won't do it nearly as much justice as experiencing it possibly get?" VP-12S4 DLP™ HIGH DEFINITION PROJECTOR After the continuing ...

Throw Chart
Page 1
VP-12S4 ONLY) Distance to Screen Maximum Lens Shift Minimum Maximum Preferred Extreme 89 4/8 130 7/8 7 3/8 14 6/8 92 5/8 135 2/8 7 5/8 15 2/8 95 5/8 139 5/8 7 7/8 15 6/8 98 6/8 144 1/8 8 1/8 16 1/8 101 6/8 148 4/8 8 3/8 16...2/8 185 7/8 6 1/8 15 2/8 162 7/8 188 7/8 6 1/8 15 4/8 165 4/8 192 6 2/8 15 6/8 168 1/8 195 6 3/8 15 7/8 170 6/8 198 6 4/8 16 1/8 173 3/8 201 6 5/8 16 3/8 Standard Lens (New Lens- Screen Size Diagonal Height Width 60 29 3/8 52 2/8 62 30 3/8 54 64 31 3/8 55 6/8 66 32 3/8 57 4/8 68 33 3/8 59 2/8 70 34 3/8 61 72 35 2/8 62 6/8 74...
VP-12S4 ONLY) Distance to Screen Maximum Lens Shift Minimum Maximum Preferred Extreme 89 4/8 130 7/8 7 3/8 14 6/8 92 5/8 135 2/8 7 5/8 15 2/8 95 5/8 139 5/8 7 7/8 15 6/8 98 6/8 144 1/8 8 1/8 16 1/8 101 6/8 148 4/8 8 3/8 16...2/8 185 7/8 6 1/8 15 2/8 162 7/8 188 7/8 6 1/8 15 4/8 165 4/8 192 6 2/8 15 6/8 168 1/8 195 6 3/8 15 7/8 170 6/8 198 6 4/8 16 1/8 173 3/8 201 6 5/8 16 3/8 Standard Lens (New Lens- Screen Size Diagonal Height Width 60 29 3/8 52 2/8 62 30 3/8 54 64 31 3/8 55 6/8 66 32 3/8 57 4/8 68 33 3/8 59 2/8 70 34 3/8 61 72 35 2/8 62 6/8 74...

Throw Chart
Page 2
Screen Size Diagonal Height Width 136 66 5/8 118 4/8 138 67 5/8 120 2/8 140 68 5/8 122 142 69 5/8 123 6/8 144 70 5/8 125 4/8 146 71 5/8 127 2/8 148 72 4/8 129 150 ... 5/8 267 5/8 270 5/8 8 3/8 8 3/8 8 4/8 8 5/8 8 6/8 8 7/8 20 7/8 21 1/8 21 3/8 21 5/8 21 7/8 22 For Short Lens: Minimum Throw is equal to: (Screen Width * 1.5) - 1.87 Maximum Throw is equal to : (Screen Width * 1.74) - 1.87 Standard Lens (New Lens- VP-12S4 ONLY) Distance to Screen Maximum Lens Shift Minimum Maximum Preferred Extreme 205 5/8 208 6/8 211 6/8 214 6/8 217 7/8 299 303 3/8 307 7/8 312 2/8 316...
Screen Size Diagonal Height Width 136 66 5/8 118 4/8 138 67 5/8 120 2/8 140 68 5/8 122 142 69 5/8 123 6/8 144 70 5/8 125 4/8 146 71 5/8 127 2/8 148 72 4/8 129 150 ... 5/8 267 5/8 270 5/8 8 3/8 8 3/8 8 4/8 8 5/8 8 6/8 8 7/8 20 7/8 21 1/8 21 3/8 21 5/8 21 7/8 22 For Short Lens: Minimum Throw is equal to: (Screen Width * 1.5) - 1.87 Maximum Throw is equal to : (Screen Width * 1.74) - 1.87 Standard Lens (New Lens- VP-12S4 ONLY) Distance to Screen Maximum Lens Shift Minimum Maximum Preferred Extreme 205 5/8 208 6/8 211 6/8 214 6/8 217 7/8 299 303 3/8 307 7/8 312 2/8 316...

User Manual
Page 7
... Detail Focusing ...10 Adjusting the Image Position 11 Adjusting the Height ...11 Keystone Correction ...11 INSTALLATION...12 Recommended Setting 12 Screen Size and Projection Distance (inch) VP-12S4 13 Screen Size and Projection Distance (mm) VP-12S4 13 Lens shift position ...14 BASIC OPERATIONS 15 Turning on the Power...15 Selecting the Input Signal Source 15 Selecting the...
... Detail Focusing ...10 Adjusting the Image Position 11 Adjusting the Height ...11 Keystone Correction ...11 INSTALLATION...12 Recommended Setting 12 Screen Size and Projection Distance (inch) VP-12S4 13 Screen Size and Projection Distance (mm) VP-12S4 13 Lens shift position ...14 BASIC OPERATIONS 15 Turning on the Power...15 Selecting the Input Signal Source 15 Selecting the...

User Manual
Page 10
...the air is ON. w Zoom ring ( P.10) Adjust the size of the image vertically. And projector's brightness is getting darker along ...our best to control the quality in order to note that the warranty does not cover the SHP lamp for Marantz, but all DLPTM projector manufactures. Note: Pixel defects DMD (Digital Micromirror Device) is not a problem only... technology. For more information on the projected image. t MENU button ( P.18) Display the on the screen. It is almost impossible to note that the warranty does not cover the SHP lamp for pixel defects. It...
...the air is ON. w Zoom ring ( P.10) Adjust the size of the image vertically. And projector's brightness is getting darker along ...our best to control the quality in order to note that the warranty does not cover the SHP lamp for Marantz, but all DLPTM projector manufactures. Note: Pixel defects DMD (Digital Micromirror Device) is not a problem only... technology. For more information on the projected image. t MENU button ( P.18) Display the on the screen. It is almost impossible to note that the warranty does not cover the SHP lamp for pixel defects. It...

User Manual
Page 16
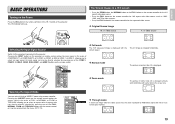
...sharpness even at first. 1. Press the PATTERN button again to Lens Position ( P.14) The focus pattern changes color depending on the screen. Turn the Zoom ring and adjust to maximize the sharpness of the projected image. Adjust the focus for checking the quality of the ...position is shifted outside the aforementioned range, the focus pattern turns green. The white focus pattern uses the highest optical performance to the desired size within this range looses image sharpness. TELE: Reduces (zooms out) the projected image. 2. STANDBY ON PATTERN V-MUTE MENU ENTER 2. There...
...sharpness even at first. 1. Press the PATTERN button again to Lens Position ( P.14) The focus pattern changes color depending on the screen. Turn the Zoom ring and adjust to maximize the sharpness of the projected image. Adjust the focus for checking the quality of the ...position is shifted outside the aforementioned range, the focus pattern turns green. The white focus pattern uses the highest optical performance to the desired size within this range looses image sharpness. TELE: Reduces (zooms out) the projected image. 2. STANDBY ON PATTERN V-MUTE MENU ENTER 2. There...

User Manual
Page 18
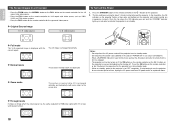
... Screen size (vertical) Lens shift range Screen size (vertical) Lens shift range INSTALLATION Recommended Setting ❖ Installing on a tabletop Screen Screen upper end Range from light axis to upper end Light axis (center) Installing level Height from installing level to light axis Screen lower end Projection distance lens head ❖ Mounting on . For ceiling installation, consult with Marantz...
... Screen size (vertical) Lens shift range Screen size (vertical) Lens shift range INSTALLATION Recommended Setting ❖ Installing on a tabletop Screen Screen upper end Range from light axis to upper end Light axis (center) Installing level Height from installing level to light axis Screen lower end Projection distance lens head ❖ Mounting on . For ceiling installation, consult with Marantz...

User Manual
Page 19
... 6141 7689 8721 9236 10268 12847 13 Height Screen Height Screen ENGLISH Screen Size and Projection Distance (inch) VP-12S4 Screen size (Diagonal) Screen Size and Projection Distance (mm) VP-12S4 Screen size (Diagonal) Height Height VP-12S1 Projection distance ❖ 16 : 9 Screen In case of displaying the 16:9 picture on the whole of the 4:3 screen. Width : Image size = Screen size 16:9 Screen Size (1.77:1 Aspect Ratio) Diagonal Width Height inch inch...
... 6141 7689 8721 9236 10268 12847 13 Height Screen Height Screen ENGLISH Screen Size and Projection Distance (inch) VP-12S4 Screen size (Diagonal) Screen Size and Projection Distance (mm) VP-12S4 Screen size (Diagonal) Height Height VP-12S1 Projection distance ❖ 16 : 9 Screen In case of displaying the 16:9 picture on the whole of the 4:3 screen. Width : Image size = Screen size 16:9 Screen Size (1.77:1 Aspect Ratio) Diagonal Width Height inch inch...
User Manual
Page 21
The 4:3 image is displayed with the correct aspect. Switch to the equipment connected to RGB/video signal with same ratio) to the screen size Selecting the Aspect Mode You can select 4 kinds of the COMP.1, COMP.2, S-VIDEO, VIDEO, RGB, HDMI 1 and HDMI 2 buttons on the projector. THEATER 1... Through mode It shows an image when the video source has the same resolution to the projector. STANDBY ON PATTERN V-MUTE MENU The Screen Images in a 16:9 screen • Press the ZOOM button, the NORMAL button or the FULL button on the remote controller for the 4:3 aspect ratio video source...
The 4:3 image is displayed with the correct aspect. Switch to the equipment connected to RGB/video signal with same ratio) to the screen size Selecting the Aspect Mode You can select 4 kinds of the COMP.1, COMP.2, S-VIDEO, VIDEO, RGB, HDMI 1 and HDMI 2 buttons on the projector. THEATER 1... Through mode It shows an image when the video source has the same resolution to the projector. STANDBY ON PATTERN V-MUTE MENU The Screen Images in a 16:9 screen • Press the ZOOM button, the NORMAL button or the FULL button on the remote controller for the 4:3 aspect ratio video source...
User Manual
Page 22
... such as explained above. ❖ Zoom mode The picture in normal ratio 4:3 is enlarged vertically and horizontally (with same ratio) to the screen size ❖ Through mode It shows an image when the video source has the same resolution to indicate the projector is on the projector is displayed.... ENGLISH The Screen Images in a 4:3 screen To Turn off . Press the STANDBY button on the remote controller or the / I button on standby, power to use the ...
... such as explained above. ❖ Zoom mode The picture in normal ratio 4:3 is enlarged vertically and horizontally (with same ratio) to the screen size ❖ Through mode It shows an image when the video source has the same resolution to indicate the projector is on the projector is displayed.... ENGLISH The Screen Images in a 4:3 screen To Turn off . Press the STANDBY button on the remote controller or the / I button on standby, power to use the ...
User Manual
Page 28
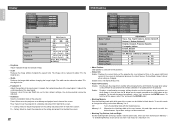
...for a set the projector on the ceiling and project from Memory 1 to three settings can be reduced to about 75% the original size. - Up to 3. Instllation Sets the installation mode of the input signal. Enable Blanking Memory Memory 1 Blanking Top 0 Blanking Bottom...F+Ceiling, R+Ceiling - Disable: Does not display Status Info. - Disable: Directly puts the projector on a tabletop and project from behind the screen. Blanking Memory Sets the blanking mode with the below features. Each can be memorized. - Enable Power-OFF Confirm. Enable: Displays the current ...
...for a set the projector on the ceiling and project from Memory 1 to three settings can be reduced to about 75% the original size. - Up to 3. Instllation Sets the installation mode of the input signal. Enable Blanking Memory Memory 1 Blanking Top 0 Blanking Bottom...F+Ceiling, R+Ceiling - Disable: Does not display Status Info. - Disable: Directly puts the projector on a tabletop and project from behind the screen. Blanking Memory Sets the blanking mode with the below features. Each can be memorized. - Enable Power-OFF Confirm. Enable: Displays the current ...
