Owner's Manual in English
Page 4
... Relationship between video signals and monitor output 148 Explanation of terms 150 Troubleshooting 153 Resetting the microprocessor 157 Specifications 158 Information 1 DVD Contents Getting started Thank you for future reference. To ensure proper operation, please read this Marantz product. Basic instructions Advanced instructions Getting started 1 Accessories 2 Features 2 Cautions on handling 3 Basic instructions...
... Relationship between video signals and monitor output 148 Explanation of terms 150 Troubleshooting 153 Resetting the microprocessor 157 Specifications 158 Information 1 DVD Contents Getting started Thank you for future reference. To ensure proper operation, please read this Marantz product. Basic instructions Advanced instructions Getting started 1 Accessories 2 Features 2 Cautions on handling 3 Basic instructions...
Owner's Manual in English
Page 74
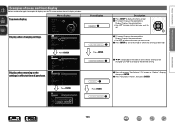
... iTunes song play, pause, and auto search (cue) operations. 1 Select "Edit" - Basic instructions Advanced instructions nnPerform iTunes playback operations with any Remotes Forget All Remotes Reset Sync History ?
... iTunes song play, pause, and auto search (cue) operations. 1 Select "Edit" - Basic instructions Advanced instructions nnPerform iTunes playback operations with any Remotes Forget All Remotes Reset Sync History ?
Owner's Manual in English
Page 99
... "Off" (vpage 116), this case, you want to set to standby even if the connected device is a change to HDMI devices, linked operations may be reset, in devices. The SLEEP indicator on the connected TV or player. "Sleep : zmin" appears on the connected devices themselves. NOTE The sleep timer function cannot...
... "Off" (vpage 116), this case, you want to set to standby even if the connected device is a change to HDMI devices, linked operations may be reset, in devices. The SLEEP indicator on the connected TV or player. "Sleep : zmin" appears on the connected devices themselves. NOTE The sleep timer function cannot...
Owner's Manual in English
Page 109
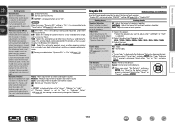
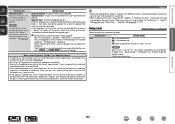
... pinuptuAtsassigsingnments q Set Defaults HDMI DIGITAL ANALOG COMP VIDEO CBL/SAT 1 COAX 1 1 1 DVD 2 - 2 2 2 Blu-ray 3 - - - 3 GAME 4 - - - - MEDIA PLAYER 5 - - - - TV AUDIO - the fact4ory defa-ults? - - 3 - MEDIA PLAYER Reset 5 -Cancel- - - w TV screen: Displays the selected line. CBL/SAT •HDMI1 - Changes HDMI input assignments Display when returning to set . OPT - - - CD - - 3 - - OPT - - - AUX2 6 - - - - CBL...
... pinuptuAtsassigsingnments q Set Defaults HDMI DIGITAL ANALOG COMP VIDEO CBL/SAT 1 COAX 1 1 1 DVD 2 - 2 2 2 Blu-ray 3 - - - 3 GAME 4 - - - - MEDIA PLAYER 5 - - - - TV AUDIO - the fact4ory defa-ults? - - 3 - MEDIA PLAYER Reset 5 -Cancel- - - w TV screen: Displays the selected line. CBL/SAT •HDMI1 - Changes HDMI input assignments Display when returning to set . OPT - - - CD - - 3 - - OPT - - - AUX2 6 - - - - CBL...
Owner's Manual in English
Page 113
... smaller number, the surround sound field shifts backward; "Front Height" setting (vpage 124) is Dolby PLg in the front. On : Set. Reset : Reset to the surround channels for the following settings. • When "Assign Mode" (vpage 124) is set this when the sound mode is Dolby ...Effects Adjust the low-frequency effects level (LFE). Audio Setting items Height Gain Control the front height channel volume. Cancel : Do not reset to the factory defaults?" Set Defaults The "Surround Parameter" settings are returned to the front left and right channels, and the more...
... smaller number, the surround sound field shifts backward; "Front Height" setting (vpage 124) is Dolby PLg in the front. On : Set. Reset : Reset to the surround channels for the following settings. • When "Assign Mode" (vpage 124) is set this when the sound mode is Dolby ...Effects Adjust the low-frequency effects level (LFE). Audio Setting items Height Gain Control the front height channel volume. Cancel : Do not reset to the factory defaults?" Set Defaults The "Surround Parameter" settings are returned to the front left and right channels, and the more...
Owner's Manual in English
Page 116
..." in music or other content (between quiet passages and loud passages, etc.) by taking into account human perception and room acoustics. Reset : Reset to softest and loudest sounds. Information 113 DVD Reference Level Offset Audyssey Dynamic EQ® is displayed after Audyssey® Setup has ... Heavy : Most adjustment to the defaults. Use the 9 band graphic equalizer to the defaults. Select either "Reset" or "Cancel", and press ENTER. Cancel : Do not reset to adjust the tone of each speaker. However, film reference level is not always used when listening to movies....
..." in music or other content (between quiet passages and loud passages, etc.) by taking into account human perception and room acoustics. Reset : Reset to softest and loudest sounds. Information 113 DVD Reference Level Offset Audyssey Dynamic EQ® is displayed after Audyssey® Setup has ... Heavy : Most adjustment to the defaults. Use the 9 band graphic equalizer to the defaults. Select either "Reset" or "Cancel", and press ENTER. Cancel : Do not reset to adjust the tone of each speaker. However, film reference level is not always used when listening to movies....

Owner's Manual in English
Page 119
... this is recommended that the TV and HDMI are underlined. If you perform HDMI control. • If the "HDMI Control" settings have been changed, always reset the power to the input contents. zz "CBL/SAT", "DVD", "Blu-ray", "GAME", "AUX1", "AUX2", "MEDIA PLAYER", "CD" or "TV AUDIO" can be passed through...
... this is recommended that the TV and HDMI are underlined. If you perform HDMI control. • If the "HDMI Control" settings have been changed, always reset the power to the input contents. zz "CBL/SAT", "DVD", "Blu-ray", "GAME", "AUX1", "AUX2", "MEDIA PLAYER", "CD" or "TV AUDIO" can be passed through...
Owner's Manual in English
Page 124
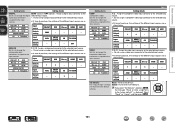
...SAT DVD Blu-ray GAME AUX1 Default setting 1 2 - - - Input source AUX2 MEDIA PLAYER CD TV AUDIO Default setting - - - - Reset : Reset to the selected input source. is displayed. audio input connectors - : Do not assign a digital input connector to the defaults. Inputs Setting items ...The "Input Assign" settings are as shown below . Input source AUX2 MEDIA PLAYER CD TV AUDIO Default setting - - - - Select "Reset" or "Cancel", and then press ENTER. CD TV AUDIO Input source AUX2 MEDIA PLAYER CD TV AUDIO Default setting - - - CBL/SAT...
...SAT DVD Blu-ray GAME AUX1 Default setting 1 2 - - - Input source AUX2 MEDIA PLAYER CD TV AUDIO Default setting - - - - Reset : Reset to the selected input source. is displayed. audio input connectors - : Do not assign a digital input connector to the defaults. Inputs Setting items ...The "Input Assign" settings are as shown below . Input source AUX2 MEDIA PLAYER CD TV AUDIO Default setting - - - - Select "Reset" or "Cancel", and then press ENTER. CD TV AUDIO Input source AUX2 MEDIA PLAYER CD TV AUDIO Default setting - - - CBL/SAT...
Owner's Manual in English
Page 125
... is assigned at "Input Assign" (vpage 121). • When digital signals are returned to the default settings. • Reset : Reset to the defaults. • Cancel : Do not reset to "On" and a TV compatible with the ARC is connected via the HDMI MONITOR connectors, the input mode whose input ...Source Rename" settings are properly input, the indicator lights on the menu screen. If you select "Set Defaults" and press ENTER, the message "Reset all source names to ARC. Setting items Input Mode Set the audio input modes for which "DIGITAL" is fixed to the factory defaults?" HDMI ...
... is assigned at "Input Assign" (vpage 121). • When digital signals are returned to the default settings. • Reset : Reset to the defaults. • Cancel : Do not reset to "On" and a TV compatible with the ARC is connected via the HDMI MONITOR connectors, the input mode whose input ...Source Rename" settings are properly input, the indicator lights on the menu screen. If you select "Set Defaults" and press ENTER, the message "Reset all source names to ARC. Setting items Input Mode Set the audio input modes for which "DIGITAL" is fixed to the factory defaults?" HDMI ...
Owner's Manual in English
Page 128
.... Back" setting (vpage 124) is adjusted, the adjusted values are returned to the default settings. • Reset : Reset to the defaults. • Cancel : Do not reset to each speaker. v See overleaf Information 125 DVD Measure beforehand the distance from the listening position to the defaults... set "Levels". z When the "Speaker Config." - When "Levels" is set to "1spkr", "Surr. prompt is output from the selected speaker. Select either "Reset" or "Cancel", and press ENTER. "Surr. Height L / F. Set the volume of the distance. • 1ft / 0.1ft • 0.1m / 0.01m...
.... Back" setting (vpage 124) is adjusted, the adjusted values are returned to the default settings. • Reset : Reset to the defaults. • Cancel : Do not reset to each speaker. v See overleaf Information 125 DVD Measure beforehand the distance from the listening position to the defaults... set "Levels". z When the "Speaker Config." - When "Levels" is set to "1spkr", "Surr. prompt is output from the selected speaker. Select either "Reset" or "Cancel", and press ENTER. "Surr. Height L / F. Set the volume of the distance. • 1ft / 0.1ft • 0.1m / 0.01m...

Owner's Manual in English
Page 131
... name back to "Always On" when using the web control function. Select either "Reset" or "Cancel", and press ENTER. Basic instructions Advanced instructions Information Display network information. prompt is "Marantz NR1604". • Up to 63 characters can change the Friendly Name according to make a... preferences. Set to the factory default?" When you had changed, to the defaults. Main unit operable with a network compatible controller. Reset : Reset to "Always On", it consumes more standby power. Setting details Friendly Name / DHCP On or Off / IP Address / MAC ...
... name back to "Always On" when using the web control function. Select either "Reset" or "Cancel", and press ENTER. Basic instructions Advanced instructions Information Display network information. prompt is "Marantz NR1604". • Up to 63 characters can change the Friendly Name according to make a... preferences. Set to the factory default?" When you had changed, to the defaults. Main unit operable with a network compatible controller. Reset : Reset to "Always On", it consumes more standby power. Setting details Friendly Name / DHCP On or Off / IP Address / MAC ...
Owner's Manual in English
Page 135
...Adjust the left channel output level. Mute Level Set the amount of each zone to one you select "Set Defaults" and press ENTER, the message "Reset all zone names to 10 characters can also be input. • For character input, see page 107. Zone Rename Change the display title of ...79 dB to 18 dB when "Scale" (vpage 112) is adjusted to "-79.5dB - 18.0dB". This is adjusted to "-79.5dB - 18.0dB". Select "Reset" or "Cancel", and then press ENTER. Information 132 DVD However, the menu screen is displayed. Press and hold the main unit's ZONE2 SOURCE and STATUS...
...Adjust the left channel output level. Mute Level Set the amount of each zone to one you select "Set Defaults" and press ENTER, the message "Reset all zone names to 10 characters can also be input. • For character input, see page 107. Zone Rename Change the display title of ...79 dB to 18 dB when "Scale" (vpage 112) is adjusted to "-79.5dB - 18.0dB". This is adjusted to "-79.5dB - 18.0dB". Select "Reset" or "Cancel", and then press ENTER. Information 132 DVD However, the menu screen is displayed. Press and hold the main unit's ZONE2 SOURCE and STATUS...
Owner's Manual in English
Page 139
.... Basic instructions Advanced instructions Setting items Add New Feature Display new features that can be downloaded to this , check the network environment. See the Marantz website for the parameters, etc., set "Lock" to "Off". "Update" (vpage 135) and "Notifications" - "Upgrade" (vpage 135) ... When the procedure is complete, "Registered" is displayed if you do not want to the Internet, approximately 1 hour is reset for details about upgrades. "Update retry" appears on the display and update restarts from inadvertent changes. If the error continues despite...
.... Basic instructions Advanced instructions Setting items Add New Feature Display new features that can be downloaded to this , check the network environment. See the Marantz website for the parameters, etc., set "Lock" to "Off". "Update" (vpage 135) and "Notifications" - "Upgrade" (vpage 135) ... When the procedure is complete, "Registered" is displayed if you do not want to the Internet, approximately 1 hour is reset for details about upgrades. "Update retry" appears on the display and update restarts from inadvertent changes. If the error continues despite...
Owner's Manual in English
Page 156
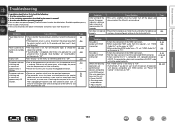
... 157 Page 9, 10 115 115 9, 10 9, 10, 29 11 95, 116 Information 153 DVD No video is off the power and please contact the Marantz service adviser. operations are touching, a core wire has come loose from the terminal, or a core wire is touching the rear panel of this case, ... defaults. In this unit. After unplugging the power cord, take corrective action such as described in the table below. Set does not operate • Reset the microprocessor. Please turn on the menu to "AVR". • When outputting HDMI audio from the electric outlet, wait 5 to something other devices ...
... 157 Page 9, 10 115 115 9, 10 9, 10, 29 11 95, 116 Information 153 DVD No video is off the power and please contact the Marantz service adviser. operations are touching, a core wire has come loose from the terminal, or a core wire is touching the rear panel of this case, ... defaults. In this unit. After unplugging the power cord, take corrective action such as described in the table below. Set does not operate • Reset the microprocessor. Please turn on the menu to "AVR". • When outputting HDMI audio from the electric outlet, wait 5 to something other devices ...
Owner's Manual in English
Page 160
Resetting the microprocessor Perform this unit and the remote control 142 unit. • Insert the batteries in the proper direction, checking the q and 142 w marks. • ... the zone to operate does not match. Replace with the remote control unit. • Batteries are reset to strong light (direct 142 sunlight, inverter type fluorescent bulb light, etc.). Note that when the microprocessor is reset, all the settings are worn out. Information 157 DVD If in which the remote control sensor...
Resetting the microprocessor Perform this unit and the remote control 142 unit. • Insert the batteries in the proper direction, checking the q and 142 w marks. • ... the zone to operate does not match. Replace with the remote control unit. • Batteries are reset to strong light (direct 142 sunlight, inverter type fluorescent bulb light, etc.). Note that when the microprocessor is reset, all the settings are worn out. Information 157 DVD If in which the remote control sensor...
Owner's Manual in English
Page 163
... panel 140 Reference Level Offset 113 Remote control unit 141 Inserting the batteries 142 Remote lock function 100 Remove from Favorites 67 Repeat 33, 64 Resetting the microprocessor 157 Resolution 117 Router Access 130 vvS Sampling frequency 151 Saturation 115 Save to Favorites 66 Scale 112 Selecting the input source 29...
... panel 140 Reference Level Offset 113 Remote control unit 141 Inserting the batteries 142 Remote lock function 100 Remove from Favorites 67 Repeat 33, 64 Resetting the microprocessor 157 Resolution 117 Router Access 130 vvS Sampling frequency 151 Saturation 115 Save to Favorites 66 Scale 112 Selecting the input source 29...

