NR1601 User Manual - English
Page 5
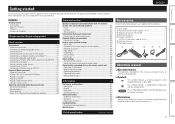
... are supplied with the product. After reading them for operations. q User guide 1 w Power cord (Cord length: Approx. 1.7 m 1 e Remote control unit (RC010SR 1 r R03/AAA batteries 2 t Setup microphone (ACM1H, Cord length: Approx. 6.0 m 1 y AM loop antenna 1 u FM indoor antenna 1 w e t y u About this manual nnOperation buttons The operations described in this user guide carefully ... of terms 70 Troubleshooting 72 Resetting the microprocessor 74 Specifications 74 Accessories Check that the illustrations in these instructions are for purchasing this Marantz product.
... are supplied with the product. After reading them for operations. q User guide 1 w Power cord (Cord length: Approx. 1.7 m 1 e Remote control unit (RC010SR 1 r R03/AAA batteries 2 t Setup microphone (ACM1H, Cord length: Approx. 6.0 m 1 y AM loop antenna 1 u FM indoor antenna 1 w e t y u About this manual nnOperation buttons The operations described in this user guide carefully ... of terms 70 Troubleshooting 72 Resetting the microprocessor 74 Specifications 74 Accessories Check that the illustrations in these instructions are for purchasing this Marantz product.
NR1601 User Manual - English
Page 6
... Dolby TrueHD, DTS-HD Master Audio, etc. Dolby Pro Logic gz The unit is provided with the M-Xport, a Marantz original innovation that provides outstanding expandability. M-XPort (Marantz-eXtension Port) This unit is equipped with a Dolby Pro Logic gz decoder. If this happens, let the unit sit.... • About Condensation If there is a major difference in temperature between this unit and a TV to the standby mode. Auto setup function The unit is provided with the supplied microphone. Reflecting sound and audio characteristics of speakers are enabled with the power turned off the...
... Dolby TrueHD, DTS-HD Master Audio, etc. Dolby Pro Logic gz The unit is provided with the M-Xport, a Marantz original innovation that provides outstanding expandability. M-XPort (Marantz-eXtension Port) This unit is equipped with a Dolby Pro Logic gz decoder. If this happens, let the unit sit.... • About Condensation If there is a major difference in temperature between this unit and a TV to the standby mode. Auto setup function The unit is provided with the supplied microphone. Reflecting sound and audio characteristics of speakers are enabled with the power turned off the...

NR1601 User Manual - English
Page 7
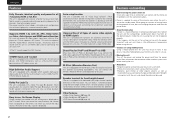
... speakers other than the 7.1-channel system (with an HDMI connector. Use the setup microphone (ACM1H) included with surround back speakers. The "Simple version" section provides the speaker installation, connection, and setup methods for the 7.1-channel system with the product, for each device. 1 ... Step 3 Calculating Step 4 Check Step 5 Store Finish 3 For the installing, connecting, and setup methods of the connected devices, refer to the user manuals for automatic setup. Connect 7.1-channel speakers, a TV and Bluray Disc player equipped with surround back speakers), see ...
... speakers other than the 7.1-channel system (with an HDMI connector. Use the setup microphone (ACM1H) included with surround back speakers. The "Simple version" section provides the speaker installation, connection, and setup methods for the 7.1-channel system with the product, for each device. 1 ... Step 3 Calculating Step 4 Check Step 5 Store Finish 3 For the installing, connecting, and setup methods of the connected devices, refer to the user manuals for automatic setup. Connect 7.1-channel speakers, a TV and Bluray Disc player equipped with surround back speakers), see ...
NR1601 User Manual - English
Page 8
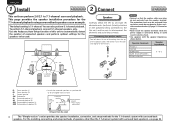
... speaker • Point slightly downwards GViewed from the sideH 4 The "Simple version" section provides the speaker installation, connection, and setup methods for the speakers to automatically detect the number of speakers other (vpage 71 "Protection Circuit"). • Never touch the speaker... NEDERLANDS SVENSKA 1 Install 2 1 2 3 4 5 Connect 1 2345 This unit can also perform 5.1-channel playback. Use the Audyssey Auto Setup function of the speaker cable, then either twist the core wire tightly or terminate it. This page provides the speaker installation procedure for the ...
... speaker • Point slightly downwards GViewed from the sideH 4 The "Simple version" section provides the speaker installation, connection, and setup methods for the speakers to automatically detect the number of speakers other (vpage 71 "Protection Circuit"). • Never touch the speaker... NEDERLANDS SVENSKA 1 Install 2 1 2 3 4 5 Connect 1 2345 This unit can also perform 5.1-channel playback. Use the Audyssey Auto Setup function of the speaker cable, then either twist the core wire tightly or terminate it. This page provides the speaker installation procedure for the ...
NR1601 User Manual - English
Page 9
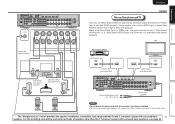
...(AC 120 V, 60 Hz) Power cord (supplied) NOTE • Do not plug in abnormal playback. For the installing, connecting, and setup methods of speakers other than the 7.1-channel system (with built-in amplifier Speaker cables (sold separately) SL SR SBL SBR Blu-ray Disc...FR C Subwoofer with surround back speakers), see page 30. Information The "Simple version" section provides the speaker installation, connection, and setup methods for enhanced high-quality playback. Simple version SVENSKA NEDERLANDS ESPAÑOL ITALIANO FRANÇAIS DEUTSCH ENGLISH Connect Blu-ray Disc ...
...(AC 120 V, 60 Hz) Power cord (supplied) NOTE • Do not plug in abnormal playback. For the installing, connecting, and setup methods of speakers other than the 7.1-channel system (with built-in amplifier Speaker cables (sold separately) SL SR SBL SBR Blu-ray Disc...FR C Subwoofer with surround back speakers), see page 30. Information The "Simple version" section provides the speaker installation, connection, and setup methods for enhanced high-quality playback. Simple version SVENSKA NEDERLANDS ESPAÑOL ITALIANO FRANÇAIS DEUTSCH ENGLISH Connect Blu-ray Disc ...
NR1601 User Manual - English
Page 10
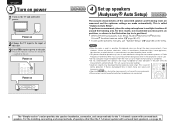
...8226; Cell phones should be performed when headphones are connected. 6 The "Simple version" section provides the speaker installation, connection, and setup methods for the 7.1-channel system with surround back speakers), see page 30. This is supplied to the unit. ENGLISH DEUTSCH FRANÇ... the TV input to turn on the TV and subwoofer power. Background noise can disrupt the room measurements. To perform measurement, place the setup microphone in volume. • Operating VOLUME + - Close windows, silence cell phones, televisions, radios, air conditioners, fluorescent lights, home ...
...8226; Cell phones should be performed when headphones are connected. 6 The "Simple version" section provides the speaker installation, connection, and setup methods for the 7.1-channel system with surround back speakers), see page 30. This is supplied to the unit. ENGLISH DEUTSCH FRANÇ... the TV input to turn on the TV and subwoofer power. Background noise can disrupt the room measurements. To perform measurement, place the setup microphone in volume. • Operating VOLUME + - Close windows, silence cell phones, televisions, radios, air conditioners, fluorescent lights, home ...

NR1601 User Manual - English
Page 11
... : "Off" • Standby mode : "Off" Advanced version Information The "Simple version" section provides the speaker installation, connection, and setup methods for the subwoofer. Audyssey MultEQ® uses the measurements from this position to "On" and disable the volume adjustment and crossover frequency setting... best results, we recommend you measure in six positions, as shown in the main listening position. Before starting Audyssey Auto Setup, place the setup microphone in GExample qH. nn When using a subwoofer with surround back speakers), see page 30. nn When using a ...
... : "Off" • Standby mode : "Off" Advanced version Information The "Simple version" section provides the speaker installation, connection, and setup methods for the subwoofer. Audyssey MultEQ® uses the measurements from this position to "On" and disable the volume adjustment and crossover frequency setting... best results, we recommend you measure in six positions, as shown in the main listening position. Before starting Audyssey Auto Setup, place the setup microphone in GExample qH. nn When using a subwoofer with surround back speakers), see page 30. nn When using a ...
NR1601 User Manual - English
Page 12
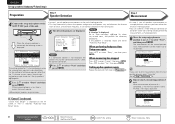
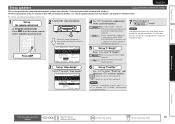
...Step 3 Calculating ) 9 Repeat step 8, measuring positions 3 to six positions. It also corrects distortion in up to 6. When performing Audyssey Auto Setup over again Press ui to select "Next" and then press ENTER. Check the speaker connection. 7 Use ui to select "Retry", and then press... and 4 of distortion within the listening area by performing measurements at 2nd listening position. If "Yes" is displayed. 3-1.Audyssey Auto Setup MultEQ Please place microphone at ear height at the main listening position. • This step automatically checks the speaker configuration and speaker ...
...Step 3 Calculating ) 9 Repeat step 8, measuring positions 3 to six positions. It also corrects distortion in up to 6. When performing Audyssey Auto Setup over again Press ui to select "Next" and then press ENTER. Check the speaker connection. 7 Use ui to select "Retry", and then press... and 4 of distortion within the listening area by performing measurements at 2nd listening position. If "Yes" is displayed. 3-1.Audyssey Auto Setup MultEQ Please place microphone at ear height at the main listening position. • This step automatically checks the speaker configuration and speaker ...
NR1601 User Manual - English
Page 13
... room is displayed, see page 47. nn When turning Dynamic Volume on • Use o to store measurement values. NOTE After performing Audyssey Auto Setup, do not want to check another item, press RETURN. 12 Use ui to select "Store" and then press ENTER. NOTE • If the...the measurement results. NOTE During saving of each speaker in subwoofers. • If you do not change speaker positions or orientation, perform Audyssey Auto Setup again to find the optimal equalizer settings. 13 Use ui to select "Next" and then press ENTER. In event of Dynamic Volume settings, see...
... room is displayed, see page 47. nn When turning Dynamic Volume on • Use o to store measurement values. NOTE After performing Audyssey Auto Setup, do not want to check another item, press RETURN. 12 Use ui to select "Store" and then press ENTER. NOTE • If the...the measurement results. NOTE During saving of each speaker in subwoofers. • If you do not change speaker positions or orientation, perform Audyssey Auto Setup again to find the optimal equalizer settings. 13 Use ui to select "Next" and then press ENTER. In event of Dynamic Volume settings, see...
NR1601 User Manual - English
Page 14
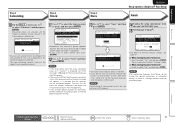
...Phase Retry Cancel Skip [ ]:Up/Down [ ]:CH • The displayed is correct, press ui to the device other than the supplied setup microphone SETUP MIC jack of the displayed speaker. [ENT]:Select [RTN]:Back Speaker Config. Check Check the speaker configuration. This function enables you are quieter.... • Speaker or subwoofer sound is too low. equalizer characteristics after Audyssey Auto Setup. NOTE Be sure to turn off the power before checking speaker connections. 1 Use ui to check the measurement results and If...
...Phase Retry Cancel Skip [ ]:Up/Down [ ]:CH • The displayed is correct, press ui to the device other than the supplied setup microphone SETUP MIC jack of the displayed speaker. [ENT]:Select [RTN]:Back Speaker Config. Check Check the speaker configuration. This function enables you are quieter.... • Speaker or subwoofer sound is too low. equalizer characteristics after Audyssey Auto Setup. NOTE Be sure to turn off the power before checking speaker connections. 1 Use ui to check the measurement results and If...
NR1601 User Manual - English
Page 18
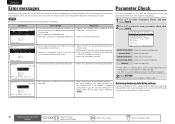
...: Displayed. HDCP is copyright protection technology comprised of data encryption and authentication of on-screen display • Menu screen MENU 1.Audio Adjust 2.Information 3.Auto Setup 4.Manual Setup 5.Input Setup [ENT]:Select • Status display screen When the input source is switched When the volume is adjusted [Auto] IN :DVD MODE:STEREO Master Volume...
...: Displayed. HDCP is copyright protection technology comprised of data encryption and authentication of on-screen display • Menu screen MENU 1.Audio Adjust 2.Information 3.Auto Setup 4.Manual Setup 5.Input Setup [ENT]:Select • Status display screen When the input source is switched When the volume is adjusted [Auto] IN :DVD MODE:STEREO Master Volume...
NR1601 User Manual - English
Page 19
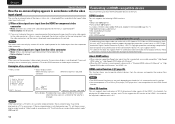
... audio connections. • Signals cannot be limited by the HDMI audio specifications of digital video signals and digital audio signals over a single HDMI cable. HDMI Setup (vpage 51) Make settings for connections Audio and video cable (sold separately) HDMI cable • This interface allows transfer of the connected device regarding permissible...
... audio connections. • Signals cannot be limited by the HDMI audio specifications of digital video signals and digital audio signals over a single HDMI cable. HDMI Setup (vpage 51) Make settings for connections Audio and video cable (sold separately) HDMI cable • This interface allows transfer of the connected device regarding permissible...
NR1601 User Manual - English
Page 26
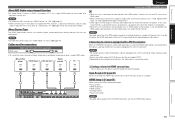
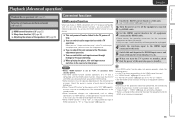
...player. 2 Press ON to turn on the power of this unit. w Load the disc in the menu. OK to be set from "Input Setup" - Playing an iPod® You can play back compressed audio with the iPod. NOTE If the connections screen is "OFF". • In .... • "Direct iPod" is as "." (period). • In "Remote mode", the iPod display is displayed on /standby (Default : Marantz) Switch TV input (Default : Marantz) Repeat playback and shuffle playback can specify the duration of this unit. Playback starts. • You can also be played. 22 6 Press ENTER...
...player. 2 Press ON to turn on the power of this unit. w Load the disc in the menu. OK to be set from "Input Setup" - Playing an iPod® You can play back compressed audio with the iPod. NOTE If the connections screen is "OFF". • In .... • "Direct iPod" is as "." (period). • In "Remote mode", the iPod display is displayed on /standby (Default : Marantz) Switch TV input (Default : Marantz) Repeat playback and shuffle playback can specify the duration of this unit. Playback starts. • You can also be played. 22 6 Press ENTER...
NR1601 User Manual - English
Page 27
Also, files encoded in WMA format when ripped from "Input Setup" - When using this unit. Important information nnUSB memory devices A... with the data on -screen display to connect and use a computer via a USB hub. • Marantz does not guarantee that can draw power from an AC adapter, we recommend playback in the menu. 23 ... Press ui to the original screen. • To play music files stored on /standby (Default : Marantz) Switch TV input (Default : Marantz) Advanced version Information Repeat playback and shuffle playback can be set from a CD, etc. NOTE •...
Also, files encoded in WMA format when ripped from "Input Setup" - When using this unit. Important information nnUSB memory devices A... with the data on -screen display to connect and use a computer via a USB hub. • Marantz does not guarantee that can draw power from an AC adapter, we recommend playback in the menu. 23 ... Press ui to the original screen. • To play music files stored on /standby (Default : Marantz) Switch TV input (Default : Marantz) Advanced version Information Repeat playback and shuffle playback can be set from a CD, etc. NOTE •...
NR1601 User Manual - English
Page 30
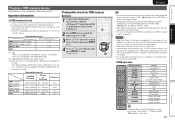
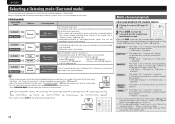
... surround back speaker is to "None". For details, see "Types of the input signal. to select the surround decoder to "Normal", and the "Front Speaker Setup" setting (vpage 51) is for enjoying stereo sound from all speakers. DOLBY PLgz z1 This mode is for 7.1-channel, 6.1-channel or 5.1-channel surround playback using...
... surround back speaker is to "None". For details, see "Types of the input signal. to select the surround decoder to "Normal", and the "Front Speaker Setup" setting (vpage 51) is for enjoying stereo sound from all speakers. DOLBY PLgz z1 This mode is for 7.1-channel, 6.1-channel or 5.1-channel surround playback using...
NR1601 User Manual - English
Page 34
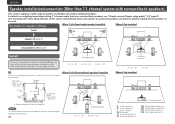
For details on installing/connecting/setting 7.1 channel audio that uses surround back speakers, see "Simple version (Simple setup guide)" (vpage 3). Procedure for speaker settings When 7.1ch (Front height speaker) installed When 5.1ch installed Install FHL FHR Connect (vpage 31) Set up speakers .... ENGLISH DEUTSCH FRANÇAIS ITALIANO ESPAÑOL NEDERLANDS SVENSKA Speaker installation/connection (Other than ear level. Use the Audyssey® Auto Setup function of this unit to automatically detect the number of speaker installation/connection/setting procedures.
For details on installing/connecting/setting 7.1 channel audio that uses surround back speakers, see "Simple version (Simple setup guide)" (vpage 3). Procedure for speaker settings When 7.1ch (Front height speaker) installed When 5.1ch installed Install FHL FHR Connect (vpage 31) Set up speakers .... ENGLISH DEUTSCH FRANÇAIS ITALIANO ESPAÑOL NEDERLANDS SVENSKA Speaker installation/connection (Other than ear level. Use the Audyssey® Auto Setup function of this unit to automatically detect the number of speaker installation/connection/setting procedures.
NR1601 User Manual - English
Page 36
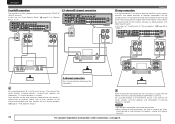
..., depending on the speaker's specifications or playback source such as front speakers (A) for multichannel playback and front speakers (B) for 2-channel playback (vpage 51 "Front Speaker Setup"). In this case, set "Front Speaker Setup" (vpage 51) of "Speaker Setup" to "B". 2.1-channel/2-channel connection SVENSKA Connect Bi-amp connection A bi-amp connection is available.
..., depending on the speaker's specifications or playback source such as front speakers (A) for multichannel playback and front speakers (B) for 2-channel playback (vpage 51 "Front Speaker Setup"). In this case, set "Front Speaker Setup" (vpage 51) of "Speaker Setup" to "B". 2.1-channel/2-channel connection SVENSKA Connect Bi-amp connection A bi-amp connection is available.
NR1601 User Manual - English
Page 37
...performed. First install and connect the speakers to this to the FRONT A terminals. 5 Set up speakers This section provides the setup methods of "Simple version". Normal SPKR-C Set when using 9.1-channel (Front/Center/Surround/Surround Back/Front height/Subwoofer) speakers. In... event of the 7.1-channel system with surround back speakers). Press AMP 2 Connect the setup microphone. Set for connecting a tweeter of the connected speakers. Measure Set to select a speaker. Skip Set not to measure the...
...performed. First install and connect the speakers to this to the FRONT A terminals. 5 Set up speakers This section provides the setup methods of "Simple version". Normal SPKR-C Set when using 9.1-channel (Front/Center/Surround/Surround Back/Front height/Subwoofer) speakers. In... event of the 7.1-channel system with surround back speakers). Press AMP 2 Connect the setup microphone. Set for connecting a tweeter of the connected speakers. Measure Set to select a speaker. Skip Set not to measure the...
NR1601 User Manual - English
Page 39
... settings. • Carry out steps 1 and 2 should any of the operations below be performed, the interlocking function may be reset, in the TV audio output setup operation, you turn the TV's power to standby, check that is compatible with this unit is not set to "ON", it is set to "OFF...
... settings. • Carry out steps 1 and 2 should any of the operations below be performed, the interlocking function may be reset, in the TV audio output setup operation, you turn the TV's power to standby, check that is compatible with this unit is not set to "ON", it is set to "OFF...
NR1601 User Manual - English
Page 41
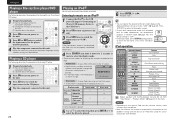
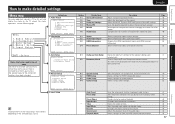
... 37 Changes input connector assignment. Audio Adjust 1.Audio Adjust 1.Surround Parameter 2.Tone 3.Audyssey Settings 4.Manual EQ 5.M-DAX 6.Audio Delay Menu 1.Audio Adjust 2.Information 3.Auto Setup 4.Manual Setup 5.Input Setup [ENT]:Select [RTN]:Back 2. Sets the audio input mode and decode mode. Shows information about tuner preset channels. Assigns name to program radio stations...
... 37 Changes input connector assignment. Audio Adjust 1.Audio Adjust 1.Surround Parameter 2.Tone 3.Audyssey Settings 4.Manual EQ 5.M-DAX 6.Audio Delay Menu 1.Audio Adjust 2.Information 3.Auto Setup 4.Manual Setup 5.Input Setup [ENT]:Select [RTN]:Back 2. Sets the audio input mode and decode mode. Shows information about tuner preset channels. Assigns name to program radio stations...


