NR1601 User Manual - English
Page 5
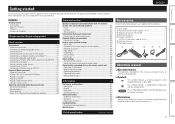
... DEUTSCH ENGLISH Simple version Basic version Advanced version Getting started 1 Accessories 1 About this manual 1 Features 2 Cautions on handling 2 Simple version (Simple setup guide 3 Basic version 12 Connections 13 Important information 13 Connecting an HDMI-compatible device 14 Connecting a TV 16 Connecting a Blu-ray Disc player /...product. To ensure proper operation, please read this manual 1 This symbol indicates a supplementary information and tips for purchasing this Marantz product. NOTE This symbol indicates points to remember operations or function limitations.
... DEUTSCH ENGLISH Simple version Basic version Advanced version Getting started 1 Accessories 1 About this manual 1 Features 2 Cautions on handling 2 Simple version (Simple setup guide 3 Basic version 12 Connections 13 Important information 13 Connecting an HDMI-compatible device 14 Connecting a TV 16 Connecting a Blu-ray Disc player /...product. To ensure proper operation, please read this manual 1 This symbol indicates a supplementary information and tips for purchasing this Marantz product. NOTE This symbol indicates points to remember operations or function limitations.
NR1601 User Manual - English
Page 6
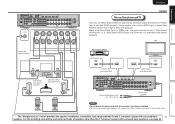
...is set to a monitor, allowing connection between this unit. Speaker terminal for the listening environment. Auto setup function The unit is provided with an "Auto setup function" which plays back TV sound with rich spacial expression. The sound from the speakers is picked ... the input source, the name of various video signals (component video, video) that are no problems with the M-Xport, a Marantz original innovation that provides outstanding expandability. The power amplifier circuit adopts a discrete-circuit configuration that achieves high-quality surround sound play back...
...is set to a monitor, allowing connection between this unit. Speaker terminal for the listening environment. Auto setup function The unit is provided with an "Auto setup function" which plays back TV sound with rich spacial expression. The sound from the speakers is picked ... the input source, the name of various video signals (component video, video) that are no problems with the M-Xport, a Marantz original innovation that provides outstanding expandability. The power amplifier circuit adopts a discrete-circuit configuration that achieves high-quality surround sound play back...

NR1601 User Manual - English
Page 7
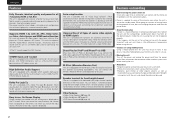
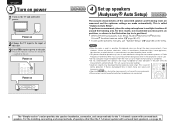
...unit, turn off the power to the user manuals for each device. 1 2 3 4 5 Install Connect Turn on Set up speakers (Audyssey® Auto Setup) Preparation Step 1 Speaker Detection Step 2 Measurement Step 3 Calculating Step 4 Check Step 5 Store Finish 3 Set up Play back (vpage 4) (vpage 4) power.... Connect 7.1-channel speakers, a TV and Bluray Disc player equipped with surround back speakers), see page 30. Use the setup microphone (ACM1H) included with the product, for the 7.1-channel system with surround back speakers. The "Simple version" section provides the...
...unit, turn off the power to the user manuals for each device. 1 2 3 4 5 Install Connect Turn on Set up speakers (Audyssey® Auto Setup) Preparation Step 1 Speaker Detection Step 2 Measurement Step 3 Calculating Step 4 Check Step 5 Store Finish 3 Set up Play back (vpage 4) (vpage 4) power.... Connect 7.1-channel speakers, a TV and Bluray Disc player equipped with surround back speakers), see page 30. Use the setup microphone (ACM1H) included with the product, for the 7.1-channel system with surround back speakers. The "Simple version" section provides the...
NR1601 User Manual - English
Page 8
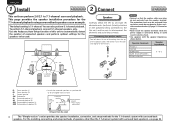
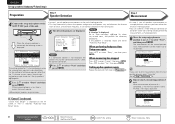
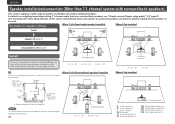
...speaker • Point slightly downwards GViewed from the sideH 4 The "Simple version" section provides the speaker installation, connection, and setup methods for the 7.1-channel system with the speaker impedances shown below. To perform 5.1-channel playback, connect 5.1-channel speakers only. Use the ...Audyssey Auto Setup function of connected speakers and perform optimal settings for the 7.1-channel playback using surround back speakers as an example. The ...
...speaker • Point slightly downwards GViewed from the sideH 4 The "Simple version" section provides the speaker installation, connection, and setup methods for the 7.1-channel system with the speaker impedances shown below. To perform 5.1-channel playback, connect 5.1-channel speakers only. Use the ...Audyssey Auto Setup function of connected speakers and perform optimal settings for the 7.1-channel playback using surround back speakers as an example. The ...
NR1601 User Manual - English
Page 9
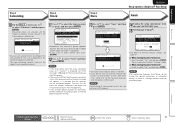
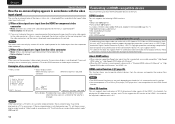
... completed. • Do not bundle power cords together with surround back speakers), see page 30. For the installing, connecting, and setup methods of speakers other than the 7.1-channel system (with connection cables. Using a cable without the HDMI logo (an uncertified HDMI product...) may result in humming or noise. The "Simple version" section provides the speaker installation, connection, and setup methods for the 7.1-channel system with Ethernet" for enhanced high-quality playback. Doing so can result in abnormal playback. When outputting Deep...
... completed. • Do not bundle power cords together with surround back speakers), see page 30. For the installing, connecting, and setup methods of speakers other than the 7.1-channel system (with connection cables. Using a cable without the HDMI logo (an uncertified HDMI product...) may result in humming or noise. The "Simple version" section provides the speaker installation, connection, and setup methods for the 7.1-channel system with Ethernet" for enhanced high-quality playback. Doing so can result in abnormal playback. When outputting Deep...
NR1601 User Manual - English
Page 10
... on Power on ITALIANO ESPAÑOL 1 2345 NEDERLANDS SVENSKA 4 Set up the speakers manually, use ). • Do not unplug the setup microphone from all around the listening area. NOTE • Make the room as quiet as measurements may be performed when headphones are being made automatically...be affected by these test signals will cause inaccurate readings. • Loud test sounds may be placed away from the main unit until Audyssey Auto Setup is part of this unit. 3 Press ON to turn on the TV and subwoofer power. Power on the menu. This will increase in use ...
... on Power on ITALIANO ESPAÑOL 1 2345 NEDERLANDS SVENSKA 4 Set up the speakers manually, use ). • Do not unplug the setup microphone from all around the listening area. NOTE • Make the room as quiet as measurements may be performed when headphones are being made automatically...be affected by these test signals will cause inaccurate readings. • Loud test sounds may be placed away from the main unit until Audyssey Auto Setup is part of this unit. 3 Press ON to turn on the TV and subwoofer power. Power on the menu. This will increase in use ...

NR1601 User Manual - English
Page 11
...209;OL ITALIANO FRANÇAIS DEUTSCH ENGLISH Set up speakers (Audyssey® Auto Setup) About setup microphone placement • Measurements are performed by placing the setup microphone successively at multiple points throughout the listening environment results in more effective correction. For... the installing, connecting, and setup methods of the listener's ear. Before starting Audyssey Auto Setup, place the setup microphone in the main listening position. nn When using a subwoofer without a direct mode...
...209;OL ITALIANO FRANÇAIS DEUTSCH ENGLISH Set up speakers (Audyssey® Auto Setup) About setup microphone placement • Measurements are performed by placing the setup microphone successively at multiple points throughout the listening environment results in more effective correction. For... the installing, connecting, and setup methods of the listener's ear. Before starting Audyssey Auto Setup, place the setup microphone in the main listening position. nn When using a subwoofer without a direct mode...
NR1601 User Manual - English
Page 12
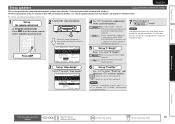
... multiple positions (two to select "Start" and then press ENTER. Measurements can be connected correctly. When performing Audyssey Auto Setup over again Press ui to select "Cancel", then press ENTER. Step2:Measurement MultEQ Please place microphone at ear height at main... menu Press o p to 6. When measurement of position 6 is resolved, return and restart "Audyssey Auto Setup". When measuring begins, a test tone is selected "Cancel Auto Setup?" It also corrects distortion in up speakers other than the 7.1-channel system, select "Amp Assign" and perform...
... multiple positions (two to select "Start" and then press ENTER. Measurements can be connected correctly. When performing Audyssey Auto Setup over again Press ui to select "Cancel", then press ENTER. Step2:Measurement MultEQ Please place microphone at ear height at main... menu Press o p to 6. When measurement of position 6 is resolved, return and restart "Audyssey Auto Setup". When measuring begins, a test tone is selected "Cancel Auto Setup?" It also corrects distortion in up speakers other than the 7.1-channel system, select "Amp Assign" and perform...
NR1601 User Manual - English
Page 13
...of speakers connected. The time required for this unit off, check the speaker connections and repeat the measurement process from the unit's SETUP MIC jack. 15 Set Dynamic Volume®. NOTE • If the result differs from the actual connection status after remeasurement or... Please wait... [----------] • Saving the results requires about 10 seconds. • If you change speaker positions or orientation, perform Audyssey Auto Setup again to find the optimal equalizer settings. 13 Use ui to select "Store" and then press ENTER. Step3:Calculating MultEQ Calculating Please wait... ...
...of speakers connected. The time required for this unit off, check the speaker connections and repeat the measurement process from the unit's SETUP MIC jack. 15 Set Dynamic Volume®. NOTE • If the result differs from the actual connection status after remeasurement or... Please wait... [----------] • Saving the results requires about 10 seconds. • If you change speaker positions or orientation, perform Audyssey Auto Setup again to find the optimal equalizer settings. 13 Use ui to select "Store" and then press ENTER. Step3:Calculating MultEQ Calculating Please wait... ...
NR1601 User Manual - English
Page 14
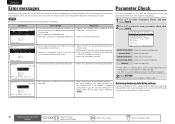
... DEUTSCH FRANÇAIS ITALIANO ESPAÑOL NEDERLANDS SVENSKA Error messages Parameter Check An error message is displayed if Audyssey® Auto Setup could be detected. • The front L speaker was not properly detected. • Check the speaker connections. 2 Use ui ...and If this happens, check the relevant items, be sure to take the necessary measures, then perform Audyssey Auto Setup over again. equalizer characteristics after Audyssey Auto Setup. Channel Level Check Check the channel level. Check Check the crossover frequency. reversed. • For some speakers,...
... DEUTSCH FRANÇAIS ITALIANO ESPAÑOL NEDERLANDS SVENSKA Error messages Parameter Check An error message is displayed if Audyssey® Auto Setup could be detected. • The front L speaker was not properly detected. • Check the speaker connections. 2 Use ui ...and If this happens, check the relevant items, be sure to take the necessary measures, then perform Audyssey Auto Setup over again. equalizer characteristics after Audyssey Auto Setup. Channel Level Check Check the channel level. Check Check the crossover frequency. reversed. • For some speakers,...
NR1601 User Manual - English
Page 18
... (3 dimensional) video signals of the connected AV device. Read the owner's manual of on-screen display • Menu screen MENU 1.Audio Adjust 2.Information 3.Auto Setup 4.Manual Setup 5.Input Setup [ENT]:Select • Status display screen When the input source is switched When the volume is superimposedz. • Status display: Not displayed. HDCP is...
... (3 dimensional) video signals of the connected AV device. Read the owner's manual of on-screen display • Menu screen MENU 1.Audio Adjust 2.Information 3.Auto Setup 4.Manual Setup 5.Input Setup [ENT]:Select • Status display screen When the input source is switched When the volume is superimposedz. • Status display: Not displayed. HDCP is...
NR1601 User Manual - English
Page 19
... a DVI-D connector When an HDMI/DVI conversion cable (sold separately) HDMI cable • This interface allows transfer of the connected device regarding permissible inputs. HDMI Setup (vpage 51) Make settings for HDMI video/audio output. • Auto Lip Sync • HDMI Audio Out • HDMI Control • Standby Source • Power...
... a DVI-D connector When an HDMI/DVI conversion cable (sold separately) HDMI cable • This interface allows transfer of the connected device regarding permissible inputs. HDMI Setup (vpage 51) Make settings for HDMI video/audio output. • Auto Lip Sync • HDMI Audio Out • HDMI Control • Standby Source • Power...
NR1601 User Manual - English
Page 26
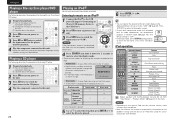
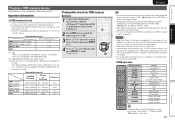
...-screen display to the original screen. • To play back both video, photo and audio. Press uio p to return to be set from "Input Setup" - NOTE • Depending on the type of the on power to the unit. 3 Press CD twice to switch the input source to the CD ...the iPod screen. • "Direct iPod" is as shown at menu "USB" (vpage 53). Direct mode Display iPod information on /standby (Default : Marantz) Switch TV input (Default : Marantz) Repeat playback and shuffle playback can also be displayed (default: 30 sec) at right. Make the necessary settings on the power of this...
...-screen display to the original screen. • To play back both video, photo and audio. Press uio p to return to be set from "Input Setup" - NOTE • Depending on the type of the on power to the unit. 3 Press CD twice to switch the input source to the CD ...the iPod screen. • "Direct iPod" is as shown at menu "USB" (vpage 53). Direct mode Display iPod information on /standby (Default : Marantz) Switch TV input (Default : Marantz) Repeat playback and shuffle playback can also be displayed (default: 30 sec) at right. Make the necessary settings on the power of this...
NR1601 User Manual - English
Page 27
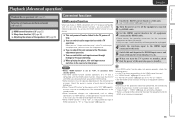
... of this unit to play back compressed audio with the USB memory device. • USB memory devices will operate or be set from "Input Setup" - Important information nnUSB memory devices A USB memory device can be played. nnUSB operation Operation buttons uio p ENTER SEARCH RETURN 6 7 (Press...reverse/fast-forward) Playback/Pause Auto search (cue) Pause Stop Repeat playback Shuffle playback TV power on/standby (Default : Marantz) Switch TV input (Default : Marantz) Advanced version Information Repeat playback and shuffle playback can be displayed (default: 30 sec) at menu "USB" (vpage ...
... of this unit to play back compressed audio with the USB memory device. • USB memory devices will operate or be set from "Input Setup" - Important information nnUSB memory devices A USB memory device can be played. nnUSB operation Operation buttons uio p ENTER SEARCH RETURN 6 7 (Press...reverse/fast-forward) Playback/Pause Auto search (cue) Pause Stop Repeat playback Shuffle playback TV power on/standby (Default : Marantz) Switch TV input (Default : Marantz) Advanced version Information Repeat playback and shuffle playback can be displayed (default: 30 sec) at menu "USB" (vpage ...
NR1601 User Manual - English
Page 30
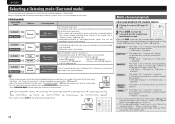
... this mode, the following items cannot be used. • "PLg Movie", "PLg Music"or "PLg Game" is not set to "Normal", and the "Front Speaker Setup" setting (vpage 51) is for enjoying stereo sound from all speakers. "S.Back" is displayed. is pressed, the surround mode is performed on the audio format...
... this mode, the following items cannot be used. • "PLg Movie", "PLg Music"or "PLg Game" is not set to "Normal", and the "Front Speaker Setup" setting (vpage 51) is for enjoying stereo sound from all speakers. "S.Back" is displayed. is pressed, the surround mode is performed on the audio format...
NR1601 User Manual - English
Page 34
Use the Audyssey® Auto Setup function of speaker installation/connection/setting procedures. When using Dolby Pro Logic gz, install front height speakers. ENGLISH DEUTSCH FRANÇAIS ITALIANO ESPAÑ... This unit is not possible to be used. For details on installing/connecting/setting 7.1 channel audio that uses surround back speakers, see "Simple version (Simple setup guide)" (vpage 3).
Use the Audyssey® Auto Setup function of speaker installation/connection/setting procedures. When using Dolby Pro Logic gz, install front height speakers. ENGLISH DEUTSCH FRANÇAIS ITALIANO ESPAÑ... This unit is not possible to be used. For details on installing/connecting/setting 7.1 channel audio that uses surround back speakers, see "Simple version (Simple setup guide)" (vpage 3).
NR1601 User Manual - English
Page 36
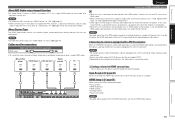
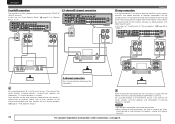
...and subwoofers, 7.1-channel playback is to connect separate amplifiers to the tweeter terminals and woofer terminals of "Speaker Setup" to "SPKR-C". In this case, set "Front Speaker Setup" (vpage 51) of speakers compatible with higher-quality sound. qw FL (L) q w FR (R) For surround... specifications or playback source such as front speakers (A) for multichannel playback and front speakers (B) for 2-channel playback (vpage 51 "Front Speaker Setup"). SW FL(B) FL(A) FR(A) FR(B) FL FR SW 2-channel connection For 2-channel playback, disconnect the subwoofers. In this case, set...
...and subwoofers, 7.1-channel playback is to connect separate amplifiers to the tweeter terminals and woofer terminals of "Speaker Setup" to "SPKR-C". In this case, set "Front Speaker Setup" (vpage 51) of speakers compatible with higher-quality sound. qw FL (L) q w FR (R) For surround... specifications or playback source such as front speakers (A) for multichannel playback and front speakers (B) for 2-channel playback (vpage 51 "Front Speaker Setup"). SW FL(B) FL(A) FR(A) FR(B) FL FR SW 2-channel connection For 2-channel playback, disconnect the subwoofers. In this case, set...
NR1601 User Manual - English
Page 37
...and then press o p to this unit. First install and connect the speakers to select a speaker. NOTE After performing Audyssey Auto Setup, do not change , perform Audyssey Auto Setup again. 3 Set up "Amp Assign" Use ui to the FRONT A terminals. 5 Set up "Front.Sp." If "B" is...Cancel [ENT]:Select [RTN]:Back 4 Use o p to select the configuration of the front speaker to select "Amp Assign". 3-1.Audyssey Auto Setup MultEQ Please place microphone at ear height at main listening position. Normal SPKR-C Set when using 9.1-channel (Front/Center/Surround/Surround Back/Front height...
...and then press o p to this unit. First install and connect the speakers to select a speaker. NOTE After performing Audyssey Auto Setup, do not change , perform Audyssey Auto Setup again. 3 Set up "Amp Assign" Use ui to the FRONT A terminals. 5 Set up "Front.Sp." If "B" is...Cancel [ENT]:Select [RTN]:Back 4 Use o p to select the configuration of the front speaker to select "Amp Assign". 3-1.Audyssey Auto Setup MultEQ Please place microphone at ear height at main listening position. Normal SPKR-C Set when using 9.1-channel (Front/Center/Surround/Surround Back/Front height...
NR1601 User Manual - English
Page 39
... set "Output audio from the player is a change to the connection between the equipment and the HDMI, or an increase in the TV audio output setup operation, you can perform the following points. • Is the TV or player compatible with the HDMI control function? • Is "HDMI Control" (vpage 51...
... set "Output audio from the player is a change to the connection between the equipment and the HDMI, or an increase in the TV audio output setup operation, you can perform the following points. • Is the TV or player compatible with the HDMI control function? • Is "HDMI Control" (vpage 51...
NR1601 User Manual - English
Page 41
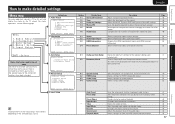
... 1.Audio Adjust 1.Surround Parameter 2.Tone 3.Audyssey Settings 4.Manual EQ 5.M-DAX 6.Audio Delay Menu 1.Audio Adjust 2.Information 3.Auto Setup 4.Manual Setup 5.Input Setup [ENT]:Select [RTN]:Back 2. Assigns name to display when tuning. For menu operations, see the following page. Shows information... about audio input signals. Shows information about tuner preset channels. Auto Setup 3.Auto Setup 1.Audyssey Auto Setup 2.Parameter Check 3-1 Audyssey Auto Setup Makes the optimum settings for iPod and USB memory device playback. 41 41 42 42 43...
... 1.Audio Adjust 1.Surround Parameter 2.Tone 3.Audyssey Settings 4.Manual EQ 5.M-DAX 6.Audio Delay Menu 1.Audio Adjust 2.Information 3.Auto Setup 4.Manual Setup 5.Input Setup [ENT]:Select [RTN]:Back 2. Assigns name to display when tuning. For menu operations, see the following page. Shows information... about audio input signals. Shows information about tuner preset channels. Auto Setup 3.Auto Setup 1.Audyssey Auto Setup 2.Parameter Check 3-1 Audyssey Auto Setup Makes the optimum settings for iPod and USB memory device playback. 41 41 42 42 43...


