
User Guide
Page 5
... this player 8 DVD Video regions 9 MP3 compatibility information 9 2 Connecting Up Easy Setup 10 Home theater video connections 11 Home theater audio connections 12 3 Controls & Displays Display 13 Remote control 14 Front panel 15 4 Getting Started Using the FL menu 16 Using the Setup Navigator 17 Playing discs 20 Navigating DVD disc menus 22...
... this player 8 DVD Video regions 9 MP3 compatibility information 9 2 Connecting Up Easy Setup 10 Home theater video connections 11 Home theater audio connections 12 3 Controls & Displays Display 13 Remote control 14 Front panel 15 4 Getting Started Using the FL menu 16 Using the Setup Navigator 17 Playing discs 20 Navigating DVD disc menus 22...
User Guide
Page 7
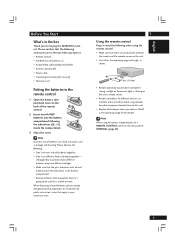
... the plus and minus ends of the remote control. 2 Insert two AA/R6P batteries into the battery compartment following accessories are no obstacles between the remote and the remote sensor on the unit's remote sensor. • Remote controllers for different devices can result in hazards... (yellow/red/white) • System control cable • Power cable • Operating instruction (this player independently, set a REMOTE CONTROL switch on the back of each other equipment located close to this MARANTZ product. Avoid using the remote control: • Make sure that there are...
... the plus and minus ends of the remote control. 2 Insert two AA/R6P batteries into the battery compartment following accessories are no obstacles between the remote and the remote sensor on the unit's remote sensor. • Remote controllers for different devices can result in hazards... (yellow/red/white) • System control cable • Power cable • Operating instruction (this player independently, set a REMOTE CONTROL switch on the back of each other equipment located close to this MARANTZ product. Avoid using the remote control: • Make sure that there are...
User Guide
Page 10
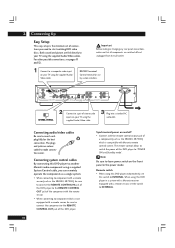
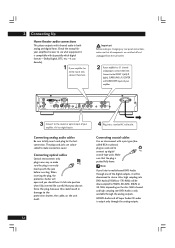
... to start watching DVD video discs. Connecting system control cables By connecting this DVD player to switch the power of stereo audio inputs on the Front panel in a system with a Marantz receiver equipped with Marantz remote control system. EXTERNAL INTERNAL 2 Connect to a pair... of this DVD player to another Marantz audio component using a supplied System Control cable, you need to your TV using the supplied Audio/Video ...
... to start watching DVD video discs. Connecting system control cables By connecting this DVD player to switch the power of stereo audio inputs on the Front panel in a system with a Marantz receiver equipped with Marantz remote control system. EXTERNAL INTERNAL 2 Connect to a pair... of this DVD player to another Marantz audio component using a supplied System Control cable, you need to your TV using the supplied Audio/Video ...
User Guide
Page 11
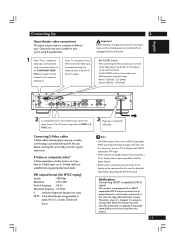
...: 0 (black) - 246 (white) Y CB /PB CR /PR COMPONENT DVI V.LEVEL DVI-D OUT (HDCP) NORMAL EXPAND RS232C VIDEO 1 2 VIDEO OUTPUT S1/S2 IN OUT EXTERNAL INTERNAL REMOTE CONTROL L L OPTICAL COAXIAL DIGITAL OUTPUT R R 1 2 FRONT SURR. Therefore, when it to connect directly to Expand. DVI V.LEVEL Switch When connecting the DVI unit, black may be...
...: 0 (black) - 246 (white) Y CB /PB CR /PR COMPONENT DVI V.LEVEL DVI-D OUT (HDCP) NORMAL EXPAND RS232C VIDEO 1 2 VIDEO OUTPUT S1/S2 IN OUT EXTERNAL INTERNAL REMOTE CONTROL L L OPTICAL COAXIAL DIGITAL OUTPUT R R 1 2 FRONT SURR. Therefore, when it to connect directly to Expand. DVI V.LEVEL Switch When connecting the DVI unit, black may be...
User Guide
Page 12
... and digital form. Y CB /PB CR /PR COMPONENT DVI V.LEVEL DVI-D OUT (HDCP) NORMAL EXPAND RS232C VIDEO 1 2 VIDEO OUTPUT S1/S2 IN OUT EXTERNAL INTERNAL REMOTE CONTROL L L OPTICAL COAXIAL DIGITAL OUTPUT R R 1 2 FRONT SURR. Also, high sampling rate DVD-Audio (192kHz or 176.4kHz) will open and you do not force the plug...
... and digital form. Y CB /PB CR /PR COMPONENT DVI V.LEVEL DVI-D OUT (HDCP) NORMAL EXPAND RS232C VIDEO 1 2 VIDEO OUTPUT S1/S2 IN OUT EXTERNAL INTERNAL REMOTE CONTROL L L OPTICAL COAXIAL DIGITAL OUTPUT R R 1 2 FRONT SURR. Also, high sampling rate DVD-Audio (192kHz or 176.4kHz) will open and you do not force the plug...
User Guide
Page 13
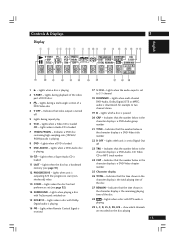
... is a DVD-Video chapter number 25 Character display 26 TOTAL - Lights when a Super Audio CD is playing 10 - Lights when Remote Control Signal is paused 20 GRP - Indicates that the time shown in the character display is playing 16 - Lights wheh unit is a ...-Audio group number 21 TITLE - Lights when playing a disc with TruSurround switched on the disc playing 13 Lights wheh a disc is received 17 5.1CH - English Controls & Displays 3 Display 1 2 3 4 56 7 8 9 0 V- Indicates that the number below in the character display is set to two channel stereo 19 ...
... is a DVD-Video chapter number 25 Character display 26 TOTAL - Lights when a Super Audio CD is playing 10 - Lights when Remote Control Signal is paused 20 GRP - Indicates that the time shown in the character display is playing 16 - Lights wheh unit is a ...-Audio group number 21 TITLE - Lights when playing a disc with TruSurround switched on the disc playing 13 Lights wheh a disc is received 17 5.1CH - English Controls & Displays 3 Display 1 2 3 4 56 7 8 9 0 V- Indicates that the number below in the character display is set to two channel stereo 19 ...
User Guide
Page 14
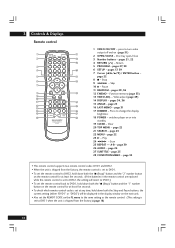
... 26 AUDIO - Return 5 PROGRAM - page 31 17 DIMMER - the current setting (either "DVD1" or "DVD2") will revert to DVD1.) • To set the remote control back to turn video output off and on (page 51) 2 OPEN/CLOSE - pages 27, 38 6 SETUP - Skip 10 8 - page 23 22 MENU - Scan... MEMO - pages 17, 39 7 Cursor (2/3/5/∞) / ENTER button - Press to DVD1 when the unit is shipped from the factory, the remote control is set the remote control to DVD2, hold down both the Stop and Pause buttons; Clear 20 TOP MENU - A-B - page 26 27 SUBTITLE - press to DVD1,...
... 26 AUDIO - Return 5 PROGRAM - page 31 17 DIMMER - the current setting (either "DVD1" or "DVD2") will revert to DVD1.) • To set the remote control back to turn video output off and on (page 51) 2 OPEN/CLOSE - pages 27, 38 6 SETUP - Skip 10 8 - page 23 22 MENU - Scan... MEMO - pages 17, 39 7 Cursor (2/3/5/∞) / ENTER button - Press to DVD1 when the unit is shipped from the factory, the remote control is set the remote control to DVD2, hold down both the Stop and Pause buttons; Clear 20 TOP MENU - A-B - page 26 27 SUBTITLE - press to DVD1,...
User Guide
Page 15
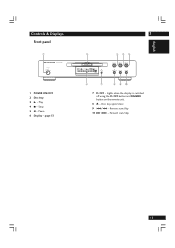
... open/close 9 4 /1 - Pause 6 Display - Lights when the display is switched off using the FL OFF button and DIMMER button on the remote unit. 8 0 - Reverse scan/skip 10 ¡ /¢ - English Controls & Displays Front panel 1 STANDBY POWER ON/OFF SACD/DVD PLAYER 1 POWER ON/OFF 2 Disc tray 3 3 - page 13 3 2 V- Forward scan/skip 15...
... open/close 9 4 /1 - Pause 6 Display - Lights when the display is switched off using the FL OFF button and DIMMER button on the remote unit. 8 0 - Reverse scan/skip 10 ¡ /¢ - English Controls & Displays Front panel 1 STANDBY POWER ON/OFF SACD/DVD PLAYER 1 POWER ON/OFF 2 Disc tray 3 3 - page 13 3 2 V- Forward scan/skip 15...
User Guide
Page 16
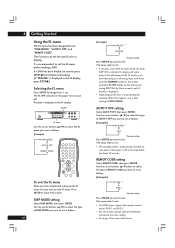
... to set . 4 Getting Started Using the FL menu The FL menu has been designed to set . • If you push the DIMMER button on the remote control or FL OFF button on the front panel during Stop. The FL OFF indicator on the player turn on and off DISP MODE. When this... follows. 16 (Example) DISP OFF * DISP ON * Factory setting Press ENTER you want to set . • The DVD player support two remote control codes: DVD 1 and DVD 2. • Set the remote control code of AUTO P OFF you want exit the FL menu. Use the cursor buttons (5/∞) to close the FL menu. It is...
... to set . 4 Getting Started Using the FL menu The FL menu has been designed to set . • If you push the DIMMER button on the remote control or FL OFF button on the front panel during Stop. The FL OFF indicator on the player turn on and off DISP MODE. When this... follows. 16 (Example) DISP OFF * DISP ON * Factory setting Press ENTER you want to set . • The DVD player support two remote control codes: DVD 1 and DVD 2. • Set the remote control code of AUTO P OFF you want exit the FL menu. Use the cursor buttons (5/∞) to close the FL menu. It is...
User Guide
Page 17
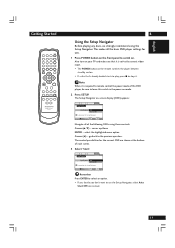
... on-screen display (OSD) appears: Audio1 A2 Video1 V2 Language General Setup Navigator Setup Navigator Start Auto Start Off Setup using these controls: Cursor (5/∞) - go back to leave this DVD player, be sure to the previous question. Audio1 A2 Video1 V2 Language General...Auto Start Off here instead. 17 select the highlighted menu option Cursor (2) - cursor up/down ENTER - Note When it is required to remote control the power mode of each screen. 3 Select 'Start'. English Getting Started 4 Using the Setup Navigator Before playing any discs, we strongly recommend...
... on-screen display (OSD) appears: Audio1 A2 Video1 V2 Language General Setup Navigator Setup Navigator Start Auto Start Off Setup using these controls: Cursor (5/∞) - go back to leave this DVD player, be sure to the previous question. Audio1 A2 Video1 V2 Language General...Auto Start Off here instead. 17 select the highlighted menu option Cursor (2) - cursor up/down ENTER - Note When it is required to remote control the power mode of each screen. 3 Select 'Start'. English Getting Started 4 Using the Setup Navigator Before playing any discs, we strongly recommend...

User Guide
Page 39
... with the mode. The current setting for each menu are available only in Expert Audio1 A2 Video1 V2 Language General Setup Menu Mode - The controls for any changes. The color of the box indicates what kind of disc the setting is playing. yellow for DVD-Audio and Super Audio CD...Setup Menu Mode • Default setting: Expert The Expert setup menu gives you access to those available in the on-screen display illustrations on the remote to all the player's settings. This is usually because a disc is applicable to Basic for any type of more about what the currently highlighted ...
... with the mode. The current setting for each menu are available only in Expert Audio1 A2 Video1 V2 Language General Setup Menu Mode - The controls for any changes. The color of the box indicates what kind of disc the setting is playing. yellow for DVD-Audio and Super Audio CD...Setup Menu Mode • Default setting: Expert The Expert setup menu gives you access to those available in the on-screen display illustrations on the remote to all the player's settings. This is usually because a disc is applicable to Basic for any type of more about what the currently highlighted ...

User Guide
Page 51
... buttons (5/∞) to select a picture quality parameter, then use the cursor buttons (2/3) to turn the Video Output (Video, S1/S2 and Component) off with the remote control Video ON/ OFF button. 51 produces a stable, generally shake-free image. • Frame - Auto On Screen Display - Audio1 A2 V1 Video2 Language General Background - Black...
... buttons (5/∞) to select a picture quality parameter, then use the cursor buttons (2/3) to turn the Video Output (Video, S1/S2 and Component) off with the remote control Video ON/ OFF button. 51 produces a stable, generally shake-free image. • Frame - Auto On Screen Display - Audio1 A2 V1 Video2 Language General Background - Black...

User Guide
Page 62
...is loaded. Note that there is stopped then restarted. Reload the disc with this component, check the points below , ask your nearest MARANTZ authorized service center or your TV using the player near an air-conditioning unit. The settings will take effect next time a DVD is... be played. Align the disc properly. • Incompatible region number. Check that connections are correct and that STANDBY indicator light on the Remote Control and checking that plugs are inserted fully. • TV/monitor or AV amplifier settings are canceled. • When the power is often...
...is loaded. Note that there is stopped then restarted. Reload the disc with this component, check the points below , ask your nearest MARANTZ authorized service center or your TV using the player near an air-conditioning unit. The settings will take effect next time a DVD is... be played. Align the disc properly. • Incompatible region number. Check that connections are correct and that STANDBY indicator light on the Remote Control and checking that plugs are inserted fully. • TV/monitor or AV amplifier settings are canceled. • When the power is often...
User Guide
Page 63
... slightly when the function is distorted. • Some DVD discs do not output digital audio. Some settings in the disc's menu. The remote control doesn't seem to work. • The CONTROL IN jack on the rear panel is no dialog from the front L/R speakers, set correctly, etc. • The Audio Out setting is... is set to 5.1ch playback, but there appears to Basic; Press 3 or 8 to the external position (page 10). • The remote control is too far from the rear, center and subwoofer speakers, set Audio Out to 5.1 Channel (page 43). • The player is set to exit the ...
... slightly when the function is distorted. • Some DVD discs do not output digital audio. Some settings in the disc's menu. The remote control doesn't seem to work. • The CONTROL IN jack on the rear panel is no dialog from the front L/R speakers, set correctly, etc. • The Audio Out setting is... is set to 5.1ch playback, but there appears to Basic; Press 3 or 8 to the external position (page 10). • The remote control is too far from the rear, center and subwoofer speakers, set Audio Out to 5.1 Channel (page 43). • The player is set to exit the ...
User Guide
Page 69
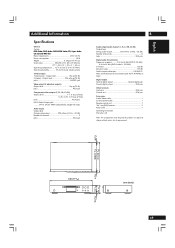
...1 Vp-p (75 Ω) C (color) - PEAK) or lower Digital output Optical digital output Optical digital jack Coaxial digital output RCA jack Other terminals Control in .) Operating temperature ...... +5°C to +35°C (+41°F to +96°F) Operating humidity 5% to improvement. 6 (1/5) 300 (11... x 311 (D) x 89 (H) mm (17 5/16(W) x 12 1/4 (D) x 3 1/2 (H) in RCA jack Control out RCA jack Accessories Audio/Video cable 1 System control cable 1 Remote control unit 1 "AA" size (R6P) batteries 2 Power cord 1 Operating Instruction Warranty card Note: The specifications and design of...
...1 Vp-p (75 Ω) C (color) - PEAK) or lower Digital output Optical digital output Optical digital jack Coaxial digital output RCA jack Other terminals Control in .) Operating temperature ...... +5°C to +35°C (+41°F to +96°F) Operating humidity 5% to improvement. 6 (1/5) 300 (11... x 311 (D) x 89 (H) mm (17 5/16(W) x 12 1/4 (D) x 3 1/2 (H) in RCA jack Control out RCA jack Accessories Audio/Video cable 1 System control cable 1 Remote control unit 1 "AA" size (R6P) batteries 2 Power cord 1 Operating Instruction Warranty card Note: The specifications and design of...


