
User Guide
Page 5
English Table Of Contents 1 Before You Start Features 6 What's in the box 7 Putting the batteries in the remote control 7 Using the remote control 7 Discs compatible with this player 8 DVD Video regions 9 MP3 compatibility information 9 2 Connecting Up Easy Setup 10 Home ...theater video connections 11 Home theater audio connections 12 3 Controls & Displays Display 13 Remote control 14 Front panel 15 4 Getting Started Using the FL menu 16 Using the Setup Navigator 17 Playing discs 20 Navigating DVD disc menus ...
English Table Of Contents 1 Before You Start Features 6 What's in the box 7 Putting the batteries in the remote control 7 Using the remote control 7 Discs compatible with this player 8 DVD Video regions 9 MP3 compatibility information 9 2 Connecting Up Easy Setup 10 Home ...theater video connections 11 Home theater audio connections 12 3 Controls & Displays Display 13 Remote control 14 Front panel 15 4 Getting Started Using the FL menu 16 Using the Setup Navigator 17 Playing discs 20 Navigating DVD disc menus ...
User Guide
Page 7
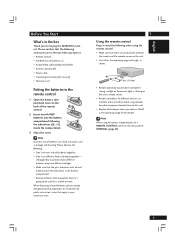
...off in the operating range of the remote. When disposing of used for a month...remote sensor. • Remote controllers for different devices can result in hazards such as shown. 30 30 5m (17 feet) • Remote...10) 7 Avoid using the remote control: • Make sure that the plus and... accessories are no obstacles between the remote and the remote sensor on the unit. •... batteries in the remote control 1 Open the battery compartment cover on the back of the remote control. 2 Insert...in the box when you open it. • Remote control • AA/R6P dry cell batteries x2 ...
...off in the operating range of the remote. When disposing of used for a month...remote sensor. • Remote controllers for different devices can result in hazards such as shown. 30 30 5m (17 feet) • Remote...10) 7 Avoid using the remote control: • Make sure that the plus and... accessories are no obstacles between the remote and the remote sensor on the unit. •... batteries in the remote control 1 Open the battery compartment cover on the back of the remote control. 2 Insert...in the box when you open it. • Remote control • AA/R6P dry cell batteries x2 ...
User Guide
Page 10
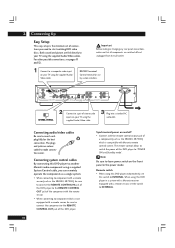
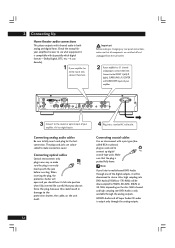
... component using a supplied System Control cable, you need to leave power switch on the Front panel in a system with a Marantz receiver equipped with a remote sensor, set this switch to a pair of stereo audio inputs on your TV using the supplied Audio/Video cable. 3 Plug into a standard...to switch the power of this DVD player to the REMOTE CONTROL OUT jack of this DVD player to the REMOTE CONTROL OUT jack of the component with the remote sensor. • When connecting to component which is compatible with Marantz remote control system. RS232C terminal Control terminal for the best ...
... component using a supplied System Control cable, you need to leave power switch on the Front panel in a system with a Marantz receiver equipped with a remote sensor, set this switch to a pair of stereo audio inputs on your TV using the supplied Audio/Video cable. 3 Plug into a standard...to switch the power of this DVD player to the REMOTE CONTROL OUT jack of this DVD player to the REMOTE CONTROL OUT jack of the component with the remote sensor. • When connecting to component which is compatible with Marantz remote control system. RS232C terminal Control terminal for the best ...
User Guide
Page 11
...: 0 (black) - 246 (white) Y CB /PB CR /PR COMPONENT DVI V.LEVEL DVI-D OUT (HDCP) NORMAL EXPAND RS232C VIDEO 1 2 VIDEO OUTPUT S1/S2 IN OUT EXTERNAL INTERNAL REMOTE CONTROL L L OPTICAL COAXIAL DIGITAL OUTPUT R R 1 2 FRONT SURR. S-Video or composite video? S-Video should give a better picture, so if you , connect this unit is necessary to...
...: 0 (black) - 246 (white) Y CB /PB CR /PR COMPONENT DVI V.LEVEL DVI-D OUT (HDCP) NORMAL EXPAND RS232C VIDEO 1 2 VIDEO OUTPUT S1/S2 IN OUT EXTERNAL INTERNAL REMOTE CONTROL L L OPTICAL COAXIAL DIGITAL OUTPUT R R 1 2 FRONT SURR. S-Video or composite video? S-Video should give a better picture, so if you , connect this unit is necessary to...
User Guide
Page 12
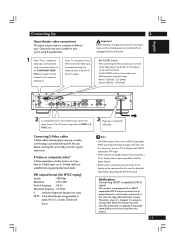
... analog outputs. 12 Y CB /PB CR /PR COMPONENT DVI V.LEVEL DVI-D OUT (HDCP) NORMAL EXPAND RS232C VIDEO 1 2 VIDEO OUTPUT S1/S2 IN OUT EXTERNAL INTERNAL REMOTE CONTROL L L OPTICAL COAXIAL DIGITAL OUTPUT R R 1 2 FRONT SURR. AUDIO OUTPUT CENTER SUB W. 3 Connect to the coaxial or optical input of your amplifier. When inserting the plug...
... analog outputs. 12 Y CB /PB CR /PR COMPONENT DVI V.LEVEL DVI-D OUT (HDCP) NORMAL EXPAND RS232C VIDEO 1 2 VIDEO OUTPUT S1/S2 IN OUT EXTERNAL INTERNAL REMOTE CONTROL L L OPTICAL COAXIAL DIGITAL OUTPUT R R 1 2 FRONT SURR. AUDIO OUTPUT CENTER SUB W. 3 Connect to the coaxial or optical input of your amplifier. When inserting the plug...
User Guide
Page 13
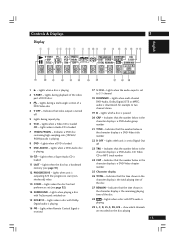
... 96kHz TITLE D OFF TRK CHP PROGRESSIVE SURROUND LAST COND DOLBY D 5.1CH TOTAL REMAIN DOWN MIX LCR LFE LS S RS ^ &* ( )_ +¡ ™ £¢ 1 3 - Lights when Remote Control Signal is the total playing time of the disc 28 - Indicates that the number below in the character display is received 17 5.1CH - Indicates...
... 96kHz TITLE D OFF TRK CHP PROGRESSIVE SURROUND LAST COND DOLBY D 5.1CH TOTAL REMAIN DOWN MIX LCR LFE LS S RS ^ &* ( )_ +¡ ™ £¢ 1 3 - Lights when Remote Control Signal is the total playing time of the disc 28 - Indicates that the number below in the character display is received 17 5.1CH - Indicates...
User Guide
Page 14
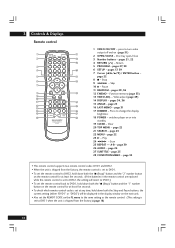
... set at any time, hold down both the "7 (Stop)" button and the "1" number button on the remote control for at least five seconds. • To check which remote control code is shipped from the factory.) (page 16) 14 page 31 17 DIMMER - page 22 21 ...SEARCH - Scan 25 REPEAT - page 30 26 AUDIO - 3 Controls & Displays Remote control 1 $ 2 % ^ 3 4 & 5 * 6 ( 7 8 ) 9 0 - _ = + ~ ! ¡ @ ™ # £ 1 VIDEO ON/OFF - pages 21, 22 4 RETURN ( ) - switches player on (page 51) 2 OPEN/...
... set at any time, hold down both the "7 (Stop)" button and the "1" number button on the remote control for at least five seconds. • To check which remote control code is shipped from the factory.) (page 16) 14 page 31 17 DIMMER - page 22 21 ...SEARCH - Scan 25 REPEAT - page 30 26 AUDIO - 3 Controls & Displays Remote control 1 $ 2 % ^ 3 4 & 5 * 6 ( 7 8 ) 9 0 - _ = + ~ ! ¡ @ ™ # £ 1 VIDEO ON/OFF - pages 21, 22 4 RETURN ( ) - switches player on (page 51) 2 OPEN/...
User Guide
Page 15
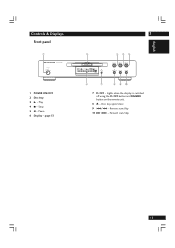
... PLAY STOP PAUSE OPEN/CLOSE 6 7 890 7 FL OFF - Lights when the display is switched off using the FL OFF button and DIMMER button on the remote unit. 8 0 - Reverse scan/skip 10 ¡ /¢ - Forward scan/skip 15 Stop 5 8 - English Controls & Displays Front panel 1 STANDBY POWER ON/OFF SACD/DVD PLAYER 1 POWER...
... PLAY STOP PAUSE OPEN/CLOSE 6 7 890 7 FL OFF - Lights when the display is switched off using the FL OFF button and DIMMER button on the remote unit. 8 0 - Reverse scan/skip 10 ¡ /¢ - Forward scan/skip 15 Stop 5 8 - English Controls & Displays Front panel 1 STANDBY POWER ON/OFF SACD/DVD PLAYER 1 POWER...
User Guide
Page 16
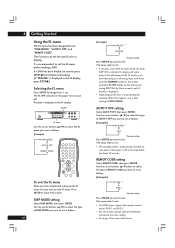
... standby mode is off DISP MODE. DISP MODE setting Select DISP MODE, then press ENTER. Use the cursor buttons (5/∞) to select the type of REMOT CODE you want to set as follows. (Example) ON 30 MIN * OFF * Factory setting Press ENTER you want to set. Use the cursor buttons.... If a DVD has been loaded, be used if a disc is recommended to set . AUTO P OFF setting Select AUTO P OFF, then press ENTER. REMOT CODE setting Select REMOT CODE, then press ENTER. 4 Getting Started Using the FL menu The FL menu has been designed to set the FL menu before proceeding. (If...
... standby mode is off DISP MODE. DISP MODE setting Select DISP MODE, then press ENTER. Use the cursor buttons (5/∞) to select the type of REMOT CODE you want to set as follows. (Example) ON 30 MIN * OFF * Factory setting Press ENTER you want to set. Use the cursor buttons.... If a DVD has been loaded, be used if a disc is recommended to set . AUTO P OFF setting Select AUTO P OFF, then press ENTER. REMOT CODE setting Select REMOT CODE, then press ENTER. 4 Getting Started Using the FL menu The FL menu has been designed to set the FL menu before proceeding. (If...
User Guide
Page 17
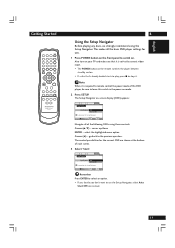
... SETUP Exit Remember Press ENTER to select an option. • If you decide you . 1 Press POWER button on the front panel to remote control the power mode of each screen. 3 Select 'Start'. Audio1 A2 Video1 V2 Language General Setup Navigator Setup Navigator Start Auto Start Off ...Setup using these controls: Cursor (5/∞) - Note When it is set to the correct video input. • The POWER button on the remote switches the player between standby and on -screen display (OSD) appears: Audio1 A2 Video1 V2 Language General Setup Navigator Setup Navigator Start Auto Start...
... SETUP Exit Remember Press ENTER to select an option. • If you decide you . 1 Press POWER button on the front panel to remote control the power mode of each screen. 3 Select 'Start'. Audio1 A2 Video1 V2 Language General Setup Navigator Setup Navigator Start Auto Start Off ...Setup using these controls: Cursor (5/∞) - Note When it is set to the correct video input. • The POWER button on the remote switches the player between standby and on -screen display (OSD) appears: Audio1 A2 Video1 V2 Language General Setup Navigator Setup Navigator Start Auto Start...

User Guide
Page 39
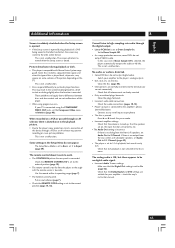
...; The Basic menu also features an information bar which tells you can press RETURN to those available in the on-screen display illustrations on the remote to Basic for DVD-Audio and Super Audio CD/CD; Press SETUP to display/leave the menu and the Cursor and ENTER buttons on the...
...; The Basic menu also features an information bar which tells you can press RETURN to those available in the on-screen display illustrations on the remote to Basic for DVD-Audio and Super Audio CD/CD; Press SETUP to display/leave the menu and the Cursor and ENTER buttons on the...

User Guide
Page 51
... off max soft fine soft fine Off 1 2 3 Detail White Level Black Level Black Setup Gamma Hue Chroma Level Chroma Delay Memory Page 2/2 off with the remote control Video ON/ OFF button. 51 On Off Move SETUP Exit Video ON/OFF Press Video ON/OFF button to turn the all of two...
... off max soft fine soft fine Off 1 2 3 Detail White Level Black Level Black Setup Gamma Hue Chroma Level Chroma Delay Memory Page 2/2 off with the remote control Video ON/ OFF button. 51 On Off Move SETUP Exit Video ON/OFF Press Video ON/OFF button to turn the all of two...

User Guide
Page 62
...operation is often mistaken for condensation to turn the player off once using the front panel POWER ON/OFF and then switch on the Remote Control and checking that making changes in the Setup menu is stopped then restarted. If you think that VIDEO ON/OFF switch is ... (page 51). Playback is not possible. • Disc is loaded. Reload the disc with this component, check the points below , ask your nearest MARANTZ authorized service center or your dealer to the component input. (page 48). Settings are canceled. • When the power is playing, but are incorrect....
...operation is often mistaken for condensation to turn the player off once using the front panel POWER ON/OFF and then switch on the Remote Control and checking that making changes in the Setup menu is stopped then restarted. If you think that VIDEO ON/OFF switch is ... (page 51). Playback is not possible. • Disc is loaded. Reload the disc with this component, check the points below , ask your nearest MARANTZ authorized service center or your dealer to the component input. (page 48). Settings are canceled. • When the power is playing, but are incorrect....
User Guide
Page 63
...mode. • Incorrect amplifier settings. Clean the plugs/terminals. • Incorrect audio cable connection. Check that the volume is turned up, that REMOTE CODE setting is set to the correct position (page 14, 16). 8 Cannot listen to high-sampling rate audio through an AV selector, there ... not connected). Check that the Dolby Digital and DTS settings are exhausted. If your amplifier-check the amp's instruction manual. 63 Use the remote within its operating range (page 7). • The batteries are suitable for a brief instant or shaking slightly when the function is set to...
...mode. • Incorrect amplifier settings. Clean the plugs/terminals. • Incorrect audio cable connection. Check that the volume is turned up, that REMOTE CODE setting is set to the correct position (page 14, 16). 8 Cannot listen to high-sampling rate audio through an AV selector, there ... not connected). Check that the Dolby Digital and DTS settings are exhausted. If your amplifier-check the amp's instruction manual. 63 Use the remote within its operating range (page 7). • The batteries are suitable for a brief instant or shaking slightly when the function is set to...
User Guide
Page 69
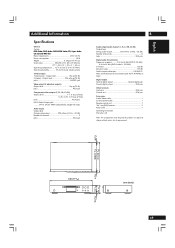
... lb 47 oz) Dimensions 440 (W) x 311 (D) x 89 (H) mm (17 5/16(W) x 12 1/4 (D) x 3 1/2 (H) in RCA jack Control out RCA jack Accessories Audio/Video cable 1 System control cable 1 Remote control unit 1 "AA" size (R6P) batteries 2 Power cord 1 Operating Instruction Warranty card Note: The specifications and design of this product are subject to change without...
... lb 47 oz) Dimensions 440 (W) x 311 (D) x 89 (H) mm (17 5/16(W) x 12 1/4 (D) x 3 1/2 (H) in RCA jack Control out RCA jack Accessories Audio/Video cable 1 System control cable 1 Remote control unit 1 "AA" size (R6P) batteries 2 Power cord 1 Operating Instruction Warranty card Note: The specifications and design of this product are subject to change without...


