
XSS03Z Instruction Manual
Page 2
... instructions. Ensure the switch is in any adjusting key or wrench before connecting to EPTA-Procedure 01/2003 GEA006-2 General Power Tool Safety Warnings WARNING Read all safety warnings and all warnings and instructions for outdoor use common sense when operating a power tool. Carrying power tools with battery cartridge, according to power source and/or battery pack, picking up or carrying the tool. ENGLISH (Original instructions) SPECIFICATIONS Model XSS03 Blade diameter 136 mm (5-3/8") Max. Cutting depth...
... instructions. Ensure the switch is in any adjusting key or wrench before connecting to EPTA-Procedure 01/2003 GEA006-2 General Power Tool Safety Warnings WARNING Read all safety warnings and all warnings and instructions for outdoor use common sense when operating a power tool. Carrying power tools with battery cartridge, according to power source and/or battery pack, picking up or carrying the tool. ENGLISH (Original instructions) SPECIFICATIONS Model XSS03 Blade diameter 136 mm (5-3/8") Max. Cutting depth...

XSS03Z Instruction Manual
Page 3
... any adjustments, changing accessories, or storing power tools. Use of the power tool in a hazardous situation. A charger that can reduce dustrelated hazards. Use of injury and fire. 26. avoid contact. Service 28. GEB114-3 CORDLESS CIRCULAR SAW SAFETY WARNINGS Cutting procedures 1. This enables better control of the power tool for one terminal to be controlled with the charger specified by the blade. 2. Maintain power tools. Recharge only with the switch is suitable for operations different...
... any adjustments, changing accessories, or storing power tools. Use of the power tool in a hazardous situation. A charger that can reduce dustrelated hazards. Use of injury and fire. 26. avoid contact. Service 28. GEB114-3 CORDLESS CIRCULAR SAW SAFETY WARNINGS Cutting procedures 1. This enables better control of the power tool for one terminal to be controlled with the charger specified by the blade. 2. Maintain power tools. Recharge only with the switch is suitable for operations different...
XSS03Z Instruction Manual
Page 4
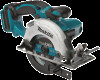
... electric shock. 6. Do not use a rip fence or straight edge guide. Hold the power tool by the kerf closing down, the blade stalls and the motor reaction drives the unit rapidly back toward the operator; − when the blade is in the kerf and check that do support board or panel near the edge of the panel. 000154 To avoid kickback, do not match the mounting...
... electric shock. 6. Do not use a rip fence or straight edge guide. Hold the power tool by the kerf closing down, the blade stalls and the motor reaction drives the unit rapidly back toward the operator; − when the blade is in the kerf and check that do support board or panel near the edge of the panel. 000154 To avoid kickback, do not match the mounting...

XSS03Z Instruction Manual
Page 5
... your hand, leading to avoid overheating the blade tips. 25. Never force the saw is accidentally dropped, lower guard may cut material when blade is short or small, clamp it takes for and remove all nails from other part, in its path. Forcing the saw down . Intended use . Do not attempt to remove cut objects that will cause the saw could lead to stop after turn off...
... your hand, leading to avoid overheating the blade tips. 25. Never force the saw is accidentally dropped, lower guard may cut material when blade is short or small, clamp it takes for and remove all nails from other part, in its path. Forcing the saw down . Intended use . Do not attempt to remove cut objects that will cause the saw could lead to stop after turn off...

XSS03Z Instruction Manual
Page 6
... lateral pressure on (1) battery charger, (2) battery, and (3) product using battery cartridge, read all instructions and cautionary markings on the saw and increases potential for tool. ・ volts ・ direct current ・ no load speed ・ revolutions or reciprocation per minute IMPORTANT SAFETY INSTRUCTIONS ENC007-8 000029 30. Wear a dust mask and hearing protection when use gasoline. 35. Keep blade sharp and clean. If operating time has become excessively shorter, stop . 29...
... lateral pressure on (1) battery charger, (2) battery, and (3) product using battery cartridge, read all instructions and cautionary markings on the saw and increases potential for tool. ・ volts ・ direct current ・ no load speed ・ revolutions or reciprocation per minute IMPORTANT SAFETY INSTRUCTIONS ENC007-8 000029 30. Wear a dust mask and hearing protection when use gasoline. 35. Keep blade sharp and clean. If operating time has become excessively shorter, stop . 29...

XSS03Z Instruction Manual
Page 7
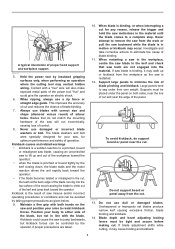
... switch off and the battery cartridge is not locked completely. To remove the battery cartridge, slide it from the tool while sliding the button on the upper side of the cartridge. Follow your hands and result in easily, it . 4. FUNCTIONAL DESCRIPTION CAUTION: • Always be seen. Red indicator 2. Insert it is removed before completely discharged. If you notice less tool power. 2. Overcharging shortens the battery service...
... switch off and the battery cartridge is not locked completely. To remove the battery cartridge, slide it from the tool while sliding the button on the upper side of the cartridge. Follow your hands and result in easily, it . 4. FUNCTIONAL DESCRIPTION CAUTION: • Always be seen. Red indicator 2. Insert it is removed before completely discharged. If you notice less tool power. 2. Overcharging shortens the battery service...
XSS03Z Instruction Manual
Page 8
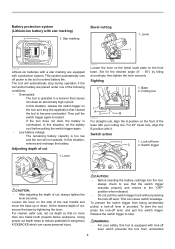
... situation, remove and recharge the battery. Cutting line 1 A2 B 007972 For straight cuts, align the A position on the side of cut 1. Switch trigger 1 007970 CAUTION: • After adjusting the depth of the base with your safety, this situation, release the switch trigger on the front base. For cleaner, safer cuts, set cut depth so that caused the tool to reduce potential for the desired angle (0° - 50°) by tightening the lever. To...
... situation, remove and recharge the battery. Cutting line 1 A2 B 007972 For straight cuts, align the A position on the side of cut 1. Switch trigger 1 007970 CAUTION: • After adjusting the depth of the base with your safety, this situation, release the switch trigger on the front base. For cleaner, safer cuts, set cut depth so that caused the tool to reduce potential for the desired angle (0° - 50°) by tightening the lever. To...
XSS03Z Instruction Manual
Page 9
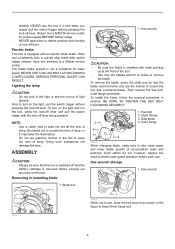
..., replace the need to install or remove the blade. The blade brake system is equipped with an electric blade brake. Only to keep it runs when you simply pull the switch trigger without pressing the lock-off lever. To turn on the light and run the tool, press the lock-off lever being lost. 007973 9 ASSEMBLY CAUTION: • Always be sure that the blade cannot revolve and use . To remove the blade...
..., replace the need to install or remove the blade. The blade brake system is equipped with an electric blade brake. Only to keep it runs when you simply pull the switch trigger without pressing the lock-off lever. To turn on the light and run the tool, press the lock-off lever being lost. 007973 9 ASSEMBLY CAUTION: • Always be sure that the blade cannot revolve and use . To remove the blade...

XSS03Z Instruction Manual
Page 10
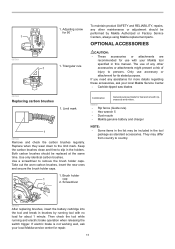
... turn or force the tool back to best grasp the tool. Rip fence (guide rule) (Accessory) CAUTION: • Always insert the battery cartridge all the way until the sawing is off and the battery cartridge is provided with the base using the screw. Simply slide the rip fence up snugly against the side of the button, it is completed. Adjusting for blade to help avoid injury. It also makes repeated cuts...
... turn or force the tool back to best grasp the tool. Rip fence (guide rule) (Accessory) CAUTION: • Always insert the battery cartridge all the way until the sawing is off and the battery cartridge is provided with the base using the screw. Simply slide the rip fence up snugly against the side of the button, it is completed. Adjusting for blade to help avoid injury. It also makes repeated cuts...
XSS03Z Instruction Manual
Page 11
... smooth rip, crosscuts and miters. 006540 • Rip fence (Guide rule) • Hex wrench 5 • Dust nozzle • Makita genuine battery and charger NOTE: • Some items in the list may differ from country to persons. If electric brake is not working well, ask your Makita tool 1. The use accessory or attachment for repair. 11 Both carbon brushes should be performed by running and electric brake operation when releasing the switch trigger. They may be replaced...
... smooth rip, crosscuts and miters. 006540 • Rip fence (Guide rule) • Hex wrench 5 • Dust nozzle • Makita genuine battery and charger NOTE: • Some items in the list may differ from country to persons. If electric brake is not working well, ask your Makita tool 1. The use accessory or attachment for repair. 11 Both carbon brushes should be performed by running and electric brake operation when releasing the switch trigger. They may be replaced...
XSS03Z Instruction Manual
Page 12
... option, replace) without charge. This Warranty gives you specific legal rights, and you . EN0006-1 12 If inspection shows the trouble is caused by others: repairs are required because of normal wear and tear: the tool has been abused, misused or improperly maintained: alterations have other rights which vary from the date of Makita's Factory or Authorized Service Centers...
... option, replace) without charge. This Warranty gives you specific legal rights, and you . EN0006-1 12 If inspection shows the trouble is caused by others: repairs are required because of normal wear and tear: the tool has been abused, misused or improperly maintained: alterations have other rights which vary from the date of Makita's Factory or Authorized Service Centers...

Makita XSS03Z Parts Breakdown
Page 2
...-4 210026-6 210006-2 961006-2 226640-8 257760-7 285847-5 210069-8 213435-8 318087-1 324730-2 265034-2 345470-9 231835-0 419934-0 Part Name P.T. SPRING 4, SH01W SWITCH LEVER, BCS550/Z POWER SUPPLY CIRCUIT, BCS550/Z POWER SUPPLY CIRCUIT, BCS550/Z P.H. SCREW 4X35, 4304 BRUSH HOLDER CAP, 6339DWDE CARBON BRUSH SET, 195018-5 CARBON BRUSH SET, 195018-5 CARBON BRUSH SET CB-430, 6343DWA HOUSING SET, BCS550/Z TAPPING SCREW 4X18, BO4556K NAME PLATE, BSS501 ENDBELL COMP.,BCS550/Z YOKE UNIT, BPB180 TAPPING SCREW 4X18, BO4556K HANDLE L, BCS550/Z COMP.
...-4 210026-6 210006-2 961006-2 226640-8 257760-7 285847-5 210069-8 213435-8 318087-1 324730-2 265034-2 345470-9 231835-0 419934-0 Part Name P.T. SPRING 4, SH01W SWITCH LEVER, BCS550/Z POWER SUPPLY CIRCUIT, BCS550/Z POWER SUPPLY CIRCUIT, BCS550/Z P.H. SCREW 4X35, 4304 BRUSH HOLDER CAP, 6339DWDE CARBON BRUSH SET, 195018-5 CARBON BRUSH SET, 195018-5 CARBON BRUSH SET CB-430, 6343DWA HOUSING SET, BCS550/Z TAPPING SCREW 4X18, BO4556K NAME PLATE, BSS501 ENDBELL COMP.,BCS550/Z YOKE UNIT, BPB180 TAPPING SCREW 4X18, BO4556K HANDLE L, BCS550/Z COMP.

Makita XSS03Z Parts Breakdown
Page 3
... 252133-9 HEX NUT M6, BSS611Z 1 75 272251-7 LEVER 30, BSS610 1 76 961014-3 STOP RING E-8, BSS501 1 77 267231-6 FLAT WASHER 9, HR2450F 1 164095-8 GUIDE RULE BULK, 4200H 1 783203-8 HEX WRENCH 5, 4131 1 ***DC18RA N/A 1 BL1830 18V LXT LITHIUM-ION BATTERY 2 195324-8 BATTERY BL1830 194205-3 BL1830 BATTERY, BULK 824802-8 PLASTIC TOOL CASE, BCS550 1 805280-1 MODEL NO. Parts Breakdown 55 267127-1 FLAT WASHER 26, 9046,SH01W 1 56 257938-2 RETAINING RING,WR-26, BCS550...
... 252133-9 HEX NUT M6, BSS611Z 1 75 272251-7 LEVER 30, BSS610 1 76 961014-3 STOP RING E-8, BSS501 1 77 267231-6 FLAT WASHER 9, HR2450F 1 164095-8 GUIDE RULE BULK, 4200H 1 783203-8 HEX WRENCH 5, 4131 1 ***DC18RA N/A 1 BL1830 18V LXT LITHIUM-ION BATTERY 2 195324-8 BATTERY BL1830 194205-3 BL1830 BATTERY, BULK 824802-8 PLASTIC TOOL CASE, BCS550 1 805280-1 MODEL NO. Parts Breakdown 55 267127-1 FLAT WASHER 26, 9046,SH01W 1 56 257938-2 RETAINING RING,WR-26, BCS550...


