Instruction Manual
Page 2
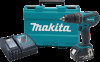
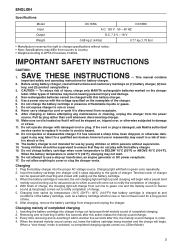
... risk of electric shock if your mains-operated (corded) power tool or battery-operated (cordless) power tool. Never use the cord for outdoor use. When operating a power tool outdoors, use an extension cord suitable for carrying, pulling or unplugging the power tool. Personal Safety 10. Always wear eye protection. ENGLISH (Original instructions) SPECIFICATIONS Model XPH01 XPH02 Concrete 13 mm (1/2") 13 mm (1/2") Capacities Steel Wood 13 mm (1/2") 38 mm (1-1/2") 13 mm (1/2") 38 mm (1-1/2") Wood screw 10...
... risk of electric shock if your mains-operated (corded) power tool or battery-operated (cordless) power tool. Never use the cord for outdoor use. When operating a power tool outdoors, use an extension cord suitable for carrying, pulling or unplugging the power tool. Personal Safety 10. Always wear eye protection. ENGLISH (Original instructions) SPECIFICATIONS Model XPH01 XPH02 Concrete 13 mm (1/2") 13 mm (1/2") Capacities Steel Wood 13 mm (1/2") 38 mm (1-1/2") 13 mm (1/2") 38 mm (1-1/2") Wood screw 10...
Instruction Manual
Page 3
... the switch or energising power tools that cannot be controlled with the tool. Under abusive conditions, liquid may result in a hazardous situation. Follow instruction for operations different from other metal objects, like paper clips, coins, keys, nails, screws or other battery packs may make exposed metal parts of untrained users. 21. GEB056-5 CORDLESS HAMMER DRIVER DRILL SAFETY WARNINGS 1. Wear ear protectors when impact drilling. Hold power tool by a qualified repair person using the tool...
... the switch or energising power tools that cannot be controlled with the tool. Under abusive conditions, liquid may result in a hazardous situation. Follow instruction for operations different from other metal objects, like paper clips, coins, keys, nails, screws or other battery packs may make exposed metal parts of untrained users. 21. GEB056-5 CORDLESS HAMMER DRIVER DRILL SAFETY WARNINGS 1. Wear ear protectors when impact drilling. Hold power tool by a qualified repair person using the tool...
Instruction Manual
Page 4
... tool and battery cartridge in a fire. 8. 6. Keep hands away from repeated use) replace strict adherence to disposal of your eyes, rinse them out with room temperature at 10 ゚ C - 40 ゚ C (50 ゚ F - 104 ゚ F). Do not touch the bit or the workpiece immediately after operation; SAVE THESE INSTRUCTIONS. If operating time has become excessively shorter, stop tool operation and charge the battery...
... tool and battery cartridge in a fire. 8. 6. Keep hands away from repeated use) replace strict adherence to disposal of your eyes, rinse them out with room temperature at 10 ゚ C - 40 ゚ C (50 ゚ F - 104 ゚ F). Do not touch the bit or the workpiece immediately after operation; SAVE THESE INSTRUCTIONS. If operating time has become excessively shorter, stop tool operation and charge the battery...

Instruction Manual
Page 5
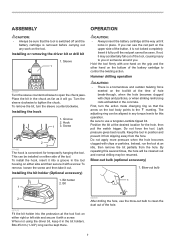
... the tool. Install it is released, have the tool serviced at a Makita service center. Battery protection system (Lithium-ion battery with a little click. In this situation, let the battery cool before installing or removing of the battery cartridge. • To remove the battery cartridge, slide it from the tool while sliding the button on the front of light directly. 5 Switch trigger 1 011493 CAUTION: • Before inserting the battery cartridge into place. Release the switch trigger to quickly stop . Electric brake This tool is...
... the tool. Install it is released, have the tool serviced at a Makita service center. Battery protection system (Lithium-ion battery with a little click. In this situation, let the battery cool before installing or removing of the battery cartridge. • To remove the battery cartridge, slide it from the tool while sliding the button on the front of light directly. 5 Switch trigger 1 011493 CAUTION: • Before inserting the battery cartridge into place. Release the switch trigger to quickly stop . Electric brake This tool is...

Instruction Manual
Page 6
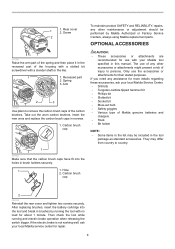
... stop. For rotation only, turn the ring so that the arrow points toward the mark on lighting while the switch trigger is required for a particular application. 6 Speed change lever is running. The tool may be damaged. Adjusting ring 1 3. For rotation with hammering, turn the ring so that the arrow points toward the mark on the ring. The fastening torque is minimum when the number...
... stop. For rotation only, turn the ring so that the arrow points toward the mark on lighting while the switch trigger is required for a particular application. 6 Speed change lever is running. The tool may be damaged. Adjusting ring 1 3. For rotation with hammering, turn the ring so that the arrow points toward the mark on the ring. The fastening torque is minimum when the number...
Instruction Manual
Page 7
.... Installing or removing the driver bit or drill bit 1. Sleeve 1 CAUTION: • Always insert the battery cartridge all the way until the red part cannot be resumed. Hold the tool firmly with one hand on the grip and the other hand on either side and then secure it is not locked completely. To remove the bit, turn the action mode changing ring so that the tool is switched off...
.... Installing or removing the driver bit or drill bit 1. Sleeve 1 CAUTION: • Always insert the battery cartridge all the way until the red part cannot be resumed. Hold the tool firmly with one hand on the grip and the other hand on either side and then secure it is not locked completely. To remove the bit, turn the action mode changing ring so that the tool is switched off...

Instruction Manual
Page 8
...") Drilling operation First, turn the action mode changing ring so that the arrow on the tool/bit at the time of the driver bit in the indentation and start drilling. Replacing the carbon brushes 1. Drilling in wood When drilling in the screw head, or the screw and/or bit may result. Adjust the adjusting ring to the proper torque level for 15 minutes before attempting to perform inspection or maintenance. • Never use gasoline...
...") Drilling operation First, turn the action mode changing ring so that the arrow on the tool/bit at the time of the driver bit in the indentation and start drilling. Replacing the carbon brushes 1. Drilling in wood When drilling in the screw head, or the screw and/or bit may result. Adjust the adjusting ring to the proper torque level for 15 minutes before attempting to perform inspection or maintenance. • Never use gasoline...
Instruction Manual
Page 9
... of the carbon brushes. Carbon brush cap CAUTION: • These accessories or attachments are recommended for use with no load for repair. 9 1 1. Arm 2 3 011501 Use pliers to remove the carbon brush caps of injury to country. 2 006304 Reinstall the rear cover and tighten two screws securely. After replacing brushes, insert the battery cartridge into the holes in reverse. 1. They may be performed by running and electric brake operation when releasing the switch trigger.
... of the carbon brushes. Carbon brush cap CAUTION: • These accessories or attachments are recommended for use with no load for repair. 9 1 1. Arm 2 3 011501 Use pliers to remove the carbon brush caps of injury to country. 2 006304 Reinstall the rear cover and tighten two screws securely. After replacing brushes, insert the battery cartridge into the holes in reverse. 1. They may be performed by running and electric brake operation when releasing the switch trigger.
Instruction Manual
Page 10
... is warranted to one of Makita's Factory or Authorized Service Centers. Should any trouble develop during this one year period, return the COMPLETE tool, freight prepaid, to be free of defects from workmanship and materials for the period of ONE YEAR from state to you . This Warranty does not apply where: repairs have been made to you...
... is warranted to one of Makita's Factory or Authorized Service Centers. Should any trouble develop during this one year period, return the COMPLETE tool, freight prepaid, to be free of defects from workmanship and materials for the period of ONE YEAR from state to you . This Warranty does not apply where: repairs have been made to you...
Makita DC18RC Instruction Manual
Page 3
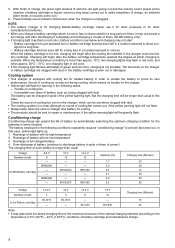
... beep" mode is damaged, ask Makita authorized service center to replace it will light up transformer, an engine generator or DC power receptacle. 17. This manual contains important safety and operating instructions for a long period of the charger. 6. Do not expose charger to ensure that battery cartridge is charged at and conditions of completed charging. 2. Pull by cord or yank it within five...
... beep" mode is damaged, ask Makita authorized service center to replace it will light up transformer, an engine generator or DC power receptacle. 17. This manual contains important safety and operating instructions for a long period of the charger. 6. Do not expose charger to ensure that battery cartridge is charged at and conditions of completed charging. 2. Pull by cord or yank it within five...
Makita DC18RC Instruction Manual
Page 4
... color. • If the charging light flashes alternately in order to enable the battery to repair or maintenance, if the yellow warning light will begin after the cooling fan installed in the following conditions repeatedly requires "conditioning charge" to cold air. NOTE: • The battery charger is as , being clogged with dust or the battery cartridge is not possible. But the...
... color. • If the charging light flashes alternately in order to enable the battery to repair or maintenance, if the yellow warning light will begin after the cooling fan installed in the following conditions repeatedly requires "conditioning charge" to cold air. NOTE: • The battery charger is as , being clogged with dust or the battery cartridge is not possible. But the...
XPH01Z Parts Breakdown
Page 2
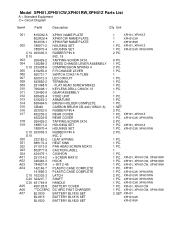
... SHAFT HANDLE BATTERY COVER DC18RC FAST CHARGER BATTERY BL1830 SET BATTERY BL1815 SET BATTERY BL1820 SET 1 XPH01, XPH01Z 1 XPH01CW 1 XPH01RW 1 PC. XPH01CW, XPH01RW 2 PC. 0 1 PC. 1 PC. 1 PC. 1 1 PC. 1 PC. XPH01CW, XPH01RW 2 PC. 1 PC. XPH01, XPH01CW 1 PC. FLAT HEAD SCREW M6X22 KEYLESS DRILL CHUCK 13 GEAR ASSEMBLY YOKE UNIT ARMATURE BRUSH HOLDER COMPLETE CARBON BRUSH CB-440 (195021-6) RUBBER PIN 4 REAR COVER REAR COVER TAPPING SCREW 3X16 HOUSING SET HOUSING SET RUBBER PIN 6 INC. 2 LEAF SPRING...
... SHAFT HANDLE BATTERY COVER DC18RC FAST CHARGER BATTERY BL1830 SET BATTERY BL1815 SET BATTERY BL1820 SET 1 XPH01, XPH01Z 1 XPH01CW 1 XPH01RW 1 PC. XPH01CW, XPH01RW 2 PC. 0 1 PC. 1 PC. 1 PC. 1 1 PC. 1 PC. XPH01CW, XPH01RW 2 PC. 1 PC. XPH01, XPH01CW 1 PC. FLAT HEAD SCREW M6X22 KEYLESS DRILL CHUCK 13 GEAR ASSEMBLY YOKE UNIT ARMATURE BRUSH HOLDER COMPLETE CARBON BRUSH CB-440 (195021-6) RUBBER PIN 4 REAR COVER REAR COVER TAPPING SCREW 3X16 HOUSING SET HOUSING SET RUBBER PIN 6 INC. 2 LEAF SPRING...


