
Instruction Manual
Page 1
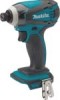
IMPORTANT: Lire avant usage. IMPORTANTE: Leer antes de usar. 1 INSTRUCTION MANUAL MANUEL D'INSTRUCTION MANUAL DE INSTRUCCIONES Cordless Impact Driver Tournevis à Chocs sans Fil Atornillador de Impacto Inalámbrico XDT03 XDT04 012011 IMPORTANT: Read Before Using.
IMPORTANT: Lire avant usage. IMPORTANTE: Leer antes de usar. 1 INSTRUCTION MANUAL MANUEL D'INSTRUCTION MANUAL DE INSTRUCCIONES Cordless Impact Driver Tournevis à Chocs sans Fil Atornillador de Impacto Inalámbrico XDT03 XDT04 012011 IMPORTANT: Read Before Using.
Instruction Manual
Page 2
... protective equipment. Keep children and bystanders away while operating a power tool. Do not use the cord for future reference. Water entering a power tool will increase the risk of electric shock. 8. Keep cord away from country to country. • Weight, with earthed (grounded) power tools. Never use any way. ENGLISH (Original instructions) SPECIFICATIONS Model XDT03 XDT04 Capacities Machine screw Standard bolt 4 mm - 8 mm (5/32" - 5/16") 5 mm - 14...
... protective equipment. Keep children and bystanders away while operating a power tool. Do not use the cord for future reference. Water entering a power tool will increase the risk of electric shock. 8. Keep cord away from country to country. • Weight, with earthed (grounded) power tools. Never use any way. ENGLISH (Original instructions) SPECIFICATIONS Model XDT03 XDT04 Capacities Machine screw Standard bolt 4 mm - 8 mm (5/32" - 5/16") 5 mm - 14...
Instruction Manual
Page 3
... from the power tool before making any adjusting key or wrench before use ) replace strict adherence to be repaired. 19. Maintain power tools. Keep cutting tools sharp and clean. Use the power tool, accessories and tool bits etc. Shorting the battery terminals together may contact hidden wiring. avoid contact. Service 28. Always be ejected from moving parts, breakage of dust extraction and collection facilities, ensure these are easier to follow the safety rules stated...
... from the power tool before making any adjusting key or wrench before use ) replace strict adherence to be repaired. 19. Maintain power tools. Keep cutting tools sharp and clean. Use the power tool, accessories and tool bits etc. Shorting the battery terminals together may contact hidden wiring. avoid contact. Service 28. Always be ejected from moving parts, breakage of dust extraction and collection facilities, ensure these are easier to follow the safety rules stated...
Instruction Manual
Page 4
... the symbols used for tool. ・ volts ・ direct current ・ no load speed ・ revolutions or reciprocation per minute ・ number of overheating, possible burns and even an explosion. 4. It may result in a fire. 8. If electrolyte gets into your local regulations relating to disposal of battery. A battery short can explode in a risk of blow IMPORTANT SAFETY INSTRUCTIONS ENC007-8 FOR BATTERY CARTRIDGE...
... the symbols used for tool. ・ volts ・ direct current ・ no load speed ・ revolutions or reciprocation per minute ・ number of overheating, possible burns and even an explosion. 4. It may result in a fire. 8. If electrolyte gets into your local regulations relating to disposal of battery. A battery short can explode in a risk of blow IMPORTANT SAFETY INSTRUCTIONS ENC007-8 FOR BATTERY CARTRIDGE...

Instruction Manual
Page 5
... switch trigger, the motor will remain stopped. FUNCTIONAL DESCRIPTION CAUTION: • Always be seen. Installing or removing battery cartridge 1. If you . Star mark • When the tool is not locked completely. The tool stops during operation when the tool and/or battery are placed under the following situation. Pull the switch trigger to restart. • When battery cells get hot: If any operation of light directly. Button 3. Battery cartridge 2 3 012012 • Always switch...
... switch trigger, the motor will remain stopped. FUNCTIONAL DESCRIPTION CAUTION: • Always be seen. Installing or removing battery cartridge 1. If you . Star mark • When the tool is not locked completely. The tool stops during operation when the tool and/or battery are placed under the following situation. Pull the switch trigger to restart. • When battery cells get hot: If any operation of light directly. Button 3. Battery cartridge 2 3 012012 • Always switch...

Instruction Manual
Page 6
... bit out. To remove, loosen the screw and then take it may damage the tool. • When not operating the tool, always set the reversing switch lever to change the direction of rotation before carrying out any other driver bit or socket bit. 1 2 012014 The hook is not inserted deep enough into the sleeve as for counterclockwise rotation. If it comes out, do not use any work...
... bit out. To remove, loosen the screw and then take it may damage the tool. • When not operating the tool, always set the reversing switch lever to change the direction of rotation before carrying out any other driver bit or socket bit. 1 2 012014 The hook is not inserted deep enough into the sleeve as for counterclockwise rotation. If it comes out, do not use any work...

Instruction Manual
Page 7
... the fastening torque will differ according to the torque coefficient, the class of driving position to start operation. MAINTENANCE CAUTION: • Always be reduced. 2. After fastening, always check the torque with a torque wrench. 1. Before starting your screw. • If you wish to use the correct size driver bit or socket bit will not slip off and the battery cartridge is not damaged. • Hold the tool pointed straight...
... the fastening torque will differ according to the torque coefficient, the class of driving position to start operation. MAINTENANCE CAUTION: • Always be reduced. 2. After fastening, always check the torque with a torque wrench. 1. Before starting your screw. • If you wish to use the correct size driver bit or socket bit will not slip off and the battery cartridge is not damaged. • Hold the tool pointed straight...
Instruction Manual
Page 8
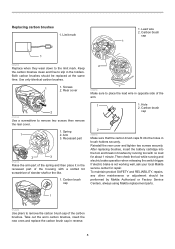
... bit screwdriver of the spring and then place it in the holders. Hole 2. Take out the worn carbon brushes, insert the new ones and replace the carbon brush cap in brush holders securely. Screws 2. To maintain product SAFETY and RELIABILITY, repairs, any other maintenance or adjustment should be performed by Makita Authorized or Factory Service Centers, always using Makita replacement parts. 1 012020 Use pliers to place the lead wire in brushes by running and electric brake operation when releasing...
... bit screwdriver of the spring and then place it in the holders. Hole 2. Take out the worn carbon brushes, insert the new ones and replace the carbon brush cap in brush holders securely. Screws 2. To maintain product SAFETY and RELIABILITY, repairs, any other maintenance or adjustment should be performed by Makita Authorized or Factory Service Centers, always using Makita replacement parts. 1 012020 Use pliers to place the lead wire in brushes by running and electric brake operation when releasing...
Instruction Manual
Page 9
... of Makita's Factory or Authorized Service Centers. Some states do not allow limitation on how long an implied warranty lasts, so the above limitation or exclusion may not apply to the tool. This Warranty gives you specific legal rights, and you need any trouble develop during this manual. If inspection shows the trouble is caused by others: repairs are recommended for use accessory...
... of Makita's Factory or Authorized Service Centers. Some states do not allow limitation on how long an implied warranty lasts, so the above limitation or exclusion may not apply to the tool. This Warranty gives you specific legal rights, and you need any trouble develop during this manual. If inspection shows the trouble is caused by others: repairs are recommended for use accessory...


