Makita DC18RC Instruction Manual
Page 3
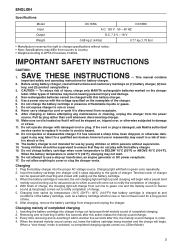
... rather than cord whenever disconnecting charger. 10. After charging, remove the battery cartridge from receptacle. 9. Inserting the battery cartridge into the proper AC voltage source. Removing and re-inserting it has received a sharp blow, been dropped, or otherwise dam- Every time removing and re-inserting it stops adjusting to notify completion of charge, the charging light will not be supervised to use or reassembly...
... rather than cord whenever disconnecting charger. 10. After charging, remove the battery cartridge from receptacle. 9. Inserting the battery cartridge into the proper AC voltage source. Removing and re-inserting it has received a sharp blow, been dropped, or otherwise dam- Every time removing and re-inserting it stops adjusting to notify completion of charge, the charging light will not be supervised to use or reassembly...
Makita DC18RC Instruction Manual
Page 4
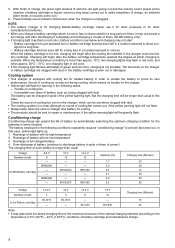
... (Ah) 1.7 2.0 2.0 2.7 3.3 3.3 Charging time (Minutes) 20 20 15 20 30 22 Voltage Number of full charged battery 4. Battery cartridge from just-operated tool or battery cartridge that has been left for warning in a location exposed to prove its low temperature 3. Voltage Number of battery cartridge and maintenance charge. 4 Battery cartridge that case, yellow light lights up. 1. But the charging time will begin after the...
... (Ah) 1.7 2.0 2.0 2.7 3.3 3.3 Charging time (Minutes) 20 20 15 20 30 22 Voltage Number of full charged battery 4. Battery cartridge from just-operated tool or battery cartridge that has been left for warning in a location exposed to prove its low temperature 3. Voltage Number of battery cartridge and maintenance charge. 4 Battery cartridge that case, yellow light lights up. 1. But the charging time will begin after the...
XBP01 Instruction Manual
Page 2
... instructions) SPECIFICATIONS Model XBP01 Max. Failure to your mains-operated (corded) power tool or battery-operated (cordless) power tool. Water entering a power tool will increase the risk of electric shock. Use of an GFCI reduces the risk of electric shock. 7. Personal Safety 10. A moment of electric shock. 8. The term "power tool" in the warnings refers to follow the warnings and instructions may result in any adapter plugs with earthed or grounded surfaces such as dust...
... instructions) SPECIFICATIONS Model XBP01 Max. Failure to your mains-operated (corded) power tool or battery-operated (cordless) power tool. Water entering a power tool will increase the risk of electric shock. Use of an GFCI reduces the risk of electric shock. 7. Personal Safety 10. A moment of electric shock. 8. The term "power tool" in the warnings refers to follow the warnings and instructions may result in any adapter plugs with earthed or grounded surfaces such as dust...
XBP01 Instruction Manual
Page 3
... the blade carefully for lubricating and changing accessories. 30. Do not overreach. Use of the power tool "live " wire may cause irritation or burns. Do not use the power tool if the switch does not turn it on . Such preventive safety measures reduce the risk of untrained users. 21. Keep cutting tools sharp and clean. Use power tools only with the charger specified by a qualified repair person using only identical replacement parts. When battery pack...
... the blade carefully for lubricating and changing accessories. 30. Do not overreach. Use of the power tool "live " wire may cause irritation or burns. Do not use the power tool if the switch does not turn it on . Such preventive safety measures reduce the risk of untrained users. 21. Keep cutting tools sharp and clean. Use power tools only with the charger specified by a qualified repair person using only identical replacement parts. When battery pack...
XBP01 Instruction Manual
Page 4
... use a damaged battery. 10. Do not store the tool and battery cartridge in this instruction manual may result in a container with room temperature at 10 ゚ C - 40 ゚ C (50 ゚ F - 104 ゚ F). Tips for tool. ・ volts ・ direct current ・ rated speed ・ no load speed ・ revolutions or reciprocation per minute IMPORTANT SAFETY INSTRUCTIONS ENC007-8 FOR BATTERY CARTRIDGE 1. Overcharging shortens the battery service life. 3. Use only Makita cutting...
... use a damaged battery. 10. Do not store the tool and battery cartridge in this instruction manual may result in a container with room temperature at 10 ゚ C - 40 ゚ C (50 ゚ F - 104 ゚ F). Tips for tool. ・ volts ・ direct current ・ rated speed ・ no load speed ・ revolutions or reciprocation per minute IMPORTANT SAFETY INSTRUCTIONS ENC007-8 FOR BATTERY CARTRIDGE 1. Overcharging shortens the battery service life. 3. Use only Makita cutting...
XBP01 Instruction Manual
Page 5
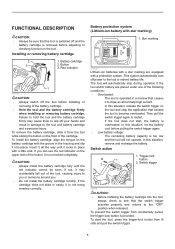
... tool. Battery protection system (Lithium-ion battery with a little click. To prevent the switch trigger from B side and pull the switch trigger. 5 Installing or removing battery cartridge 2 1. Button 3. In this situation, remove and recharge the battery. To start , the battery is provided. Failure to hold the tool and the battery cartridge firmly may accidentally fall out of the battery cartridge. • Hold the tool and the battery cartridge firmly when installing or removing battery cartridge. Trigger-lock button...
... tool. Battery protection system (Lithium-ion battery with a little click. To prevent the switch trigger from B side and pull the switch trigger. 5 Installing or removing battery cartridge 2 1. Button 3. In this situation, remove and recharge the battery. To start , the battery is provided. Failure to hold the tool and the battery cartridge firmly may accidentally fall out of the battery cartridge. • Hold the tool and the battery cartridge firmly when installing or removing battery cartridge. Trigger-lock button...
XBP01 Instruction Manual
Page 6
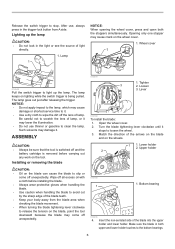
... use , always press in the trigger-lock button from the blade area when checking the blade movement. • When turning the blade tightening lever clockwise to release the tension on the blade can cause the blade to clean the lamp. Wipe off all excess oil with a cloth before carrying out any work on the wheels. 1 1. Installing or removing the blade 014579 3 1 1. Bottom bearing 014236 4. Make sure the blade in the light...
... use , always press in the trigger-lock button from the blade area when checking the blade movement. • When turning the blade tightening lever clockwise to release the tension on the blade can cause the blade to clean the lamp. Wipe off all excess oil with a cloth before carrying out any work on the wheels. 1 1. Installing or removing the blade 014579 3 1 1. Bottom bearing 014236 4. Make sure the blade in the light...

XBP01 Instruction Manual
Page 7
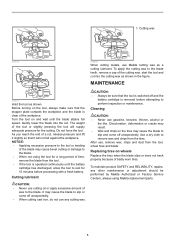
... part of a cut . 004747 Select the proper cutting position for hanging the tool. Contact with two screws. Position the blade on or off the tool or when cutting. Stopper plate 2. OPERATION CAUTION: • Never hold the tool firmly when turning on another wheel similarly. 7. Screws A 2 014191 5. Hold the blade in reverse. To remove the blade, follow the installation procedure in place and turn the blade- Screws 3. Make sure that the blade is useful...
... part of a cut . 004747 Select the proper cutting position for hanging the tool. Contact with two screws. Position the blade on or off the tool or when cutting. Stopper plate 2. OPERATION CAUTION: • Never hold the tool firmly when turning on another wheel similarly. 7. Screws A 2 014191 5. Hold the blade in reverse. To remove the blade, follow the installation procedure in place and turn the blade- Screws 3. Make sure that the blade is useful...
XBP01 Instruction Manual
Page 8
... cutting cast iron, do not use any other maintenance or adjustment should be sure that it slightly so that the tool is switched off and the battery cartridge is operated continuously until the blade attains full speed. Before turning on wheels Replace the tires when the blade slips or does not track properly because of time, remove the blade from the tool. • If the tool is removed before...
... cutting cast iron, do not use any other maintenance or adjustment should be sure that it slightly so that the tool is switched off and the battery cartridge is operated continuously until the blade attains full speed. Before turning on wheels Replace the tires when the blade slips or does not track properly because of time, remove the blade from the tool. • If the tool is removed before...
XBP01 Instruction Manual
Page 9
If inspection shows the trouble is caused by others: repairs are recommended for use with your local Makita Service Center. • Band saw blades • Hex wrench 4 • Cutting wax • Hook • Wheel cover • Makita genuine battery and charger NOTE: • Some items in the list may be free of defects from workmanship and materials for the period of ONE YEAR from the date...
If inspection shows the trouble is caused by others: repairs are recommended for use with your local Makita Service Center. • Band saw blades • Hex wrench 4 • Cutting wax • Hook • Wheel cover • Makita genuine battery and charger NOTE: • Some items in the list may be free of defects from workmanship and materials for the period of ONE YEAR from the date...
XBP01Z Parts Breakdown
Page 2
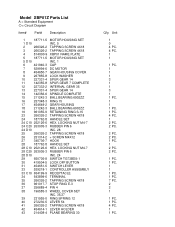
Model XBP01Z Parts List A = Standard Equipment 〇= Circuit Diagram Item# Part# Description 1 187711-5 MOTOR HOUSING SET 1 D10 INC. 5 2 266326-2 TAPPING SCREW 4X18 3 266326-2 TAPPING SCREW 4X18 4 814X90-9 XBP01 NAME PLATE 5 187711-5 MOTOR HOUSING SET 5 D10 INC. 1 6 421940-3 CAP 7 629994-6 DC MOTOR 8 454650-7 GEAR HOUSING COVER 9 267855-8 LOCK WASHER 10 227331-4 SPUR GEAR 14 11 142355-8 SPUR GEAR 7 COMPLETE 12 227332-2 INTERNAL GEAR 36 13 227331-4 SPUR GEAR 14 14 142356-6 SPINDLE COMPLETE 15...
Model XBP01Z Parts List A = Standard Equipment 〇= Circuit Diagram Item# Part# Description 1 187711-5 MOTOR HOUSING SET 1 D10 INC. 5 2 266326-2 TAPPING SCREW 4X18 3 266326-2 TAPPING SCREW 4X18 4 814X90-9 XBP01 NAME PLATE 5 187711-5 MOTOR HOUSING SET 5 D10 INC. 1 6 421940-3 CAP 7 629994-6 DC MOTOR 8 454650-7 GEAR HOUSING COVER 9 267855-8 LOCK WASHER 10 227331-4 SPUR GEAR 14 11 142355-8 SPUR GEAR 7 COMPLETE 12 227332-2 INTERNAL GEAR 36 13 227331-4 SPUR GEAR 14 14 142356-6 SPINDLE COMPLETE 15...

XBP01Z Parts Breakdown
Page 3
... WR 47 346728-9 STOPPER PLATE 48 346729-7 PLATE 49 266326-2 TAPPING SCREW 4X18 50 234313-9 COMPRESSION SPRING 9 51 256033-5 PIN 6 52 266326-2 TAPPING SCREW 4X18 53 343494-9 SLEEVE 5 54 165738-5 SLIDE PLATE 55 267164-5 FLAT WASHER 15 56 253874-0 FLAT WASHER 4 57 266326-2 TAPPING SCREW 4X18 58 424589-8 RUBBER TIRE 59 142358-2 WHEEL COMPLETE B 60 265484-1 HEX. SOCKET HEAD BOLT M6X17 61 454730...
... WR 47 346728-9 STOPPER PLATE 48 346729-7 PLATE 49 266326-2 TAPPING SCREW 4X18 50 234313-9 COMPRESSION SPRING 9 51 256033-5 PIN 6 52 266326-2 TAPPING SCREW 4X18 53 343494-9 SLEEVE 5 54 165738-5 SLIDE PLATE 55 267164-5 FLAT WASHER 15 56 253874-0 FLAT WASHER 4 57 266326-2 TAPPING SCREW 4X18 58 424589-8 RUBBER TIRE 59 142358-2 WHEEL COMPLETE B 60 265484-1 HEX. SOCKET HEAD BOLT M6X17 61 454730...

XBP01Z Parts Breakdown
Page 4
A01 783202-0 HEX. WRENCH 4 A02 196658-2 BAND SAW BLADE E01 802E58-3 CAUTION LABEL 1 PC. 1 PC. 1
A01 783202-0 HEX. WRENCH 4 A02 196658-2 BAND SAW BLADE E01 802E58-3 CAUTION LABEL 1 PC. 1 PC. 1

XBP01 Flyer English
Page 1
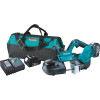
... CONVENIENCE Includes blade wheel cover suitable for cutting conduit, Unistrut®, copper pipe, threaded rod, etc. weighs only 7.5 lbs.(with battery) for convenient operation • 2-1/2"cutting capacity is ideal for appropriate one -handed operation: meets ANSI Standard 60745-2-20 SPEED Makita-built motor delivers 630 ft./min. 18V LXT® Lithium-Ion Cordless Compact Band Saw Kit Model XBP01/Z MAKITA-BUILT MOTOR DELIVERS 630 FT./MIN.BLADE SPEED FOR FAST CUTTING • Compact...
... CONVENIENCE Includes blade wheel cover suitable for cutting conduit, Unistrut®, copper pipe, threaded rod, etc. weighs only 7.5 lbs.(with battery) for convenient operation • 2-1/2"cutting capacity is ideal for appropriate one -handed operation: meets ANSI Standard 60745-2-20 SPEED Makita-built motor delivers 630 ft./min. 18V LXT® Lithium-Ion Cordless Compact Band Saw Kit Model XBP01/Z MAKITA-BUILT MOTOR DELIVERS 630 FT./MIN.BLADE SPEED FOR FAST CUTTING • Compact...

XBP01 Flyer English
Page 2
... 18-1/2" Net Weight 7.5 lbs. All specifications subject to the Makita General Catalog or visit our website at 18-1/2" long; blade speed for appropriate one-handed operation: meets ANSI Standard 60745-2-20 n Accepts standard 32-7/8" x 1/2" blades n Built-in use n 3-year warranty on tool 1-year warranty on battery n *compared to stock on hand. 18V LXT® Lithium-Ion Cordless Compact Band Saw Kit Model XBP01/Z FEATURES & BENEFITS n Makita-built motor delivers 630 ft./min.
... 18-1/2" Net Weight 7.5 lbs. All specifications subject to the Makita General Catalog or visit our website at 18-1/2" long; blade speed for appropriate one-handed operation: meets ANSI Standard 60745-2-20 n Accepts standard 32-7/8" x 1/2" blades n Built-in use n 3-year warranty on tool 1-year warranty on battery n *compared to stock on hand. 18V LXT® Lithium-Ion Cordless Compact Band Saw Kit Model XBP01/Z FEATURES & BENEFITS n Makita-built motor delivers 630 ft./min.


