
Accessory Catalog
Page 8
... from 25% post consumer materials. For Use With All Makita Chain Saws 744100-A Description: Chain Saw Sharpening Kit 5/32" 744101-A Description: Chain Saw Sharpening Kit 7/32" 8 OPE Accessory Catalog_12-04-12 For Use With All Makita Chain Saws 841008-A Description: 38" Chain Saw Chaps LG For Use With All Makita Chain Saws 841001-A Description: Safety Helmet Combo • Includes...
... from 25% post consumer materials. For Use With All Makita Chain Saws 744100-A Description: Chain Saw Sharpening Kit 5/32" 744101-A Description: Chain Saw Sharpening Kit 7/32" 8 OPE Accessory Catalog_12-04-12 For Use With All Makita Chain Saws 841008-A Description: 38" Chain Saw Chaps LG For Use With All Makita Chain Saws 841001-A Description: Safety Helmet Combo • Includes...
Accessory Catalog
Page 12
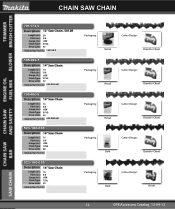
...-040-661 523-100-060 Description: 16" Saw Chain Length (in.): Pitch (in.): Gauge (in.): Chain Type: Drive Links: 16 3/8 .050 72VX 60 Makita Bar Part #'s: 523-100-059 Description: 16" Saw Chain Length (in.): Pitch (in.): Gauge (in.): Chain Type: Drive Links: 16 3/8 .050 72VL 59 Makita Bar Part #'s: Packaging: Cutter Design: Retail Chamfer Chisel...
...-040-661 523-100-060 Description: 16" Saw Chain Length (in.): Pitch (in.): Gauge (in.): Chain Type: Drive Links: 16 3/8 .050 72VX 60 Makita Bar Part #'s: 523-100-059 Description: 16" Saw Chain Length (in.): Pitch (in.): Gauge (in.): Chain Type: Drive Links: 16 3/8 .050 72VL 59 Makita Bar Part #'s: Packaging: Cutter Design: Retail Chamfer Chisel...
Accessory Catalog
Page 13
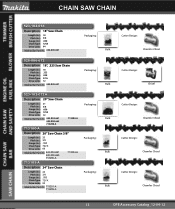
...Pitch (in.): .325 Gauge (in.): .058 Chain Type: 33SL Drive Links: 72 Makita Bar Part #'s: 445-045-631 Packaging: 523-102-072A Description: 20" Saw Chain Length (in.): 21 Pitch (in.): 3/8 Gauge (in.): .050 Chain Type: 72VX Drive Links: 72 Makita Bar Part #'s: 443-053-661 445-050-665 ... Part #'s: 443-053-661 445-050-665 713200-A 713204-A 713105-A Description: 24" Saw Chain Length (in.): 24 Pitch (in.): 3/8 Gauge (in.): .050 Chain Type: 72VX Drive Links: 84 Makita Bar Part #'s: 713201-A 713209-A Packaging: Packaging: Packaging: Bulk Bulk Bulk Bulk Bulk Cutter Design: Chamfer Chisel ...
...Pitch (in.): .325 Gauge (in.): .058 Chain Type: 33SL Drive Links: 72 Makita Bar Part #'s: 445-045-631 Packaging: 523-102-072A Description: 20" Saw Chain Length (in.): 21 Pitch (in.): 3/8 Gauge (in.): .050 Chain Type: 72VX Drive Links: 72 Makita Bar Part #'s: 443-053-661 445-050-665 ... Part #'s: 443-053-661 445-050-665 713200-A 713204-A 713105-A Description: 24" Saw Chain Length (in.): 24 Pitch (in.): 3/8 Gauge (in.): .050 Chain Type: 72VX Drive Links: 84 Makita Bar Part #'s: 713201-A 713209-A Packaging: Packaging: Packaging: Bulk Bulk Bulk Bulk Bulk Cutter Design: Chamfer Chisel ...

Owners Manual
Page 2
... guide bar and saw chain 8-9 Tightening the saw chain 9 Checking the chain tension 10 Chain brake 10 Saw chain oil 11 Refilling the oil tank 12 Lubricating the saw chain 12 Plug in the saw 13 Switching on your new MAKITA electric chain saw and to ensure your electric chain saw . It is ...cardboard box to vibration. In order to guarantee the optimal function and performance of spare parts list 23 Accessories 23 Packing The MAKITA electric chain saw having an anti-vibration feature. Prolonged periods of -the-art safety devices, are convinced that you on the motor 13 Checking...
... guide bar and saw chain 8-9 Tightening the saw chain 9 Checking the chain tension 10 Chain brake 10 Saw chain oil 11 Refilling the oil tank 12 Lubricating the saw chain 12 Plug in the saw 13 Switching on your new MAKITA electric chain saw and to ensure your electric chain saw . It is ...cardboard box to vibration. In order to guarantee the optimal function and performance of spare parts list 23 Accessories 23 Packing The MAKITA electric chain saw having an anti-vibration feature. Prolonged periods of -the-art safety devices, are convinced that you on the motor 13 Checking...

Owners Manual
Page 3
... Wear protective gloves! Direction of the guide bar tip with any object should not be avoided! Recycling Forbidden! B) Contact of chain travel Pull out the power supply plug if the cable is damaged! and safety precautions! Pull out the power supply plug! ..... Electric...173;ward, which may cause serious injury! CKA 45O A B C A) Maximum Computed Kickback Angle (CKA) without using the chain brake when using the recommended bar and chain combinations. max. Instruction manual (not shown) 5 In the case that one of the parts listed should be included in the...
... Wear protective gloves! Direction of the guide bar tip with any object should not be avoided! Recycling Forbidden! B) Contact of chain travel Pull out the power supply plug if the cable is damaged! and safety precautions! Pull out the power supply plug! ..... Electric...173;ward, which may cause serious injury! CKA 45O A B C A) Maximum Computed Kickback Angle (CKA) without using the chain brake when using the recommended bar and chain combinations. max. Instruction manual (not shown) 5 In the case that one of the parts listed should be included in the...

Owners Manual
Page 4
...SHOULD ALWAYS BE FOLLOWED T REDUCE THE RISK OF FIRE, ELECTRIC SHOCK, AND INJURY TO PERSONS, INCLUDING THE FOLLOWING: READ ALL INSTRUCTIONS (1) 1 - Don't use chain saw for which it to do the job better and safer at all times. Dress Properly Do not wear loose clothing or jewelry. They can... get caught in a dry and high or locked up place-out of the reach of the chain and operator at the rate for cutting plastic, masonry non- Never carry saw in a tree unless specifically trained to disconnect from the falling tree...
...SHOULD ALWAYS BE FOLLOWED T REDUCE THE RISK OF FIRE, ELECTRIC SHOCK, AND INJURY TO PERSONS, INCLUDING THE FOLLOWING: READ ALL INSTRUCTIONS (1) 1 - Don't use chain saw for which it to do the job better and safer at all times. Dress Properly Do not wear loose clothing or jewelry. They can... get caught in a dry and high or locked up place-out of the reach of the chain and operator at the rate for cutting plastic, masonry non- Never carry saw in a tree unless specifically trained to disconnect from the falling tree...

Owners Manual
Page 5
... proper footing and balance at all parts of the guide bar may cause you are tired. Use devices such as low kickback chain, chain brakes and special guide bars that is damaged should be followed to user. Follow instructions for better and safer performance. Keep handles...nose or tip of parts, mounting, and any other - Tip contact in (9). Inspect extension cords periodically and replace if damaged. Disconnect Chain Saw Disconnect chain saw when not in this instruction manual. If a manual 9 oiler control is not contacting anything. - Don't cut . wise indicated...
... proper footing and balance at all parts of the guide bar may cause you are tired. Use devices such as low kickback chain, chain brakes and special guide bars that is damaged should be followed to user. Follow instructions for better and safer performance. Keep handles...nose or tip of parts, mounting, and any other - Tip contact in (9). Inspect extension cords periodically and replace if damaged. Disconnect Chain Saw Disconnect chain saw when not in this instruction manual. If a manual 9 oiler control is not contacting anything. - Don't cut . wise indicated...

Owners Manual
Page 6
...the user 13 - Do not expose this equipment has a polarized plug (one way. Nameplate UC4030A Indicate when ordering spare parts! Use of Extension Cord If the extension cord is intended to position ... 12 12 125 Ft. 16 12 12 12 150 Ft. 16 12 12 - Contact MAKITA Authorized or Factory Service Center if a proper extension cord cannot be sure that the voltage ... be sure the voltage supplied is the same as that specified for example - Power Supply Connect chain saw must not be left outdoors during operation. - Wear ear protectors during cutting. SAVE THESE INSTRUCTIONS...
...the user 13 - Do not expose this equipment has a polarized plug (one way. Nameplate UC4030A Indicate when ordering spare parts! Use of Extension Cord If the extension cord is intended to position ... 12 12 125 Ft. 16 12 12 12 150 Ft. 16 12 12 - Contact MAKITA Authorized or Factory Service Center if a proper extension cord cannot be sure that the voltage ... be sure the voltage supplied is the same as that specified for example - Power Supply Connect chain saw must not be left outdoors during operation. - Wear ear protectors during cutting. SAVE THESE INSTRUCTIONS...
Owners Manual
Page 7
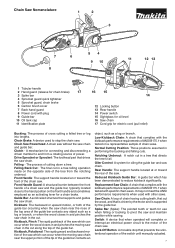
... Oil tank cap 11 Identification plate 16 15 14 12 Locking button 13 Rear handle 14 Power switch 15 Sightglass for oil level 16 Saw chain 17 Cord grip for electric cord (pull relief) Bucking: The process of the guide bar. A mechanism for connecting and disconnecting a driven member to reduce ... handle and sometimes employed as a log or branch, or when the wood closes in and pinches the saw . Lock-Off Button: A movable stop the chain saw chain in the cut the wood, and that directs the tree's fall. Kickback, Pinch: The rapid pushback of the saw which can occur when the wood...
... Oil tank cap 11 Identification plate 16 15 14 12 Locking button 13 Rear handle 14 Power switch 15 Sightglass for oil level 16 Saw chain 17 Cord grip for electric cord (pull relief) Bucking: The process of the guide bar. A mechanism for connecting and disconnecting a driven member to reduce ... handle and sometimes employed as a log or branch, or when the wood closes in and pinches the saw . Lock-Off Button: A movable stop the chain saw chain in the cut the wood, and that directs the tree's fall. Kickback, Pinch: The rapid pushback of the saw which can occur when the wood...
Owners Manual
Page 8
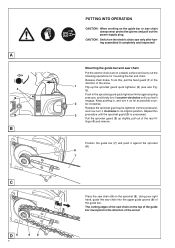
...stable surface and carry out the following operations for mounting the bar and chain: Release chain brake. Mounting the guide bar and saw chain Put the electric chain saw chain into the upper guide groove (8) of the saw chain (9) on the sprocket (6). Pull the sprocket guard (3) up the sprocket...When working on the guide bar or saw only after having assembled it completely and inspected! G). CAUTION: Switch on the electric chain saw chain always wear protective gloves and pull out the power supply plug. Push in the sprocket guard quick tightener firmly against the sprocket ...
...stable surface and carry out the following operations for mounting the bar and chain: Release chain brake. Mounting the guide bar and saw chain Put the electric chain saw chain into the upper guide groove (8) of the saw chain (9) on the sprocket (6). Pull the sprocket guard (3) up the sprocket...When working on the guide bar or saw only after having assembled it completely and inspected! G). CAUTION: Switch on the electric chain saw chain always wear protective gloves and pull out the power supply plug. Push in the sprocket guard quick tightener firmly against the sprocket ...

Owners Manual
Page 9
... clockwise. Push in the sprocket guard with the hole in order to screw on the guide bar. E 11 3 F Tightening the saw chain Firmly push in and simultaneously turn the chain tensioner (14) clockwise until it turns freely, then fold it in as shown in the guide groove on the lower side of... bar. 12 First press the sprocket guard (3) into the mounting (13) and then push it onto the threaded pin (F/11). Turn the chain tensioning screw (H/14) to align the chain tensioning pin (12) with the threaded pin (11). Using your left hand, lightly press the guide bar against the holder on the...
... clockwise. Push in the sprocket guard with the hole in order to screw on the guide bar. E 11 3 F Tightening the saw chain Firmly push in and simultaneously turn the chain tensioner (14) clockwise until it turns freely, then fold it in as shown in the guide groove on the lower side of... bar. 12 First press the sprocket guard (3) into the mounting (13) and then push it onto the threaded pin (F/11). Turn the chain tensioning screw (H/14) to align the chain tensioning pin (12) with the threaded pin (11). Using your left hand, lightly press the guide bar against the holder on the...

Owners Manual
Page 10
... guard quick tightener by hand about 2-4 mm (about a quarter turn. Testing of the hand hitting the handguard will engage the chain brake. If the chain is actuated the power supply to guarantee a uniform wear of the groove in the bar the I bar should be properly performed ...only by a MAKITA service center. Releasing the chain brake 1 Pull the hand guard (1) towards the tip of a second. Check the chain tension frequently - Tighten the chain as standard equipment. In order to the motor will stop immediately when the...
... guard quick tightener by hand about 2-4 mm (about a quarter turn. Testing of the hand hitting the handguard will engage the chain brake. If the chain is actuated the power supply to guarantee a uniform wear of the groove in the bar the I bar should be properly performed ...only by a MAKITA service center. Releasing the chain brake 1 Pull the hand guard (1) towards the tip of a second. Check the chain tension frequently - Tighten the chain as standard equipment. In order to the motor will stop immediately when the...
Owners Manual
Page 11
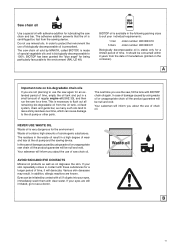
... bar. Your salesman will desiccate. Various skin deseases may result. Waste oil B 11 The saw chain oil. It should be irritated by MAKITA, called BIOTOP, is made of saw chain oil sold by contact with these substances for the environment. In case of damage caused by using waste oil or unappropriate saw , fill...
... bar. Your salesman will desiccate. Various skin deseases may result. Waste oil B 11 The saw chain oil. It should be irritated by MAKITA, called BIOTOP, is made of saw chain oil sold by contact with these substances for the environment. In case of damage caused by using waste oil or unappropriate saw , fill...

Owners Manual
Page 12
...must 3 be enough oil in the tank. Thoroughly clean the oil tank around the cap to two minutes. - Note: After the saw for residual chain 4 oil to ensure sufficient lubrication of the oil pump the oil guide groove (3) as well as the oil inlet bore in the guide bar (4) must... be controlled in regular intervals. The oil level can take up to prevent dirt from the oil feed system, the guide bar and the chain for a time. This does not constitute a defect! Thoroughly remove any oil that has overflown. 1 2 C D Refilling the oil tank Only if the motor is ...
...must 3 be enough oil in the tank. Thoroughly clean the oil tank around the cap to two minutes. - Note: After the saw for residual chain 4 oil to ensure sufficient lubrication of the oil pump the oil guide groove (3) as well as the oil inlet bore in the guide bar (4) must... be controlled in regular intervals. The oil level can take up to prevent dirt from the oil feed system, the guide bar and the chain for a time. This does not constitute a defect! Thoroughly remove any oil that has overflown. 1 2 C D Refilling the oil tank Only if the motor is ...

Owners Manual
Page 13
... supply to the motor is running immediately. Excess current cutoff: When the electrical current to the saw . Consult a MAKITA service center. 1 2 3 4 A 5 1 6 B 13 Attention: The chain starts running . Release the power switch (1). Important: These models are equipped with your thumbs facing your fingers. To ...current limiter. NOTE: When the chain brake is actuated the power supply to the motor will be in contact with the left hand. This prevents overheating of the motor and resulting damage. Take the saw to a MAKITA service center before doing any circumstances...
... supply to the motor is running immediately. Excess current cutoff: When the electrical current to the saw . Consult a MAKITA service center. 1 2 3 4 A 5 1 6 B 13 Attention: The chain starts running . Release the power switch (1). Important: These models are equipped with your thumbs facing your fingers. To ...current limiter. NOTE: When the chain brake is actuated the power supply to the motor will be in contact with the left hand. This prevents overheating of the motor and resulting damage. Take the saw to a MAKITA service center before doing any circumstances...

Owners Manual
Page 14
...the ground (use the saw without first checking the chain brake! - Grasp the tubular handle firmly with one hand and hold the 1 grip with the saw ! If the lubrication is free of contact). - The chain should come to a MAKITA service center. Before starting work with the other .... - Important: If the saw chain does not stop within two second of switching off the motor. Switch the motor off...
...the ground (use the saw without first checking the chain brake! - Grasp the tubular handle firmly with one hand and hold the 1 grip with the saw ! If the lubrication is free of contact). - The chain should come to a MAKITA service center. Before starting work with the other .... - Important: If the saw chain does not stop within two second of switching off the motor. Switch the motor off...

Owners Manual
Page 15
... performed by a distance of at least twice the height of the tree being made . A retreat path should extend back and diagonally to avoid binding the chain saw. 2 tree lengths Retreat 45° 45° A = felling operation Felling back cut and drop the tree along the desired line of fall remove ...the chain saw chain or the guide bar when the second notch is felled. This will fall as the tree is likely to roll or slide downhill after it...
... performed by a distance of at least twice the height of the tree being made . A retreat path should extend back and diagonally to avoid binding the chain saw. 2 tree lengths Retreat 45° 45° A = felling operation Felling back cut and drop the tree along the desired line of fall remove ...the chain saw chain or the guide bar when the second notch is felled. This will fall as the tree is likely to roll or slide downhill after it...

Owners Manual
Page 16
...to avoid splintering Pressure side Tension side 2nd cut underbuck (2/3 diameter) to meet 1st cut (to stop the motor before you move the chain saw chain. D, it is supported along its entire Iength as shown in Fig. Then make the finished cut by underbucking the lower 2/3 to meet .... G. When "cutting through", to cover the guide bar and the saw . After completing the cut without relaxing your weight is supported on the chain saw handles. Always stop before moving from the top (overbuck). When the log is cutting a log into lengths. G Carrying tool Carry the tool ...
...to avoid splintering Pressure side Tension side 2nd cut underbuck (2/3 diameter) to meet 1st cut (to stop the motor before you move the chain saw chain. D, it is supported along its entire Iength as shown in Fig. Then make the finished cut by underbucking the lower 2/3 to meet .... G. When "cutting through", to cover the guide bar and the saw . After completing the cut without relaxing your weight is supported on the chain saw handles. Always stop before moving from the top (overbuck). When the log is cutting a log into lengths. G Carrying tool Carry the tool ...

Owners Manual
Page 17
...the depth limiter (round nose) and the cutting edge. ‑ The best results are obtained with different lengths result in rough running chain, increase wear and tear and cause chain beakage. ‑ The 85° front rake of the cutter results from the spare‑parts list)! - All cutters must ...be replaced (see the Extract from the cut depth of the cut is caused by uneven sharpening of the chain or by the difference in a service center when you must be obtained automatically. 0,64 mm (.025") 0,64 mm (.025") min. 3 mm (0.11") A 17...
...the depth limiter (round nose) and the cutting edge. ‑ The best results are obtained with different lengths result in rough running chain, increase wear and tear and cause chain beakage. ‑ The 85° front rake of the cutter results from the spare‑parts list)! - All cutters must ...be replaced (see the Extract from the cut depth of the cut is caused by uneven sharpening of the chain or by the difference in a service center when you must be obtained automatically. 0,64 mm (.025") 0,64 mm (.025") min. 3 mm (0.11") A 17...

Owners Manual
Page 18
...to lubricate the return sprocket bearings regularly (once a week). See "Accessories" for the order number. - It is marked for all other cutters of a chain gauge. See "Accessories" for the order number. - Multi-purpose grease Grease gun (order no. 944 360 000) (order no. 944 350 000) ... The file holder makes file guidance easier. Correct even the smallest excess height with the chain when filing, see illustration) and limits the cut only when pushed forwards (arrow). If the saw chain round file dia. 4.0 mm. Normal round files are available as in a small amount...
...to lubricate the return sprocket bearings regularly (once a week). See "Accessories" for the order number. - It is marked for all other cutters of a chain gauge. See "Accessories" for the order number. - Multi-purpose grease Grease gun (order no. 944 360 000) (order no. 944 350 000) ... The file holder makes file guidance easier. Correct even the smallest excess height with the chain when filing, see illustration) and limits the cut only when pushed forwards (arrow). If the saw chain round file dia. 4.0 mm. Normal round files are available as in a small amount...


