

Owners Manual
Page 3
...Power tools are connected and properly used. If damaged, have the power tool repaired before use the next heavier gage. Use the power tool, accessories and tool bits etc. If in doubt, use . Handle the bits very carefully. these are dangerous in the hands of untrained users. 21.... 7. Use of starting the power tool accidentally. 20. Store idle power tools out of the reach of parts and any adjustments, changing accessories, or storing power tools. Follow instruction for misalignment or binding of moving parts, breakage of children and do the job better and safer ...
...Power tools are connected and properly used. If damaged, have the power tool repaired before use the next heavier gage. Use the power tool, accessories and tool bits etc. If in doubt, use . Handle the bits very carefully. these are dangerous in the hands of untrained users. 21.... 7. Use of starting the power tool accidentally. 20. Store idle power tools out of the reach of parts and any adjustments, changing accessories, or storing power tools. Follow instruction for misalignment or binding of moving parts, breakage of children and do the job better and safer ...
Owners Manual
Page 6
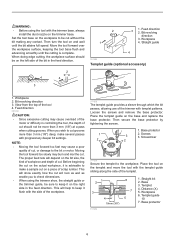
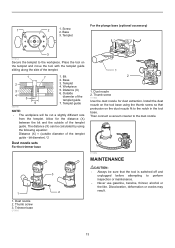
... protector. When doing edge cutting, the workpiece surface should not be more than 3 mm (1/8") at a pass when cutting grooves. Straight guide 4 001985 Templet guide (optional accessory) 1. NOTE: • Moving the tool forward too fast may cause a poor quality of cut on the left side of the bit in the feed direction...
... protector. When doing edge cutting, the workpiece surface should not be more than 3 mm (1/8") at a pass when cutting grooves. Straight guide 4 001985 Templet guide (optional accessory) 1. NOTE: • Moving the tool forward too fast may cause a poor quality of cut on the left side of the bit in the feed direction...
Owners Manual
Page 7
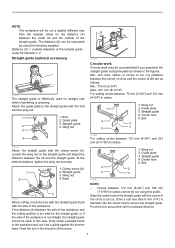
... 2. Guide plate 3. Bolt 2 3 001993 For cutting circles between the router bit and the outside diameter of the templet guide router bit diameter) / 2 Straight guide (optional accessory) 011840 The straight guide is not straight, the straight guide cannot be used for the distance (X) between 121 mm (4-3/4") and 221 mm (8-11/16") in...
... 2. Guide plate 3. Bolt 2 3 001993 For cutting circles between the router bit and the outside diameter of the templet guide router bit diameter) / 2 Straight guide (optional accessory) 011840 The straight guide is not straight, the straight guide cannot be used for the distance (X) between 121 mm (4-3/4") and 221 mm (8-11/16") in...
Owners Manual
Page 8
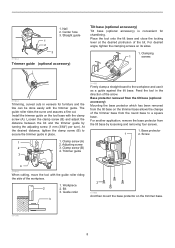
...011844 Trimming, curved cuts in veneers for chamfering. Adjusting screw 2 3. Straight guide 1 2 3 011843 Trimmer guide (optional accessory) Tilt base (optional accessory) Tilt base (optional accessory) is convenient for furniture and the like can be done easily with the clamp screw (A). Base protector removed from the tilt ...base (optional accessory) Mounting the base protector which has been removed from the tilt base by turning the adjusting screw (1 mm (3/64") per...
...011844 Trimming, curved cuts in veneers for chamfering. Adjusting screw 2 3. Straight guide 1 2 3 011843 Trimmer guide (optional accessory) Tilt base (optional accessory) Tilt base (optional accessory) is convenient for furniture and the like can be done easily with the clamp screw (A). Base protector removed from the tilt ...base (optional accessory) Mounting the base protector which has been removed from the tilt base by turning the adjusting screw (1 mm (3/64") per...
Owners Manual
Page 9
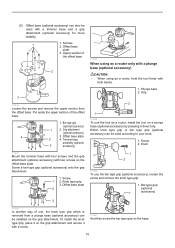
Collet nut 3. Pulley 3. Wrench 1 2. Insert the hex wrench into the collet cone on the offset base 1 1. Offset base (optional accessory) 012085 (1) Offset base (optional accessory) is convenient for work in a tight area such as shown in the figure. 3 011992 To install the bit, fall the tool with the offset base ...
Collet nut 3. Pulley 3. Wrench 1 2. Insert the hex wrench into the collet cone on the offset base 1 1. Offset base (optional accessory) 012085 (1) Offset base (optional accessory) is convenient for work in a tight area such as shown in the figure. 3 011992 To install the bit, fall the tool with the offset base ...
Owners Manual
Page 10
Screws 2. Put aside the upper section of the offset base 2 3 011934 Loosen the screws and remove the upper section from a plunge base (optional accessory) can also be used according to your work. 1. Grip 2 1 011855 To use the tool as a router, hold the tool firmly with both hands. 1. Screw ...2 011856 To use , the knob type grip which is removed from the offset base. Bar type grip (optional 1 accessory) 3 011984 In another way of use the bar type grip (optional accessory), loosen the screw and remove the knob type grip. 1. To install the knob type grip, place it on the ...
Screws 2. Put aside the upper section of the offset base 2 3 011934 Loosen the screws and remove the upper section from a plunge base (optional accessory) can also be used according to your work. 1. Grip 2 1 011855 To use the tool as a router, hold the tool firmly with both hands. 1. Screw ...2 011856 To use , the knob type grip which is removed from the offset base. Bar type grip (optional 1 accessory) 3 011984 In another way of use the bar type grip (optional accessory), loosen the screw and remove the knob type grip. 1. To install the knob type grip, place it on the ...
Owners Manual
Page 11
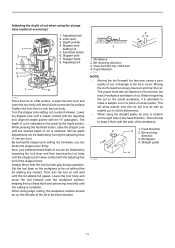
... lever to the bit or motor. By turning the stopper pole setting nut clockwise, you to check dimensions. • When using the plunge base (optional accessory) 1 2 3 4 5 6 1. Bit revolving direction 3. Then turn ). Workpiece 2. Feed direction 001984 NOTE: • Moving the tool forward too fast may burn and mar the cut. This will...
... lever to the bit or motor. By turning the stopper pole setting nut clockwise, you to check dimensions. • When using the plunge base (optional accessory) 1 2 3 4 5 6 1. Bit revolving direction 3. Then turn ). Workpiece 2. Feed direction 001984 NOTE: • Moving the tool forward too fast may burn and mar the cut. This will...
Owners Manual
Page 12
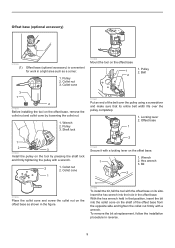
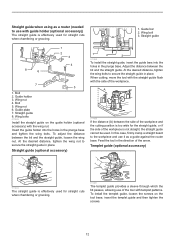
...a router (needed to use of the tool with the wing nut. To install the templet guide, loosen the screws on the guide holder (optional accessory) with templet patterns. Wing bolt 3. Guide holder 3. Adjust the distance between the bit and the straight guide, loosen the wing nut. When cutting..., move the tool with the straight guide flush with guide holder (optional accessory)) The straight guide is too wide for straight cuts when chamfering or grooving. 011851 The templet guide provides a sleeve through which the bit ...
...a router (needed to use of the tool with the wing nut. To install the templet guide, loosen the screws on the guide holder (optional accessory) with templet patterns. Wing bolt 3. Guide holder 3. Adjust the distance between the bit and the straight guide, loosen the wing nut. When cutting..., move the tool with the straight guide flush with guide holder (optional accessory)) The straight guide is too wide for straight cuts when chamfering or grooving. 011851 The templet guide provides a sleeve through which the bit ...
Owners Manual
Page 13
... the templet guide sliding along the side of the templet guide 7. Base 3. Base 3. Then connect a vacuum cleaner to the workpiece. For the plunge base (optional accessory) 1 2 1.
... the templet guide sliding along the side of the templet guide 7. Base 3. Base 3. Then connect a vacuum cleaner to the workpiece. For the plunge base (optional accessory) 1 2 1.
Owners Manual
Page 14
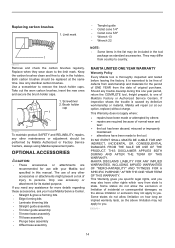
...The use of any assistance for use accessory or attachment for the period of injury to be replaced at our option, replace) without charge. MAKITA LIMITED ONE YEAR WARRANTY Warranty Policy Every Makita tool is caused by defective workmanship or material, Makita will repair (or at the same... and secure the brush holder caps. 1. They may be performed by others: repairs are recommended for more details regarding these accessories, ask your Makita tool specified in the holders. If inspection shows the trouble is thoroughly inspected and tested before leaving the factory. IN NO ...
...The use of any assistance for use accessory or attachment for the period of injury to be replaced at our option, replace) without charge. MAKITA LIMITED ONE YEAR WARRANTY Warranty Policy Every Makita tool is caused by defective workmanship or material, Makita will repair (or at the same... and secure the brush holder caps. 1. They may be performed by others: repairs are recommended for more details regarding these accessories, ask your Makita tool specified in the holders. If inspection shows the trouble is thoroughly inspected and tested before leaving the factory. IN NO ...

Flyer (English)
Page 2
... - NTF-0212 MA-0979-12 0 88381 61909 7 Makita U.S.A.,14930 Northam St.,La Mirada,CA 90638 "The Makita Teal color is the registered trade dress of ROUTER accessories. allows for routing as close as RT0700C plus: n Plunge base (195563-0) n Template guide 16mm...horsepower* 1-1/4 Height 7-7/8" Net weight 3.9 lbs. same as 3/4" to the Makita General Catalog or visit our website at different angles n Offset Base - UPC code RT0700C 088381-619059 RT0700CX3 088381-619097 OPTIONAL ACCESSORIES RT0700C 0 88381 61905 9 RT0700CX3 n Plunge base (195563-0) n Tilt base (...
... - NTF-0212 MA-0979-12 0 88381 61909 7 Makita U.S.A.,14930 Northam St.,La Mirada,CA 90638 "The Makita Teal color is the registered trade dress of ROUTER accessories. allows for routing as close as RT0700C plus: n Plunge base (195563-0) n Template guide 16mm...horsepower* 1-1/4 Height 7-7/8" Net weight 3.9 lbs. same as 3/4" to the Makita General Catalog or visit our website at different angles n Offset Base - UPC code RT0700C 088381-619059 RT0700CX3 088381-619097 OPTIONAL ACCESSORIES RT0700C 0 88381 61905 9 RT0700CX3 n Plunge base (195563-0) n Tilt base (...