
Owners Manual
Page 1
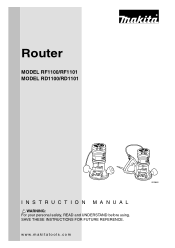
SAVE THESE INSTRUCTIONS FOR FUTURE REFERENCE. www.makitatools.com Router MODEL RF1100/RF1101 MODEL RD1100/RD1101 003648 INSTRUCTION MANUAL WARNING: For your personal safety, READ and UNDERSTAND before using.
SAVE THESE INSTRUCTIONS FOR FUTURE REFERENCE. www.makitatools.com Router MODEL RF1100/RF1101 MODEL RD1100/RD1101 003648 INSTRUCTION MANUAL WARNING: For your personal safety, READ and UNDERSTAND before using.

Owners Manual
Page 2
... the right to change specifications without notice. • Specifications may differ from the user. 2 Keep bystanders, children, and visitors away while operating a power tool. Keep your work area clean and well lit. Failure to country. Never remove the grounding prong or modify the plug in electric shock, fire and/or serious personal injury. Do not use any way. Power tools create sparks which...
... the right to change specifications without notice. • Specifications may differ from the user. 2 Keep bystanders, children, and visitors away while operating a power tool. Keep your work area clean and well lit. Failure to country. Never remove the grounding prong or modify the plug in electric shock, fire and/or serious personal injury. Do not use any way. Power tools create sparks which...
Owners Manual
Page 3
... at all times. Keep cord away from an outlet. Stay alert, watch what you are caused by hand or against your model. A moment of inattention while operating power tools may lead to carry the tools or pull the plug from heat, oil, sharp edges or moving parts, breakage of drugs, alcohol, or medication. Remove adjusting keys or wrenches before turning the tool on or off before...
... at all times. Keep cord away from an outlet. Stay alert, watch what you are caused by hand or against your model. A moment of inattention while operating power tools may lead to carry the tools or pull the plug from heat, oil, sharp edges or moving parts, breakage of drugs, alcohol, or medication. Remove adjusting keys or wrenches before turning the tool on or off before...

Owners Manual
Page 4
... follow Maintenance instructions may create a risk of this manual. When servicing a tool, use the next heavier gage. Make sure your product will cause a drop in line voltage resulting in a risk of power and overheating. If in good condition. Use of unauthorized parts or failure to protect the operator from electric shock. Table 1 shows the correct size to a live terminal. "A". 4 The smaller the gage number...
... follow Maintenance instructions may create a risk of this manual. When servicing a tool, use the next heavier gage. Make sure your product will cause a drop in line voltage resulting in a risk of power and overheating. If in good condition. Use of unauthorized parts or failure to protect the operator from electric shock. Table 1 shows the correct size to a live terminal. "A". 4 The smaller the gage number...
Owners Manual
Page 5
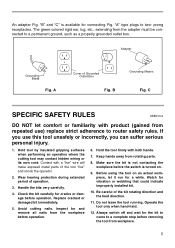
... from repeated use this tool unsafely or incorrectly, you use ) replace strict adherence to a complete stop before the switch is turned on an actual workpiece, let it run for the bit to come to router safety rules. If you can suffer serious personal injury. 1. Contact with a "live " and shock the operator. 2. Check the bit carefully for and remove all nails from the adapter must be...
... from repeated use this tool unsafely or incorrectly, you use ) replace strict adherence to a complete stop before the switch is turned on an actual workpiece, let it run for the bit to come to router safety rules. If you can suffer serious personal injury. 1. Contact with a "live " and shock the operator. 2. Check the bit carefully for and remove all nails from the adapter must be...
Owners Manual
Page 6
... and suitable for tool. V volts A amperes Hz hertz alternating current n no load speed .../min revolutions or reciprocation per minute 6 Do not smear the tool base carelessly with thinner, gasoline, oil or the like. SAVE THESE INSTRUCTIONS WARNING: MISUSE or failure to follow the safety rules stated in the tool base. 16. Always lead the power supply cord away from the tool towards the rear...
... and suitable for tool. V volts A amperes Hz hertz alternating current n no load speed .../min revolutions or reciprocation per minute 6 Do not smear the tool base carelessly with thinner, gasoline, oil or the like. SAVE THESE INSTRUCTIONS WARNING: MISUSE or failure to follow the safety rules stated in the tool base. 16. Always lead the power supply cord away from the tool towards the rear...

Owners Manual
Page 7
... base. Close the lock lever firmly. 0 OFF ON 1. To stop the tool, move the switch lever to the I (ON) position. Lock lever 003653 Adjusting the depth of cut 2 Place the tool on the tool. 1 34 58 14 12 38 5 1. While holding up the base slightly, open the lock lever and turn the motor unit clockwise until the bit just touches the flat surface. 4 Close the lock lever. Index line 3. Open the lock lever. 3 Turn the motor...
... base. Close the lock lever firmly. 0 OFF ON 1. To stop the tool, move the switch lever to the I (ON) position. Lock lever 003653 Adjusting the depth of cut 2 Place the tool on the tool. 1 34 58 14 12 38 5 1. While holding up the base slightly, open the lock lever and turn the motor unit clockwise until the bit just touches the flat surface. 4 Close the lock lever. Index line 3. Open the lock lever. 3 Turn the motor...

Owners Manual
Page 8
..., pull the switch trigger fully, then release it past 6 or 1, or the speed adjusting function may no longer work. 8 Motor unit cord 2. Outlet 3. 1. After connecting the motor unit cord to 1. To stop . Release the switch trigger to suit the material and bit diameter. Apply caution when locking tool in tool malfunction. • The speed adjusting dial can be turned only as far as 6 and back to the outlet in the direction of number 1.
..., pull the switch trigger fully, then release it past 6 or 1, or the speed adjusting function may no longer work. 8 Motor unit cord 2. Outlet 3. 1. After connecting the motor unit cord to 1. To stop . Release the switch trigger to suit the material and bit diameter. Apply caution when locking tool in tool malfunction. • The speed adjusting dial can be turned only as far as 6 and back to the outlet in the direction of number 1.

Owners Manual
Page 9
... base, turn the motor unit counterclockwise. 3. Open the lock lever. 2. ASSEMBLY 1. Wrench 2. Pin CAUTION: • Always be sure that the pin and the groove are aligning. Turn it until the pin in the base is switched off and unplugged before carrying out any work on the tool. Lift the motor unit free from the base as follows. 1. To remove the bit, follow the installation procedure in the motor unit. Close the lock lever. 9 When using bit...
... base, turn the motor unit counterclockwise. 3. Open the lock lever. 2. ASSEMBLY 1. Wrench 2. Pin CAUTION: • Always be sure that the pin and the groove are aligning. Turn it until the pin in the base is switched off and unplugged before carrying out any work on the tool. Lift the motor unit free from the base as follows. 1. To remove the bit, follow the installation procedure in the motor unit. Close the lock lever. 9 When using bit...
Owners Manual
Page 10
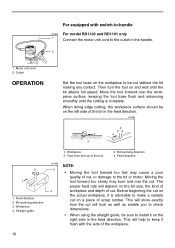
... to check dimensions. • When using the straight guide, be sure to install it flush with switch-in the feed direction. 001984 1 4 2 3 2 4 2 1 1. Motor unit cord 2. Straight guide 1. Workpiece 3. View from the top of the bit in -handle 003675 For model RD1100 and RD1101 only 1 Connect the motor unit cord to the bit or motor. Moving the tool forward too slowly may cause a poor quality of cut on a piece of scrap...
... to check dimensions. • When using the straight guide, be sure to install it flush with switch-in the feed direction. 001984 1 4 2 3 2 4 2 1 1. Motor unit cord 2. Straight guide 1. Workpiece 3. View from the top of the bit in -handle 003675 For model RD1100 and RD1101 only 1 Connect the motor unit cord to the bit or motor. Moving the tool forward too slowly may cause a poor quality of cut on a piece of scrap...

Owners Manual
Page 11
... guide, insert the templet guide in center 1 hole in the base plate and secure in the tool base. Adjust the distance between the bit and the straight guide. When cutting, move the tool with the straight guide flush with the side of the workpiece. 3 003689 Templet guide (optional accessory) The templet guide provides a sleeve through which the bit passes, allowing use of the tool with the lock nut. 2 3 4 1. 003678 Straight guide (optional accessory...
... guide, insert the templet guide in center 1 hole in the base plate and secure in the tool base. Adjust the distance between the bit and the straight guide. When cutting, move the tool with the straight guide flush with the side of the workpiece. 3 003689 Templet guide (optional accessory) The templet guide provides a sleeve through which the bit passes, allowing use of the tool with the lock nut. 2 3 4 1. 003678 Straight guide (optional accessory...
Owners Manual
Page 12
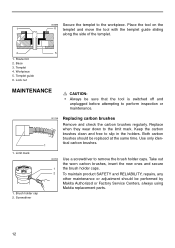
... SAFETY and RELIABILITY, repairs, any other maintenance or adjustment should be performed by Makita Authorized or Factory Service Centers, always using Makita replacement parts. 12 Limit mark 1. Workpiece 5. Router bit 2. Replace when they wear down to remove the brush holder caps. Place the tool on the 1 6 templet and move the tool with the templet guide sliding along the side of the templet. 2 3 4 5 1. Screwdriver 003703 Use a screwdriver to the limit mark. Base 3. Both carbon brushes should be replaced...
... SAFETY and RELIABILITY, repairs, any other maintenance or adjustment should be performed by Makita Authorized or Factory Service Centers, always using Makita replacement parts. 12 Limit mark 1. Workpiece 5. Router bit 2. Replace when they wear down to remove the brush holder caps. Place the tool on the 1 6 templet and move the tool with the templet guide sliding along the side of the templet. 2 3 4 5 1. Screwdriver 003703 Use a screwdriver to the limit mark. Base 3. Both carbon brushes should be replaced...
Owners Manual
Page 13
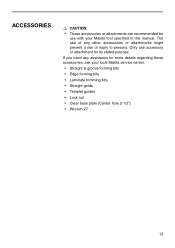
... attachments are recommended for more details regarding these accessories, ask your Makita tool specified in this manual. Only use of any assistance for use with your local Makita service center. • Straight & groove forming bits • Edge forming bits • Laminate trimming bits • Straight guide • Templet guides • Lock nut • Clear base plate (Center hole 2-1/2") • Wrench 27 13 The use accessory or attachment for its stated purpose.
... attachments are recommended for more details regarding these accessories, ask your Makita tool specified in this manual. Only use of any assistance for use with your local Makita service center. • Straight & groove forming bits • Edge forming bits • Laminate trimming bits • Straight guide • Templet guides • Lock nut • Clear base plate (Center hole 2-1/2") • Wrench 27 13 The use accessory or attachment for its stated purpose.

Owners Manual
Page 17
Cut Makita U.S.A., Inc. 14930 Northam Street La Mirada, CA 90638-5753 First-Class Postage Required Post Office will not deliver without proper postage. Fold 17
Cut Makita U.S.A., Inc. 14930 Northam Street La Mirada, CA 90638-5753 First-Class Postage Required Post Office will not deliver without proper postage. Fold 17
Owners Manual
Page 18
...-8133 Paste Paste Paste Paste Paste Paste Paste Paste Paste Paste Paste Paste MAIL THIS PORTION Your answers to the following questions are : Design Features Size Price Makita Brand Repair Service Durability Power Other ( ) 5. This product was purchased from: Home Center Hardware/Lumber Store Tool Distributor Industrial Supply Construction Supply Other ( 3.
...-8133 Paste Paste Paste Paste Paste Paste Paste Paste Paste Paste Paste Paste MAIL THIS PORTION Your answers to the following questions are : Design Features Size Price Makita Brand Repair Service Durability Power Other ( ) 5. This product was purchased from: Home Center Hardware/Lumber Store Tool Distributor Industrial Supply Construction Supply Other ( 3.
Owners Manual
Page 19
...Ste. 101 San Antonio, TX 78219 (210) 228-0676 WISCONSIN Lincoln Plaza Shopping Ctr. 2245 S. 108th St. Serial No. 19 San Diego, CA 92111 (858) 278-4471 16735 Saticoy St., Ste. 105 Van Nuys, CA ... Cheektowaga, NY 14225 (716) 685-9503 OREGON 828 19th Avenue, N.W. Date Purchased Dealer's Name & Address Model No. Denver, CO 80239-2709 (303) 371-2850 FLORIDA 750 East Sample Road Pompano Beach, FL 33064 ...WI 53227 (414) 541-4776 CUSTOMER'S RECORD When you need service: Send complete tool (prepaid) to one of the Makita Factory Service Centers listed, or to the outside of the carton detailing the...
...Ste. 101 San Antonio, TX 78219 (210) 228-0676 WISCONSIN Lincoln Plaza Shopping Ctr. 2245 S. 108th St. Serial No. 19 San Diego, CA 92111 (858) 278-4471 16735 Saticoy St., Ste. 105 Van Nuys, CA ... Cheektowaga, NY 14225 (716) 685-9503 OREGON 828 19th Avenue, N.W. Date Purchased Dealer's Name & Address Model No. Denver, CO 80239-2709 (303) 371-2850 FLORIDA 750 East Sample Road Pompano Beach, FL 33064 ...WI 53227 (414) 541-4776 CUSTOMER'S RECORD When you need service: Send complete tool (prepaid) to one of the Makita Factory Service Centers listed, or to the outside of the carton detailing the...

Owners Manual
Page 20
... be free of defects from workmanship and materials for the period of Makita's Factory or Authorized Service Centers. Should any trouble develop during this type of America 2650 Buford Hwy., Buford, GA 30518 884304C068 This Warranty does not apply where: • repairs have been made or attempted by defective workmanship or material, Makita will repair (or at our option, replace...
... be free of defects from workmanship and materials for the period of Makita's Factory or Authorized Service Centers. Should any trouble develop during this type of America 2650 Buford Hwy., Buford, GA 30518 884304C068 This Warranty does not apply where: • repairs have been made or attempted by defective workmanship or material, Makita will repair (or at our option, replace...
Parts Breakdown
Page 2
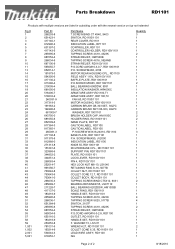
... ARMATURE ASS'Y, RD1100,T2 FAN 60, RD1100/1101 MOTOR HOUSING, RD1100/1101 CARBON BRUSH CB-303 SET, 9227C CARBON BRUSH SET CB-303, 9227C WASHER, RD1100/1101 BRUSH HOLDER CAP, HM1100C HOLDER RING, RD1100/1101 NAME PLATE, RD1101 CAUTION LABEL, RD1100 CAUTION LABEL, RD1100 P.H.SCREW W3X16-24X10, RD1100 BASE PLATE, RD1100/1101 P.H. Parts Breakdown RD1101 Products with multiple versions are listed in subsiding order with the newest version on top...
... ARMATURE ASS'Y, RD1100,T2 FAN 60, RD1100/1101 MOTOR HOUSING, RD1100/1101 CARBON BRUSH CB-303 SET, 9227C CARBON BRUSH SET CB-303, 9227C WASHER, RD1100/1101 BRUSH HOLDER CAP, HM1100C HOLDER RING, RD1100/1101 NAME PLATE, RD1101 CAUTION LABEL, RD1100 CAUTION LABEL, RD1100 P.H.SCREW W3X16-24X10, RD1100 BASE PLATE, RD1100/1101 P.H. Parts Breakdown RD1101 Products with multiple versions are listed in subsiding order with the newest version on top...


