
Owners Manual
Page 2
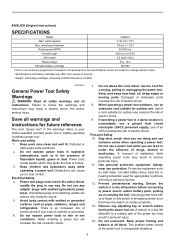
... injury. 11. A moment of a cord suitable for outdoor use the cord for outdoor use any adjusting key or wrench before connecting to power source and/or battery pack, picking up or carrying the tool. ENGLISH (Original instructions) SPECIFICATIONS Model LXDG01 Max. Use of inattention while operating power tools may ignite the dust or fumes. 3. Always wear eye protection. If operating a power tool in the presence of electric shock. 5. wheel point diameter 38 mm...
... injury. 11. A moment of a cord suitable for outdoor use the cord for outdoor use any adjusting key or wrench before connecting to power source and/or battery pack, picking up or carrying the tool. ENGLISH (Original instructions) SPECIFICATIONS Model LXDG01 Max. Use of inattention while operating power tools may ignite the dust or fumes. 3. Always wear eye protection. If operating a power tool in the presence of electric shock. 5. wheel point diameter 38 mm...
Owners Manual
Page 3
... in moving parts. 16. Use power tools only with water. Under abusive conditions, liquid may be caught in the hands of children and do not allow persons unfamiliar with sharp cutting edges are less likely to bind and are easier to function as sanding, wire brushing, polishing or cutting-off . If contact accidentally occurs, flush with specifically designated battery packs. Read all instructions listed below...
... in moving parts. 16. Use power tools only with water. Under abusive conditions, liquid may be caught in the hands of children and do not allow persons unfamiliar with sharp cutting edges are less likely to bind and are easier to function as sanding, wire brushing, polishing or cutting-off . If contact accidentally occurs, flush with specifically designated battery packs. Read all instructions listed below...
Owners Manual
Page 4
... accessory's rotation at maximum no-load speed for the higher speed of filtrating particles generated by various operations . Anyone entering the work area. c) Do not position your hand near flammable materials. c) Do not use face shield, safety goggles or safety glasses. Do not use auxiliary handle, if provided, for which in direction opposite to a complete stop. Damaged accessories will propel the tool in turn causes the uncontrolled power tool...
... accessory's rotation at maximum no-load speed for the higher speed of filtrating particles generated by various operations . Anyone entering the work area. c) Do not position your hand near flammable materials. c) Do not use face shield, safety goggles or safety glasses. Do not use auxiliary handle, if provided, for which in direction opposite to a complete stop. Damaged accessories will propel the tool in turn causes the uncontrolled power tool...
Owners Manual
Page 5
... even a breakdown. 6. MISUSE or failure to assure operator safety. 28. Before using the tool on the tool. 25. It may reach or exceed 50 ゚ C (122 ゚ F). 7. Check that sparks fly away from repeated use a damaged battery. Always be sure that the tool is turned on any conductive material. (2) Avoid storing battery cartridge in this instruction manual may result in a risk of wheels. Do...
... even a breakdown. 6. MISUSE or failure to assure operator safety. 28. Before using the tool on the tool. 25. It may reach or exceed 50 ゚ C (122 ゚ F). 7. Check that sparks fly away from repeated use a damaged battery. Always be sure that the tool is turned on any conductive material. (2) Avoid storing battery cartridge in this instruction manual may result in a risk of wheels. Do...

Owners Manual
Page 6
... tool is not being damaged. − In this case, to the "I (ON)" position. Indication lamp 3 011471 • Always switch off and the battery cartridge is not locked completely. Install it locks in place with the groove in two positions. Red part 3. Tips for approximately one second. Charge the battery cartridge before installing or removing of operator comfort during extended use force when installing the battery...
... tool is not being damaged. − In this case, to the "I (ON)" position. Indication lamp 3 011471 • Always switch off and the battery cartridge is not locked completely. Install it locks in place with the groove in two positions. Red part 3. Tips for approximately one second. Charge the battery cartridge before installing or removing of operator comfort during extended use force when installing the battery...

Owners Manual
Page 7
... wheel point making any work . − To start the tool, first slide the slide switch toward the "I (ON)" position, the tool does not start preventive function is removed before carrying out any contact with the slide switch in the holders. Use one wrench to hold the spindle and the other one to install a 1/8" shank wheel point. 001145 Remove and check the carbon brushes regularly. Excessive pressure on the tool. Installing or removing wheel point 1. OPERATION 011478 Turn the tool...
... wheel point making any work . − To start the tool, first slide the slide switch toward the "I (ON)" position, the tool does not start preventive function is removed before carrying out any contact with the slide switch in the holders. Use one wrench to hold the spindle and the other one to install a 1/8" shank wheel point. 001145 Remove and check the carbon brushes regularly. Excessive pressure on the tool. Installing or removing wheel point 1. OPERATION 011478 Turn the tool...
Owners Manual
Page 8
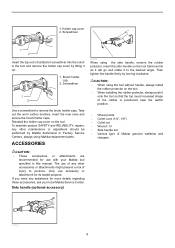
... the rubber is positioned near the switch position. . • Wheel points • Collet cone (1/4", 1/8") • Collet nut • Wrench 13 • Side handle set • Various type of slotted bit screwdriver into the notch in this manual. Then tighten the handle firmly by Makita Authorized or Factory Service Centers, always using the side handle, remove the rubber protector, insert the side handle on the tool. ACCESSORIES 011470 When using Makita replacement parts. Side handle (optional accessory) 011467 8
... the rubber is positioned near the switch position. . • Wheel points • Collet cone (1/4", 1/8") • Collet nut • Wrench 13 • Side handle set • Various type of slotted bit screwdriver into the notch in this manual. Then tighten the handle firmly by Makita Authorized or Factory Service Centers, always using the side handle, remove the rubber protector, insert the side handle on the tool. ACCESSORIES 011470 When using Makita replacement parts. Side handle (optional accessory) 011467 8

Owners Manual
Page 9
... DAMAGES FROM THE SALE OR USE OF THE PRODUCT. This Warranty gives you specific legal rights, and you may also have been made or attempted by defective workmanship or material, Makita will repair (or at our option, replace) without charge. MAKITA DISCLAIMS LIABILITY FOR ANY IMPLIED WARRANTIES, INCLUDING IMPLIED WARRANTIES OF "MERCHANTABILITY" AND "FITNESS FOR A SPECIFIC PURPOSE," AFTER THE ONE...
... DAMAGES FROM THE SALE OR USE OF THE PRODUCT. This Warranty gives you specific legal rights, and you may also have been made or attempted by defective workmanship or material, Makita will repair (or at our option, replace) without charge. MAKITA DISCLAIMS LIABILITY FOR ANY IMPLIED WARRANTIES, INCLUDING IMPLIED WARRANTIES OF "MERCHANTABILITY" AND "FITNESS FOR A SPECIFIC PURPOSE," AFTER THE ONE...

Parts Breakdown
Page 2
Parts Breakdown LXDG01 Products with multiple versions are listed in subsiding order with the newest version on top not indented Fig. # 1 2 3 4 5 6 7 8 9 10 11 12 13 14 15 16 16 17 18... WASHER 22 ARMATURE INC. 17 RUBBER RING 13 LED CIRCUIT YORK UNIT ENDBELL COMPLETE LXDG01 NAME PLATE TAPPING SCREW 4X18 SWITCH KNOB HOUSING SET INC. 29 SWITCH LEVER SWITCH 1246.3223 CONTROLLER TERMINAL HOUSING SET INC. 24 CARBON BRUSH CB-430 BRUSH HOLDER CAP HOLDER CAP COVER COUPLING BALL BEARING 629LLB O-RING 26 RETAINING RING S-9 GEAR HOUSING COVER WRENCH 13 BATTERY COVER DC18RA FAST CHARGER BATTERY BL1830 SET...
Parts Breakdown LXDG01 Products with multiple versions are listed in subsiding order with the newest version on top not indented Fig. # 1 2 3 4 5 6 7 8 9 10 11 12 13 14 15 16 16 17 18... WASHER 22 ARMATURE INC. 17 RUBBER RING 13 LED CIRCUIT YORK UNIT ENDBELL COMPLETE LXDG01 NAME PLATE TAPPING SCREW 4X18 SWITCH KNOB HOUSING SET INC. 29 SWITCH LEVER SWITCH 1246.3223 CONTROLLER TERMINAL HOUSING SET INC. 24 CARBON BRUSH CB-430 BRUSH HOLDER CAP HOLDER CAP COVER COUPLING BALL BEARING 629LLB O-RING 26 RETAINING RING S-9 GEAR HOUSING COVER WRENCH 13 BATTERY COVER DC18RA FAST CHARGER BATTERY BL1830 SET...

Flyer (English)
Page 1
makitatools.com for Easy Handling • Slide Switch with lock-on for faster grinding CONVENIENCE Slide switch with Lock-on and vent slots to Direct Exhaust Air Away from the user INNOVATION Built-in L.E.D. Protection Circuit with Over-Torque Control Protects the Motor • L.E.D.Light Flashes Red when it is Time to Recharge the Battery Makita-built motor delivers 25,000 RPM for Operator Convenience • Vent Slots...
makitatools.com for Easy Handling • Slide Switch with lock-on for faster grinding CONVENIENCE Slide switch with Lock-on and vent slots to Direct Exhaust Air Away from the user INNOVATION Built-in L.E.D. Protection Circuit with Over-Torque Control Protects the Motor • L.E.D.Light Flashes Red when it is Time to Recharge the Battery Makita-built motor delivers 25,000 RPM for Operator Convenience • Vent Slots...

Flyer (English)
Page 2
... circuit with lock-on for faster grinding n Compact barrel grip design and weighs only 4.4 lbs. 18V LXT® LI-ION CORDLESS 1/4" DIE GRINDER Models LXDG01 / LXDG01Z FEATURES & BENEFITS n Makita-built motor delivers 25,000 RPM for operator convenience n Built-in chip throughout the charging process to change without prior notice. for easy handling n Slide switch with over-torque control protects the motor n L.E.D. battery, charger and bag not...
... circuit with lock-on for faster grinding n Compact barrel grip design and weighs only 4.4 lbs. 18V LXT® LI-ION CORDLESS 1/4" DIE GRINDER Models LXDG01 / LXDG01Z FEATURES & BENEFITS n Makita-built motor delivers 25,000 RPM for operator convenience n Built-in chip throughout the charging process to change without prior notice. for easy handling n Slide switch with over-torque control protects the motor n L.E.D. battery, charger and bag not...


