Owners Manual
Page 2
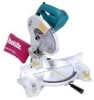
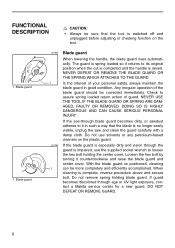
Bevel angle : ...Left 45° Max. REMOVE ADJUSTING KEYS AND WRENCHES. SPECIFICATIONS Blade diameter 255 mm (10") Hole diameter 15.88 mm (5/8") Max. Learn the tool's applications and limitations, as well as the specific potential hazards peculiar to... mm (1-7/8" x 2-5/8") 35 mm x 92 mm (1-3/8" x 3-5/8") No load speed (RPM 4,600/min. For Your Own Safety Read Instruction Manual Before Operating Tool Save it on. 4. KEEP GUARDS IN PLACE and in working order. 2 3. Read the owner's manual carefully. Form habit of checking to see that keys and adjusting wrenches are removed from...
Bevel angle : ...Left 45° Max. REMOVE ADJUSTING KEYS AND WRENCHES. SPECIFICATIONS Blade diameter 255 mm (10") Hole diameter 15.88 mm (5/8") Max. Learn the tool's applications and limitations, as well as the specific potential hazards peculiar to... mm (1-7/8" x 2-5/8") 35 mm x 92 mm (1-3/8" x 3-5/8") No load speed (RPM 4,600/min. For Your Own Safety Read Instruction Manual Before Operating Tool Save it on. 4. KEEP GUARDS IN PLACE and in working order. 2 3. Read the owner's manual carefully. Form habit of checking to see that keys and adjusting wrenches are removed from...
Owners Manual
Page 3
... use face or dust mask if cutting operation is unintentionally contacted. 19. When servicing use tool in moving parts, breakage of the tool, a guard or other ). Don't use only identical replacement parts. 23. All visitors should be properly repaired or replaced. 20. Also use of parts, ... fit fully in damp or wet locations, or expose them to persons. 18. SECURE WORK. DIRECTION OF FEED. Keep work into a blade or cutter against the direction of rotation of improper accessories may affect its intended function - USE RIGHT TOOL. Keep proper footing and balance ...
... use face or dust mask if cutting operation is unintentionally contacted. 19. When servicing use tool in moving parts, breakage of the tool, a guard or other ). Don't use only identical replacement parts. 23. All visitors should be properly repaired or replaced. 20. Also use of parts, ... fit fully in damp or wet locations, or expose them to persons. 18. SECURE WORK. DIRECTION OF FEED. Keep work into a blade or cutter against the direction of rotation of improper accessories may affect its intended function - USE RIGHT TOOL. Keep proper footing and balance ...
Owners Manual
Page 4
...tool and wait for the tool can result in loss of power and overheating. USE PROPER EXTENSION CORD. Do not operate saw blade. Never clamp or tie the blade guard into the open position. 4. Unplug tool before each use your hand to secure the workpiece. 5. as well as that specified...cause a drop in line voltage resulting in SERIOUS INJURY to the user - Never reach around saw if blade guard does not move freely and close instantly. If in good condition. Wear eye protection. 2. Check blade guard for cord Ampere Rating More Than 0 6 10 12 Not More Than 6 10 12 16 Volts ...
...tool and wait for the tool can result in loss of power and overheating. USE PROPER EXTENSION CORD. Do not operate saw blade. Never clamp or tie the blade guard into the open position. 4. Unplug tool before each use your hand to secure the workpiece. 5. as well as that specified...cause a drop in line voltage resulting in SERIOUS INJURY to the user - Never reach around saw if blade guard does not move freely and close instantly. If in good condition. Wear eye protection. 2. Check blade guard for cord Ampere Rating More Than 0 6 10 12 Not More Than 6 10 12 16 Volts ...
Owners Manual
Page 8
... and unplugged before adjusting or checking function on the plastic guard. If the see-through age or UV light exposure, contact a Makita service center for a new guard. Loosen the hex bolt by turning it in good condition. Blade guard 001860 1 001782 1 Blade guard When lowering the handle, the blade guard rises automatically. DOING SO IS HIGHLY DANGEROUS AND CAN...
... and unplugged before adjusting or checking function on the plastic guard. If the see-through age or UV light exposure, contact a Makita service center for a new guard. Loosen the hex bolt by turning it in good condition. Blade guard 001860 1 001782 1 Blade guard When lowering the handle, the blade guard rises automatically. DOING SO IS HIGHLY DANGEROUS AND CAN...
Owners Manual
Page 11
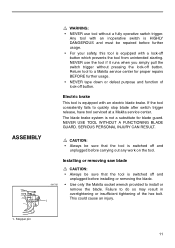
...Always be sure that the tool is switched off and unplugged before carrying out any work on the tool. Failure to a Makita service center for blade guard. NEVER use tool without pressing the lock-off button which prevents the tool from unintended starting. SERIOUS PERSONAL INJURY CAN RESULT.... be sure that the tool is switched off button. If the tool consistently fails to install or remove the blade. Stopper pin 11 NEVER USE TOOL WITHOUT A FUNCTIONING BLADE GUARD. WARNING: • NEVER use the tool if it runs when you simply pull the switch trigger without a...
...Always be sure that the tool is switched off and unplugged before carrying out any work on the tool. Failure to a Makita service center for blade guard. NEVER use tool without pressing the lock-off button which prevents the tool from unintended starting. SERIOUS PERSONAL INJURY CAN RESULT.... be sure that the tool is switched off button. If the tool consistently fails to install or remove the blade. Stopper pin 11 NEVER USE TOOL WITHOUT A FUNCTIONING BLADE GUARD. WARNING: • NEVER use the tool if it runs when you simply pull the switch trigger without a...
Owners Manual
Page 12
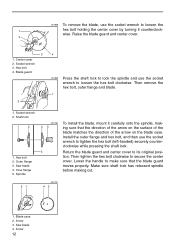
...the hex bolt clockwise to its original posi- Saw blade 4. Then remove the hex bolt, outer flange and blade. 1 1. Inner flange 5. Arrow 3. Center cover 2. Saw blade 4. clockwise while pressing the shaft lock. 3 Return the blade guard and center cover to secure the center cover. Make...center cover by turning it carefully onto the spindle, mak- 45 ing sure that the blade guard moves properly. Hex bolt 2. Lower the handle to tighten the hex bolt (left-handed) securely counter- Blade case 2. wise. Hex bolt 4. Shaft lock 1 2 1. Outer flange 3. Install...
...the hex bolt clockwise to its original posi- Saw blade 4. Then remove the hex bolt, outer flange and blade. 1 1. Inner flange 5. Arrow 3. Center cover 2. Saw blade 4. clockwise while pressing the shaft lock. 3 Return the blade guard and center cover to secure the center cover. Make...center cover by turning it carefully onto the spindle, mak- 45 ing sure that the blade guard moves properly. Hex bolt 2. Lower the handle to tighten the hex bolt (left-handed) securely counter- Blade case 2. wise. Hex bolt 4. Shaft lock 1 2 1. Outer flange 3. Install...
Owners Manual
Page 25
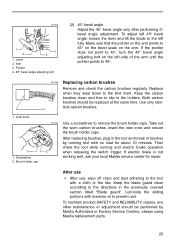
... running tool with no load for repair. 001770 1 2 4 3 1. Keep the carbon brushes clean and free to the directions in the previously covered section titled "Blade guard". Lubricate the sliding portions with a cloth or the like. Screwdriver 2. Keep the blade guard clean according to slip in brushes by Makita Authorized or Factory Service Centers, always using...
... running tool with no load for repair. 001770 1 2 4 3 1. Keep the carbon brushes clean and free to the directions in the previously covered section titled "Blade guard". Lubricate the sliding portions with a cloth or the like. Screwdriver 2. Keep the blade guard clean according to slip in brushes by Makita Authorized or Factory Service Centers, always using...
Parts Breakdown
Page 3
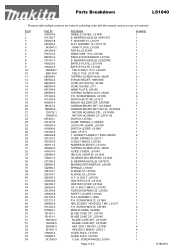
... CPL., LS1030N MOTOR HOUSING CP.,LS1011N SWITCH, LS1040 COMP. H. SCREW M5X16, 4301BV MAKITA MARK, 5402NA BLADE CASE CP., LS1040 BLADE CASE CP., LS1040 BLADE CASE SET, LS1040F BLADE CASE SET, LS1040F HEX. SPRING 9, LS1011 ...H. BEARING 6000LLB, 6222DWE BAFFLE PLATE, LS1011N BAFFLE PLATE, LS1045 FIELD ASS'Y 115V, LS1045 FIELD 115V, LS1011N TAPPING SCREW 4X18, 4323K STRAIN RELIEF, HM1500B CORD (2X14X8 SJ), 2414B CORD GUARD, 2711 NAME PLATE, LS1040...
... CPL., LS1030N MOTOR HOUSING CP.,LS1011N SWITCH, LS1040 COMP. H. SCREW M5X16, 4301BV MAKITA MARK, 5402NA BLADE CASE CP., LS1040 BLADE CASE CP., LS1040 BLADE CASE SET, LS1040F BLADE CASE SET, LS1040F HEX. SPRING 9, LS1011 ...H. BEARING 6000LLB, 6222DWE BAFFLE PLATE, LS1011N BAFFLE PLATE, LS1045 FIELD ASS'Y 115V, LS1045 FIELD 115V, LS1011N TAPPING SCREW 4X18, 4323K STRAIN RELIEF, HM1500B CORD (2X14X8 SJ), 2414B CORD GUARD, 2711 NAME PLATE, LS1040...


