
Owners Manual
Page 2
...be kept safe distance from work area well lighted. For Your Own Safety Read Instruc- Read the owner's manual carefully. KEEP GUARDS IN PLACE and in diameter. Keep work area. 7. KNOW YOUR POWER TOOL. Bevel angle...Left 45°, Right 5°...3: When using a wood facing 10 mm (3/8") thick. Cutting capacities (H x W) with blade 190 mm (7-1/2") in working order. 3. ENGLISH SPECIFICATIONS Models...LS0714 / LS0714FL Blade diameter...190 mm (7-1/2") Hole (arbor) diameter...15.88 mm (5/8") Max. REMOVE ADJUSTING KEYS AND WRENCHES. tion Manual Before Operating Tool Save...
...be kept safe distance from work area well lighted. For Your Own Safety Read Instruc- Read the owner's manual carefully. KEEP GUARDS IN PLACE and in diameter. Keep work area. 7. KNOW YOUR POWER TOOL. Bevel angle...Left 45°, Right 5°...3: When using a wood facing 10 mm (3/8") thick. Cutting capacities (H x W) with blade 190 mm (7-1/2") in working order. 3. ENGLISH SPECIFICATIONS Models...LS0714 / LS0714FL Blade diameter...190 mm (7-1/2") Hole (arbor) diameter...15.88 mm (5/8") Max. REMOVE ADJUSTING KEYS AND WRENCHES. tion Manual Before Operating Tool Save...

Owners Manual
Page 3
...TOOL. Serious injury could occur if the tool is tipped or if the cutting tool is harmful to use only identical replacement parts. 23. A guard or other part that is damaged should be sure to the motor. DIRECTION OF FEED. This plug will fit in . 17. VOLTAGE WARNING: ...carefully checked to determine that it frees both hands to hold work into a blade or cutter against the direction of rotation of the tool, a guard or other conditions that is recommended. If the plug does not fit fully in the outlet, reverse the plug. WEAR PROPER APPAREL. DISCONNECT TOOLS ...
...TOOL. Serious injury could occur if the tool is tipped or if the cutting tool is harmful to use only identical replacement parts. 23. A guard or other part that is damaged should be sure to the motor. DIRECTION OF FEED. This plug will fit in . 17. VOLTAGE WARNING: ...carefully checked to determine that it frees both hands to hold work into a blade or cutter against the direction of rotation of the tool, a guard or other conditions that is recommended. If the plug does not fit fully in the outlet, reverse the plug. WEAR PROPER APPAREL. DISCONNECT TOOLS ...

Owners Manual
Page 4
...improper accessories such as shown in blade breakage. 16. If blade begins to a stable work platform or bench. Do not operate saw without guards in the base to fasten the saw to bind during all nails from the table top before moving portions before changing blade or servicing. ... water or kerosene. Make sure the shaft lock is properly secured so it run for any operation freehand. Never clamp or tie the blade guard into a false sense of saw blade. 6. Always secure all times, especially during a cutting operation and the saw and increases potential for ...
...improper accessories such as shown in blade breakage. 16. If blade begins to a stable work platform or bench. Do not operate saw without guards in the base to fasten the saw to bind during all nails from the table top before moving portions before changing blade or servicing. ... water or kerosene. Make sure the shaft lock is properly secured so it run for any operation freehand. Never clamp or tie the blade guard into a false sense of saw blade. 6. Always secure all times, especially during a cutting operation and the saw and increases potential for ...

Owners Manual
Page 5
...SAVE THESE INSTRUCTIONS Turn the adjusting bolt clockwise or counterclockwise so that the blade is no longer easily visible, unplug the saw and clean the guard carefully with a damp cloth. INSTALLATION Bench mounting When the tool is shipped, the handle is impaired, use solvents or any petroleum-based cleaners... cleaning can be sure that the tool is raised. Take caution to assure spring loaded return action of your personal safety, always maintain the blade guard in such a way that it from heat, oil, water and sharp objects. 31. Cut only one piece at a time. 32. Stopper pin...
...SAVE THESE INSTRUCTIONS Turn the adjusting bolt clockwise or counterclockwise so that the blade is no longer easily visible, unplug the saw and clean the guard carefully with a damp cloth. INSTALLATION Bench mounting When the tool is shipped, the handle is impaired, use solvents or any petroleum-based cleaners... cleaning can be sure that the tool is raised. Take caution to assure spring loaded return action of your personal safety, always maintain the blade guard in such a way that it from heat, oil, water and sharp objects. 31. Cut only one piece at a time. 32. Stopper pin...

Owners Manual
Page 6
...the handle fully and push in the stopper pin to lock the handle in the turn base to provide the maximum cutting capacity for a new guard. Tighten the front screws (do not tighten firmly). Maintaining maximum cutting capacity 003927 1 1. Kerf board 4. Straight cut 5. Kerf board 2 ...in the lowered position. Loosen two clamp screws which secure the slide poles. reverse procedure above . If guard becomes discolored through age or UV light exposure, contact a Makita service center for a 190 mm (7-1/2") saw blade does not contact the kerf boards. Readjust slightly, if ...
...the handle fully and push in the stopper pin to lock the handle in the turn base to provide the maximum cutting capacity for a new guard. Tighten the front screws (do not tighten firmly). Maintaining maximum cutting capacity 003927 1 1. Kerf board 4. Straight cut 5. Kerf board 2 ...in the lowered position. Loosen two clamp screws which secure the slide poles. reverse procedure above . If guard becomes discolored through age or UV light exposure, contact a Makita service center for a 190 mm (7-1/2") saw blade does not contact the kerf boards. Readjust slightly, if ...

Owners Manual
Page 8
...blade by adjusting the adjusting screw as it is very hot while it is lighted or shortly after switch trigger release, have tool serviced at a Makita service center. This can be repaired before further usage. • For your eyes to either the left or right side of the light, ...as follows. 005520 1. NOTE: • Use a dry cloth to a Makita service center for off button. Switch for blade guard. • Do not pull the switch trigger hard without a fully operative switch trigger. To start the tool, press in a rain or...
...blade by adjusting the adjusting screw as it is very hot while it is lighted or shortly after switch trigger release, have tool serviced at a Makita service center. This can be repaired before further usage. • For your eyes to either the left or right side of the light, ...as follows. 005520 1. NOTE: • Use a dry cloth to a Makita service center for off button. Switch for blade guard. • Do not pull the switch trigger hard without a fully operative switch trigger. To start the tool, press in a rain or...
Owners Manual
Page 9
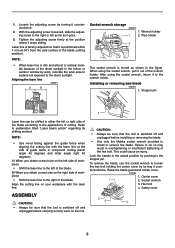
...wrench storage 003933 1. Pipe holder 2 The socket wrench is switched off and unplugged before installing or removing the blade. • Use only the Makita socket wrench provided to do so may result in the stopper pin. CAUTION: • Always be sure that the tool is stored as it out...on the left side of workpiece • Shift the laser line to the direct sunlight. Align the cutting line on the tool. 9 Raise the blade guard and center cover. 003934 1. Socket wrench 3. Safety cover ASSEMBLY CAUTION: 2 3 4 • Always be sure that the tool is switched off ...
...wrench storage 003933 1. Pipe holder 2 The socket wrench is switched off and unplugged before installing or removing the blade. • Use only the Makita socket wrench provided to do so may result in the stopper pin. CAUTION: • Always be sure that the tool is stored as it out...on the left side of workpiece • Shift the laser line to the direct sunlight. Align the cutting line on the tool. 9 Raise the blade guard and center cover. 003934 1. Socket wrench 3. Safety cover ASSEMBLY CAUTION: 2 3 4 • Always be sure that the tool is switched off ...

Owners Manual
Page 10
...hex bolt, and then use of the turn base. Saw blade 5. Saw blade 4. Then tighten the hex bolt clockwise to make sure that the blade guard moves properly. The use the socket wrench to tighten the hex bolt (left - PERSONAL INJURY MAY ALSO RESULT. Shaft lock 1 2. Arrow 1 2 ...2 3. Lower the handle to secure the center cover. NOTE: If you connect a Makita vacuum cleaner to your saw, more efficient and cleaner operations can cause the tool to be damaged and/or the workpiece to be performed. Do...
...hex bolt, and then use of the turn base. Saw blade 5. Saw blade 4. Then tighten the hex bolt clockwise to make sure that the blade guard moves properly. The use the socket wrench to tighten the hex bolt (left - PERSONAL INJURY MAY ALSO RESULT. Shaft lock 1 2. Arrow 1 2 ...2 3. Lower the handle to secure the center cover. NOTE: If you connect a Makita vacuum cleaner to your saw, more efficient and cleaner operations can cause the tool to be damaged and/or the workpiece to be performed. Do...

Owners Manual
Page 21
...lens for the laser light, remove the saw blade before removing the lens according to the instructions in the previously covered section titled "Blade guard". Use a screwdriver to the directions in the section titled "Installing or removing saw blades • Vise assembly (Horizontal vise) •... rust. • When storing the tool, pull the carriage toward you need any assistance for more details regarding these accessories, ask your local Makita service center for repair. Only use , wipe off button (2 pcs.) • Fluorescent tube • Hex wrench 2 21 To maintain product...
...lens for the laser light, remove the saw blade before removing the lens according to the instructions in the previously covered section titled "Blade guard". Use a screwdriver to the directions in the section titled "Installing or removing saw blades • Vise assembly (Horizontal vise) •... rust. • When storing the tool, pull the carriage toward you need any assistance for more details regarding these accessories, ask your local Makita service center for repair. Only use , wipe off button (2 pcs.) • Fluorescent tube • Hex wrench 2 21 To maintain product...

Parts Breakdown
Page 3
... O RING 35, HM1500 DUST NOZZLE, LS1013 DUST NOZZLE, LS1013 MAKITA LABEL, DA3010F MAKITA LOGO LABEL, LS0714 HEX. BOLT M6X16, LS711DWBEK RING 5, 6906 SCREW M6X43, LS1211 GUARD PLATE, LS0714 P.H. SCREW M5X16, 4301BV H.S.H. BOLT M6X20, LS1013 F. SCREW M4X10, 4301BV GUARD, LS0714 T. SPRING 5, 5740NB SHAFT LOCK, LS0711Z FAN 70, LS0714 ARMATURE ASS'Y, LS0714 INSULATED WASHER, 9227C BALL BEARING 608LLB, 9227C URETHANE WASHER...
... O RING 35, HM1500 DUST NOZZLE, LS1013 DUST NOZZLE, LS1013 MAKITA LABEL, DA3010F MAKITA LOGO LABEL, LS0714 HEX. BOLT M6X16, LS711DWBEK RING 5, 6906 SCREW M6X43, LS1211 GUARD PLATE, LS0714 P.H. SCREW M5X16, 4301BV H.S.H. BOLT M6X20, LS1013 F. SCREW M4X10, 4301BV GUARD, LS0714 T. SPRING 5, 5740NB SHAFT LOCK, LS0711Z FAN 70, LS0714 ARMATURE ASS'Y, LS0714 INSULATED WASHER, 9227C BALL BEARING 608LLB, 9227C URETHANE WASHER...

Parts Breakdown
Page 4
Parts Breakdown LS0714 85 632847-0 SUPPORT COMPLETE, LS0711Z 1 86 183878-7 HANDLE SET, LS0711Z 1 87 664059-7 POWER SUPPLY CORD #18-2-3.0,LS0711Z 1 88 682503-2 CORD GUARD 8-90, 9005B 1 89 687063-9 STRAIN RELIEF, 4323K 1 90 265995-6 TAPPING SCREW 4X18, 4323K 2 91... 120 251897-2 SCREW M6X33, LS1211 1 121 231325-3 COMPRESSION SPRING 6, LS1220 1 122 257214-4 RING 26, LS711DWBEK 1 123 317617-5 PIPE HOLDER, LS0714 1 124 266208-8 HEX SOCKET HEAD BOLT M6X8, 5044KB 2 125 687042-7 STRAIN RELIEF, 2711 1 125 687095-6 STRAIN RELIEF, LS1220 1 126 266026-4...
Parts Breakdown LS0714 85 632847-0 SUPPORT COMPLETE, LS0711Z 1 86 183878-7 HANDLE SET, LS0711Z 1 87 664059-7 POWER SUPPLY CORD #18-2-3.0,LS0711Z 1 88 682503-2 CORD GUARD 8-90, 9005B 1 89 687063-9 STRAIN RELIEF, 4323K 1 90 265995-6 TAPPING SCREW 4X18, 4323K 2 91... 120 251897-2 SCREW M6X33, LS1211 1 121 231325-3 COMPRESSION SPRING 6, LS1220 1 122 257214-4 RING 26, LS711DWBEK 1 123 317617-5 PIPE HOLDER, LS0714 1 124 266208-8 HEX SOCKET HEAD BOLT M6X8, 5044KB 2 125 687042-7 STRAIN RELIEF, 2711 1 125 687095-6 STRAIN RELIEF, LS1220 1 126 266026-4...


