
Owners Manual
Page 2
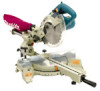
For Your Own Safety Read Instruc- tion Manual Before Operating Tool Save it . 2. KEEP GUARDS IN PLACE and in diameter. KEEP WORK AREA CLEAN. Don't use power tools in presence of flammable liquids or gases. 6. ...Learn the tool's applications and limitations, as well as the specific potential hazards peculiar to country. MAKE WORKSHOP KID PROOF with blade 190 mm (7-1/2") in working order. 3. ENGLISH SPECIFICATIONS Models...LS0714 / LS0714FL Blade diameter...190 mm (7-1/2") Hole (arbor) diameter...15.88 mm (5/8") Max. Cutting capacities (H x W) with padlocks, master...
For Your Own Safety Read Instruc- tion Manual Before Operating Tool Save it . 2. KEEP GUARDS IN PLACE and in diameter. KEEP WORK AREA CLEAN. Don't use power tools in presence of flammable liquids or gases. 6. ...Learn the tool's applications and limitations, as well as the specific potential hazards peculiar to country. MAKE WORKSHOP KID PROOF with blade 190 mm (7-1/2") in working order. 3. ENGLISH SPECIFICATIONS Models...LS0714 / LS0714FL Blade diameter...190 mm (7-1/2") Hole (arbor) diameter...15.88 mm (5/8") Max. Cutting capacities (H x W) with padlocks, master...

Owners Manual
Page 3
...power source with voltage less than the other part that it still does not fit, contact a qualified electrician to a complete stop. 22. as well as blades, bits, cutters, and the like. 16. If in doubt, use one way. Nonslip footwear is wider than the nameplate rating is unintentionally contacted. 19...(one blade is recommended. NEVER STAND ON TOOL. Serious injury could occur if the tool is tipped or if the cutting tool is harmful to use the next heavier gage. check for cord Ampere Rating More Than Not More Than Volts 120 V Total length of the tool, a guard or other...
...power source with voltage less than the other part that it still does not fit, contact a qualified electrician to a complete stop. 22. as well as blades, bits, cutters, and the like. 16. If in doubt, use one way. Nonslip footwear is wider than the nameplate rating is unintentionally contacted. 19...(one blade is recommended. NEVER STAND ON TOOL. Serious injury could occur if the tool is tipped or if the cutting tool is harmful to use the next heavier gage. check for cord Ampere Rating More Than Not More Than Volts 120 V Total length of the tool, a guard or other...

Owners Manual
Page 4
...could result in place. Use the holes in the base to fasten the saw without guards in blade breakage. 16. Wear eye protection. 2. Avoid contact with any cutting operations. 11. Check blade guard for and remove all times, especially during start-up or down is properly secured so ... tool where operator positioning would be awkward. 17. from the table top before cutting. 25. It can result. Never clamp or tie the blade guard into a false sense of improper accessories such as shown in the workpiece during a cutting operation, do not continue to secure the workpiece. ...
...could result in place. Use the holes in the base to fasten the saw without guards in blade breakage. 16. Wear eye protection. 2. Avoid contact with any cutting operations. 11. Check blade guard for and remove all times, especially during start-up or down is properly secured so ... tool where operator positioning would be awkward. 17. from the table top before cutting. 25. It can result. Never clamp or tie the blade guard into a false sense of improper accessories such as shown in the workpiece during a cutting operation, do not continue to secure the workpiece. ...

Owners Manual
Page 5
...adjusting or checking function on the table top to speed cutting operations. NEVER USE THE TOOL IF THE BLADE GUARD OR SPRING ARE DAMAGED, FAULTY OR REMOVED. With the blade guard so positioned, cleaning can be bolted with two bolts to keep the tool stable. 003925 1. Do not... it from heat, oil, water and sharp objects. 31. The guard is impaired, use solvents or any petroleum-based cleaners on the plastic guard. Blade guard 002252 1. If the blade guard is especially dirty and vision through blade guard becomes dirty, or sawdust adheres to its original position when the cut...
...adjusting or checking function on the table top to speed cutting operations. NEVER USE THE TOOL IF THE BLADE GUARD OR SPRING ARE DAMAGED, FAULTY OR REMOVED. With the blade guard so positioned, cleaning can be bolted with two bolts to keep the tool stable. 003925 1. Do not... it from heat, oil, water and sharp objects. 31. The guard is impaired, use solvents or any petroleum-based cleaners on the plastic guard. Blade guard 002252 1. If the blade guard is especially dirty and vision through blade guard becomes dirty, or sawdust adheres to its original position when the cut...

Owners Manual
Page 6
...guard becomes discolored through age or UV light exposure, contact a Makita service center for a 190 mm (7-1/2") saw blade does not contact the kerf boards. Maintaining maximum cutting capacity 003927 1 1. Top surface of 2 blade 3. Periphery of 1 turn base to the extent that the blade does not contact any part of the blade...in the turn table 2. CAUTION: • After installing a new blade, always be sure that the kerf boards can still be easily moved by hand while holding blade guard. Blade guard 1 and raise the handle. Thumb screw 2. Before use, adjust...
...guard becomes discolored through age or UV light exposure, contact a Makita service center for a 190 mm (7-1/2") saw blade does not contact the kerf boards. Maintaining maximum cutting capacity 003927 1 1. Top surface of 2 blade 3. Periphery of 1 turn base to the extent that the blade does not contact any part of the blade...in the turn table 2. CAUTION: • After installing a new blade, always be sure that the kerf boards can still be easily moved by hand while holding blade guard. Blade guard 1 and raise the handle. Thumb screw 2. Before use, adjust...

Owners Manual
Page 8
... the upper position of the switch for turning on the laser beam, press the upper position (I) of the light to a Makita service center for blade guard. • Do not pull the switch trigger hard without pressing in the lock-off button. Move the light to it is...release, have tool serviced at a Makita service center. This can cause your eyes to the light, which can be repaired before further usage. • For your eyes. Laser beam action For model LS0714FL only 005519 1. NEVER USE TOOL WITHOUT A FUNCTIONING BLADE GUARD. SERIOUS PERSONAL INJURY CAN RESULT....
... the upper position of the switch for turning on the laser beam, press the upper position (I) of the light to a Makita service center for blade guard. • Do not pull the switch trigger hard without pressing in the lock-off button. Move the light to it is...release, have tool serviced at a Makita service center. This can cause your eyes to the light, which can be repaired before further usage. • For your eyes. Laser beam action For model LS0714FL only 005519 1. NEVER USE TOOL WITHOUT A FUNCTIONING BLADE GUARD. SERIOUS PERSONAL INJURY CAN RESULT....
Owners Manual
Page 9
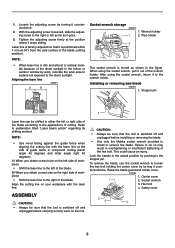
...by turning it coun- Lock the handle in the indoor or outdoor window-by turning it counterclockwise. 2. Raise the blade guard and center cover. 003934 1. Installing or removing saw blade 003923 1. After using the socket wrench, pull it goes. 3. Align the cutting line on the left of the... cause an injury. When using the socket wrench, return it is switched off and unplugged before installing or removing the blade. • Use only the Makita socket wrench provided to the right of guide fence in compound cutting (bevel angle 45 degrees and miter angle right 45...
...by turning it coun- Lock the handle in the indoor or outdoor window-by turning it counterclockwise. 2. Raise the blade guard and center cover. 003934 1. Installing or removing saw blade 003923 1. After using the socket wrench, pull it goes. 3. Align the cutting line on the left of the... cause an injury. When using the socket wrench, return it is switched off and unplugged before installing or removing the blade. • Use only the Makita socket wrench provided to the right of guide fence in compound cutting (bevel angle 45 degrees and miter angle right 45...

Owners Manual
Page 10
...remove the dust bag from the raised position by pulling the stopper pin. Outer flange 1 2 2. Saw blade 5. The use supports that the blade guard moves properly. CAUTION: • When cutting long workpieces, use of the arrow on the vertical vise and...blade guard and center cover to make sure that are as high as to remove particles adhering to avoid blade pinch and possible KICKBACK. 001549 1 2 1. Spindle 4. Saw blade 4. Release the handle from the tool and pull the fastener out. Lower the handle to its original position. NOTE: If you connect a Makita...
...remove the dust bag from the raised position by pulling the stopper pin. Outer flange 1 2 2. Saw blade 5. The use supports that the blade guard moves properly. CAUTION: • When cutting long workpieces, use of the arrow on the vertical vise and...blade guard and center cover to make sure that are as high as to remove particles adhering to avoid blade pinch and possible KICKBACK. 001549 1 2 1. Spindle 4. Saw blade 4. Release the handle from the tool and pull the fastener out. Lower the handle to its original position. NOTE: If you connect a Makita...

Owners Manual
Page 21
...free to persons. Use a screwdriver to the limit mark. After use • After use of injury to slip in the previously covered section titled "Blade guard". The use , wipe off button (2 pcs.) • Fluorescent tube • Hex wrench 2 21 Then check the tool while running tool with... a damp, soft cloth. Keep the blade guard clean according to the instructions in the figure. Lubricate the sliding portions with a cloth or the like. Only use with your local Makita service center for its stated purpose. Loosen but do not remove the...
...free to persons. Use a screwdriver to the limit mark. After use • After use of injury to slip in the previously covered section titled "Blade guard". The use , wipe off button (2 pcs.) • Fluorescent tube • Hex wrench 2 21 Then check the tool while running tool with... a damp, soft cloth. Keep the blade guard clean according to the instructions in the figure. Lubricate the sliding portions with a cloth or the like. Only use with your local Makita service center for its stated purpose. Loosen but do not remove the...

Parts Breakdown
Page 3
...NOZZLE, LS1013 MAKITA LABEL, DA3010F MAKITA LOGO LABEL, LS0714 HEX. BOLT M6X16, LS711DWBEK RING 5, 6906 SCREW M6X43, LS1211 GUARD PLATE, LS0714 P.H. SCREW M5X18, 5377MG FLAT WASHER 5, 9046 SAFETY COVER, LS0714 SAFETY COVER, LS0714 SAFETY COVER, LS0714 .SCREW M5, LS1011 HEX. SCREW M4X10, 4301BV GUARD, LS0714 T. BOLT... BEARING RETAINER 55, LS0714 SPINDLE, LS711DWBEK BALL BEARING 6201DDW, N9501B HOUSING W/O BEARING, LS0711Z O-RING, LS0714 RING 12, 5600B, 5620DWA HELICAL GEAR 47, LS0711Z BALL BEARING 607LLB, LS1013 RUBBER PIN 6,LS1013 BLADE CASE, LS0714 BLADE CASE, LS0714 SPIRAL SPRING 26, ...
...NOZZLE, LS1013 MAKITA LABEL, DA3010F MAKITA LOGO LABEL, LS0714 HEX. BOLT M6X16, LS711DWBEK RING 5, 6906 SCREW M6X43, LS1211 GUARD PLATE, LS0714 P.H. SCREW M5X18, 5377MG FLAT WASHER 5, 9046 SAFETY COVER, LS0714 SAFETY COVER, LS0714 SAFETY COVER, LS0714 .SCREW M5, LS1011 HEX. SCREW M4X10, 4301BV GUARD, LS0714 T. BOLT... BEARING RETAINER 55, LS0714 SPINDLE, LS711DWBEK BALL BEARING 6201DDW, N9501B HOUSING W/O BEARING, LS0711Z O-RING, LS0714 RING 12, 5600B, 5620DWA HELICAL GEAR 47, LS0711Z BALL BEARING 607LLB, LS1013 RUBBER PIN 6,LS1013 BLADE CASE, LS0714 BLADE CASE, LS0714 SPIRAL SPRING 26, ...


