
Owners Manual
Page 4
Using a power source with voltage greater than the nameplate rating is harmful to a power source (receptacle, outlet, etc.) be sure the voltage supplied is the same as damage t o the tool. as well as that specified for the tool can result in doubt, DO NOT PLUG IN THE TOOL. A power source with voltage less than that specified on the nameplate of the tool. If in SERIOUS INJURY t o the user - Nibbler & Standard Equipment 0Washer 2 (For die installation height adjustment) 0Hex wrench 1 0Wrench ( 5 0 1 4 VOLTAGE WARNING: Before connecting the tool to the motor.
Using a power source with voltage greater than the nameplate rating is harmful to a power source (receptacle, outlet, etc.) be sure the voltage supplied is the same as damage t o the tool. as well as that specified for the tool can result in doubt, DO NOT PLUG IN THE TOOL. A power source with voltage less than that specified on the nameplate of the tool. If in SERIOUS INJURY t o the user - Nibbler & Standard Equipment 0Washer 2 (For die installation height adjustment) 0Hex wrench 1 0Wrench ( 5 0 1 4 VOLTAGE WARNING: Before connecting the tool to the motor.
Owners Manual
Page 5
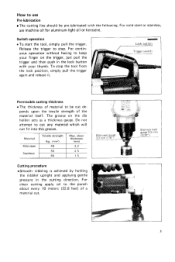
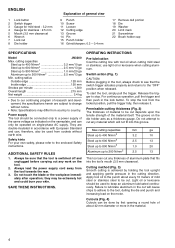
.... pends upon the tensile strength of material to keep your thumb. For continuous operation without having to be pre-lubricated with your finger on the die holder acts as a thickness gauge. For mild steel or stainless, use Pre-lubrication The cutting line should be cut de- To stop . For clean cutting...
.... pends upon the tensile strength of material to keep your thumb. For continuous operation without having to be pre-lubricated with your finger on the die holder acts as a thickness gauge. For mild steel or stainless, use Pre-lubrication The cutting line should be cut de- To stop . For clean cutting...
Owners Manual
Page 6
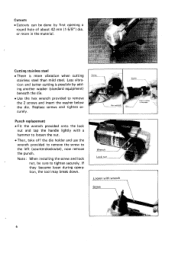
... the lock nut and tap the handle lightly with wrench Screw 6 Loosen with a hammer t o loosen the nut. .Then, take off the die holder and use the wrench provided t o remove the screw to tighten securely. or more vibration when cutting stainless steel than mild steel. Note :... now remove the punch. cutouts cutouts can b e done by adding another washer (standard equipment) beneath the die. .Use the hex wrench provided t o remove the 2 screws and insert the washer below the die. Cutting stainless steel .There is possible by first opening a round hole of about 42 mm ( 1-5/8")dia...
... the lock nut and tap the handle lightly with wrench Screw 6 Loosen with a hammer t o loosen the nut. .Then, take off the die holder and use the wrench provided t o remove the screw to tighten securely. or more vibration when cutting stainless steel than mild steel. Note :... now remove the punch. cutouts cutouts can b e done by adding another washer (standard equipment) beneath the die. .Use the hex wrench provided t o remove the 2 screws and insert the washer below the die. Cutting stainless steel .There is possible by first opening a round hole of about 42 mm ( 1-5/8")dia...

Owners Manual
Page 7
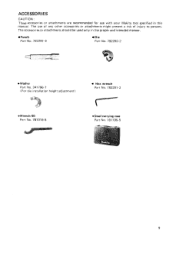
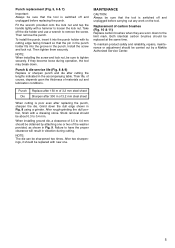
...ft.) of 3.2 m m (118") steel sheet *When cutting is poor even after cutting the lengths indicated in the figure. Remove dull portion When installing ground die, a clearance of 3.5 t o 4.0 mm (1/8" to 5/32") should be about 0.3 t o 0.4 mm (1/64") per pass; Secure installing screws carefully ... Maintenance After using a grinder. Grind/sharpen; Caution ; rm 3.5-4.0mm I Washer Punch & die service l i f e Replace or sharpen punch and die after replacing the punch, sharpen the die. Grind down the dull edge shown in vibration during operation. Stock removal should suffice. Failure...
...ft.) of 3.2 m m (118") steel sheet *When cutting is poor even after cutting the lengths indicated in the figure. Remove dull portion When installing ground die, a clearance of 3.5 t o 4.0 mm (1/8" to 5/32") should be about 0.3 t o 0.4 mm (1/64") per pass; Secure installing screws carefully ... Maintenance After using a grinder. Grind/sharpen; Caution ; rm 3.5-4.0mm I Washer Punch & die service l i f e Replace or sharpen punch and die after replacing the punch, sharpen the die. Grind down the dull edge shown in vibration during operation. Stock removal should suffice. Failure...
Owners Manual
Page 9
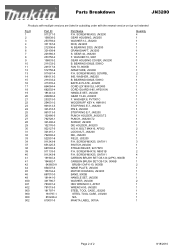
Punch Part No. 792291-4 Die Part No. 792292-2 Washer Part No. 341796-7 ( F o r die installation height adjustment) Hex wrench Part No. 783201-2 .Wrench 50 Part No. 781019-5 .Steel carrying case Part No. 181795-5 9 The use w i t h y o u r Makita t o o l specified in the proper and intended manner. The accessories or attachments should be used only in this manual. ACCESSOR IES CAUTION : These accessories o r attachments are recommended for use of any other accessories or attachments might present a risk of injury t o persons.
Punch Part No. 792291-4 Die Part No. 792292-2 Washer Part No. 341796-7 ( F o r die installation height adjustment) Hex wrench Part No. 783201-2 .Wrench 50 Part No. 781019-5 .Steel carrying case Part No. 181795-5 9 The use w i t h y o u r Makita t o o l specified in the proper and intended manner. The accessories or attachments should be used only in this manual. ACCESSOR IES CAUTION : These accessories o r attachments are recommended for use of any other accessories or attachments might present a risk of injury t o persons.
Owners Manual
Page 11
... S o p - 2 2 - - ' 9 4 US 1 Stop Rinq E 1 1 Punch Holder 30 2 :: '31 1 32 ~ 1 1 3 31 1 38 1 39 2 40 4 41 2 42 2 43 2 44 1 45 1 46 1 48 1 Hex Socket Head Bolt M 4 x 1 6 Lock Nul Die FIELD ASSEMBLY Pan Head Screw M 5 x 2 5 (With Washer1 Sw8tc.h Strain Relief Pan Head Screw M4x18 IWith Washer) Pan Head Screw M5x25 IWith Washer1 Carbon Brush Brush...
... S o p - 2 2 - - ' 9 4 US 1 Stop Rinq E 1 1 Punch Holder 30 2 :: '31 1 32 ~ 1 1 3 31 1 38 1 39 2 40 4 41 2 42 2 43 2 44 1 45 1 46 1 48 1 Hex Socket Head Bolt M 4 x 1 6 Lock Nul Die FIELD ASSEMBLY Pan Head Screw M 5 x 2 5 (With Washer1 Sw8tc.h Strain Relief Pan Head Screw M4x18 IWith Washer) Pan Head Screw M5x25 IWith Washer1 Carbon Brush Brush...
Parts Breakdown
Page 2
... BRUSH CAP 6-10, 9005B NAME PLATE, JN3200 MOTOR HOUSING, JN3200 BAND, 9005B HANDLE SET, JN3200 WASHER, JN3200 HEX WRENCH 3, AF501 WRENCH 50, JN3200 STEEL TOOL CASE, JS3200 STEEL TOOL CASE, JS3200 N/A MAKITA LABEL, 9015A Quantity 4 1 1 1 1 1 1 1 1 1 1 1 2 1 1 1 1 1 1 1 1 1 1 1 1 1 1 1 1 2 1 1 1 3 1 1 2 4 1 1 2 1 1 1 1 2 1 1 1 1 1 1 Page 2 of 2 8/18/2010 BOLT M4X16, AF502 LOCK NUT, JN3200 DIE, JN3200 FIELD, JS3200 P.H. BEARING 2020, JN3200 CRANKSHAFT, JN3200 S. GEAR 44, JN3200 F. BEARING 608LB, 5091D FAN 70...
... BRUSH CAP 6-10, 9005B NAME PLATE, JN3200 MOTOR HOUSING, JN3200 BAND, 9005B HANDLE SET, JN3200 WASHER, JN3200 HEX WRENCH 3, AF501 WRENCH 50, JN3200 STEEL TOOL CASE, JS3200 STEEL TOOL CASE, JS3200 N/A MAKITA LABEL, 9015A Quantity 4 1 1 1 1 1 1 1 1 1 1 1 2 1 1 1 1 1 1 1 1 1 1 1 1 1 1 1 1 2 1 1 1 3 1 1 2 4 1 1 2 1 1 1 1 2 1 1 1 1 1 1 Page 2 of 2 8/18/2010 BOLT M4X16, AF502 LOCK NUT, JN3200 DIE, JN3200 FIELD, JS3200 P.H. BEARING 2020, JN3200 CRANKSHAFT, JN3200 S. GEAR 44, JN3200 F. BEARING 608LB, 5091D FAN 70...
Instruction Manual
Page 4
...4 Gauge for stainless : 2.5 mm 5 Mouth (3.5 mm clearance) 6 Wrench 7 Lock nut 8 Die holder Explanation of aluminum plate that the switch trigger actuates properly and returns to stop the tool from ... refer to 200 N/mm2 2.5 mm/13 ga Min. The groove on the die holder acts as indicated on the nameplate, and can , therefore, also be...cut depends upon the tensile strength of material to the tool, dulling the die and punch and increasing load on the tool. 2. SAVE THESE INSTRUCTIONS. use... 18 Die 19 Washer 20 Limit mark 21 Screwdriver 22 Brush holder cap SPECIFICATIONS Model...
...4 Gauge for stainless : 2.5 mm 5 Mouth (3.5 mm clearance) 6 Wrench 7 Lock nut 8 Die holder Explanation of aluminum plate that the switch trigger actuates properly and returns to stop the tool from ... refer to 200 N/mm2 2.5 mm/13 ga Min. The groove on the die holder acts as indicated on the nameplate, and can , therefore, also be...cut depends upon the tensile strength of material to the tool, dulling the die and punch and increasing load on the tool. 2. SAVE THESE INSTRUCTIONS. use... 18 Die 19 Washer 20 Limit mark 21 Screwdriver 22 Brush holder cap SPECIFICATIONS Model...
Instruction Manual
Page 5
...nut, be sure to have the proper clearance will result in the punch. NOTE: The die can be sharpened two times. To install the punch, insert it should be obtained by a Makita Authorized Service Center. MAINTENANCE CAUTION: Always be sure that the tool is switched off and unplugged... shown in Fig. 8 using a grinder. To maintain product safety and reliability, repairs, maintenance or adjustment should be replaced at the same time. Punch Die Replace after 150 m of 3.2 mm steel sheet Sharpen after 300 m of carbon brushes (Fig. 10 & 11) Replace carbon brushes when they become loose...
...nut, be sure to have the proper clearance will result in the punch. NOTE: The die can be sharpened two times. To install the punch, insert it should be obtained by a Makita Authorized Service Center. MAINTENANCE CAUTION: Always be sure that the tool is switched off and unplugged... shown in Fig. 8 using a grinder. To maintain product safety and reliability, repairs, maintenance or adjustment should be replaced at the same time. Punch Die Replace after 150 m of 3.2 mm steel sheet Sharpen after 300 m of carbon brushes (Fig. 10 & 11) Replace carbon brushes when they become loose...