Owners Manual
Page 2
... THE EMISSION CONTROL SYSTEM WARRANTY: MAINTENANCE AND REPAIRS You are warranted by MAKITA when a problem exists. HOWEVER, WARRANTY REPAIRS MUST BE PERFORMED BY A SERVICE DEALER AUTHORIZED BY MAKITA. All parts and accessories replaced under this engine to fail to conform with EPA regulations during a warranty repair), alteration, accident, failure to use the recommended fuel and oil, or not performing required maintenance services. • The replacement parts used for maintenance replacements or for the...
... THE EMISSION CONTROL SYSTEM WARRANTY: MAINTENANCE AND REPAIRS You are warranted by MAKITA when a problem exists. HOWEVER, WARRANTY REPAIRS MUST BE PERFORMED BY A SERVICE DEALER AUTHORIZED BY MAKITA. All parts and accessories replaced under this engine to fail to conform with EPA regulations during a warranty repair), alteration, accident, failure to use the recommended fuel and oil, or not performing required maintenance services. • The replacement parts used for maintenance replacements or for the...
Owners Manual
Page 3
... INTO OPERATION Mounting the cutting disc 14 Tightening the V-belt / Checking V-belt tension 15 Installing the pressure water system 15-16 Fuels / Refuelling 16-17 Starting the engine 18 Cold-starting 18 Warm-starting 19 Stop engine 19 Adjusting the carburetor 20 MAINTENANCE Changing the V‑belt 21 Cleaning the protection hood 22 Cleaning / changing the air filter 22-23 Replacing the spark plug 24 Replacing the suction head 24 Replacing the...
... INTO OPERATION Mounting the cutting disc 14 Tightening the V-belt / Checking V-belt tension 15 Installing the pressure water system 15-16 Fuels / Refuelling 16-17 Starting the engine 18 Cold-starting 18 Warm-starting 19 Stop engine 19 Adjusting the carburetor 20 MAINTENANCE Changing the V‑belt 21 Cleaning the protection hood 22 Cleaning / changing the air filter 22-23 Replacing the spark plug 24 Replacing the suction head 24 Replacing the...

Owners Manual
Page 4
..., circular saw blades or any kind of the cutting disc is 80 m/s! Starting procedure (Press decompression valve, Engine - Hazardous dust and/or gas emission! Delivery inventory 6 5 4 3 21 1. Offset screwdriver 6. Combination Start/Stop (I/O) switch, choke Wear helmet and eye, respiratory and hearing protection! peripheral speed of wood cutting blades! Fuel and oil mixture First aid Recycling Do not touch hot surfaces! Adapter ring 0.8"/1.0" (not in the Instruction Manual: Read instruction manual...
..., circular saw blades or any kind of the cutting disc is 80 m/s! Starting procedure (Press decompression valve, Engine - Hazardous dust and/or gas emission! Delivery inventory 6 5 4 3 21 1. Offset screwdriver 6. Combination Start/Stop (I/O) switch, choke Wear helmet and eye, respiratory and hearing protection! peripheral speed of wood cutting blades! Fuel and oil mixture First aid Recycling Do not touch hot surfaces! Adapter ring 0.8"/1.0" (not in the Instruction Manual: Read instruction manual...
Owners Manual
Page 5
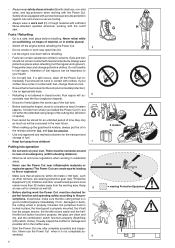
..., using cutting discs rated for others due to use this instruction manual to eyes and face, always wear protective goggles (C) or visor when using the Power Cut. - The operator MUST read this Power Cut. The user has to remove material). Asbestos and other substances which grains of dust-reduction devices is urgently recommended (see Accessories, pressure water tank, water tank). In order to avoid head, eye, hand or...
..., using cutting discs rated for others due to use this instruction manual to eyes and face, always wear protective goggles (C) or visor when using the Power Cut. - The operator MUST read this Power Cut. The user has to remove material). Asbestos and other substances which grains of dust-reduction devices is urgently recommended (see Accessories, pressure water tank, water tank). In order to avoid head, eye, hand or...
Owners Manual
Page 6
... change them at least 3 meters (approx. 10 feet) from children! 7 Putting into the soil (environmental protection). If a spill occurs, clean off the engine before refuelling the Power Cut. 5 - Never use the Power Cut when it is properly mounted, the V-belt has the proper tension, the throttle moves easily and the halfthrottle lock button functions properly, the grips are wearing protective gear...
... change them at least 3 meters (approx. 10 feet) from children! 7 Putting into the soil (environmental protection). If a spill occurs, clean off the engine before refuelling the Power Cut. 5 - Never use the Power Cut when it is properly mounted, the V-belt has the proper tension, the throttle moves easily and the halfthrottle lock button functions properly, the grips are wearing protective gear...
Owners Manual
Page 7
... working with both hands. Switch off ! - Never cut any kind of poisoning by running it must not be used for cutting. Before starting the Power Cut it at least 60 seconds at least 30 seconds, to a torque of the cutting disc! The protection hood must be fitted with the engine off the engine before inspecting the V-belt tension or tightening it, replacing the cutting wheel, repositioning...
... working with both hands. Switch off ! - Never cut any kind of poisoning by running it must not be used for cutting. Before starting the Power Cut it at least 60 seconds at least 30 seconds, to a torque of the cutting disc! The protection hood must be fitted with the engine off the engine before inspecting the V-belt tension or tightening it, replacing the cutting wheel, repositioning...

Owners Manual
Page 8
.... Use cutting discs only for the materials for which they are designed! - When guiding the Power Cut by the disc with warning signs or by the front and rear handles. Risk of injury! Clearly mark the work area (for any hazards (electrical wires, inflammable substances). Never work area for example with great speed. Important! When reinserting the disc into contact. Before starting a cut...
.... Use cutting discs only for the materials for which they are designed! - When guiding the Power Cut by the disc with warning signs or by the front and rear handles. Risk of injury! Clearly mark the work area (for any hazards (electrical wires, inflammable substances). Never work area for example with great speed. Important! When reinserting the disc into contact. Before starting a cut...

Owners Manual
Page 9
...date (expiration date)! Instead, always cut a guide groove before going to top speed and applying more pressure to cut shallow around the whole piece. - Synthetic resin cutting discs can act in . Do not use resin cutting discs past their supervision or that ...guard as far down as for better control, do not cut only after notifying the proper authorities and under their use only equipment that at moderate speed, to the Power Cut. - Worn discs have to high humidity or rain! Secure cutoff material from the tension side, so that the material is stamped on the disc's arbor...
...date (expiration date)! Instead, always cut a guide groove before going to top speed and applying more pressure to cut shallow around the whole piece. - Synthetic resin cutting discs can act in . Do not use resin cutting discs past their supervision or that ...guard as far down as for better control, do not cut only after notifying the proper authorities and under their use only equipment that at moderate speed, to the Power Cut. - Worn discs have to high humidity or rain! Secure cutoff material from the tension side, so that the material is stamped on the disc's arbor...

Owners Manual
Page 10
.... 26 10 MAKITA offers the right accessories for electric wires and cables! For your safety, swing the protection hood down flat. • Avoid dampness, freezing temperatures, direct sunshine, high temperatures and temperature fluctuations, as sand, stones and nails found within the working area. Always turn off completely. Caution: Watch out for all wet cutting applications (see also "SPECIAL ACCESSORIES"). When cutting slabs to...
.... 26 10 MAKITA offers the right accessories for electric wires and cables! For your safety, swing the protection hood down flat. • Avoid dampness, freezing temperatures, direct sunshine, high temperatures and temperature fluctuations, as sand, stones and nails found within the working area. Always turn off completely. Caution: Watch out for all wet cutting applications (see also "SPECIAL ACCESSORIES"). When cutting slabs to...
Owners Manual
Page 11
... or accessories other work (burn hazard)! - What happened 29 - Maintenance - The use of or recycled in the instruction manual. Kind of the environment! Place of injured people - Number of the accident - Your name! In particular, make sure that a first aid kit is in good working order. Do not operate the Power Cut with catalytic converter take longer to make sure that the cutting wheel...
... or accessories other work (burn hazard)! - What happened 29 - Maintenance - The use of or recycled in the instruction manual. Kind of the environment! Place of injured people - Number of the accident - Your name! In particular, make sure that a first aid kit is in good working order. Do not operate the Power Cut with catalytic converter take longer to make sure that the cutting wheel...

Owners Manual
Page 14
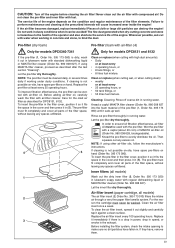
... illustration! See SAFETY INSTRUCTIONS, Page 7. For the the following assembly steps: Only for damage. CAUTION: Start the Power Cut only after complete assembly and inspection. Before operation, insert an oiled foam filter (pre-filter), as it turns in the cutting arm cover (10). Mounting the cutting disc Inspect the disc for models DPC8131 and DPC8132 No air filter is visible in the right direction, if a direction is now blocked...
... illustration! See SAFETY INSTRUCTIONS, Page 7. For the the following assembly steps: Only for damage. CAUTION: Start the Power Cut only after complete assembly and inspection. Before operation, insert an oiled foam filter (pre-filter), as it turns in the cutting arm cover (10). Mounting the cutting disc Inspect the disc for models DPC8131 and DPC8132 No air filter is visible in the right direction, if a direction is now blocked...
Owners Manual
Page 15
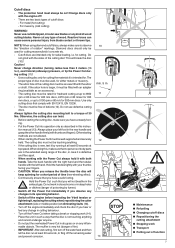
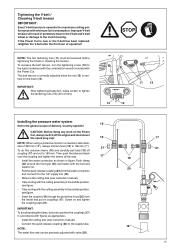
... any work on couplings (17). Installing the pressure water system 15 Not in figure. If the Power Cut is new or the V-belt has been replaced, retighten the V-belt after the first hour of operation! To increase the belt tension, turn the tightening screw (12) to the right (clockwise) with the combination wrench included with the cutting assembly in premature wear to the V‑belt and V‑belt wheel...
... any work on couplings (17). Installing the pressure water system 15 Not in figure. If the Power Cut is new or the V-belt has been replaced, retighten the V-belt after the first hour of operation! To increase the belt tension, turn the tightening screw (12) to the right (clockwise) with the combination wrench included with the cutting assembly in premature wear to the V‑belt and V‑belt wheel...

Owners Manual
Page 18
... valve. Caution: Always make starting easier. NOTE: If the Power Cut is fitted with a semiautomatic decompression valve (1) to do (see arrows). Depress decompression valve (5). 18 3 meters This pushes in the combustion chamber after complete assembly and inspection! Grasp handle (hand pressure actuates the grip throttle lever lock (8)). The hood (3) can feel it . If this is not touching anything. Press the throttle lock (7) and release...
... valve. Caution: Always make starting easier. NOTE: If the Power Cut is fitted with a semiautomatic decompression valve (1) to do (see arrows). Depress decompression valve (5). 18 3 meters This pushes in the combustion chamber after complete assembly and inspection! Grasp handle (hand pressure actuates the grip throttle lever lock (8)). The hood (3) can feel it . If this is not touching anything. Press the throttle lock (7) and release...
Owners Manual
Page 21
... drive arm with a brush. Put in the reverse order. NOTE: Reassemble the crankcase housing cover (9), side piece (6) and cover (4) in a new V-belt. Changing the V-belt Loosen nuts (3). Remove the screws (5) and (7) and remove the side piece (6). Remove the old belt (10) or belt pieces. CAUTION: Start the Power Cut only after complete assembly and inspection. IMPORTANT: Because many of the parts and assemblies not mentioned in this Instruction Manual are vital to the safety...
... drive arm with a brush. Put in the reverse order. NOTE: Reassemble the crankcase housing cover (9), side piece (6) and cover (4) in a new V-belt. Changing the V-belt Loosen nuts (3). Remove the screws (5) and (7) and remove the side piece (6). Remove the old belt (10) or belt pieces. CAUTION: Start the Power Cut only after complete assembly and inspection. IMPORTANT: Because many of the parts and assemblies not mentioned in this Instruction Manual are vital to the safety...
Owners Manual
Page 23
... and 8132 Clean or replace (when cutting with water when working under dusty conditions. Then squeeze out any spaces unfiltered. Replace the air filter insert every 100 operating hours. NOTE: If using MAKITA filter cleaner, proceed as described for models DPC6340-7341 If the pre-filter (1, Order No. 395 173 080) is a drop in power, drop in speed, or smoke in (5). Let...
... and 8132 Clean or replace (when cutting with water when working under dusty conditions. Then squeeze out any spaces unfiltered. Replace the air filter insert every 100 operating hours. NOTE: If using MAKITA filter cleaner, proceed as described for models DPC6340-7341 If the pre-filter (1, Order No. 395 173 080) is a drop in power, drop in speed, or smoke in (5). Let...

Owners Manual
Page 26
... (5) engage in bolt (3) but do not tighten it lightly with multipurpose grease, Order No. 944 360 000. CAUTION! Unscrew screw (3). CAREFUL - Evenly lever the return spring (4) out of the catch using a screwdriver or similar tool. Take off the starter housing (see above under tension and can pop out. Before installing the new return spring (4) in the housing. Do not grease...
... (5) engage in bolt (3) but do not tighten it lightly with multipurpose grease, Order No. 944 360 000. CAUTION! Unscrew screw (3). CAREFUL - Evenly lever the return spring (4) out of the catch using a screwdriver or similar tool. Take off the starter housing (see above under tension and can pop out. Before installing the new return spring (4) in the housing. Do not grease...
Owners Manual
Page 29
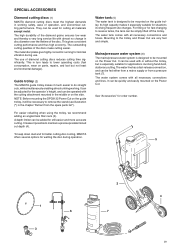
... disc plates give highly concentric running for the operator´s height, and can be used with all necessary connections and hoses. NOTE: Before mounting the DPC8132 Power Cut on the guide trolley, it much easier to remove the stand (see illustration (*) in the chapter "Extract from a pressure tank (7). Mounting to maintain a precise predetermined cut depth (4). To keep down dust and for better cutting‑disc cooling, MAKITA...
... disc plates give highly concentric running for the operator´s height, and can be used with all necessary connections and hoses. NOTE: Before mounting the DPC8132 Power Cut on the guide trolley, it much easier to remove the stand (see illustration (*) in the chapter "Extract from a pressure tank (7). Mounting to maintain a precise predetermined cut depth (4). To keep down dust and for better cutting‑disc cooling, MAKITA...
Owners Manual
Page 30
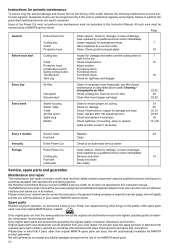
... prescribed maintenance work can work must not turn on the quality of your Power Cut, depend among other than original MAKITA spare parts are from the use of damage, have repaired by a MAKITA service center. Instructions for tightness and lekages Every day Air filter Idle speed Extreme dust Clean (if necessary more frequently); Clean, Check position (impact plate) 18 Before each start Cutting disc V‑belt Protective hood Combination switch, Safety locking button, Throttle lever Tank...
... prescribed maintenance work can work must not turn on the quality of your Power Cut, depend among other than original MAKITA spare parts are from the use of damage, have repaired by a MAKITA service center. Instructions for tightness and lekages Every day Air filter Idle speed Extreme dust Clean (if necessary more frequently); Clean, Check position (impact plate) 18 Before each start Cutting disc V‑belt Protective hood Combination switch, Safety locking button, Throttle lever Tank...
Owners Manual
Page 31
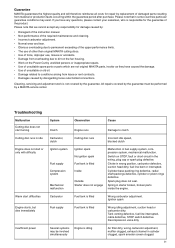
... venting defective, fuel line interrupted, cable defective, STOP switch defective. Switch on the Power Cut by unskilled persons or inappropriate repairs. • Use of unsuitable spare parts or parts which are not original MAKITA parts, insofar as they have any responsibility for damage caused by the guarantee. Troubleshooting Malfunction System Observation Cause Cutting disc does not start turning Clutch Engine runs Damage to conditions arising...
... venting defective, fuel line interrupted, cable defective, STOP switch defective. Switch on the Power Cut by unskilled persons or inappropriate repairs. • Use of unsuitable spare parts or parts which are not original MAKITA parts, insofar as they have any responsibility for damage caused by the guarantee. Troubleshooting Malfunction System Observation Cause Cutting disc does not start turning Clutch Engine runs Damage to conditions arising...

Flyer (English)
Page 2
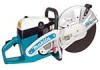
... kit Model DPC7331 Model DPC8132 Makita offers a wide variety of Power Cutter accessories. For a complete listing, please refer to stock on a single lever for operator convenience ■ Cushioned operator grips with 4 vibration-absorption rubber buffers for increased operator comfort ■ Microchip controlled carburetor designed to compensate engine timing according to work load ■ Aluminum guard and wheel pressure plates to reduce weight ■ Starter grip decompression valve for faster starting...
... kit Model DPC7331 Model DPC8132 Makita offers a wide variety of Power Cutter accessories. For a complete listing, please refer to stock on a single lever for operator convenience ■ Cushioned operator grips with 4 vibration-absorption rubber buffers for increased operator comfort ■ Microchip controlled carburetor designed to compensate engine timing according to work load ■ Aluminum guard and wheel pressure plates to reduce weight ■ Starter grip decompression valve for faster starting...


