Owners Manual
Page 3
...Water entering a power tool will do not allow persons unfamiliar with these are caused by a qualified repair person using only identical replacement parts. Properly maintained cutting tools with another . Remove any adjustments, changing accessories, or storing power tools. When battery pack is in ... Do not abuse the cord. Many accidents are connected and properly used with sharp cutting edges are less likely to a rotating part of fire when used . If damaged, have the power tool repaired before inserting battery pack. dust extraction and collection facilities, ensure...
...Water entering a power tool will do not allow persons unfamiliar with these are caused by a qualified repair person using only identical replacement parts. Properly maintained cutting tools with another . Remove any adjustments, changing accessories, or storing power tools. When battery pack is in ... Do not abuse the cord. Many accidents are connected and properly used with sharp cutting edges are less likely to a rotating part of fire when used . If damaged, have the power tool repaired before inserting battery pack. dust extraction and collection facilities, ensure...
Owners Manual
Page 4
...Never recharge a fully charged battery cartridge. GEB026-1 ENC007-2 SPECIFIC SAFETY RULES DO NOT let comfort or familiarity with product (gained from rotating parts. 5. Keep hands away from repeated use this instruction manual may cause serious personal injury. Some material contains chemicals which may result in .... (2) Avoid storing battery cartridge in a risk of your eyes, rinse them out with a "live" wire will make exposed metal parts of blow SAVE THESE INSTRUCTIONS. Be careful not to follow the safety rules stated in high locations. 3. Charge the battery cartridge before...
...Never recharge a fully charged battery cartridge. GEB026-1 ENC007-2 SPECIFIC SAFETY RULES DO NOT let comfort or familiarity with product (gained from rotating parts. 5. Keep hands away from repeated use this instruction manual may cause serious personal injury. Some material contains chemicals which may result in .... (2) Avoid storing battery cartridge in a risk of your eyes, rinse them out with a "live" wire will make exposed metal parts of blow SAVE THESE INSTRUCTIONS. Be careful not to follow the safety rules stated in high locations. 3. Charge the battery cartridge before...
Owners Manual
Page 5
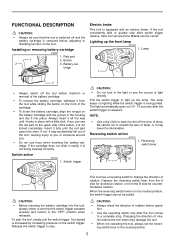
...comes to a complete stop. The light automatically goes out 10 - 15 seconds after switch trigger release, have tool serviced at a Makita service center. Reversing switch action 007157 1. CAUTION: • Before inserting the battery cartridge into place. Lighting up the lamp. Insert... neutral position, the switch trigger cannot be seen. Reversing switch lever A B 1 This tool has a reversing switch to quickly stop . Red part 1 2. tridge Electric brake This tool is released. If not, it from the B side for counter- Tool speed is being inserted correctly. ...
...comes to a complete stop. The light automatically goes out 10 - 15 seconds after switch trigger release, have tool serviced at a Makita service center. Reversing switch action 007157 1. CAUTION: • Before inserting the battery cartridge into place. Lighting up the lamp. Insert... neutral position, the switch trigger cannot be seen. Reversing switch lever A B 1 This tool has a reversing switch to quickly stop . Red part 1 2. tridge Electric brake This tool is released. If not, it from the B side for counter- Tool speed is being inserted correctly. ...
Owners Manual
Page 7
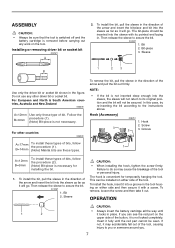
... sleeve to secure the bit. 004347 1. OPERATION 1 2 CAUTION: • Always insert the battery cartridge all the way until the red part cannot be secured. The bit-piece should be inserted into the sleeve, the sleeve will not return to its pointed end facing in. To...1. Hook 2. Groove A=17mm To install these types of bit. A=12mm B=9mm To install these types of bits, follow the procedure (1). 1 B=14mm (Note) Makita bits are these type of bits, follow the procedure (2). (Note) Bit-piece is not necessary. Bit 2. Sleeve CAUTION: • When installing the hook, tighten...
... sleeve to secure the bit. 004347 1. OPERATION 1 2 CAUTION: • Always insert the battery cartridge all the way until the red part cannot be secured. The bit-piece should be inserted into the sleeve, the sleeve will not return to its pointed end facing in. To...1. Hook 2. Groove A=17mm To install these types of bit. A=12mm B=9mm To install these types of bits, follow the procedure (1). 1 B=14mm (Note) Makita bits are these type of bits, follow the procedure (2). (Note) Bit-piece is not necessary. Bit 2. Sleeve CAUTION: • When installing the hook, tighten...
Owners Manual
Page 10
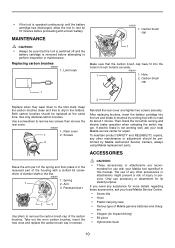
... the same time. Rear cover 1 2. If you need any assistance for 15 minutes before attempting to slip in the recessed part of Makita genuine batteries and chargers • Stopper (for repair. Screws 2 Reinstall the rear cover and tighten two screws securely. Spring...the tool is switched off and the battery cartridge is not working well, ask your Makita tool specified in brushes by Makita Authorized Service Centers, always using Makita replacement parts. Use only identical carbon brushes. To maintain product SAFETY and RELIABILITY, repairs, any ...
... the same time. Rear cover 1 2. If you need any assistance for 15 minutes before attempting to slip in the recessed part of Makita genuine batteries and chargers • Stopper (for repair. Screws 2 Reinstall the rear cover and tighten two screws securely. Spring...the tool is switched off and the battery cartridge is not working well, ask your Makita tool specified in brushes by Makita Authorized Service Centers, always using Makita replacement parts. Use only identical carbon brushes. To maintain product SAFETY and RELIABILITY, repairs, any ...


