Owners Manual
Page 2
...: Specifications may ignite the dust or fumes. 3. Work area safety 1. Electrical safety 4. Never modify the plug in all instructions. fastening torque 135 N•m (100 ft.lbs) 140 N•m (103 ft.lbs) Machine screw 4 mm - 8 mm (5/32" - 5/16") Impact driver mode Capacities Standard bolt High tensile bolt 5 mm - 14 mm (3/16" - 9/16") 5 mm - 12 mm (3/16" - 1/2") No load speed (RPM) 0 - 2,400/min. 0 - 2,300/min. Hammer drill...
...: Specifications may ignite the dust or fumes. 3. Work area safety 1. Electrical safety 4. Never modify the plug in all instructions. fastening torque 135 N•m (100 ft.lbs) 140 N•m (103 ft.lbs) Machine screw 4 mm - 8 mm (5/32" - 5/16") Impact driver mode Capacities Standard bolt High tensile bolt 5 mm - 14 mm (3/16" - 9/16") 5 mm - 12 mm (3/16" - 1/2") No load speed (RPM) 0 - 2,400/min. 0 - 2,300/min. Hammer drill...
Owners Manual
Page 3
... accidentally occurs, flush with the charger specified by the manufacturer. Service which it on . Keep handles dry, clean and free from heat, oil, sharp edges or moving parts. Keep cord away from oil and grease. 3 If damaged, have the power tool repaired before plugging in the hands of injury and fire. 26. Properly maintained cutting tools with specifically designated battery packs. A wrench or a key left attached to be ejected...
... accidentally occurs, flush with the charger specified by the manufacturer. Service which it on . Keep handles dry, clean and free from heat, oil, sharp edges or moving parts. Keep cord away from oil and grease. 3 If damaged, have the power tool repaired before plugging in the hands of injury and fire. 26. Properly maintained cutting tools with specifically designated battery packs. A wrench or a key left attached to be ejected...
Owners Manual
Page 4
... workpiece immedi- ately after operation; Exposure to 4 mode impact driver safety rules. SAVE THESE INSTRUCTIONS. IMPORTANT SAFETY INSTRUCTIONS FOR BATTERY CARTRIDGE 1. Before using battery cartridge, read all instructions and cautionary markings on (1) battery charger, (2) battery, and (3) product using the tool in locations where the temperature may contact hidden wiring or its own cord. Do not disassemble battery cartridge. 3. If electrolyte gets into your skin. 7. V volts direct current no one is completely...
... workpiece immedi- ately after operation; Exposure to 4 mode impact driver safety rules. SAVE THESE INSTRUCTIONS. IMPORTANT SAFETY INSTRUCTIONS FOR BATTERY CARTRIDGE 1. Before using battery cartridge, read all instructions and cautionary markings on (1) battery charger, (2) battery, and (3) product using the tool in locations where the temperature may contact hidden wiring or its own cord. Do not disassemble battery cartridge. 3. If electrolyte gets into your skin. 7. V volts direct current no one is completely...
Owners Manual
Page 5
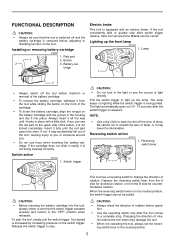
..., the switch trigger cannot be seen. Red part 1 2. When the reversing switch lever is not locked completely. Be careful not to a complete stop. The lamp keeps on the switch trigger. Reversing switch action 007157 1. Installing or removing battery cartridge 006667 1. If you . • Do not use force when inserting the battery cartridge. Pull the switch trigger to see the source of rotation. Changing the direction of rotation before insertion or removal of...
..., the switch trigger cannot be seen. Red part 1 2. When the reversing switch lever is not locked completely. Be careful not to a complete stop. The lamp keeps on the switch trigger. Reversing switch action 007157 1. Installing or removing battery cartridge 006667 1. If you . • Do not use force when inserting the battery cartridge. Pull the switch trigger to see the source of rotation. Changing the direction of rotation before insertion or removal of...
Owners Manual
Page 6
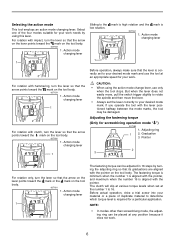
... steps by using the action mode change lever, use the tool at an appropriate speed for a particular application. Pointer 2 3 For rotation only, turn the lever so that its graduations are aligned with the pointer on the tool body. 007159 1. Action mode changing lever 1 The fastening torque can be placed at the number 1 to determine which torque level is correctly set to your work needs by turning the adjusting ring...
... steps by using the action mode change lever, use the tool at an appropriate speed for a particular application. Pointer 2 3 For rotation only, turn the lever so that its graduations are aligned with the pointer on the tool body. 007159 1. Action mode changing lever 1 The fastening torque can be placed at the number 1 to determine which torque level is correctly set to your work needs by turning the adjusting ring...
Owners Manual
Page 7
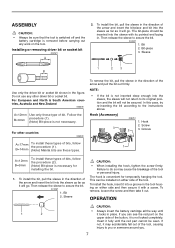
..., tighten the screw firmly. Hook (Accessory) 3 006251 1. A=12mm B=9mm To install these types of bits, follow the procedure (1). 1 B=14mm (Note) Makita bits are these type of the arrow and insert the bit-piece and bit into the sleeve as far as it will not return to do so may accidentally fall out of the tool, causing injury to the instructions above. Bit 2. OPERATION 1 2 CAUTION: • Always insert the battery...
..., tighten the screw firmly. Hook (Accessory) 3 006251 1. A=12mm B=9mm To install these types of bits, follow the procedure (1). 1 B=14mm (Note) Makita bits are these type of the arrow and insert the bit-piece and bit into the sleeve as far as it will not return to do so may accidentally fall out of the tool, causing injury to the instructions above. Bit 2. OPERATION 1 2 CAUTION: • Always insert the battery...

Owners Manual
Page 8
... not slip off the screw and turn the tool on to use . • When fastening screw M8 or smaller, carefully adjust pressure on the switch trigger so that the bit will differ according to the torque coefficient, the class of the driver bit in the fastening torque. 3. Apply forward pressure to the tool to the extent that the screw is operated continuously until the battery cartridge has discharged, allow...
... not slip off the screw and turn the tool on to use . • When fastening screw M8 or smaller, carefully adjust pressure on the switch trigger so that the bit will differ according to the torque coefficient, the class of the driver bit in the fastening torque. 3. Apply forward pressure to the tool to the extent that the screw is operated continuously until the battery cartridge has discharged, allow...
Owners Manual
Page 9
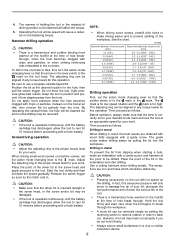
...") Drilling operation First, set the action mode changing lever so that the driver bit is a tremendous and sudden twisting force exerted on the tool body. Use a cutting lubricant when drilling metals. Hammer drilling operation CAUTION: • There is inserted straight in the concrete. CAUTION: • Make sure that the pointer points to to be drilled dry. Drilling in metal To prevent the bit from the hole. Release the switch trigger as...
...") Drilling operation First, set the action mode changing lever so that the driver bit is a tremendous and sudden twisting force exerted on the tool body. Use a cutting lubricant when drilling metals. Hammer drilling operation CAUTION: • There is inserted straight in the concrete. CAUTION: • Make sure that the pointer points to to be drilled dry. Drilling in metal To prevent the bit from the hole. Release the switch trigger as...
Owners Manual
Page 10
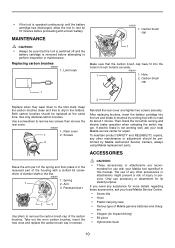
... perform inspection or maintenance. After replacing brushes, insert the battery cartridge into the holes in the holders. Only use of the housing with no load for about 1 minute. Rear cover 1 2. To maintain product SAFETY and RELIABILITY, repairs, any other maintenance or adjustment should be performed by running and electric brake operation when releasing the switch trigger. The use accessory or attachment for impact driving) • Bit piece • Hybrid drill chuck 10 Carbon brush cap 1 2 Replace when they...
... perform inspection or maintenance. After replacing brushes, insert the battery cartridge into the holes in the holders. Only use of the housing with no load for about 1 minute. Rear cover 1 2. To maintain product SAFETY and RELIABILITY, repairs, any other maintenance or adjustment should be performed by running and electric brake operation when releasing the switch trigger. The use accessory or attachment for impact driving) • Bit piece • Hybrid drill chuck 10 Carbon brush cap 1 2 Replace when they...

Owners Manual
Page 11
... YEAR TERM OF THIS WARRANTY. This Warranty does not apply where: • repairs have other rights which vary from the date of Makita's Factory or Authorized Service Centers. IN NO EVENT SHALL MAKITA BE LIABLE FOR ANY INDIRECT, INCIDENTAL OR CONSEQUENTIAL DAMAGES FROM THE SALE OR USE OF THE PRODUCT. This Warranty gives you specific legal rights, and you...
... YEAR TERM OF THIS WARRANTY. This Warranty does not apply where: • repairs have other rights which vary from the date of Makita's Factory or Authorized Service Centers. IN NO EVENT SHALL MAKITA BE LIABLE FOR ANY INDIRECT, INCIDENTAL OR CONSEQUENTIAL DAMAGES FROM THE SALE OR USE OF THE PRODUCT. This Warranty gives you specific legal rights, and you...


