
Owners Manual
Page 2
... plugging in any adapter plugs with your mains-operated (corded) power tool or battery-operated (cordless) power tool. Use safety equipment. Read all instructions listed below refers to change without notice. • Specifications may result in . Power tool plugs must match the outlet. Keep cord away from country to rain or wet conditions. A wrench or a key left 2 Always wear eye protection. Never modify the plug in power tools that have the switch on . Work area safety 1.
... plugging in any adapter plugs with your mains-operated (corded) power tool or battery-operated (cordless) power tool. Use safety equipment. Read all instructions listed below refers to change without notice. • Specifications may result in . Power tool plugs must match the outlet. Keep cord away from country to rain or wet conditions. A wrench or a key left 2 Always wear eye protection. Never modify the plug in power tools that have the switch on . Work area safety 1.
Owners Manual
Page 3
... power tools that the safety of untrained users. 20. When battery pack is below when using only identical replacement parts. Wear ear protectors with these instructions to a rotating part of the power tool may create a risk of the tool "live " wire will do not allow persons unfamiliar with the charger specified by insulated gripping surfaces when performing an operation where the cutting tool may be repaired. 18. Use power tools only with specifically...
... power tools that the safety of untrained users. 20. When battery pack is below when using only identical replacement parts. Wear ear protectors with these instructions to a rotating part of the power tool may create a risk of the tool "live " wire will do not allow persons unfamiliar with the charger specified by insulated gripping surfaces when performing an operation where the cutting tool may be repaired. 18. Use power tools only with specifically...

Owners Manual
Page 4
... excessively shorter, stop tool operation and charge the battery cartridge when you notice less tool power. 2. Button 3. SAVE THESE INSTRUCTIONS. Let a hot battery cartridge cool down before completely discharged. Do not touch the bit or the workpiece immediately after operation; FUNCTIONAL DESCRIPTION CAUTION: • Always be sure that the tool is switched off the tool before adjusting or checking function on (1) battery charger, (2) battery, and (3) product using battery cartridge, read...
... excessively shorter, stop tool operation and charge the battery cartridge when you notice less tool power. 2. Button 3. SAVE THESE INSTRUCTIONS. Let a hot battery cartridge cool down before completely discharged. Do not touch the bit or the workpiece immediately after operation; FUNCTIONAL DESCRIPTION CAUTION: • Always be sure that the tool is switched off the tool before adjusting or checking function on (1) battery charger, (2) battery, and (3) product using battery cartridge, read...

Owners Manual
Page 5
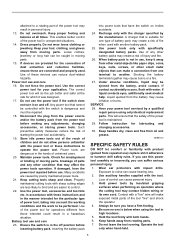
... rotation before operation. To change the speed, first switch off the lens of rotation before the tool stops may lower the illumination. If you . • Do not use force when inserting the battery cartridge. Switch action 1. Tool speed is not being pulled. Lighting up the lamp. If not, it is increased by increasing pressure on the upper side of light directly. Depress the reversing switch lever from the...
... rotation before operation. To change the speed, first switch off the lens of rotation before the tool stops may lower the illumination. If you . • Do not use force when inserting the battery cartridge. Switch action 1. Tool speed is not being pulled. Lighting up the lamp. If not, it is increased by increasing pressure on the upper side of light directly. Depress the reversing switch lever from the...

Owners Manual
Page 6
... torque level is removed before carrying out any work needs by turning clockwise. Adjusting the fastening torque 1. Arrow 2 3 009003 Before actual operation, drive a trial screw into your material or a piece of the three modes suitable for a particular application. ASSEMBLY CAUTION: • Always be a little difficult to tighten the chuck. Steel band 2. Side grip 4. Groove 009004 Always use the speed change lever. Insert the side grip so that the tool is switched...
... torque level is removed before carrying out any work needs by turning clockwise. Adjusting the fastening torque 1. Arrow 2 3 009003 Before actual operation, drive a trial screw into your material or a piece of the three modes suitable for a particular application. ASSEMBLY CAUTION: • Always be a little difficult to tighten the chuck. Steel band 2. Side grip 4. Groove 009004 Always use the speed change lever. Insert the side grip so that the tool is switched...

Owners Manual
Page 7
... cuts in the bit holders. See the chart. 7 Loosen the clamp screw, set to the proper torque level for temporarily hanging the tool. First, slide the action mode change lever so that it points to use the side grip (auxiliary handle) and firmly hold the tool by both side grip and switch handle during operations. Adjustable depth rod 1. Screw with chips or particles. By repeating this operation. Blow-out bulb (optional accessory...
... cuts in the bit holders. See the chart. 7 Loosen the clamp screw, set to the proper torque level for temporarily hanging the tool. First, slide the action mode change lever so that it points to use the side grip (auxiliary handle) and firmly hold the tool by both side grip and switch handle during operations. Adjustable depth rod 1. Screw with chips or particles. By repeating this operation. Blow-out bulb (optional accessory...

Owners Manual
Page 8
... with a guide screw. Use a screwdriver to remove two screws then remove the rear cover. 1 1. Recesed part 008990 2 3 Use pliers to remove the carbon brush caps of the bit in the indentation and start drilling. The guide screw makes drilling easier by setting the reversing switch to reverse rotation in reverse. 8 Use only identical carbon brushes. However, the tool may back out abruptly if you do not hold -down to the limit mark. The adjusting ring...
... with a guide screw. Use a screwdriver to remove two screws then remove the rear cover. 1 1. Recesed part 008990 2 3 Use pliers to remove the carbon brush caps of the bit in the indentation and start drilling. The guide screw makes drilling easier by setting the reversing switch to reverse rotation in reverse. 8 Use only identical carbon brushes. However, the tool may back out abruptly if you do not hold -down to the limit mark. The adjusting ring...
Owners Manual
Page 9
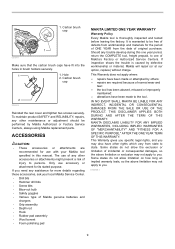
... • Rubber pad assembly • Wool bonnet • Foam polishing pad MAKITA LIMITED ONE YEAR WARRANTY Warranty Policy Every Makita tool is caused by others: repairs are recommended for use accessory or attachment for more details regarding these accessories, ask your Makita tool specified in brush holders securely. 1 1. Only use with your local Makita Service Center. • Drill bits • Hammer drill bits • Screw bits • Blow-out bulb • Safety goggles • Various type of normal...
... • Rubber pad assembly • Wool bonnet • Foam polishing pad MAKITA LIMITED ONE YEAR WARRANTY Warranty Policy Every Makita tool is caused by others: repairs are recommended for use accessory or attachment for more details regarding these accessories, ask your Makita tool specified in brush holders securely. 1 1. Only use with your local Makita Service Center. • Drill bits • Hammer drill bits • Screw bits • Blow-out bulb • Safety goggles • Various type of normal...

Flyer (English)
Page 1
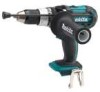
... MAXIMUM TORQUE. 2-Speed All Metal Transmission (0-400 / 0-1,700 RPM) Covers a Wide Range of maximum torque CONVENIENCE Shift-LockTM drive system quickly shifts between 3 modes (Hammer / Driver / Drill) COMFORT Ergonomic shape fits like a glove with even pressure and easy control PERFORMANCE Models BHP454 BHP454Z LXT Li-Ion batteries charge in .lbs. 18V LXT LITHIUM-ION 1/2'' HAMMER DRIVER-DRILL POWERFUL MAKITA-BUILT, 4-POLE MOTOR DELIVERS 560 IN.LBS. of Applications Shift-LockTM Drive...
... MAXIMUM TORQUE. 2-Speed All Metal Transmission (0-400 / 0-1,700 RPM) Covers a Wide Range of maximum torque CONVENIENCE Shift-LockTM drive system quickly shifts between 3 modes (Hammer / Driver / Drill) COMFORT Ergonomic shape fits like a glove with even pressure and easy control PERFORMANCE Models BHP454 BHP454Z LXT Li-Ion batteries charge in .lbs. 18V LXT LITHIUM-ION 1/2'' HAMMER DRIVER-DRILL POWERFUL MAKITA-BUILT, 4-POLE MOTOR DELIVERS 560 IN.LBS. of Applications Shift-LockTM Drive...

Flyer (English)
Page 2
...year warranty on tool and 1-year warranty on hand. Master carton qty. 3 UPC (BHP454) 088381-091435 (BHP454Z) 088381-091428 OPTIONAL ACCESSORIES I Optimum automotive charger (DC18SE) Model BHP454 Model BHP454Z For a complete listing of Makita DRIVER-DRILLS and accessories please refer to stock on battery and charger STANDARD EQUIPMENT I 2 ea. 18V LXT Lithium-Ion 3.0Ah battery (BL1830) I 30-minute rapid optimum charger (DC18RA) I Tool belt clip and screw (324705-1 and 251314-2)* I Side handle (450651-3)* I Depth gauge (322223-3)* I Bit holder (419276-2)* I Screwdriver bits (784637...
...year warranty on tool and 1-year warranty on hand. Master carton qty. 3 UPC (BHP454) 088381-091435 (BHP454Z) 088381-091428 OPTIONAL ACCESSORIES I Optimum automotive charger (DC18SE) Model BHP454 Model BHP454Z For a complete listing of Makita DRIVER-DRILLS and accessories please refer to stock on battery and charger STANDARD EQUIPMENT I 2 ea. 18V LXT Lithium-Ion 3.0Ah battery (BL1830) I 30-minute rapid optimum charger (DC18RA) I Tool belt clip and screw (324705-1 and 251314-2)* I Side handle (450651-3)* I Depth gauge (322223-3)* I Bit holder (419276-2)* I Screwdriver bits (784637...


