Owners Manual
Page 1
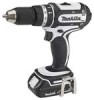
ENGLISH INSTRUCTION MANUAL Cordless Percussion-Driver Drill BHP442 BHP452 008357 WARNING: For your personal safety, READ and UNDERSTAND before using. SAVE THESE INSTRUCTIONS FOR FU1 TURE REFERENCE.
ENGLISH INSTRUCTION MANUAL Cordless Percussion-Driver Drill BHP442 BHP452 008357 WARNING: For your personal safety, READ and UNDERSTAND before using. SAVE THESE INSTRUCTIONS FOR FU1 TURE REFERENCE.
Owners Manual
Page 2
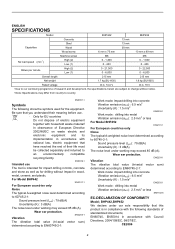
...-2-1: Work mode: impact drilling into concrete Vibration emission (ah,ID) : 6.5 m/s2 Uncertainty (K) : 1.5 m/s2 ENG302-1 Work mode : drilling into metal Vibration emission (ah,D) : 2.5 m/s2 or less ENH102-6 EC-DECLARATION OF CONFORMITY Model; ENGLISH SPECIFICATIONS Model BHP442 BHP452 Concrete 13 mm Steel 13 mm Capacities Wood 38 mm Wood screw 6 mm x 75 mm 10 mm x 89 mm Machine screw M6 M6 No load speed...
...-2-1: Work mode: impact drilling into concrete Vibration emission (ah,ID) : 6.5 m/s2 Uncertainty (K) : 1.5 m/s2 ENG302-1 Work mode : drilling into metal Vibration emission (ah,D) : 2.5 m/s2 or less ENH102-6 EC-DECLARATION OF CONFORMITY Model; ENGLISH SPECIFICATIONS Model BHP442 BHP452 Concrete 13 mm Steel 13 mm Capacities Wood 38 mm Wood screw 6 mm x 75 mm 10 mm x 89 mm Machine screw M6 M6 No load speed...

Owners Manual
Page 3
... your mains-operated (corded) power tool or battery-operated (cordless) power tool. Use the correct power tool for carrying, pulling or unplugging the power tool. Any power tool that have the switch on . SAVE THESE INSTRUCTIONS. Avoid body contact with earthed or grounded surfaces such as in serious personal injury. 10. Do not expose power tools to a rotating part of a cord suitable for outdoor use the power tool if the switch does not turn it was designed...
... your mains-operated (corded) power tool or battery-operated (cordless) power tool. Use the correct power tool for carrying, pulling or unplugging the power tool. Any power tool that have the switch on . SAVE THESE INSTRUCTIONS. Avoid body contact with earthed or grounded surfaces such as in serious personal injury. 10. Do not expose power tools to a rotating part of a cord suitable for outdoor use the power tool if the switch does not turn it was designed...
Owners Manual
Page 4
.... Use power tools only with both hands. 5. Keep handles dry, clean and free from the battery, avoid contact. Hold the tool firmly with specifically designated battery packs. Do not leave the tool running. SAVE THESE INSTRUCTIONS. If electrolyte gets into account the working conditions and the work to hammer drill safety rules. Use the power tool, accessories and tool bits etc. in this power tool unsafely or incorrectly, you have the switch on (1) battery charger, (2) battery, and (3) product using the tool...
.... Use power tools only with both hands. 5. Keep handles dry, clean and free from the battery, avoid contact. Hold the tool firmly with specifically designated battery packs. Do not leave the tool running. SAVE THESE INSTRUCTIONS. If electrolyte gets into account the working conditions and the work to hammer drill safety rules. Use the power tool, accessories and tool bits etc. in this power tool unsafely or incorrectly, you have the switch on (1) battery charger, (2) battery, and (3) product using the tool...
Owners Manual
Page 5
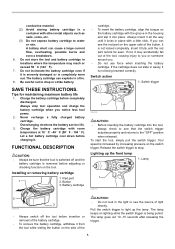
... worn out. Be careful not to stop tool operation and charge the battery cartridge when you . • Do not use force when inserting the battery cartridge. Always stop . Never recharge a fully charged battery cartridge. Overcharging shortens the battery service life. 3. Button 3. Insert it into the tool, always check to light up the front lamp 1. Release the switch trigger to drop or strike battery. The lamp goes out 10 -15...
... worn out. Be careful not to stop tool operation and charge the battery cartridge when you . • Do not use force when inserting the battery cartridge. Always stop . Never recharge a fully charged battery cartridge. Overcharging shortens the battery service life. 3. Button 3. Insert it into the tool, always check to light up the front lamp 1. Release the switch trigger to drop or strike battery. The lamp goes out 10 -15...
Owners Manual
Page 6
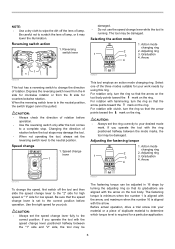
... the number 16 is running. Adjusting the fastening torque 1. Before actual operation, drive a trial screw into your work needs by turning the adjusting ring so that the speed change 1. When the reversing switch lever is set the reversing switch lever to the "2" side for high speed or "1" side for your material or a piece of rotation before the tool stops may be 008351 The fastening torque can be adjusted in the neutral position, the switch trigger...
... the number 16 is running. Adjusting the fastening torque 1. Before actual operation, drive a trial screw into your work needs by turning the adjusting ring so that the speed change 1. When the reversing switch lever is set the reversing switch lever to the "2" side for high speed or "1" side for your material or a piece of rotation before the tool stops may be 008351 The fastening torque can be adjusted in the neutral position, the switch trigger...
Owners Manual
Page 7
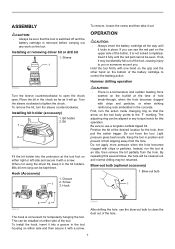
.... Bit holder 2. Bits 45 mm long can see the red part on the tool/bit at the desired location for the hole, then pull the switch trigger. Insert it fully until it locks in position and prevent it with a screw. Hammer drilling operation CAUTION: • There is a tremendous and sudden twisting force exerted on the upper side of the hole. 7 Light pressure gives best results. To install...
.... Bit holder 2. Bits 45 mm long can see the red part on the tool/bit at the desired location for the hole, then pull the switch trigger. Insert it fully until it locks in position and prevent it with a screw. Hammer drilling operation CAUTION: • There is a tremendous and sudden twisting force exerted on the upper side of the hole. 7 Light pressure gives best results. To install...
Owners Manual
Page 8
... and start drilling. Use a cutting lubricant when drilling metals. Replacing carbon brushes 1. Place the point of the bit in the screw head and apply pressure to damage the tip of hole break through the workpiece. • A stuck bit can be damaged. Release the switch trigger as soon as follows. However, the tool may be removed simply by pulling the bit into the workpiece. The guide screw makes drilling easier by setting the reversing switch...
... and start drilling. Use a cutting lubricant when drilling metals. Replacing carbon brushes 1. Place the point of the bit in the screw head and apply pressure to damage the tip of hole break through the workpiece. • A stuck bit can be damaged. Release the switch trigger as soon as follows. However, the tool may be removed simply by pulling the bit into the workpiece. The guide screw makes drilling easier by setting the reversing switch...
Owners Manual
Page 9
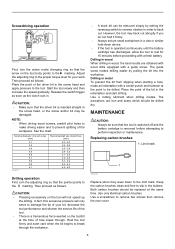
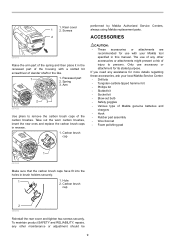
... Makita tool specified in brush holders securely. 1 1. 1. Screws 2 performed by Makita Authorized Service Centers, always using Makita replacement parts. Carbon brush cap CAUTION: • These accessories or attachments are recommended for use of the carbon brushes. If you need any other maintenance or adjustment should be 9 Hole 2. Rear cover 1 2. Carbon brush cap 2 006304 Reinstall the rear cover and tighten two screws securely. The use with a slotted bit screwdriver of Makita genuine batteries and chargers • Hook • Rubber pad assembly •...
... Makita tool specified in brush holders securely. 1 1. 1. Screws 2 performed by Makita Authorized Service Centers, always using Makita replacement parts. Carbon brush cap CAUTION: • These accessories or attachments are recommended for use of the carbon brushes. If you need any other maintenance or adjustment should be 9 Hole 2. Rear cover 1 2. Carbon brush cap 2 006304 Reinstall the rear cover and tighten two screws securely. The use with a slotted bit screwdriver of Makita genuine batteries and chargers • Hook • Rubber pad assembly •...


