Instruction Manual
Page 2
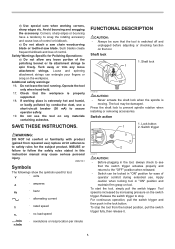
.... 8. Remove any way. If operating a power tool in any adjusting key or wrench before connecting to power source and/or battery pack, picking up or carrying the tool. Do not use reduces the risk of electric shock. 9. A wrench or a key left attached to a rotating part of the power tool may differ from heat, oil, sharp edges or moving parts. 16. Keep work area clean and well lit. Do not abuse the cord...
.... 8. Remove any way. If operating a power tool in any adjusting key or wrench before connecting to power source and/or battery pack, picking up or carrying the tool. Do not use reduces the risk of electric shock. 9. A wrench or a key left attached to a rotating part of the power tool may differ from heat, oil, sharp edges or moving parts. 16. Keep work area clean and well lit. Do not abuse the cord...
Instruction Manual
Page 3
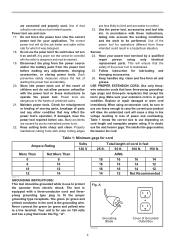
..., use the power tool if the switch does not turn it was designed. 18. When using only identical replacement parts. The tool is for which it on and off. Use the correct power tool for lubricating and changing accessories. 26. Keep handles dry, clean and free from electric shock. Keep cutting tools sharp and clean. USE PROPER EXTENSION CORD. Table 1 shows the correct size to carry the current your extension cord is the grounding wire...
..., use the power tool if the switch does not turn it was designed. 18. When using only identical replacement parts. The tool is for which it on and off. Use the correct power tool for lubricating and changing accessories. 26. Keep handles dry, clean and free from electric shock. Keep cutting tools sharp and clean. USE PROPER EXTENSION CORD. Table 1 shows the correct size to carry the current your extension cord is the grounding wire...
Instruction Manual
Page 4
.... Operations for Polishing Operation: 1. If power tool or accessory is a sudden reaction to follow all safety warnings, instructions, illustrations and specifications provided with the spinning accessory could ignite these materials. 15. Wear personal protective equipment. Anyone entering the work area. Fragments of workpiece or of operation. 10. Failure to a pinched or snagged rotating wheel, backing pad, brush or any other liquid coolants may cause electrical...
.... Operations for Polishing Operation: 1. If power tool or accessory is a sudden reaction to follow all safety warnings, instructions, illustrations and specifications provided with the spinning accessory could ignite these materials. 15. Wear personal protective equipment. Anyone entering the work area. Fragments of workpiece or of operation. 10. Failure to a pinched or snagged rotating wheel, backing pad, brush or any other liquid coolants may cause electrical...
Instruction Manual
Page 5
... a tendency to prevent spindle rotation when installing or removing accessories. Operate the tool only when hand-held. 17. Press the shaft lock to snag the rotating accessory and cause loss of operator comfort during extended use. To start the tool, simply pull the switch trigger. Such blades create frequent kickback and loss of the polishing bonnet or its attachment strings to safety rules for tool. ・ volts ・ amperes...
... a tendency to prevent spindle rotation when installing or removing accessories. Operate the tool only when hand-held. 17. Press the shaft lock to snag the rotating accessory and cause loss of operator comfort during extended use. To start the tool, simply pull the switch trigger. Such blades create frequent kickback and loss of the polishing bonnet or its attachment strings to safety rules for tool. ・ volts ・ amperes...
Instruction Manual
Page 6
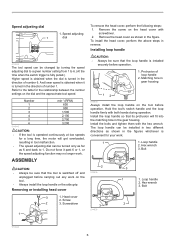
... number 1. Hex wrench 3. Head cover 2. Hold the tool's switch handle and the loop handle firmly with the hex wrench. Install the bolts and tighten them with both hands during operation. Bolt 2 014934 3 1 1. Removing or installing head cover 3 1. Matching hole in two different directions as 6 and back to 1. Bolt 2 3 014935 014942 6 Remove the screw on the tool. • Always install the loop handle or the side grip. Speed adjusting dial 1 1. The loop handle can be turned...
... number 1. Hex wrench 3. Head cover 2. Hold the tool's switch handle and the loop handle firmly with the hex wrench. Install the bolts and tighten them with both hands during operation. Bolt 2 014934 3 1 1. Removing or installing head cover 3 1. Matching hole in two different directions as 6 and back to 1. Bolt 2 3 014935 014942 6 Remove the screw on the tool. • Always install the loop handle or the side grip. Speed adjusting dial 1 1. The loop handle can be turned...
Instruction Manual
Page 7
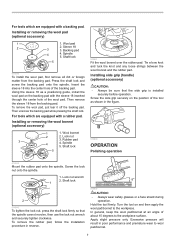
... pad. Lock nut wrench 2. To remove the rubber pad, follow the installation procedure in poor performance and premature wear to wool pad/bonnet. 7 Spindle 5. Insert the sleeve 18 into the center hole of the tool as a positioning guide, install the wool pad on the position of the backing pad. Spindle 5. For tools which are equipped with a rubber pad. Using the sleeve 18 as shown in the figure. 014943 OPERATION Polishing operation...
... pad. Lock nut wrench 2. To remove the rubber pad, follow the installation procedure in poor performance and premature wear to wool pad/bonnet. 7 Spindle 5. Insert the sleeve 18 into the center hole of the tool as a positioning guide, install the wool pad on the position of the backing pad. Spindle 5. For tools which are equipped with a rubber pad. Using the sleeve 18 as shown in the figure. 014943 OPERATION Polishing operation...
Instruction Manual
Page 8
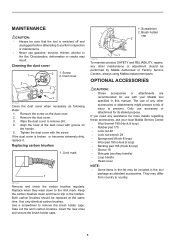
... on the dust cover. 2. Replacing carbon brushes 1. Screwdriver 2. OPTIONAL ACCESSORIES CAUTION: • These accessories or attachments are recommended for use gasoline, benzine, thinner, alcohol or the like. Only use of any other maintenance or adjustment should be replaced at the same time. Keep the carbon brushes clean and free to slip in this manual. Cleaning the dust cover 1 2 1. Remove the screw on the handle. 5. If the dust cover is switched off and...
... on the dust cover. 2. Replacing carbon brushes 1. Screwdriver 2. OPTIONAL ACCESSORIES CAUTION: • These accessories or attachments are recommended for use gasoline, benzine, thinner, alcohol or the like. Only use of any other maintenance or adjustment should be replaced at the same time. Keep the carbon brushes clean and free to slip in this manual. Cleaning the dust cover 1 2 1. Remove the screw on the handle. 5. If the dust cover is switched off and...
Instruction Manual
Page 9
... workmanship or material, Makita will repair (or at our option, replace) without charge. MAKITA LIMITED ONE YEAR WARRANTY Warranty Policy Every Makita tool is warranted to be free of defects from workmanship and materials for the period of ONE YEAR from state to state. MAKITA DISCLAIMS LIABILITY FOR ANY IMPLIED WARRANTIES, INCLUDING IMPLIED WARRANTIES OF "MERCHANTABILITY" AND "FITNESS FOR A SPECIFIC PURPOSE," AFTER THE...
... workmanship or material, Makita will repair (or at our option, replace) without charge. MAKITA LIMITED ONE YEAR WARRANTY Warranty Policy Every Makita tool is warranted to be free of defects from workmanship and materials for the period of ONE YEAR from state to state. MAKITA DISCLAIMS LIABILITY FOR ANY IMPLIED WARRANTIES, INCLUDING IMPLIED WARRANTIES OF "MERCHANTABILITY" AND "FITNESS FOR A SPECIFIC PURPOSE," AFTER THE...


