
Owners Manual
Page 1
Belt Sander MODEL 9031 INSTRUCTION MANUAL S PEClFICAT10 NS Belt size Belt speed Overall length 30 mm x 533 mm (1.3116" x 21") 200 m - 1,000 m (656 ft. ~ 3,280 f t , ) / m ~ n . 380 mm (14-31/32") * Manufacturer reserves the right t o change specifications without notice. * Note: Specifications may differ from country to country. WARNING: For your personal safety, READ and UNDERSTAND before using. Net weight 2.1 kg (4.6 Ibs) SAVE THESE INSTRUCTIONS FOR FUTURE REFERENCE.
Belt Sander MODEL 9031 INSTRUCTION MANUAL S PEClFICAT10 NS Belt size Belt speed Overall length 30 mm x 533 mm (1.3116" x 21") 200 m - 1,000 m (656 ft. ~ 3,280 f t , ) / m ~ n . 380 mm (14-31/32") * Manufacturer reserves the right t o change specifications without notice. * Note: Specifications may differ from country to country. WARNING: For your personal safety, READ and UNDERSTAND before using. Net weight 2.1 kg (4.6 Ibs) SAVE THESE INSTRUCTIONS FOR FUTURE REFERENCE.

Owners Manual
Page 2
... work . Inspect tool cords periodically and if damaged, have repaired by cord or yank it to hold work area well lit. Don't use , tools should be caught in use, before servicing, and when changing accessories, such as blades, bits, cutters. When not in use tool in dry, and high or locked-up place - Keep handles dry, clean, and free from heat, oil, and sharp edges. IMPORTANT SAFETY INSTRUCTIONS (For All Tools) WARNING: WHEN USING ELECTRICTOOLS...
... work . Inspect tool cords periodically and if damaged, have repaired by cord or yank it to hold work area well lit. Don't use , tools should be caught in use, before servicing, and when changing accessories, such as blades, bits, cutters. When not in use tool in dry, and high or locked-up place - Keep handles dry, clean, and free from heat, oil, and sharp edges. IMPORTANT SAFETY INSTRUCTIONS (For All Tools) WARNING: WHEN USING ELECTRICTOOLS...

Owners Manual
Page 3
... surfaces. When using an extension cord, be carefully checked to determine that keys and adjusting wrenches are removed from tool before turning it will draw. Table 1 shows the correct size to see that it on switch. TABLE 1 MINIMUM GAGE FOR CORD SETS I Total Length of the tool, a guard or other ). When tool is used outdoors, use only extension cords intended for alignment of moving parts, binding of moving parts, breakage of parts, mounting, and...
... surfaces. When using an extension cord, be carefully checked to determine that keys and adjusting wrenches are removed from tool before turning it will draw. Table 1 shows the correct size to see that it on switch. TABLE 1 MINIMUM GAGE FOR CORD SETS I Total Length of the tool, a guard or other ). When tool is used outdoors, use only extension cords intended for alignment of moving parts, binding of moving parts, breakage of parts, mounting, and...

Owners Manual
Page 4
....) be sure the voltage supplied is turned on. 3.Keep hands away from rotating parts. 4. Hold the tool firmly with voltage less than that specified on the workpiece surface. Using a power source with both hands. 2. Do not leave the tool running. ADDITIONAL SAFETY RULES 1. If in SERIOUS INJURY t o the user - Operate the tool only when hand-held. 5. SAVE THESE INSTRUCTIONS. 4 as well as that specified...
....) be sure the voltage supplied is turned on. 3.Keep hands away from rotating parts. 4. Hold the tool firmly with voltage less than that specified on the workpiece surface. Using a power source with both hands. 2. Do not leave the tool running. ADDITIONAL SAFETY RULES 1. If in SERIOUS INJURY t o the user - Operate the tool only when hand-held. 5. SAVE THESE INSTRUCTIONS. 4 as well as that specified...

Owners Manual
Page 5
... Grip holder Installing or removing the abrasive belt CAUTION : Always be pivoted for easy operation. See the figure a t right. Loop the belt over the rear pulley. NOTE : The arrow on the inside of the tool. Install it by screwing it firmly on the rear pulley must point in the same direction. -, Arrow 5 Installing the side grip For your own safety, always use the...
... Grip holder Installing or removing the abrasive belt CAUTION : Always be pivoted for easy operation. See the figure a t right. Loop the belt over the rear pulley. NOTE : The arrow on the inside of the tool. Install it by screwing it firmly on the rear pulley must point in the same direction. -, Arrow 5 Installing the side grip For your own safety, always use the...
Owners Manual
Page 6
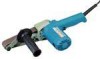
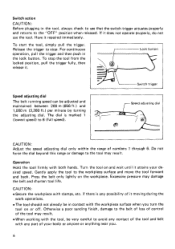
If i t does not operate properly, do not use the tool. Have it . To start the tool, simply pull the trigger. Turn the tool on the workpiece. Release the trigger to avoid any contact of the tool and belt with any possibility of numbers 1 through 6. To stop . Lock button Speed adjusting dial The belt running speed can be in the lock button. Speed adjusting dial I CAUTION : Adjust the speed adjusting dial only within the range of it attains your...
If i t does not operate properly, do not use the tool. Have it . To start the tool, simply pull the trigger. Turn the tool on the workpiece. Release the trigger to avoid any contact of the tool and belt with any possibility of numbers 1 through 6. To stop . Lock button Speed adjusting dial The belt running speed can be in the lock button. Speed adjusting dial I CAUTION : Adjust the speed adjusting dial only within the range of it attains your...

Owners Manual
Page 7
Noczazple Vacuum cleaner CAUTION : Always close the nozzle cap when the hose of a vacuum cleaner/dust collector to the nozzle. Never insert your finger into the nozzle. 7 Connect the hose of a vacuum cleaner/dust collector i s not connected to the nozzle. Dust extraction Open the nozzle cap.
Noczazple Vacuum cleaner CAUTION : Always close the nozzle cap when the hose of a vacuum cleaner/dust collector to the nozzle. Never insert your finger into the nozzle. 7 Connect the hose of a vacuum cleaner/dust collector i s not connected to the nozzle. Dust extraction Open the nozzle cap.
Owners Manual
Page 8
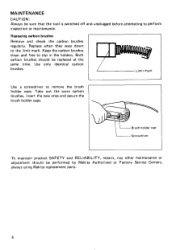
... using Makita replacement parts. 8 I \ Brush holder cap LScrewdriver 'To maintain product SAFETY and RELIABILITY, repairs, nay other maintenance or adjustment should be sure that the tool i s switched off and unplugged before attempting t o perform inspection or maintenance. Take out the worn carbon brushes, insert the new ones and secure the brush holder caps. Keep the carbon brushes clean and free t o slip in the holders. Replacing carbon brushes Remove and check the carbon brushes regularly. Use only identical carbon brushes. 3 Limit mark Use a screwdriver to...
... using Makita replacement parts. 8 I \ Brush holder cap LScrewdriver 'To maintain product SAFETY and RELIABILITY, repairs, nay other maintenance or adjustment should be sure that the tool i s switched off and unplugged before attempting t o perform inspection or maintenance. Take out the worn carbon brushes, insert the new ones and secure the brush holder caps. Keep the carbon brushes clean and free t o slip in the holders. Replacing carbon brushes Remove and check the carbon brushes regularly. Use only identical carbon brushes. 3 Limit mark Use a screwdriver to...
Owners Manual
Page 9
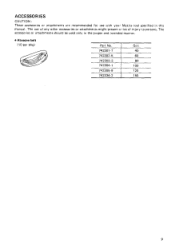
The use with your Makita tool specified in the proper and intended manner. 0 Abrasive belt (10 per pkg) Part No. Grit 742301.7 I 40 742302-5 60 742303-3 80 742304- 1 100 742305-9 I 120 742334-2 I 150 9 ACCESSORIES CAUTION : These accessories or attachments are recommended for use of any other accessories or attachments might present a risk of injury t o persons. The accessories or attachments should be used only in this manual.
The use with your Makita tool specified in the proper and intended manner. 0 Abrasive belt (10 per pkg) Part No. Grit 742301.7 I 40 742302-5 60 742303-3 80 742304- 1 100 742305-9 I 120 742334-2 I 150 9 ACCESSORIES CAUTION : These accessories or attachments are recommended for use of any other accessories or attachments might present a risk of injury t o persons. The accessories or attachments should be used only in this manual.
Owners Manual
Page 10
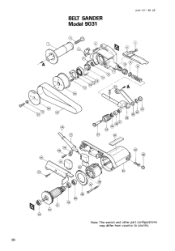
BELT SANDER Model 9031 June-01 - ' 9 5 US Note: The switch and other part configurations may differ from country to country. 10
BELT SANDER Model 9031 June-01 - ' 9 5 US Note: The switch and other part configurations may differ from country to country. 10

Owners Manual
Page 11
... 1 49 1 50 1 51 1 52 1 53 1 Strain Relief Cord Cord Guard Sprmg PI" 4 20 Top Pulley Shaft Pulley 3 0 - 2 5 Ball Bearing 6880DW Sleeve 12 Ball Bearing 6 8 8 0 O W Angle Stay Complete Arm Complete W a v e Washer 12 Hex Nut M 6 - 1 7 Name Plate Carbon Brush Brush Holder Cap Motor Housing Complete FIELD ASSEMBLY Tapping Screw Bind ET 4x60 Baffle Plate Ball Bearing 627LB Insulation Washer ARMATURE ASSEMBLY IWith Item 49 5 0 52 & 531 Fan 60 Ball...
... 1 49 1 50 1 51 1 52 1 53 1 Strain Relief Cord Cord Guard Sprmg PI" 4 20 Top Pulley Shaft Pulley 3 0 - 2 5 Ball Bearing 6880DW Sleeve 12 Ball Bearing 6 8 8 0 O W Angle Stay Complete Arm Complete W a v e Washer 12 Hex Nut M 6 - 1 7 Name Plate Carbon Brush Brush Holder Cap Motor Housing Complete FIELD ASSEMBLY Tapping Screw Bind ET 4x60 Baffle Plate Ball Bearing 627LB Insulation Washer ARMATURE ASSEMBLY IWith Item 49 5 0 52 & 531 Fan 60 Ball...

Owners Manual
Page 12
...state. This Warranty gives you specific legal rights, and you may also have other rights which vary from state to be free of defects...Makita will repair (or at our option, replace) without charge. alterations have been made t o the tool. Should any trouble develop during this one-year period, return the COMPLETE tool, freight prepaid, to one of Makita's Factory or Authorized Service Centers. MAKITA DISCLAIMS LIABILITY FOR ANY IMPLIED WARRANTIES, INCLUDING IMPLIED WARRANTIES O F "MERCHANTABILITY" AND "FITNESS FOR A SPECIFIC PURPOSE.'' AFTER THE ONE-YEAR TERM O F THIS WARRANTY. MAKITA...
...state. This Warranty gives you specific legal rights, and you may also have other rights which vary from state to be free of defects...Makita will repair (or at our option, replace) without charge. alterations have been made t o the tool. Should any trouble develop during this one-year period, return the COMPLETE tool, freight prepaid, to one of Makita's Factory or Authorized Service Centers. MAKITA DISCLAIMS LIABILITY FOR ANY IMPLIED WARRANTIES, INCLUDING IMPLIED WARRANTIES O F "MERCHANTABILITY" AND "FITNESS FOR A SPECIFIC PURPOSE.'' AFTER THE ONE-YEAR TERM O F THIS WARRANTY. MAKITA...

Parts Breakdown
Page 2
WASHER 12,9031 HEX NUT M6-17, 9031 NAME PLATE, 9031 CARBON BRUSH 408 SET, 3901 CARBON BRUSH SET CB-408, KP0800K BRUSH CAP , 9031 MOTOR HOUSING COMPLETE,9031 FIELD ASS'Y 115V, 9031 TAPPING SCREW BIND BT4X60, 9031 TAPPING SCREW FLANGE PT4X60,HR2410 BAFFLE PLATE, 9031 B. WASHER 12, 9031 NUT M16, 9031 GEAR HOUSING COMPLETE, 9031 BALL BEARING 607LB, 9031 HELICAL GEAR 35, 9031 SPRING PIN 3.5-12, 9031 BALL BEARING 6940DDW,9031 BEARING RETAINER 44, 9031 TAPPING SCREW CT4X12, 9031 PULLEY 33-64, 9031 ABRASIVE BELT 30X533 AA100,9031 N/A PULLEY LINER, 9031 F. BEARING...
WASHER 12,9031 HEX NUT M6-17, 9031 NAME PLATE, 9031 CARBON BRUSH 408 SET, 3901 CARBON BRUSH SET CB-408, KP0800K BRUSH CAP , 9031 MOTOR HOUSING COMPLETE,9031 FIELD ASS'Y 115V, 9031 TAPPING SCREW BIND BT4X60, 9031 TAPPING SCREW FLANGE PT4X60,HR2410 BAFFLE PLATE, 9031 B. WASHER 12, 9031 NUT M16, 9031 GEAR HOUSING COMPLETE, 9031 BALL BEARING 607LB, 9031 HELICAL GEAR 35, 9031 SPRING PIN 3.5-12, 9031 BALL BEARING 6940DDW,9031 BEARING RETAINER 44, 9031 TAPPING SCREW CT4X12, 9031 PULLEY 33-64, 9031 ABRASIVE BELT 30X533 AA100,9031 N/A PULLEY LINER, 9031 F. BEARING...

Parts Breakdown
Page 3
Parts Breakdown 1,004 A-23880 N/A 1 1,005 794117-6 ABRASIVE BELT 30X533 AA120,9031 1 1,005 A-23896 N/A 1 5,001 810134-9 CAUTION LABEL, 3709 1 9031 Page 3 of 3 8/18/2010
Parts Breakdown 1,004 A-23880 N/A 1 1,005 794117-6 ABRASIVE BELT 30X533 AA120,9031 1 1,005 A-23896 N/A 1 5,001 810134-9 CAUTION LABEL, 3709 1 9031 Page 3 of 3 8/18/2010


