
Owners Manual
Page 1
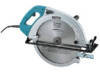
Circular Saw Equipped with Electric Blade Brake 415 mm (16 - 5/16") MODEL 5402NA 001963 INSTRUCTION MANUAL WARNING: For your personal safety, READ and UNDERSTAND before using. www.makitatools.com SAVE THESE INSTRUCTIONS FOR FUTURE REFERENCE.
Circular Saw Equipped with Electric Blade Brake 415 mm (16 - 5/16") MODEL 5402NA 001963 INSTRUCTION MANUAL WARNING: For your personal safety, READ and UNDERSTAND before using. www.makitatools.com SAVE THESE INSTRUCTIONS FOR FUTURE REFERENCE.

Owners Manual
Page 2
... without notice. • Specifications may differ from the user. cutting capacities at 90° at 45° No load speed (RPM) Overall length Net weight 5402NA 415 mm (16-5/16") 158 mm (6-3/16") 106 mm (4-3/16") 2,200/min. 616 mm (24-1/4") 13.0 kg (28.7 lbs) • Manufacturer reserves the right to... codes and ordinances. Failure to country. Do not operate power tools in explosive atmospheres, such as to whether the outlet is properly grounded. Do not use any way.
... without notice. • Specifications may differ from the user. cutting capacities at 90° at 45° No load speed (RPM) Overall length Net weight 5402NA 415 mm (16-5/16") 158 mm (6-3/16") 106 mm (4-3/16") 2,200/min. 616 mm (24-1/4") 13.0 kg (28.7 lbs) • Manufacturer reserves the right to... codes and ordinances. Failure to country. Do not operate power tools in explosive atmospheres, such as to whether the outlet is properly grounded. Do not use any way.
Owners Manual
Page 3
...increase the risk of electric shock if your application. Avoid accidental starting the tool accidentally. 19. Remove adjusting keys or wrenches before using. Do not overreach. Any tool that may result in moving parts. Store idle tools out of reach of children and other practical ...footing and balance enables better control of control. 16. Dust mask, non-skid safety shoes, hard hat, or hearing protection must be used on or off before making any other condition that are caused by qualified repair personnel. Properly maintained tools with your model. Many accidents...
...increase the risk of electric shock if your application. Avoid accidental starting the tool accidentally. 19. Remove adjusting keys or wrenches before using. Do not overreach. Any tool that may result in moving parts. Store idle tools out of reach of children and other practical ...footing and balance enables better control of control. 16. Dust mask, non-skid safety shoes, hard hat, or hearing protection must be used on or off before making any other condition that are caused by qualified repair personnel. Properly maintained tools with your model. Many accidents...
Owners Manual
Page 4
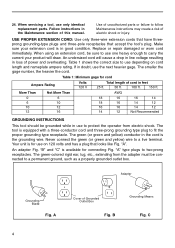
...12 Not Recommended GROUNDING INSTRUCTIONS This tool should be grounded while in good condition. "B" and "C" is the grounding wire. C USE PROPER EXTENSION CORD: Use only three-wire extension cords that have threeprong grounding-type plugs and three-pole receptacles that looks like Fig. If in the... voltage resulting in the cord is available for cord Ampere Rating Volts 120 V Total length of this manual. Follow instructions in doubt, use on cord length and nameplate ampere rating. An undersized cord will draw. Never connect the green (or green and yellow) wire to...
...12 Not Recommended GROUNDING INSTRUCTIONS This tool should be grounded while in good condition. "B" and "C" is the grounding wire. C USE PROPER EXTENSION CORD: Use only three-wire extension cords that have threeprong grounding-type plugs and three-pole receptacles that looks like Fig. If in the... voltage resulting in the cord is available for cord Ampere Rating Volts 120 V Total length of this manual. Follow instructions in doubt, use on cord length and nameplate ampere rating. An undersized cord will draw. Never connect the green (or green and yellow) wire to...
Owners Manual
Page 5
...serviced before grasping cut by insulated gripping surfaces when performing an operation where the cutting tool may contact hidden wiring or its path. Never use a rip fence or straight edge guide. An unprotected, coasting blade will cause the saw down on auxiliary handle, or motor housing. ...Blades that do not match the mounting hardware of the saw safety rules. Wait until blade stops before use. The guard can not protect you can lead to serious personal injury. 3. Leaving blade exposed is important to support the work . It...
...serviced before grasping cut by insulated gripping surfaces when performing an operation where the cutting tool may contact hidden wiring or its path. Never use a rip fence or straight edge guide. An unprotected, coasting blade will cause the saw down on auxiliary handle, or motor housing. ...Blades that do not match the mounting hardware of the saw safety rules. Wait until blade stops before use. The guard can not protect you can lead to serious personal injury. 3. Leaving blade exposed is important to support the work . It...
Owners Manual
Page 6
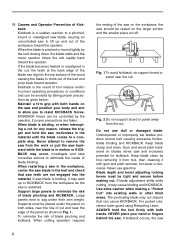
...the kerf and jump back toward operator. Unsharpened or improperly set blades produce narrow kerf causing excessive friction, blade binding and KICKBACK. Never use dull or damaged blade. If blade adjustment shifts while cutting, it with gum and pitch remover, hot water or kerosene. If kickback ... is the result of Kickback: Kickback is a sudden reaction to a pinched, bound or misaligned saw blade, causing an uncontrolled saw . Use extra caution when making cut off. Causes and Operator Prevention of tool misuse and/or incorrect operating procedures or conditions and can be controlled ...
...the kerf and jump back toward operator. Unsharpened or improperly set blades produce narrow kerf causing excessive friction, blade binding and KICKBACK. Never use dull or damaged blade. If blade adjustment shifts while cutting, it with gum and pitch remover, hot water or kerosene. If kickback ... is the result of Kickback: Kickback is a sudden reaction to a pinched, bound or misaligned saw blade, causing an uncontrolled saw . Use extra caution when making cut off. Causes and Operator Prevention of tool misuse and/or incorrect operating procedures or conditions and can be controlled ...
Owners Manual
Page 7
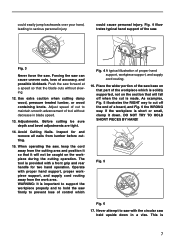
... WRONG way. could easily jump backwards over your hand, leading to maintain smooth advancement of proper hand support, workpiece support, and supply cord routing. 16. Use extra caution when cutting damp wood, pressure treated lumber, or wood containing knots. Inspect for two hand operation. As examples, Fig. 5 illustrates the RIGHT way...
... WRONG way. could easily jump backwards over your hand, leading to maintain smooth advancement of proper hand support, workpiece support, and supply cord routing. 16. Use extra caution when cutting damp wood, pressure treated lumber, or wood containing knots. Inspect for two hand operation. As examples, Fig. 5 illustrates the RIGHT way...
Owners Manual
Page 8
... setting the tool down after switch is released. Some material contains chemicals which may cause serious personal injury. SYMBOLS USD101-2 The followings show the symbols used for tool. Contact with coasting blade can lead to prevent dust inhalation and skin contact. Fig. 7 18. SAVE THESE INSTRUCTIONS WARNING: MISUSE or failure to...
... setting the tool down after switch is released. Some material contains chemicals which may cause serious personal injury. SYMBOLS USD101-2 The followings show the symbols used for tool. Contact with coasting blade can lead to prevent dust inhalation and skin contact. Fig. 7 18. SAVE THESE INSTRUCTIONS WARNING: MISUSE or failure to...

Owners Manual
Page 9
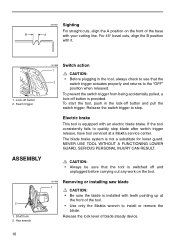
...90° clockwise. To lock the lock lever, push it down . Clamp screw 2. Release 2. Lock lever 001966 Blade steady device In general way, use the lock lever by tightening the lever. Lever 3. When you replace a saw blade, release the lock lever. 3 9 FUNCTIONAL DESCRIPTION CAUTION: •...; Always be sure that no more than one blade tooth projects below workpiece. Using proper cut depth so that the tool is switched off and unplugged before adjusting or checking function on the back. 1 Set for the desired...
...90° clockwise. To lock the lock lever, push it down . Clamp screw 2. Release 2. Lock lever 001966 Blade steady device In general way, use the lock lever by tightening the lever. Lever 3. When you replace a saw blade, release the lock lever. 3 9 FUNCTIONAL DESCRIPTION CAUTION: •...; Always be sure that no more than one blade tooth projects below workpiece. Using proper cut depth so that the tool is switched off and unplugged before adjusting or checking function on the back. 1 Set for the desired...
Owners Manual
Page 10
... on the tool. 001969 Removing or installing saw blade 1 CAUTION: • Be sure the blade is equipped with teeth pointing up at a Makita service center. For 45° bevel cuts, align the B position with your cutting line. Electric brake This tool is installed with an electric ...remove the blade. Release the switch trigger to stop blade after switch trigger release, have tool serviced at the front of the tool. • Use only the Makita wrench to the "OFF" position when released. Release the lock lever of the base B A with it. 1. Swich trigger ASSEMBLY 2 1. Shaft...
... on the tool. 001969 Removing or installing saw blade 1 CAUTION: • Be sure the blade is equipped with teeth pointing up at a Makita service center. For 45° bevel cuts, align the B position with your cutting line. Electric brake This tool is installed with an electric ...remove the blade. Release the switch trigger to stop blade after switch trigger release, have tool serviced at the front of the tool. • Use only the Makita wrench to the "OFF" position when released. Release the lock lever of the base B A with it. 1. Swich trigger ASSEMBLY 2 1. Shaft...

Owners Manual
Page 11
... inner flange has a 25 mm (63/64") diameter on one side and a 25.4 mm (1") diameter on the wrong side can result in the figure to use. Mounting the blade on the other. Outer flange 5. Saw blade 001970 3 4 To remove the blade, press the shaft lock so that the blade cannot revolve... and lower blade guards of the blade you intend to keep it from being lost. 1 11 Hex bolt 001972 Hex wrench storage When not in use . Inner flange 4. After installing the blade, lock the lock lever. The side with 25.4 mm (1") diameter is marked by "25.4". Lever 2. Outer flange 3. Such efforts...
... inner flange has a 25 mm (63/64") diameter on one side and a 25.4 mm (1") diameter on the wrong side can result in the figure to use. Mounting the blade on the other. Outer flange 5. Saw blade 001970 3 4 To remove the blade, press the shaft lock so that the blade cannot revolve... and lower blade guards of the blade you intend to keep it from being lost. 1 11 Hex bolt 001972 Hex wrench storage When not in use . Inner flange 4. After installing the blade, lock the lock lever. The side with 25.4 mm (1") diameter is marked by "25.4". Lever 2. Outer flange 3. Such efforts...

Owners Manual
Page 12
... rear handle and the front grip firmly when starting or stopping the tool, since there is completed. The tool is provided with your finger. Use both to stop and then withdraw tool. If the cut by the blade. Release switch, wait for blade to best grasp the tool. Base... CAUTION: • Be sure to help avoid injury. 12 Forcing or twisting the tool will result in a straight line gently. Use eye protection to move the tool forward over the workpiece surface, keeping it flat and advancing smoothly until the blade attains full speed. Then remove...
... rear handle and the front grip firmly when starting or stopping the tool, since there is completed. The tool is provided with your finger. Use both to stop and then withdraw tool. If the cut by the blade. Release switch, wait for blade to best grasp the tool. Base... CAUTION: • Be sure to help avoid injury. 12 Forcing or twisting the tool will result in a straight line gently. Use eye protection to move the tool forward over the workpiece surface, keeping it flat and advancing smoothly until the blade attains full speed. Then remove...

Owners Manual
Page 13
... slide the rip fence up snugly against the side of the workpiece and secure it is switched off , adjust the adjusting screw with the base using a triangular rule, try square, etc. 1. It also makes repeated cuts of 90° cut (vertical cut) 1 2 This adjustment has been made at the factory. Clamp...
... slide the rip fence up snugly against the side of the workpiece and secure it is switched off , adjust the adjusting screw with the base using a triangular rule, try square, etc. 1. It also makes repeated cuts of 90° cut (vertical cut) 1 2 This adjustment has been made at the factory. Clamp...
Owners Manual
Page 14
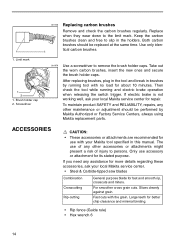
... CAUTION: • These accessories or attachments are recommended for fast and smooth rip, crosscuts and miters. Fast cuts with your Makita tool specified in brushes by Makita Authorized or Factory Service Centers, always using Makita replacement parts. Large teeth for its stated purpose. Brush holder cap 2. If electric brake is not working well, ask...
... CAUTION: • These accessories or attachments are recommended for fast and smooth rip, crosscuts and miters. Fast cuts with your Makita tool specified in brushes by Makita Authorized or Factory Service Centers, always using Makita replacement parts. Large teeth for its stated purpose. Brush holder cap 2. If electric brake is not working well, ask...
Owners Manual
Page 18
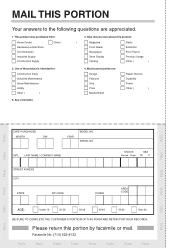
... about this portion by facsimile or mail. 18 Facsimile No: (714) 522-8133 Paste Paste Paste Paste Paste Paste Paste Paste Paste Paste Paste Paste Use of the product is intended for: Construction Trade Industrial Maintenance Home Maintenance Hobby Other ( ) 4. Most favored points are appreciated. 1. LAST NAME / COMPANY NAME .../Lumber Store Tool Distributor Industrial Supply Construction Supply Other ( 3. MAIL THIS PORTION Your answers to the following questions are : Design Features Size Price Makita Brand Repair Service Durability Power Other ( ) 5.
... about this portion by facsimile or mail. 18 Facsimile No: (714) 522-8133 Paste Paste Paste Paste Paste Paste Paste Paste Paste Paste Paste Paste Use of the product is intended for: Construction Trade Industrial Maintenance Home Maintenance Hobby Other ( ) 4. Most favored points are appreciated. 1. LAST NAME / COMPANY NAME .../Lumber Store Tool Distributor Industrial Supply Construction Supply Other ( 3. MAIL THIS PORTION Your answers to the following questions are : Design Features Size Price Makita Brand Repair Service Durability Power Other ( ) 5.

Owners Manual
Page 20
... above limitation or exclusion may not apply to filter out microscopic particles. IN NO EVENT SHALL MAKITA BE LIABLE FOR ANY INDIRECT, INCIDENTAL OR CONSEQUENTIAL DAMAGES FROM THE SALE OR USE OF THE PRODUCT. To reduce your exposure to these chemicals are required because of normal wear and... trouble develop during this type of work with approved safety equipment, such as those dust masks that are specially designed to you . 884353B065 Makita Corporation 3-11-8, Sumiyoshi-cho, Anjo, Aichi 446-8502 Japan This Warranty does not apply where: • repairs have other rights which vary...
... above limitation or exclusion may not apply to filter out microscopic particles. IN NO EVENT SHALL MAKITA BE LIABLE FOR ANY INDIRECT, INCIDENTAL OR CONSEQUENTIAL DAMAGES FROM THE SALE OR USE OF THE PRODUCT. To reduce your exposure to these chemicals are required because of normal wear and... trouble develop during this type of work with approved safety equipment, such as those dust masks that are specially designed to you . 884353B065 Makita Corporation 3-11-8, Sumiyoshi-cho, Anjo, Aichi 446-8502 Japan This Warranty does not apply where: • repairs have other rights which vary...


