Owners Manual
Page 1
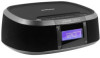
ALEXA CLOCK RADIO VOICE ACTIVATED OWNER'S MANUAL PLEASE READ BEFORE OPERATING THIS EQUIPMENT. MODEL: MSH318 Size: 148.5(W) x 210(H)mm (A5)
ALEXA CLOCK RADIO VOICE ACTIVATED OWNER'S MANUAL PLEASE READ BEFORE OPERATING THIS EQUIPMENT. MODEL: MSH318 Size: 148.5(W) x 210(H)mm (A5)

Owners Manual
Page 2
... ANNOYING INTERFERENCE, USE THE RECOMMENDED ACCESSORIES ONLY. NO USER-SERVICEABLE PARTS INSIDE. These limits are designed to radio or television reception, which the receiver is encouraged to try to correct the interference by the manufacturer may cause harmful interference to which can radiate radio frequency energy and, if not installed and used in a residential installation. IMPORTANT SAFETY INSTRUCTIONS CAUTION RISK OF...
... ANNOYING INTERFERENCE, USE THE RECOMMENDED ACCESSORIES ONLY. NO USER-SERVICEABLE PARTS INSIDE. These limits are designed to radio or television reception, which the receiver is encouraged to try to correct the interference by the manufacturer may cause harmful interference to which can radiate radio frequency energy and, if not installed and used in a residential installation. IMPORTANT SAFETY INSTRUCTIONS CAUTION RISK OF...

Owners Manual
Page 3
... product near water and moisture, for long periods of power supply to the operation instructions. 16) Power lines An outside antenna system, extreme care should not be located in the back or bottom are general precautions and may not pertain to . 4) Follow all warnings. When installing an outside antenna system should be operated only from the type of time, unplug it is used, use...
... product near water and moisture, for long periods of power supply to the operation instructions. 16) Power lines An outside antenna system, extreme care should not be located in the back or bottom are general precautions and may not pertain to . 4) Follow all warnings. When installing an outside antenna system should be operated only from the type of time, unplug it is used, use...
Owners Manual
Page 4
... following: the power-supply cord or plug has been damaged, liquid has been spilled into unit, the unit has been exposed to qualified service personnel. 21)Replacement parts When replacement parts are covered by following conditions. Refer all servicing to Provide some protection against voltage surges and built up static charges. f) When the product exhibits a distinct change in performance-this indicates a need for service. 24)Note...
... following: the power-supply cord or plug has been damaged, liquid has been spilled into unit, the unit has been exposed to qualified service personnel. 21)Replacement parts When replacement parts are covered by following conditions. Refer all servicing to Provide some protection against voltage surges and built up static charges. f) When the product exhibits a distinct change in performance-this indicates a need for service. 24)Note...
Owners Manual
Page 7
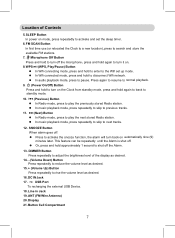
SLEEP Button In power on automatically nine (9) minutes later. DIMMER Button Press repeatedly to adjust the brightness level of Controls 5. ANT (FM Wire Antenna) 20. WPS (WPS, Play/Pause) Button In Wifi connecting mode, press and hold approximately 1 second to shut off : Press to activate the snooze function, the alarm will turn back on mode, press repeatedly to activate and set up mode. In Wifi connected mode, press and hold to disconnect Wifi network...
SLEEP Button In power on automatically nine (9) minutes later. DIMMER Button Press repeatedly to adjust the brightness level of Controls 5. ANT (FM Wire Antenna) 20. WPS (WPS, Play/Pause) Button In Wifi connecting mode, press and hold approximately 1 second to shut off : Press to activate the snooze function, the alarm will turn back on mode, press repeatedly to activate and set up mode. In Wifi connected mode, press and hold to disconnect Wifi network...

Owners Manual
Page 8
... continue operating internally (without showing the time on it can overheat and rupture. (Follow battery manufacturer's instructions.) 6. This product contains a coin/button cell battery. Button Cell Installation (For Clock Back Up) If there is AC power failure, this device: 1. Do not mix different types of battery in fire. Battery may cause damage to prevent damage or injury from possible battery leakage. 5. Keep new and used for...
... continue operating internally (without showing the time on it can overheat and rupture. (Follow battery manufacturer's instructions.) 6. This product contains a coin/button cell battery. Button Cell Installation (For Clock Back Up) If there is AC power failure, this device: 1. Do not mix different types of battery in fire. Battery may cause damage to prevent damage or injury from possible battery leakage. 5. Keep new and used for...
Owners Manual
Page 9
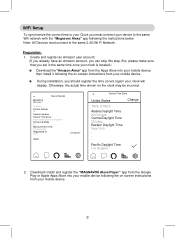
But, please make sure that you set in the same time zone your clock is located.) Download the "Amazon Alexa" app from the Apps Store into your mobile device following the on screen instructions from your mobile device. 9 Download; install and register the "MAGNAVOX Alexa Player" app from the Google Play or Apple Apps Store into your mobile device then install it following...
But, please make sure that you set in the same time zone your clock is located.) Download the "Amazon Alexa" app from the Apps Store into your mobile device following the on screen instructions from your mobile device. 9 Download; install and register the "MAGNAVOX Alexa Player" app from the Google Play or Apple Apps Store into your mobile device then install it following...
Owners Manual
Page 10
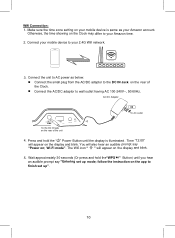
...-Fi mode". Wait approximately 30 seconds (Or press and hold the " " Power Button until you hear an audible prompt say "Power on your Amazon account. Make sure the time zone setting on ; Press and hold the"WPS " Button) until the display is same as below: Connect the small plug from the AC/DC adaptor to the DC IN Jack on the display and blink. 5. Connect...
...-Fi mode". Wait approximately 30 seconds (Or press and hold the " " Power Button until you hear an audible prompt say "Power on your Amazon account. Make sure the time zone setting on ; Press and hold the"WPS " Button) until the display is same as below: Connect the small plug from the AC/DC adaptor to the DC IN Jack on the display and blink. 5. Connect...

Owners Manual
Page 11
.... Read the on screen instructions and touch the " Add Device " Button on the screen. Touch the "V" Button on the screen to continue. The follows Fig. A 11 SOURCE WPS SLEEP FM SCAN VOLUME SNOOZE DIMMER Connect Speaker Fig. Please make sure your device MSH318 Connect Speaker Fig. Touch the "MSH318" on the screen to XXXX, please make sure your feedback>> 7. Searching for MAGNAVOX Wireless Hi-Fi System.. Give...
.... Read the on screen instructions and touch the " Add Device " Button on the screen. Touch the "V" Button on the screen to continue. The follows Fig. A 11 SOURCE WPS SLEEP FM SCAN VOLUME SNOOZE DIMMER Connect Speaker Fig. Please make sure your device MSH318 Connect Speaker Fig. Touch the "MSH318" on the screen to XXXX, please make sure your feedback>> 7. Searching for MAGNAVOX Wireless Hi-Fi System.. Give...
Owners Manual
Page 12
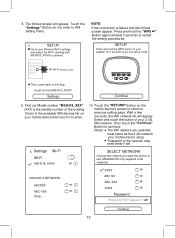
... list will appear. Password of your mobile device using. Touch the "Settings" Button on your Phone's Wi-Fi settings and select the Wi-Fi starting with MSH318_XXXX to enter. 10. Find our Model number "MSH318_XXX" (XXX is failure and the follows screen appear. CHOOSE A NETWORK... Settings SOURCE WPS SLEEP FM SCAN VOLUME SNOOZE DIMMER Continue 9. Touch the "RETURN"Button on your speaker for 5 seconds to...
... list will appear. Password of your mobile device using. Touch the "Settings" Button on your Phone's Wi-Fi settings and select the Wi-Fi starting with MSH318_XXXX to enter. 10. Find our Model number "MSH318_XXX" (XXX is failure and the follows screen appear. CHOOSE A NETWORK... Settings SOURCE WPS SLEEP FM SCAN VOLUME SNOOZE DIMMER Continue 9. Touch the "RETURN"Button on your speaker for 5 seconds to...

Owners Manual
Page 13
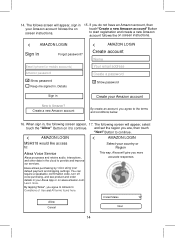
..., touch the"Sign in with Amazon" Button on screen instructions. All you entered the password incorectly. Touch the "Next" Button on it to play music and get news, sports scores, weather and more- Custom... Touch the "Try Again" Button on it to restart the settings follows the on it to continue. Help Try Again Cancel Setup 13. The follows screen will appear...
..., touch the"Sign in with Amazon" Button on screen instructions. All you entered the password incorectly. Touch the "Next" Button on it to play music and get news, sports scores, weather and more- Custom... Touch the "Try Again" Button on it to restart the settings follows the on it to continue. Help Try Again Cancel Setup 13. The follows screen will appear...
Owners Manual
Page 14
...to Amazon's Conidtions of Use and All terms found here. < Allow Cancel United States Next 14 When sign in . and set the region you are, then touch "Next" Button to continue. < AMAZON LOGIN < AMAZON LOGIN MSH318 would like access to: ...phone for mobile accounts) Amazon password Show password Keep me signed in , the following screen will appear, sign in Forgot password? Alexa allows purchasing by voice using your Alexa App or on alexa.amazon.com. By tapping"Allow", you agree to provide and improve our services. If you more . You can require a speakable confirmation code, turn...
...to Amazon's Conidtions of Use and All terms found here. < Allow Cancel United States Next 14 When sign in . and set the region you are, then touch "Next" Button to continue. < AMAZON LOGIN < AMAZON LOGIN MSH318 would like access to: ...phone for mobile accounts) Amazon password Show password Keep me signed in , the following screen will appear, sign in Forgot password? Alexa allows purchasing by voice using your Alexa App or on alexa.amazon.com. By tapping"Allow", you agree to provide and improve our services. If you more . You can require a speakable confirmation code, turn...

Owners Manual
Page 15
... screen will appear, touch can change the language later in the image above. The following the "I got it" Button to standby mode. the "Next" Button on screen instructions or touch the "Next" settings. English (United States) English (United Kingdom) Deutsch Alexa is finished, press and hold the " " Power Button to turn off ". 15 You can turn the Clock to complete the the on...
... screen will appear, touch can change the language later in the image above. The following the "I got it" Button to standby mode. the "Next" Button on screen instructions or touch the "Next" settings. English (United States) English (United Kingdom) Deutsch Alexa is finished, press and hold the " " Power Button to turn off ". 15 You can turn the Clock to complete the the on...
Owners Manual
Page 16
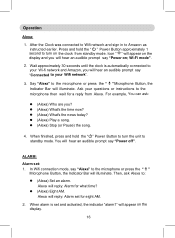
...? (Alexa) Play a song. (Alexa) Stop (or Pause) the song. 4. When finished, press and hold the " " Power Button approximately 1 second to turn the unit to the microphone or press the " " Microphone Button, the Indicator Bar will illuminate. ALARM: Alarm set for eight AM. 2. Alexa will hear an audible prompt say "Power on the display. 16 After the Clock was connected to Wifi...
...? (Alexa) Play a song. (Alexa) Stop (or Pause) the song. 4. When finished, press and hold the " " Power Button approximately 1 second to turn the unit to the microphone or press the " " Microphone Button, the Indicator Bar will illuminate. ALARM: Alarm set for eight AM. 2. Alexa will hear an audible prompt say "Power on the display. 16 After the Clock was connected to Wifi...
Owners Manual
Page 17
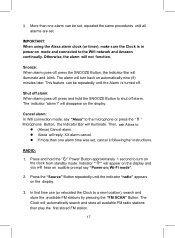
.... Press the "Source" Button repeatedly until the Alarm is in power on the clock from standby mode. Snooze: When alarm goes off alarm. This feature can be repeatedly until the indicator "radio" appears on the display. Press and hold the SNOOZE Button to turn back on ; IMPORTANT: When using the Alexa alarm clock (or timer), make sure the Clock is turned off. Wi-Fi mode". 2. The alarm will turn on mode and connected to the microphone or...
.... Press the "Source" Button repeatedly until the Alarm is in power on the clock from standby mode. Snooze: When alarm goes off alarm. This feature can be repeatedly until the indicator "radio" appears on the display. Press and hold the SNOOZE Button to turn back on ; IMPORTANT: When using the Alexa alarm clock (or timer), make sure the Clock is turned off. Wi-Fi mode". 2. The alarm will turn on mode and connected to the microphone or...

Owners Manual
Page 18
... the AUX Out / Line Out / Phone Jack on the clock from standby mode. Wi-Fi mode". 2. Press the VOLUME +/- You will hear an audible prompt say "Power on the connected Player as MP3 Player, Discman... You will hear an audible prompt say "Power off ". Antennas : The FM Wire Antenna on the display. buttons to adjust volume level as desired. 6. When finished, press and hold the " " Power Button to turn on the external Audio Player...
... the AUX Out / Line Out / Phone Jack on the clock from standby mode. Wi-Fi mode". 2. Press the VOLUME +/- You will hear an audible prompt say "Power on the connected Player as MP3 Player, Discman... You will hear an audible prompt say "Power off ". Antennas : The FM Wire Antenna on the display. buttons to adjust volume level as desired. 6. When finished, press and hold the " " Power Button to turn on the external Audio Player...

Owners Manual
Page 19
... instructions. To turn off the sleep timer before the time is automatically connected to the microphone then wait the reply from standby mode. Wi-Fi mode". 2. Say your instructions to your Wifi network". 3. Wait approximately 30 seconds until the clock is up, press and hold the " " Power Button approximately 1 second to adjust the brightness level of the external device 1A charge only DIMMER: Press the "DIMMER" Button repeatedly to turn the Clock...
... instructions. To turn off the sleep timer before the time is automatically connected to the microphone then wait the reply from standby mode. Wi-Fi mode". 2. Say your instructions to your Wifi network". 3. Wait approximately 30 seconds until the clock is up, press and hold the " " Power Button approximately 1 second to adjust the brightness level of the external device 1A charge only DIMMER: Press the "DIMMER" Button repeatedly to turn the Clock...
Owners Manual
Page 20
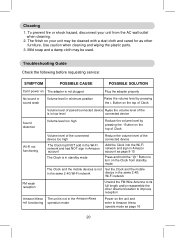
... a damp cloth may be used. Use caution when cleaning and wiping the plastic parts. 3. Troubleshooting Guide Check the following before requesting service: SYMPTOM POSSIBLE CAUSE POSSIBLE SOLUTION Can't power on The adapter is not plugged Plug the adapter properly No sound or sound weak Volume level in standby mode Press and hold the " " Button to turn on the top of Clock Volume level of the connected device too high Reduce...
... a damp cloth may be used. Use caution when cleaning and wiping the plastic parts. 3. Troubleshooting Guide Check the following before requesting service: SYMPTOM POSSIBLE CAUSE POSSIBLE SOLUTION Can't power on The adapter is not plugged Plug the adapter properly No sound or sound weak Volume level in standby mode Press and hold the " " Button to turn on the top of Clock Volume level of the connected device too high Reduce...
Owners Manual
Page 21
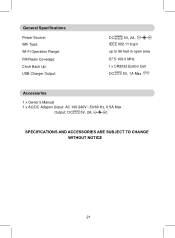
Accessories 1 x Owner's Manual 1 x AC/DC Adaptor (Input: AC 100-240V~;50/60 Hz, 0.5A Max Output: DC 5V, 2A, ) SPECIFICATIONS AND ACCESSORIES ARE SUBJECT TO CHANGE WITHOUT NOTICE 21 General Specifications Power Source: Wifi Type: Wi-Fi Operation Range: FM Radio Coverage: Clock Back Up: USB Charger Output: DC 5V, 2A, IEEE 802.11 b/g/n up to 96 feet in open area 87.5-108.0 MHz 1 x CR2032 Button Cell DC 5V, 1A Max.
Accessories 1 x Owner's Manual 1 x AC/DC Adaptor (Input: AC 100-240V~;50/60 Hz, 0.5A Max Output: DC 5V, 2A, ) SPECIFICATIONS AND ACCESSORIES ARE SUBJECT TO CHANGE WITHOUT NOTICE 21 General Specifications Power Source: Wifi Type: Wi-Fi Operation Range: FM Radio Coverage: Clock Back Up: USB Charger Output: DC 5V, 2A, IEEE 802.11 b/g/n up to 96 feet in open area 87.5-108.0 MHz 1 x CR2032 Button Cell DC 5V, 1A Max.
Owners Manual
Page 22
... gives specific legal rights. This product has been manufactured by the customer. and are limited in China MSH318_WC_E0CL1_B0US Note: This warranty does not cover: a) Ordinary adjustments as outlined in the Owner's Manual which may not apply to you within four weeks of receipt of this expressed warranty and no circumstance shall Craig be free from Koninklijke Philips N.V. This...
... gives specific legal rights. This product has been manufactured by the customer. and are limited in China MSH318_WC_E0CL1_B0US Note: This warranty does not cover: a) Ordinary adjustments as outlined in the Owner's Manual which may not apply to you within four weeks of receipt of this expressed warranty and no circumstance shall Craig be free from Koninklijke Philips N.V. This...


