

User manual, English (US)
Page 3
Keep these instructions. 2. Do not install near water. 6. A grounding type plug has two blades and third grounding prong. aratus. Disposal of Antenna Grounding as to operate normally or exhibits a marked change in accordance with one wider than the other apparatus (including amplifiers) that may be mounted to qualified service personnel. The power supply cord or the plug has been damaged; Objects have fallen into...
Keep these instructions. 2. Do not install near water. 6. A grounding type plug has two blades and third grounding prong. aratus. Disposal of Antenna Grounding as to operate normally or exhibits a marked change in accordance with one wider than the other apparatus (including amplifiers) that may be mounted to qualified service personnel. The power supply cord or the plug has been damaged; Objects have fallen into...

User manual, English (US)
Page 4
... time and channel. Audio/Video Jack panel for various types of programming such as VCRs, DVD Players, Cable Boxes, and more. Audio/Video Inputs and Outputs. Automatic Programming of Channels for quick and easy selection of favorite stations available in either English or Spanish) show helpful messages for setting TV controls. SmartPicture™ allows you to Use the Closed Captioning Control 20 Audio/Video Connections Using the A/V Input Jacks 21 Using the Side A/V Input Jacks 21 Using the A/V Output Jacks 22 Using the S-Video Input Jack 23 Remote Control Use Setting...
... time and channel. Audio/Video Jack panel for various types of programming such as VCRs, DVD Players, Cable Boxes, and more. Audio/Video Inputs and Outputs. Automatic Programming of Channels for quick and easy selection of favorite stations available in either English or Spanish) show helpful messages for setting TV controls. SmartPicture™ allows you to Use the Closed Captioning Control 20 Audio/Video Connections Using the A/V Input Jacks 21 Using the Side A/V Input Jacks 21 Using the A/V Output Jacks 22 Using the S-Video Input Jack 23 Remote Control Use Setting...

User manual, English (US)
Page 6
... the Picture menu features until the word DNR is a video adjustment feature that affects the picture quality of the TV, not the sound. Picture Color Picture Sharpness Tint Color Temp. HOW TO USE THE DNR (NOISE REDUCTION) CONTROL For reasons such as poor cable reception, the picture can help eliminate this type of interference and improve the quality of the picture. 1 Press the MENU button on the remote to display the on-screen menu...
... the Picture menu features until the word DNR is a video adjustment feature that affects the picture quality of the TV, not the sound. Picture Color Picture Sharpness Tint Color Temp. HOW TO USE THE DNR (NOISE REDUCTION) CONTROL For reasons such as poor cable reception, the picture can help eliminate this type of interference and improve the quality of the picture. 1 Press the MENU button on the remote to display the on-screen menu...

User manual, English (US)
Page 9
...; button to turn the AVL control ON or OFF. 6 When finished, press the STATUS /EXIT button to remove the menu from broadcast programming or commercials are never the same. HOW TO USE THE AVL (AUTOMATIC VOLUME LEVELER) CONTROL In most cases, the volume levels coming from the TV's screen. This provides a more consistent sound by reducing the peaks and valleys that occur during program changes or...
...; button to turn the AVL control ON or OFF. 6 When finished, press the STATUS /EXIT button to remove the menu from broadcast programming or commercials are never the same. HOW TO USE THE AVL (AUTOMATIC VOLUME LEVELER) CONTROL In most cases, the volume levels coming from the TV's screen. This provides a more consistent sound by reducing the peaks and valleys that occur during program changes or...

User manual, English (US)
Page 10
...; button to display the SOUND menu features. 4 Press the ᮣ or ■ button to scroll the Sound menu features until the word SOUND is in stereo. When channel changes are made, the screen may indicate Mono for a second or two, then change to Stereo. Main Picture Sound Features Install Brightness Color Picture Sharpness Tint More... 6 SLEEP POWER 1 A/CH STATUS/EXIT CC CLOCK TV RECORD 1 VCR 2 ACC 45 4TV/VCR 3 6 7 SMART 8 29 SMART 0 SOUND PICTURE MENU...
...; button to display the SOUND menu features. 4 Press the ᮣ or ■ button to scroll the Sound menu features until the word SOUND is in stereo. When channel changes are made, the screen may indicate Mono for a second or two, then change to Stereo. Main Picture Sound Features Install Brightness Color Picture Sharpness Tint More... 6 SLEEP POWER 1 A/CH STATUS/EXIT CC CLOCK TV RECORD 1 VCR 2 ACC 45 4TV/VCR 3 6 7 SMART 8 29 SMART 0 SOUND PICTURE MENU...

User manual, English (US)
Page 11
... off at the specific Start Time. buttons to select a specific channel for the TV to remove the menu from the TV's screen. Timer Time Start Time Stop Time Channel Activate Display 10 :30 AM 4 SLEEP POWER 1 A/CH STATUS/EXIT CC CLOCK TV RECORD 1 VCR 2 ACC 45 TV/VCR 3 6 7 SMART 8 0 29 SMART SOUND PICTURE MENU SURF VOL CH MUTE 2 3 Timer Time Start Time Stop Time Channel Activate Display Timer Time Start Time Stop Time Channel Activate Display Timer Time Start Time Stop Time Channel Activate Display Timer Time Start Time Stop Time Channel Activate Display 12 :30 PM...
... off at the specific Start Time. buttons to select a specific channel for the TV to remove the menu from the TV's screen. Timer Time Start Time Stop Time Channel Activate Display 10 :30 AM 4 SLEEP POWER 1 A/CH STATUS/EXIT CC CLOCK TV RECORD 1 VCR 2 ACC 45 TV/VCR 3 6 7 SMART 8 0 29 SMART SOUND PICTURE MENU SURF VOL CH MUTE 2 3 Timer Time Start Time Stop Time Channel Activate Display Timer Time Start Time Stop Time Channel Activate Display Timer Time Start Time Stop Time Channel Activate Display Timer Time Start Time Stop Time Channel Activate Display 12 :30 PM...

User manual, English (US)
Page 13
... access code or changing it , then you press the Number buttons. "XXXX" appears on -screen menu. 2 Press the ᮣ or ■ button until SMARTLOCK is highlighted. 5 Press the ᮣᮣ button. Main Picture Sound Features Install Brightness Color Picture Sharpness Tint More... 1 7 POWER SLEEP A/CH STATUS/EXIT CC TV RECORD CLOCK TV/VCR 6 1 VCR 2 3 ACC 4 7 5 8 46 9 SMART SOUND 0 2SMART PICTURE MENU SURF VOL 2 4 MUTE CH 3 5 Main Picture Sound Features Install Timer SmartLock Features Timer SmartLock Time Start Time Stop Time Channel Activate Display...
... access code or changing it , then you press the Number buttons. "XXXX" appears on -screen menu. 2 Press the ᮣ or ■ button until SMARTLOCK is highlighted. 5 Press the ᮣᮣ button. Main Picture Sound Features Install Brightness Color Picture Sharpness Tint More... 1 7 POWER SLEEP A/CH STATUS/EXIT CC TV RECORD CLOCK TV/VCR 6 1 VCR 2 3 ACC 4 7 5 8 46 9 SMART SOUND 0 2SMART PICTURE MENU SURF VOL 2 4 MUTE CH 3 5 Main Picture Sound Features Install Timer SmartLock Features Timer SmartLock Time Start Time Stop Time Channel Activate Display...

User manual, English (US)
Page 14
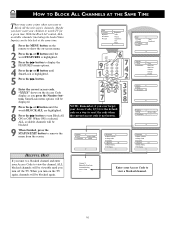
... channels you forget your Access Code to view the channel, ALL blocked channels will be viewable until SMARTLOCK is highlighted. 6 Press the ᮣᮣ button. 7 Enter the correct access code. When ON is not known. Repeat step 9 to block. Main Picture Sound Features Install Brightness Color Picture Sharpness Tint More... Main Picture Sound Features Install Timer SmartLock 7 1 2 SLEEP POWER A/CH STATUS/EXIT CC CLOCK TV RECORD 1 VCR 2 ACC 45 TV/VCR 3 6 789 SMART SMART 0 SOUND PICTURE MENU...
... channels you forget your Access Code to view the channel, ALL blocked channels will be viewable until SMARTLOCK is highlighted. 6 Press the ᮣᮣ button. 7 Enter the correct access code. When ON is not known. Repeat step 9 to block. Main Picture Sound Features Install Brightness Color Picture Sharpness Tint More... Main Picture Sound Features Install Timer SmartLock 7 1 2 SLEEP POWER A/CH STATUS/EXIT CC CLOCK TV RECORD 1 VCR 2 ACC 45 TV/VCR 3 6 789 SMART SMART 0 SOUND PICTURE MENU...

User manual, English (US)
Page 15
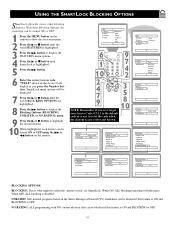
... -screen menu. 2 Press the ᮣ or ■ button until the word FEATURES is highlighted. 5 Press the ᮣᮣ button. 6 Enter the correct access code. Main Picture Sound Features Install Brightness Color Picture Sharpness Tint More... 9 SLEEP A/CH STATUS/EXIT 6POWER CC CLOCK TV RECORD TV/VCR 1 VCR 2 3 1 ACC 4 7 5 8 6 9 SMART SMART 0 SOUND PICTURE MENU SURF 7 4 2 2 VOL 4 7 MUTE CH 3 5 8 NOTE: Remember, if you press the Number buttons. Features Timer SmartLock Access Code XXXX SmartLock Block Channel Setup Code Clear...
... -screen menu. 2 Press the ᮣ or ■ button until the word FEATURES is highlighted. 5 Press the ᮣᮣ button. 6 Enter the correct access code. Main Picture Sound Features Install Brightness Color Picture Sharpness Tint More... 9 SLEEP A/CH STATUS/EXIT 6POWER CC CLOCK TV RECORD TV/VCR 1 VCR 2 3 1 ACC 4 7 5 8 6 9 SMART SMART 0 SOUND PICTURE MENU SURF 7 4 2 2 VOL 4 7 MUTE CH 3 5 8 NOTE: Remember, if you press the Number buttons. Features Timer SmartLock Access Code XXXX SmartLock Block Channel Setup Code Clear...
User manual, English (US)
Page 16
...Channel Setup Code Clear All Block All Off Movie Rating TV Rating Main Picture Sound Features Install Timer SmartLock Features Timer SmartLock Timer Start Time Stop Time Channel Activate Display Features Timer SmartLock Timer Start Time Stop Time Channel Activate Display Features Timer SmartLock Access Code - - - - SLEEP 6POWER A/CH STATUS/EXIT CC CLOCK TV RECORD 9VCR ACC 1 4 2 5 TV/VCR 3 6 1 789 SMART SMART 0 SOUND PICTURE MENU SURF 7 4 2 23 4 VOL MUTE CH 5 78 NOTE: Remember, if you press the Number buttons. SmartLock Block Channel Setup...
...Channel Setup Code Clear All Block All Off Movie Rating TV Rating Main Picture Sound Features Install Timer SmartLock Features Timer SmartLock Timer Start Time Stop Time Channel Activate Display Features Timer SmartLock Timer Start Time Stop Time Channel Activate Display Features Timer SmartLock Access Code - - - - SLEEP 6POWER A/CH STATUS/EXIT CC CLOCK TV RECORD 9VCR ACC 1 4 2 5 TV/VCR 3 6 1 789 SMART SMART 0 SOUND PICTURE MENU SURF 7 4 2 23 4 VOL MUTE CH 5 78 NOTE: Remember, if you press the Number buttons. SmartLock Block Channel Setup...

User manual, English (US)
Page 17
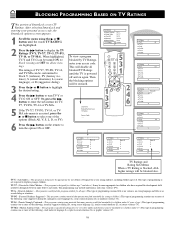
... screen will R disable all higher ratings will be blocked as well. (Example: If the PG-13 rating is set to block or censor programming. BLOCKING PROGRAMMING BASED ON MOVIE RATINGS T here are two types of the Movie Ratings options. Main Picture Sound Features Install Brightness Color Picture Sharpness Tint More... This will prompt you ever forget 7 4 2 3 5 8 10 your Access Code. 6 Using the Number buttons on the TV...
... screen will R disable all higher ratings will be blocked as well. (Example: If the PG-13 rating is set to block or censor programming. BLOCKING PROGRAMMING BASED ON MOVIE RATINGS T here are two types of the Movie Ratings options. Main Picture Sound Features Install Brightness Color Picture Sharpness Tint More... This will prompt you ever forget 7 4 2 3 5 8 10 your Access Code. 6 Using the Number buttons on the TV...
User manual, English (US)
Page 18
...; button to turn the option ON or OFF. Channel 12 Blocked By SmOarfftSLotocpk Time TV Rating Channel Activate Access Code Display - - - - SmartLock Block Channel Setup Code Clear All Block All Movie Rating TV Rating TV-Y TV-Y7 TV-G TV-PG TV-14 TV-MA SLEEP A/CH STATUS/EXIT CC TV RECORD 1 VCR 2 ACC 45 POWER 5CLOCK TV/VCR 33 6 7 SMART 8 0 19 SMART SOUND PICTURE MENU SURF VOL 1 3 5 MUTE CH 2 4 6 TV Rating TV-Y Off TV-Y7 TV-G TV-PG TV-14 TV-MA TV Rating TV-Y On TV-Y7 TV-G TV...
...; button to turn the option ON or OFF. Channel 12 Blocked By SmOarfftSLotocpk Time TV Rating Channel Activate Access Code Display - - - - SmartLock Block Channel Setup Code Clear All Block All Movie Rating TV Rating TV-Y TV-Y7 TV-G TV-PG TV-14 TV-MA SLEEP A/CH STATUS/EXIT CC TV RECORD 1 VCR 2 ACC 45 POWER 5CLOCK TV/VCR 33 6 7 SMART 8 0 19 SMART SOUND PICTURE MENU SURF VOL 1 3 5 MUTE CH 2 4 6 TV Rating TV-Y Off TV-Y7 TV-G TV-PG TV-14 TV-MA TV Rating TV-Y On TV-Y7 TV-G TV...
User manual, English (US)
Page 19
... Access Code display as you ever forget your Access Code, 0,7,1,1 is the default code or a way to reset the code when the current access code is not known. Main Picture Sound Features Install Brightness Color Picture Sharpness Tint More... 6 SLEEP POWER A/CH STATUS/EXIT CC CLOCK TV RECORD 1 VCR ACC 1 4 2 5 TV/VCR 3 6 789 10 SMART SOUND 0 SMART PICTURE MENU SURF 9 7 4 2 2 4 7 9 VOL MUTE 3 CH 5 8 10 NOTE: Remember, if you press the Number buttons. Features Timer SmartLock Access Code XXXX SmartLock Block Channel Setup Code...
... Access Code display as you ever forget your Access Code, 0,7,1,1 is the default code or a way to reset the code when the current access code is not known. Main Picture Sound Features Install Brightness Color Picture Sharpness Tint More... 6 SLEEP POWER A/CH STATUS/EXIT CC CLOCK TV RECORD 1 VCR ACC 1 4 2 5 TV/VCR 3 6 789 10 SMART SOUND 0 SMART PICTURE MENU SURF 9 7 4 2 2 4 7 9 VOL MUTE 3 CH 5 8 10 NOTE: Remember, if you press the Number buttons. Features Timer SmartLock Access Code XXXX SmartLock Block Channel Setup Code...
User manual, English (US)
Page 21
... right) OUT jacks on the rear of the VCR. buttons to playback video from the TV speakers will be mute. Then connect one end of the VIDEO (yellow) cable to the AV1 in VIDEO jack on the Side of TV Optional Headphones Audio Cables (red & white) 3 SLEEP POWER A/CH STATUS/EXIT CC CLOCK TV RECORD 1 VCR 2 ACC 45 TV/VCR 3 6 789 SMART SMART 0 SOUND PICTURE MENU SURF VOL CH MUTE 21 S-VIDEO VIDEO L AUDIO R 2 S-VIDEO VIDEO L AUDIO R Jack Panel of the television. 3 Turn the TV and the...
... right) OUT jacks on the rear of the VCR. buttons to playback video from the TV speakers will be mute. Then connect one end of the VIDEO (yellow) cable to the AV1 in VIDEO jack on the Side of TV Optional Headphones Audio Cables (red & white) 3 SLEEP POWER A/CH STATUS/EXIT CC CLOCK TV RECORD 1 VCR 2 ACC 45 TV/VCR 3 6 789 SMART SMART 0 SOUND PICTURE MENU SURF VOL CH MUTE 21 S-VIDEO VIDEO L AUDIO R 2 S-VIDEO VIDEO L AUDIO R Jack Panel of the television. 3 Turn the TV and the...
User manual, English (US)
Page 23
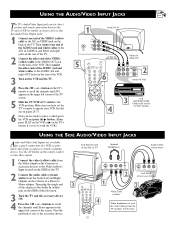
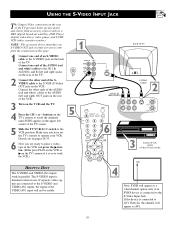
... set the TV's remote to the S-VIDEO jack on the back of the VCR. 3 Turn on this page. 1 Connect one end of the AUDIO (red and white) cables to the AV1 In AUDIO L and R (left corner of an S-VIDEO cable to operate your VCR. The S-VIDEO input is connected to work the VCR.) HELPFUL HINT The S-VIDEO and VIDEO AV1 inputs work in parallel. Connect one end of the TV screen. 5 Slide the TV/VCR/ACC switch to the S-VIDEO and VIDEO AV1 inputs, the signal...
... set the TV's remote to the S-VIDEO jack on the back of the VCR. 3 Turn on this page. 1 Connect one end of the AUDIO (red and white) cables to the AV1 In AUDIO L and R (left corner of an S-VIDEO cable to operate your VCR. The S-VIDEO input is connected to work the VCR.) HELPFUL HINT The S-VIDEO and VIDEO AV1 inputs work in parallel. Connect one end of the TV screen. 5 Slide the TV/VCR/ACC switch to the S-VIDEO and VIDEO AV1 inputs, the signal...
User manual, English (US)
Page 25
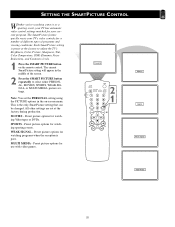
... quickly resets your current program. Each SmartPicture setting is preset at the factory during production. Note: You set at the factory to select either PERSONAL, MOVIES, SPORTS, WEAK SIGNAL, or MULTI MEDIA picture settings. Preset picture options for use with video games. MULTI MEDIA - SETTING THE SMARTPICTURE CONTROL Whether you're watching a movie or a sporting event, your TV has automatic video control settings matched for your TV's video controls for a number of different types of the screen...
... quickly resets your current program. Each SmartPicture setting is preset at the factory during production. Note: You set at the factory to select either PERSONAL, MOVIES, SPORTS, WEAK SIGNAL, or MULTI MEDIA picture settings. Preset picture options for use with video games. MULTI MEDIA - SETTING THE SMARTPICTURE CONTROL Whether you're watching a movie or a sporting event, your TV has automatic video control settings matched for your TV's video controls for a number of different types of the screen...
User manual, English (US)
Page 26
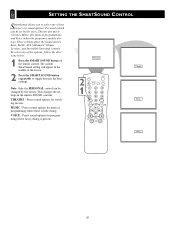
... present. The current SmartSound setting will appear in the menu's SOUND controls. This changes the settings in the middle of the screen. 2 Press the SMART SOUND button repeatedly to select one of four factory-set by the viewer. Preset sound options for programming where heavy dialog is little dialog. Personal SLEEP 2 A/CH STATUS/EXIT TV RECORD CC 1 VCR ACC 1 4 2 5 POWER CLOCK TV/VCR 3 6 789 SMART SMART 0 SOUND PICTURE MENU SURF VOL CH MUTE...
... present. The current SmartSound setting will appear in the menu's SOUND controls. This changes the settings in the middle of the screen. 2 Press the SMART SOUND button repeatedly to select one of four factory-set by the viewer. Preset sound options for programming where heavy dialog is little dialog. Personal SLEEP 2 A/CH STATUS/EXIT TV RECORD CC 1 VCR ACC 1 4 2 5 POWER CLOCK TV/VCR 3 6 789 SMART SMART 0 SOUND PICTURE MENU SURF VOL CH MUTE...

User manual, English (US)
Page 34
... on the AC power strip, if one is not on the AC power strip if one is set to the TV's ANT 75Ω plug? • Check the TUNER MODE control for the correct tuner set- TROUBLESHOOTING No Power • Check the TV power cord. No Picture • Check the antenna connections. No Sound • Check the VOLUME buttons. • Check the MUTE button on the front of the TV. • Check the TV power cord.
... on the AC power strip, if one is not on the AC power strip if one is set to the TV's ANT 75Ω plug? • Check the TUNER MODE control for the correct tuner set- TROUBLESHOOTING No Power • Check the TV power cord. No Picture • Check the antenna connections. No Sound • Check the VOLUME buttons. • Check the MUTE button on the front of the TV. • Check the TV power cord.

User manual, English (US)
Page 36
... (phono type plug) receive audio and video signals from the screen). Coaxial Cable • A single solid antenna wire normally matched with specific feature controls (color adjustment, programming, etc.). 36 Status/Exit • Allows the user to the 75 Ohm Input terminals on the TV screen. Tuner Mode • Designed for first time set up and use where the TV is in progress. On-screen Displays (OSD) • The wording or messages generated by the television to "time out...
... (phono type plug) receive audio and video signals from the screen). Coaxial Cable • A single solid antenna wire normally matched with specific feature controls (color adjustment, programming, etc.). 36 Status/Exit • Allows the user to the 75 Ohm Input terminals on the TV screen. Tuner Mode • Designed for first time set up and use where the TV is in progress. On-screen Displays (OSD) • The wording or messages generated by the television to "time out...

User manual, English (US)
Page 37
... 19 Closed Caption Control 20 Clear All Blocked Channels 15 Color Control 5 Definitions/Understanding SmartLock 12 Color Temperature Control 5 Movie Ratings 17 Contrast + (Black Stretch) Control 7 TV Ratings 18 DNR (Dynamic Noise Reduction) Control 6 SmartPicture Control 25 Factory Service Information 38-39 SmartSound Control 26 Glossary of Terms 36 Sound Control 10 Index 37 Stereo/Mono Settings 10 Picture Controls 5 Surf Control 27 Registration Information 2 Table of Contents 4 Remote Control Use with Accessory Devices: Timer Controls 13 Code Entry...
... 19 Closed Caption Control 20 Clear All Blocked Channels 15 Color Control 5 Definitions/Understanding SmartLock 12 Color Temperature Control 5 Movie Ratings 17 Contrast + (Black Stretch) Control 7 TV Ratings 18 DNR (Dynamic Noise Reduction) Control 6 SmartPicture Control 25 Factory Service Information 38-39 SmartSound Control 26 Glossary of Terms 36 Sound Control 10 Index 37 Stereo/Mono Settings 10 Picture Controls 5 Surf Control 27 Registration Information 2 Table of Contents 4 Remote Control Use with Accessory Devices: Timer Controls 13 Code Entry...


