
Owners Manual
Page 4
If the unit is displaying erratic behavior move away from any fluorescent lighting, as it may cause interference regarding use of this unit near fluorescent lighting may be the cause. 3 1. Don't touch the projector lens. 3. Use of the remote. Do not look directly into the projector light. 2.
If the unit is displaying erratic behavior move away from any fluorescent lighting, as it may cause interference regarding use of this unit near fluorescent lighting may be the cause. 3 1. Don't touch the projector lens. 3. Use of the remote. Do not look directly into the projector light. 2.
Owners Manual
Page 5
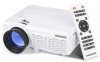
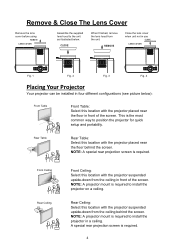
... the lens cover when unit not in use CLOSE LENS COVER OK Fig. 1 Fig. 2 Fig. 3 OK Fig. 4 Placing Your ProOKjector OK Your projector can be installed in four different configurations (see picture below): Front Table Front Table: Select this location with the... projector placed near the floor behind the screen. This is required to install the projector in a ceiling. Front Ceiling Rear Ceiling Front Ceiling: Select this location with the projector suspended upside-down from the ceiling in front of the screen....
... the lens cover when unit not in use CLOSE LENS COVER OK Fig. 1 Fig. 2 Fig. 3 OK Fig. 4 Placing Your ProOKjector OK Your projector can be installed in four different configurations (see picture below): Front Table Front Table: Select this location with the... projector placed near the floor behind the screen. This is required to install the projector in a ceiling. Front Ceiling Rear Ceiling Front Ceiling: Select this location with the projector suspended upside-down from the ceiling in front of the screen....
Owners Manual
Page 6
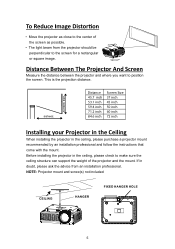
...the screen for a rectangular or square image. Distance Between The Projector And Screen Measure the distance between the projector and where you want to position the screen. Before installing the projector in the ceiling, please purchase a projector mount recommended by an installation professional and follow the instructions that ... inch 71.2 inch 84.6 inch Screen Size 37 inch 45 inch 50 inch 60 inch 72 inch Installing your Projector in the Ceiling When installing the projector in the ceiling, please check to make sure the ceiling structure can support the weight of the screen as close ...
...the screen for a rectangular or square image. Distance Between The Projector And Screen Measure the distance between the projector and where you want to position the screen. Before installing the projector in the ceiling, please purchase a projector mount recommended by an installation professional and follow the instructions that ... inch 71.2 inch 84.6 inch Screen Size 37 inch 45 inch 50 inch 60 inch 72 inch Installing your Projector in the Ceiling When installing the projector in the ceiling, please check to make sure the ceiling structure can support the weight of the screen as close ...
Owners Manual
Page 7
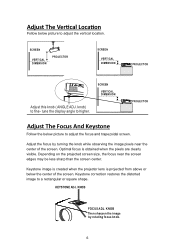
... and trapezoidal screen. SCREEN VERTICAL DIMENSION AV TF HDMI USB VGA PROJECTOR Adjust The Focus And Keystone Follow the below the center of the screen. SCREEN VERTICAL DIMENSION PROJECTOR SCREEN VERTICAL DIMENSION AV TF HDMI USB VGA PROJECTOR AV TF HDMI Adjust this knob ( ANGLE ADJ. Optimal focus... or below picture to a rectangular or square shape. KEYSTONE ADJ. knob) to fine- Keystone image is created when the projector lens is obtained when the pixels are clearly visible. Depending on the projected screen size, the focus near the center of the screen.
... and trapezoidal screen. SCREEN VERTICAL DIMENSION AV TF HDMI USB VGA PROJECTOR Adjust The Focus And Keystone Follow the below the center of the screen. SCREEN VERTICAL DIMENSION PROJECTOR SCREEN VERTICAL DIMENSION AV TF HDMI USB VGA PROJECTOR AV TF HDMI Adjust this knob ( ANGLE ADJ. Optimal focus... or below picture to a rectangular or square shape. KEYSTONE ADJ. knob) to fine- Keystone image is created when the projector lens is obtained when the pixels are clearly visible. Depending on the projected screen size, the focus near the center of the screen.

Owners Manual
Page 9
Controls Of Projector 1 34 VGA IR 2 OK 14 13 12 5 15 16 17 18 19 20 6 7 8 9 10 11 AV HDMI 1 HDMI 2 USB 1. LENS 2. ANGEL ADJ. POWER Indicator 15. TF Card Slot 18. USB Port 20. AV IN Jack 17. VGA IN Port 4. IR Sensor 5. Knob 6. EAR PHONE Jack 16. TRAPEZOIDAL ADJ. DC IN Jack 8 FOCUS ADJ. Knob 3. Knob OK 9. HDMI 1 & 2 Ports 19.
Controls Of Projector 1 34 VGA IR 2 OK 14 13 12 5 15 16 17 18 19 20 6 7 8 9 10 11 AV HDMI 1 HDMI 2 USB 1. LENS 2. ANGEL ADJ. POWER Indicator 15. TF Card Slot 18. USB Port 20. AV IN Jack 17. VGA IN Port 4. IR Sensor 5. Knob 6. EAR PHONE Jack 16. TRAPEZOIDAL ADJ. DC IN Jack 8 FOCUS ADJ. Knob 3. Knob OK 9. HDMI 1 & 2 Ports 19.
Owners Manual
Page 10
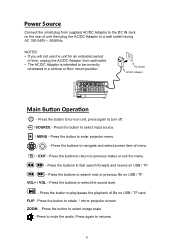
... to return to select input source. / MENU - Press the button to navigate and select screen item of menu. / EXIT - Press the buttons to rotate / mirror projector screen ZOOM - Press the buttons to play/pause the playback of file on USB / TF card. Press the button to search next or previous file... on USB / TF. FLIP - Press to enter projector menu. Press the button to mute the audio. Press the buttons to turn off. / SOURCE - OK OK - Press the button to turn on unit, press...
... to return to select input source. / MENU - Press the button to navigate and select screen item of menu. / EXIT - Press the buttons to rotate / mirror projector screen ZOOM - Press the buttons to play/pause the playback of file on USB / TF card. Press the button to search next or previous file... on USB / TF. FLIP - Press to enter projector menu. Press the button to mute the audio. Press the buttons to turn off. / SOURCE - OK OK - Press the button to turn on unit, press...
Owners Manual
Page 11
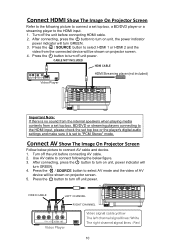
... shown on unit, the power indicator power indicator will turn GREEN. 3. Connect AV Show The Image On Projector Screen Follow below figure. 3. Connect HDMI Show The Image On Projector Screen Refer to the following the below picture to turn off the unit before connecting AV cable. 2. Press... the button to "PCM Stereo" mode. Use AV cable to connect following picture to connect a set to turn on projector screen. 5. Press the button to turn on projector screen. 4. After connecting, press the button to select AV mode and the video of AV device will be shown on...
... shown on unit, the power indicator power indicator will turn GREEN. 3. Connect AV Show The Image On Projector Screen Follow below figure. 3. Connect HDMI Show The Image On Projector Screen Refer to the following the below picture to turn off the unit before connecting AV cable. 2. Press... the button to "PCM Stereo" mode. Use AV cable to connect following picture to connect a set to turn on projector screen. 5. Press the button to turn on projector screen. 4. After connecting, press the button to select AV mode and the video of AV device will be shown on...

Owners Manual
Page 12
Press the button to turn off unit power. Turn off power of VGA device will turn GREEN. 4. Connect VGA Show The Image On Projector Screen Follow below picture to get the sound from the unit, please connect AV IN cable when you connect VGA input. 11 Press the button ...to select VGA mode and the video of your projector before connect VGA cable. 2. VGA IR COMPUTER CABLE To VGA PORT OR COMPUTER CABLE NOTE BOOK DECK TOP Please refer to the following table to...
Press the button to turn off unit power. Turn off power of VGA device will turn GREEN. 4. Connect VGA Show The Image On Projector Screen Follow below picture to get the sound from the unit, please connect AV IN cable when you connect VGA input. 11 Press the button ...to select VGA mode and the video of your projector before connect VGA cable. 2. VGA IR COMPUTER CABLE To VGA PORT OR COMPUTER CABLE NOTE BOOK DECK TOP Please refer to the following table to...
Owners Manual
Page 13
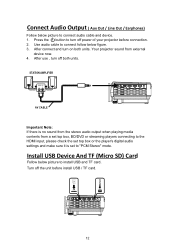
Your projector sound from a set top box, BD/DVD or streaming players connecting to the HDMI input, please check the set top box or the player's digital ... connection. 2. STATION AMPLIFIER AV TF C AR D HDMI 1 HDMI 2 USB DC IN AV CABLE Important Note: If there is set to turn off power of your projector before install USB / TF card. Use audio cable to connect follow below picture to connect audio cable and device. 1. After use , turn on both units...
Your projector sound from a set top box, BD/DVD or streaming players connecting to the HDMI input, please check the set top box or the player's digital ... connection. 2. STATION AMPLIFIER AV TF C AR D HDMI 1 HDMI 2 USB DC IN AV CABLE Important Note: If there is set to turn off power of your projector before install USB / TF card. Use audio cable to connect follow below picture to connect audio cable and device. 1. After use , turn on both units...
Owners Manual
Page 16
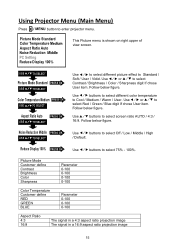
... 0-100 0-100 Aspect Ratio 4:3 16:9 The signal in a 4:3 aspect ratio projection image The signal in a 16:9 aspect ratio projection image 15 Use buttons to enter projector menu. Follow below figure. Using Projector Menu (Main Menu) Press button to select Off / Low / Middle / High / Default. Follow below figure.
... 0-100 0-100 Aspect Ratio 4:3 16:9 The signal in a 4:3 aspect ratio projection image The signal in a 16:9 aspect ratio projection image 15 Use buttons to enter projector menu. Follow below figure. Using Projector Menu (Main Menu) Press button to select Off / Low / Middle / High / Default. Follow below figure.
Owners Manual
Page 17
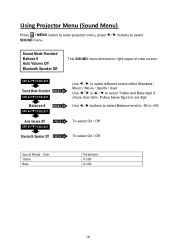
... Off PRESS OK USE TO SELECT Bluetooth Speaker Off PRESS OK To select On / Off. Sound Mode - Follow below figure to enter projector menu, press SOUND menu. Using Projector Menu (Sound Menu) Press button to set digit. buttons to select Treble and Bass digit if chose User item. Use or to select...
... Off PRESS OK USE TO SELECT Bluetooth Speaker Off PRESS OK To select On / Off. Sound Mode - Follow below figure to enter projector menu, press SOUND menu. Using Projector Menu (Sound Menu) Press button to set digit. buttons to select Treble and Bass digit if chose User item. Use or to select...
Owners Manual
Page 18
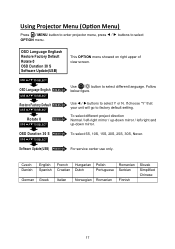
... TO SELECT PRESS OK Use OK OK button to select Y or N. USE TO SELECT Software Update(USB) PRESS OK For service center use only. Using Projector Menu (Option Menu) Press button to enter...
... TO SELECT PRESS OK Use OK OK button to select Y or N. USE TO SELECT Software Update(USB) PRESS OK For service center use only. Using Projector Menu (Option Menu) Press button to enter...