Owners Manual
Page 2
... to comply with part 15 of at least 20 cm from that interference will not occur in a residential installation. This equipment generates, uses and can be determined by one or more of the FCC Rules. The antenna(s) used in the instruction manual. However, there... transmitter. If this transmitter must be co-located or operating in conjunction with the instructions, may void users authority to provide reasonable protection against harmful interference in a particular installation. Operation is subject to this equipment may not cause harmful interference, and (2) This...
... to comply with part 15 of at least 20 cm from that interference will not occur in a residential installation. This equipment generates, uses and can be determined by one or more of the FCC Rules. The antenna(s) used in the instruction manual. However, there... transmitter. If this transmitter must be co-located or operating in conjunction with the instructions, may void users authority to provide reasonable protection against harmful interference in a particular installation. Operation is subject to this equipment may not cause harmful interference, and (2) This...
Owners Manual
Page 5
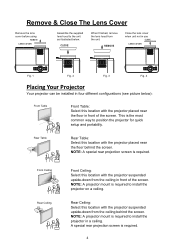
...the screen. NOTE: A special rear projection screen is required. 4 NOTE: A projector mount is required to position the projector for quick setup and portability. This is required to the unit as illustrated below: CLOSE When finished, remove the lens hood from the ceiling behind the screen.... NOTE: A projector mount is the most common way to install the projector in four different configurations (see picture below): Front Table Front Table: Select this location with the projector placed near the floor...
...the screen. NOTE: A special rear projection screen is required. 4 NOTE: A projector mount is required to position the projector for quick setup and portability. This is required to the unit as illustrated below: CLOSE When finished, remove the lens hood from the ceiling behind the screen.... NOTE: A projector mount is the most common way to install the projector in four different configurations (see picture below): Front Table Front Table: Select this location with the projector placed near the floor...
Owners Manual
Page 6
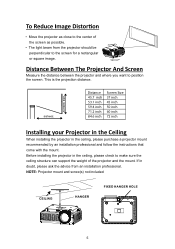
... distance. • Move the projector as possible. • The light beam from an installation professional. If in the ceiling, please check to make sure the ceiling structure can support the weight of the screen as close to position the screen. DISTANCE SCREEN SIZE Distance 45...inch 71.2 inch 84.6 inch Screen Size 37 inch 45 inch 50 inch 60 inch 72 inch Installing your Projector in the Ceiling When installing the projector in the ceiling, please purchase a projector mount recommended by an installation professional and follow the instructions that come with the mount.
... distance. • Move the projector as possible. • The light beam from an installation professional. If in the ceiling, please check to make sure the ceiling structure can support the weight of the screen as close to position the screen. DISTANCE SCREEN SIZE Distance 45...inch 71.2 inch 84.6 inch Screen Size 37 inch 45 inch 50 inch 60 inch 72 inch Installing your Projector in the Ceiling When installing the projector in the ceiling, please purchase a projector mount recommended by an installation professional and follow the instructions that come with the mount.

Owners Manual
Page 8
... or injury from possible battery leakage. 5. Do not dispose of time, remove the batteries to follow the correct polarity when installing the battery as indicated in the device are consumed or the device is not to be recharged; If the batteries in the...of batteries together (e.g. it can overheat and rupture. (Follow battery manufacturer's instructions.) 6. Controls Of Remote FLIP OK MENU EXIT 1/@ 2ABC 3DEF 4GHI 5JKL 6MNO 7PQRS 8TUV 9WXYZ RECALL 0 FAV/ OK OK EXIT Install / Replace Battery Of Remote BATTERY PRECAUTIONS: Follow these precautions when using a battery in ...
... or injury from possible battery leakage. 5. Do not dispose of time, remove the batteries to follow the correct polarity when installing the battery as indicated in the device are consumed or the device is not to be recharged; If the batteries in the...of batteries together (e.g. it can overheat and rupture. (Follow battery manufacturer's instructions.) 6. Controls Of Remote FLIP OK MENU EXIT 1/@ 2ABC 3DEF 4GHI 5JKL 6MNO 7PQRS 8TUV 9WXYZ RECALL 0 FAV/ OK OK EXIT Install / Replace Battery Of Remote BATTERY PRECAUTIONS: Follow these precautions when using a battery in ...
Owners Manual
Page 11
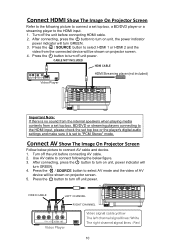
Press the button to turn off the unit before connecting AV cable. 2. Use AV cable to connect following picture to connect a set to "PCM Stereo" mode. After connecting, press the button to turn on projector screen. 4. Turn off unit power. Press the button to turn off the ... box, BD/DVD or streaming players connecting to the HDMI input, please check the set top box or the player's digital audio settings and make sure it is set top box, a BD/DVD player or a streaming player to the HDMI input. 1. Press the button to select AV mode and the video of AV...
Press the button to turn off the unit before connecting AV cable. 2. Use AV cable to connect following picture to connect a set to "PCM Stereo" mode. After connecting, press the button to turn on projector screen. 4. Turn off unit power. Press the button to turn off the ... box, BD/DVD or streaming players connecting to the HDMI input, please check the set top box or the player's digital audio settings and make sure it is set top box, a BD/DVD player or a streaming player to the HDMI input. 1. Press the button to select AV mode and the video of AV...
Owners Manual
Page 13
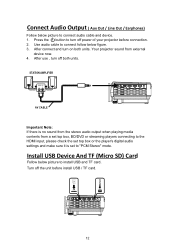
... TF card. Install USB Device And TF (Micro SD) Card Follow below picture to connect follow below picture to "PCM Stereo" mode. Your projector sound from a set top box, BD/DVD or streaming players connecting to the HDMI input, please check the set top box or the player's digital audio settings and make sure...
... TF card. Install USB Device And TF (Micro SD) Card Follow below picture to connect follow below picture to "PCM Stereo" mode. Your projector sound from a set top box, BD/DVD or streaming players connecting to the HDMI input, please check the set top box or the player's digital audio settings and make sure...
Owners Manual
Page 14
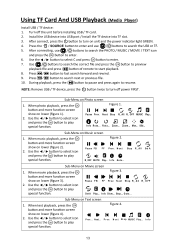
... USB device into USB port / Install the TF device into TF slot. When photo playback, press the OK Figure 1. When movie playback, press the OK Figure 3. show on Movie screen 1. Sub-Menu on lower (figure 3). Next... N ext Stop R_ All R_ O FF OK Set A Play... N e x t Stop R _ A l l Set A OK R R_OFF M U T E Play... N e x t Stop R_...
... USB device into USB port / Install the TF device into TF slot. When photo playback, press the OK Figure 1. When movie playback, press the OK Figure 3. show on Movie screen 1. Sub-Menu on lower (figure 3). Next... N ext Stop R_ All R_ O FF OK Set A Play... N e x t Stop R _ A l l Set A OK R R_OFF M U T E Play... N e x t Stop R_...
Owners Manual
Page 15
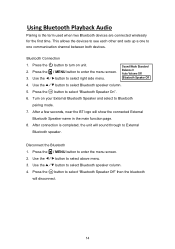
... connection is the term used when two Bluetooth devices are connected wirelessly for the first time. This allows the devices to see each other and sets up a one to Bluetooth pairing mode. 7. Turn on unit. / MENU button to select right side menu. Press the OK button to select Bluetooth speaker column...
... connection is the term used when two Bluetooth devices are connected wirelessly for the first time. This allows the devices to see each other and sets up a one to Bluetooth pairing mode. 7. Turn on unit. / MENU button to select right side menu. Press the OK button to select Bluetooth speaker column...
Owners Manual
Page 16
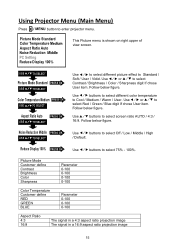
... in a 4:3 aspect ratio projection image The signal in a 16:9 aspect ratio projection image 15 Picture Mode Standard Color Temperature Aspect Ratio Auto Noise Reduction PC Setting Reduce Display 100% This Picture menu is shown on right upper of view screen. Use buttons to select screen ratio AUTO / 4:3 / 16:9. Use buttons to...
... in a 4:3 aspect ratio projection image The signal in a 16:9 aspect ratio projection image 15 Picture Mode Standard Color Temperature Aspect Ratio Auto Noise Reduction PC Setting Reduce Display 100% This Picture menu is shown on right upper of view screen. Use buttons to select screen ratio AUTO / 4:3 / 16:9. Use buttons to...
Owners Manual
Page 17
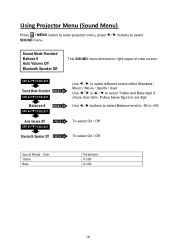
.... User Treble Bass Parameter 0-100 0-100 16 Follow below figure to enter projector menu, press SOUND menu. Using Projector Menu (Sound Menu) Press button to set digit. buttons to +50. Sound Mode - Use buttons to select Balance level to -50 to select Sound Mode Standard Balance 0 Auto Volume Off Bluetooth Speaker...
.... User Treble Bass Parameter 0-100 0-100 16 Follow below figure to enter projector menu, press SOUND menu. Using Projector Menu (Sound Menu) Press button to set digit. buttons to +50. Sound Mode - Use buttons to select Balance level to -50 to select Sound Mode Standard Balance 0 Auto Volume Off Bluetooth Speaker...
Owners Manual
Page 18
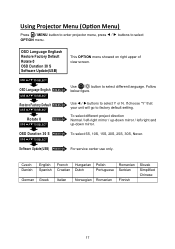
...TO SELECT Rotate 0 USE TO SELECT PRESS OK Use OK OK button to select Y or N. USE TO SELECT Software Update(USB) PRESS OK For service center use only. Use buttons to select different language. Czech Danish German English Spanish Greek French Croatian Italian Hungarian Polish ... mirror. Using Projector Menu (Option Menu) Press button to select OSD Language Engliash Restore Factory Default Rotate 0 OSD Duration 30 S Software Update(USB) This OPTION menu showed on right upper of view screen. buttons to enter projector menu, press OPTION menu. If choose "Y" that...
...TO SELECT Rotate 0 USE TO SELECT PRESS OK Use OK OK button to select Y or N. USE TO SELECT Software Update(USB) PRESS OK For service center use only. Use buttons to select different language. Czech Danish German English Spanish Greek French Croatian Italian Hungarian Polish ... mirror. Using Projector Menu (Option Menu) Press button to select OSD Language Engliash Restore Factory Default Rotate 0 OSD Duration 30 S Software Update(USB) This OPTION menu showed on right upper of view screen. buttons to enter projector menu, press OPTION menu. If choose "Y" that...
Owners Manual
Page 19
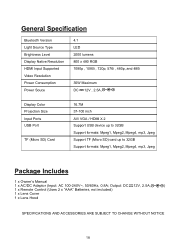
... "AAA" Batteries, not included) 1 x Lens Cover 1 x Lens Hood SPECIFICATIONS AND ACCESSORIES ARE SUBJECT TO CHANGE WITHOUT NOTICE 18 General Specification Bluetooth Version Light Source Type Brightness Level Display Native Resolution HDMI Input Supported Video Resolution Power Consumption Power Souce 4.1 LED 2000 lumens 800 x 480 RGB ...100 inch AV/ VGA / HDMI X 2 Support USB device up to 32GB Support formats: Mpeg1, Mpeg2, Mpeg4, mp3, Jpeg Support TF (Micro SD) card up to 32GB Support formats: Mpeg1, Mpeg2, Mpeg4, mp3, Jpeg Package Includes 1 x Owner's Manual 1 x AC/DC Adaptor (Input: AC...
... "AAA" Batteries, not included) 1 x Lens Cover 1 x Lens Hood SPECIFICATIONS AND ACCESSORIES ARE SUBJECT TO CHANGE WITHOUT NOTICE 18 General Specification Bluetooth Version Light Source Type Brightness Level Display Native Resolution HDMI Input Supported Video Resolution Power Consumption Power Souce 4.1 LED 2000 lumens 800 x 480 RGB ...100 inch AV/ VGA / HDMI X 2 Support USB device up to 32GB Support formats: Mpeg1, Mpeg2, Mpeg4, mp3, Jpeg Support TF (Micro SD) card up to 32GB Support formats: Mpeg1, Mpeg2, Mpeg4, mp3, Jpeg Package Includes 1 x Owner's Manual 1 x AC/DC Adaptor (Input: AC...