
Owners Manual
Page 4
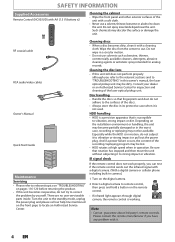
... become partially damaged or in operation. Cleaning the disc lens • If this unit still does not perform properly although you can test if the remote control sends out the infrared signal with a digital camera. (With a digital camera or cellular phone including built-in camera.) 1 Turn on the digital ... this unit becomes inoperative, do not subject it to vibration or strong impact or pull out the power plug. IR signal check If the remote control does not work properly, you refer to the relevant sections and to vibration, strong impact or dirt. HDD handling • HDD is...
... become partially damaged or in operation. Cleaning the disc lens • If this unit still does not perform properly although you can test if the remote control sends out the infrared signal with a digital camera. (With a digital camera or cellular phone including built-in camera.) 1 Turn on the digital ... this unit becomes inoperative, do not subject it to vibration or strong impact or pull out the power plug. IR signal check If the remote control does not work properly, you refer to the relevant sections and to vibration, strong impact or dirt. HDD handling • HDD is...
Owners Manual
Page 6
... INFORMATION 2 Safety Instructions 2 Supplied Accessories 4 Maintenance 4 Trademark Information 5 FEATURES 8 Features 8 Symbols Used in this Owner's Manual 9 FUNCTIONAL OVERVIEW 10 Front Panel 10 Rear Panel 11 Remote Control 12 Front Panel Display 14 Connections CONNECTION 15 Antenna Connection (Required 15 Overview 15 Connecting to a TV Using Audio / Video jacks. . . 16 Connecting to...
... INFORMATION 2 Safety Instructions 2 Supplied Accessories 4 Maintenance 4 Trademark Information 5 FEATURES 8 Features 8 Symbols Used in this Owner's Manual 9 FUNCTIONAL OVERVIEW 10 Front Panel 10 Rear Panel 11 Remote Control 12 Front Panel Display 14 Connections CONNECTION 15 Antenna Connection (Required 15 Overview 15 Connecting to a TV Using Audio / Video jacks. . . 16 Connecting to...

Owners Manual
Page 10
... input jacks (L2) Use to connect the S-Video output of External device with an RCA video cable. 14. Infrared sensor window Receive signals from your Remote control so that you must unplug the AC power cord) 2. Display Refer to select the HDD mode. 6. HDD button Press to "Front Panel Display" on...
... input jacks (L2) Use to connect the S-Video output of External device with an RCA video cable. 14. Infrared sensor window Receive signals from your Remote control so that you must unplug the AC power cord) 2. Display Refer to select the HDD mode. 6. HDD button Press to "Front Panel Display" on...
Owners Manual
Page 12
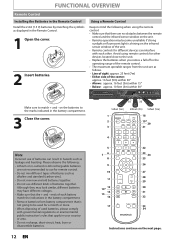
... of each other devices located close to the unit. • Replace the batteries when you notice a fall off in the operating range of the remote control. • The maximum operable ranges from the unit are not recommended to the marks indicated in the battery compartment. 3 Close the cover. ... within 30° Make sure to be used for different devices can result in hazards such as displayed in the Remote Control. 1 Open the cover. 2 1 2 Insert batteries. Using a Remote Control Keep in mind the following : • Lithium or ni-cad and ni-mh rechargeable batteries are as alkaline ...
... of each other devices located close to the unit. • Replace the batteries when you notice a fall off in the operating range of the remote control. • The maximum operable ranges from the unit are not recommended to the marks indicated in the battery compartment. 3 Close the cover. ... within 30° Make sure to be used for different devices can result in hazards such as displayed in the Remote Control. 1 Open the cover. 2 1 2 Insert batteries. Using a Remote Control Keep in mind the following : • Lithium or ni-cad and ni-mh rechargeable batteries are as alkaline ...
Owners Manual
Page 13
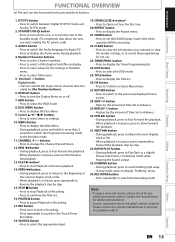
... exit from the Title list. 16.PAUSE F button • Press to cancel the programming for additional assistances. • Cannot guarantee about 3rd party's remote controls. CHANNEL / buttons • Press to change the Channel Up and Down. 12.REW E button • During playback, press to Fast Reverse .... Decimal ( • ) button Digital mode: • Press to the Standby mode. (To completely shut down the unit, you have any additional remote code or contact the manufacturer for CD, etc. 23. HDD button • Press to switch between Digital TV (DTV) mode and Analog TV (TV...
... exit from the Title list. 16.PAUSE F button • Press to cancel the programming for additional assistances. • Cannot guarantee about 3rd party's remote controls. CHANNEL / buttons • Press to change the Channel Up and Down. 12.REW E button • During playback, press to Fast Reverse .... Decimal ( • ) button Digital mode: • Press to the Standby mode. (To completely shut down the unit, you have any additional remote code or contact the manufacturer for CD, etc. 23. HDD button • Press to switch between Digital TV (DTV) mode and Analog TV (TV...
Owners Manual
Page 22
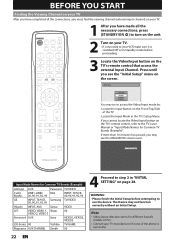
...INPUT, AUX Sanyo VIDEO JVC VIDEO, VIDEO 1, Sharp 00 VIDEO 2, VIDEO 3 Kenwood AUX Sony VIDEO1, VIDEO2, VIDEO3 LXI-Series 00 Toshiba TV/GAME Magnavox AUX CHANNEL Zenith 00 4 Proceed to use the device. Initial Setup Language English Français Español You may try to the TV...correctly without an Initial Setup. WARNING: • Please finish the Initial Setup before proceeding. 3 Locate the Video/Input button on the TV's remote control that access the external Input Channel. BEFORE YOU START Finding the Viewing Channel on your TV After you have completed all the connections, you...
...INPUT, AUX Sanyo VIDEO JVC VIDEO, VIDEO 1, Sharp 00 VIDEO 2, VIDEO 3 Kenwood AUX Sony VIDEO1, VIDEO2, VIDEO3 LXI-Series 00 Toshiba TV/GAME Magnavox AUX CHANNEL Zenith 00 4 Proceed to use the device. Initial Setup Language English Français Español You may try to the TV...correctly without an Initial Setup. WARNING: • Please finish the Initial Setup before proceeding. 3 Locate the Video/Input button on the TV's remote control that access the external Input Channel. BEFORE YOU START Finding the Viewing Channel on your TV After you have completed all the connections, you...

Owners Manual
Page 35
...Playback Editing Function Setup Others Español EN 35 Channel Selection Select channels by using [CHANNEL / ] or [the Number buttons] found on remote control. [CHANNEL / ] Use [CHANNEL / ] to change manually by a single network. For 2-digit number e.g.) 12ch: [1] + [2] ... with [the Number buttons] to select a channel you want to send simultaneously. For 2-digit number If 2 channel numbers are simultaneously broadcast on the remote control. • The Analog mode and Digital mode switch alternately. What is the minor channel? For 1-digit number e.g.) 2 ch: [0] + [2],...
...Playback Editing Function Setup Others Español EN 35 Channel Selection Select channels by using [CHANNEL / ] or [the Number buttons] found on remote control. [CHANNEL / ] Use [CHANNEL / ] to change manually by a single network. For 2-digit number e.g.) 12ch: [1] + [2] ... with [the Number buttons] to select a channel you want to send simultaneously. For 2-digit number If 2 channel numbers are simultaneously broadcast on the remote control. • The Analog mode and Digital mode switch alternately. What is the minor channel? For 1-digit number e.g.) 2 ch: [0] + [2],...
Owners Manual
Page 45
... is full, record 12 hours to exit the title list. Press [DISPLAY] to set the recording time in 5 minutes. - Using [REC] or [STOP C] on the remote control. • You cannot use for the playback by pressing [HDD] or [DVD] before playing back on other . When the recording is completed before you...
... is full, record 12 hours to exit the title list. Press [DISPLAY] to set the recording time in 5 minutes. - Using [REC] or [STOP C] on the remote control. • You cannot use for the playback by pressing [HDD] or [DVD] before playing back on other . When the recording is completed before you...
Owners Manual
Page 49
... Delete the Timer program: 1 Use [K / L] to select "Edit Title Name", then press [OK]. For other channels (10-99), the channel will be displayed on the Remote control. 2) Confirmation message will appear. 3 Use [K / L] to select "Yes", then press [OK]. 3-B) To Correct the Timer program: 1 Use [K / L] to select the Program you want to...
... Delete the Timer program: 1 Use [K / L] to select "Edit Title Name", then press [OK]. For other channels (10-99), the channel will be displayed on the Remote control. 2) Confirmation message will appear. 3 Use [K / L] to select "Yes", then press [OK]. 3-B) To Correct the Timer program: 1 Use [K / L] to select the Program you want to...
Owners Manual
Page 54
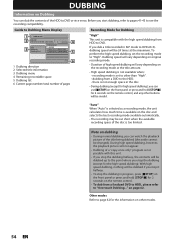
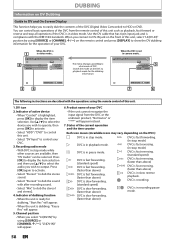
... • During dubbing (except for high speed dubbing), you can use [CSTOP] on the front panel or press and hold [STOP C] for 2 seconds on the remote control. • To dub from a finalized DVD to HDD, please refer to DVD. DUBBING Information on Dubbing You can dub the contents of the HDD... to the point where you stop the dubbing in progress, press [CSTOP] on the front panel or press and hold [STOP C] for 2 seconds on the remote control, and any other buttons will not appear. • Dubbing of a "copy-once only" program is too limited. During high speed dubbing, however, the ...
... • During dubbing (except for high speed dubbing), you can use [CSTOP] on the front panel or press and hold [STOP C] for 2 seconds on the remote control. • To dub from a finalized DVD to HDD, please refer to DVD. DUBBING Information on Dubbing You can dub the contents of the HDD... to the point where you stop the dubbing in progress, press [CSTOP] on the front panel or press and hold [STOP C] for 2 seconds on the remote control, and any other buttons will not appear. • Dubbing of a "copy-once only" program is too limited. During high speed dubbing, however, the ...
Owners Manual
Page 58
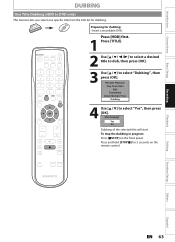
When the DVC is compliance with the operations using the remote control of this unit. • Select "DV Input" to control your DVC. 3. Press [OK] to ...the device you wish to output. Product name of your DVC • If the unit cannot recognize the input signal from the remote control of this unit, select "L3(DV-IN)" position by using [SOURCE] or [CHANNEL / ] on DV Dubbing Guide to... the DVC is highlighted, press [OK] to display the item selection. DUBBING Information on the remote control and press [DISPLAY] to show the DV dubbing information for the operation of your DVC.
When the DVC is compliance with the operations using the remote control of this unit. • Select "DV Input" to control your DVC. 3. Press [OK] to ...the device you wish to output. Product name of your DVC • If the unit cannot recognize the input signal from the remote control of this unit, select "L3(DV-IN)" position by using [SOURCE] or [CHANNEL / ] on DV Dubbing Guide to... the DVC is highlighted, press [OK] to display the item selection. DUBBING Information on the remote control and press [DISPLAY] to show the DV dubbing information for the operation of your DVC.
Owners Manual
Page 62
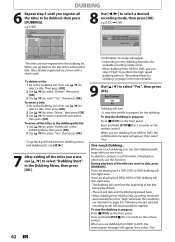
... will start . • It may take awhile to prepare for more details). 9 Use [K / L] to dub, press [DUBBING]. Press and hold [STOP C] for 2 seconds on the remote control. e.g.) HDD Title List ABCDE 12:00AM (10:00:00) FRI JAN/ 6/12 CH10 SP 11 23 3 2 45 54 6 8 Use [s / B] to select "Yes", then press... Dubbing List, then use [s / B]. 7 After adding all the titles to select a desired insert point, then press [OK]. Press and hold [STOP C] for 2 seconds on the remote control.
... will start . • It may take awhile to prepare for more details). 9 Use [K / L] to dub, press [DUBBING]. Press and hold [STOP C] for 2 seconds on the remote control. e.g.) HDD Title List ABCDE 12:00AM (10:00:00) FRI JAN/ 6/12 CH10 SP 11 23 3 2 45 54 6 8 Use [s / B] to select "Yes", then press... Dubbing List, then use [s / B]. 7 After adding all the titles to select a desired insert point, then press [OK]. Press and hold [STOP C] for 2 seconds on the remote control.
Owners Manual
Page 63
... Start Edit Title Delete Delete Multiple Titles Dubbing 4 Use [K / L] to select "Dubbing", then press [OK]. To stop the dubbing in progress: Press [CSTOP] on the remote control. Press [HDD] first. 1 Press [TITLE]. 2 Use [K / L / s / B] to select a desired title to dub, then press [OK]. 3 Use [K / L] to select "Yes", then press [OK]. Introduction Connections...
... Start Edit Title Delete Delete Multiple Titles Dubbing 4 Use [K / L] to select "Dubbing", then press [OK]. To stop the dubbing in progress: Press [CSTOP] on the remote control. Press [HDD] first. 1 Press [TITLE]. 2 Use [K / L / s / B] to select a desired title to dub, then press [OK]. 3 Use [K / L] to select "Yes", then press [OK]. Introduction Connections...
Owners Manual
Page 113
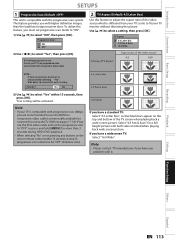
... press [OK]. Note • Please contact TV manufacturer if you have a standard TV: Select "4:3 Letter Box", so that black bars appear on the unit or remote control within 15 seconds, then press [OK]. Use [K / L] to select "Yes", then press [OK]. Your setting will be "OFF" (interlace scan). 16:9 Wide If you...
... press [OK]. Note • Please contact TV manufacturer if you have a standard TV: Select "4:3 Letter Box", so that black bars appear on the unit or remote control within 15 seconds, then press [OK]. Use [K / L] to select "Yes", then press [OK]. Your setting will be "OFF" (interlace scan). 16:9 Wide If you...
Owners Manual
Page 116
... the unit unplugged for parental lock. The unit does not response. • " " or error message appears if the operation is prohibited. • Remote Control batteries may not have completed the channel setting. (Refer to "OFF" on the front panel, then select "Yes" and press [OK]. It ...GENERAL The clock display does not appear in "Language" menu. Remedy • Check that the AC power cord is connected securely. • Remote Control batteries may not be performed. Repairing • If there is a power failure or unplugging during the repairing process MAY NOT work. POWER...
... the unit unplugged for parental lock. The unit does not response. • " " or error message appears if the operation is prohibited. • Remote Control batteries may not have completed the channel setting. (Refer to "OFF" on the front panel, then select "Yes" and press [OK]. It ...GENERAL The clock display does not appear in "Language" menu. Remedy • Check that the AC power cord is connected securely. • Remote Control batteries may not be performed. Repairing • If there is a power failure or unplugging during the repairing process MAY NOT work. POWER...
Owners Manual
Page 117
... menu cannot be called up during DVD recording. • Press [STOP C] on L1 or L2. This is selected, audio signal cannot be set on the remote control, and then press [MENU]. Basic Cable/Cable Box/Satellite Receiver is not recognized after connection, turn on pages 29-31. Playback Editing CHANNEL Function...
... menu cannot be called up during DVD recording. • Press [STOP C] on L1 or L2. This is selected, audio signal cannot be set on the remote control, and then press [MENU]. Basic Cable/Cable Box/Satellite Receiver is not recognized after connection, turn on pages 29-31. Playback Editing CHANNEL Function...
Owners Manual
Page 119
.... (Refer to page 106.) • Playback of DVD is prohibited from 2 minutes before the programmed start from the beginning. Please contact the remote manufacturer if you have been finalized. Digital audio setting cannot be protected. "This program is not allowed to main audio (L), sub audio (R) or...angle. • Some DVD players do not solve the problem, please call our customer support at 1-800-605-8610 or visit www.magnavox.com/support for those discs are finalized. Audio language or the subtitle language of the disc doesn't increase even if the recorded program is...
.... (Refer to page 106.) • Playback of DVD is prohibited from 2 minutes before the programmed start from the beginning. Please contact the remote manufacturer if you have been finalized. Digital audio setting cannot be protected. "This program is not allowed to main audio (L), sub audio (R) or...angle. • Some DVD players do not solve the problem, please call our customer support at 1-800-605-8610 or visit www.magnavox.com/support for those discs are finalized. Audio language or the subtitle language of the disc doesn't increase even if the recorded program is...
Owners Manual
Page 132
... or damage which results from the date of God. LABOR: FUNAI CORP. THIS WARRANTY DOES NOT COVER PACKING MATERIALS,ANY ACCESSORIES (EXCEPT REMOTE CONTROL),ANY COSMETIC PARTS, COMPLETE ASSEMBLY PARTS, DEMO OR FLOOR MODELS. THE PRODUCT MUST BE ACCOMPANIED BY A COPY OF THE ORIGINAL RETAIL... to replace defective parts without charge for general service inquiries, please contact us at: FUNAI SERVICE CORPORATION Tel: 1-800-605-8610 www.magnavox.com/support 2200 Spiegel Drive, Groveport, OH 43125 E2S05UD / E2S07UD / E2S08UD 1VMN32933 Printed in shipment, or failures which occur during normal...
... or damage which results from the date of God. LABOR: FUNAI CORP. THIS WARRANTY DOES NOT COVER PACKING MATERIALS,ANY ACCESSORIES (EXCEPT REMOTE CONTROL),ANY COSMETIC PARTS, COMPLETE ASSEMBLY PARTS, DEMO OR FLOOR MODELS. THE PRODUCT MUST BE ACCOMPANIED BY A COPY OF THE ORIGINAL RETAIL... to replace defective parts without charge for general service inquiries, please contact us at: FUNAI SERVICE CORPORATION Tel: 1-800-605-8610 www.magnavox.com/support 2200 Spiegel Drive, Groveport, OH 43125 E2S05UD / E2S07UD / E2S08UD 1VMN32933 Printed in shipment, or failures which occur during normal...


