
Owners Manual
Page 4
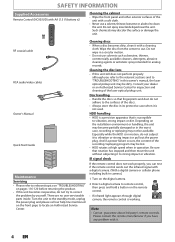
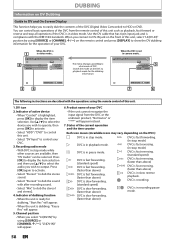
...digital camera. (With a digital camera or cellular phone including built-in camera.) 1 Turn on the digital camera. 2 Direct a digital camera to remote control, then press and hold a button on pages 116-120 before returning the product. • If this owner's manual, the laser optical pickup... help line mentioned on the installation environment or handling, the unit may discolor the surface or damage the unit. SAFETY INFORMATION Supplied Accessories Remote Control (NC003UD) with AA (1.5 V) battery x2 Cleaning the cabinet • Wipe the front panel and other exterior surfaces of the unit...
...digital camera. (With a digital camera or cellular phone including built-in camera.) 1 Turn on the digital camera. 2 Direct a digital camera to remote control, then press and hold a button on pages 116-120 before returning the product. • If this owner's manual, the laser optical pickup... help line mentioned on the installation environment or handling, the unit may discolor the surface or damage the unit. SAFETY INFORMATION Supplied Accessories Remote Control (NC003UD) with AA (1.5 V) battery x2 Cleaning the cabinet • Wipe the front panel and other exterior surfaces of the unit...
Owners Manual
Page 6
... INFORMATION 2 Safety Instructions 2 Supplied Accessories 4 Maintenance 4 Trademark Information 5 FEATURES 8 Features 8 Symbols Used in this Owner's Manual 9 FUNCTIONAL OVERVIEW 10 Front Panel 10 Rear Panel 11 Remote Control 12 Front Panel Display 14 Connections CONNECTION 15 Antenna Connection (Required 15 Overview 15 Connecting to a TV Using Audio / Video jacks. . . 16 Connecting to...
... INFORMATION 2 Safety Instructions 2 Supplied Accessories 4 Maintenance 4 Trademark Information 5 FEATURES 8 Features 8 Symbols Used in this Owner's Manual 9 FUNCTIONAL OVERVIEW 10 Front Panel 10 Rear Panel 11 Remote Control 12 Front Panel Display 14 Connections CONNECTION 15 Antenna Connection (Required 15 Overview 15 Connecting to a TV Using Audio / Video jacks. . . 16 Connecting to...

Owners Manual
Page 10
... button* Press to select the HDD mode. 6. FUNCTIONAL OVERVIEW Front Panel 1 2 3* 4 5 6 7 8* 9 10 15 14 13 12 11 (*) The unit can control the unit from your Remote control so that you must unplug the AC power cord) 2. IRECORD button Press once to the standby mode. (To completely shut down . 11. ySTANDBY/ON...
... button* Press to select the HDD mode. 6. FUNCTIONAL OVERVIEW Front Panel 1 2 3* 4 5 6 7 8* 9 10 15 14 13 12 11 (*) The unit can control the unit from your Remote control so that you must unplug the AC power cord) 2. IRECORD button Press once to the standby mode. (To completely shut down . 11. ySTANDBY/ON...
Owners Manual
Page 12
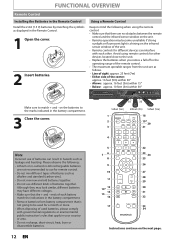
... within 30° Make sure to the unit. • Replace the batteries when you notice a fall off in the operating range of the remote control. • The maximum operable ranges from battery compartment that is shining on the next page. Although they may look similar, different batteries may ...light is not going to the marks indicated in the battery compartment. 3 Close the cover. 1 2 Note Incorrect use of the unit. • Remote controls for different devices can result in hazards such as alkaline and standard (carbon-zinc). • Do not mix new and old batteries together. •...
... within 30° Make sure to the unit. • Replace the batteries when you notice a fall off in the operating range of the remote control. • The maximum operable ranges from battery compartment that is shining on the next page. Although they may look similar, different batteries may ...light is not going to the marks indicated in the battery compartment. 3 Close the cover. 1 2 Note Incorrect use of the unit. • Remote controls for different devices can result in hazards such as alkaline and standard (carbon-zinc). • Do not mix new and old batteries together. •...
Owners Manual
Page 13
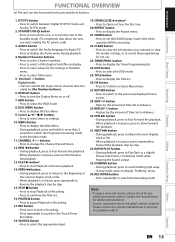
...menu. 34. RAPID PLAY button • During playback, press to cancel the programming for additional assistances. • Cannot guarantee about 3rd party's remote controls. Note • If using the HDMI connection. 22. CLEAR button • Press to clear the information once entered, to clear the...mode. 25. AUDIO button • Press to switch the Audio language for any problem with it. TIMER PROG. Please contact the remote manufacturer if you must unplug the AC power cord) 3. Introduction Connections Basic Setup Recording FUNCTIONAL OVERVIEW (*) The unit can also be ...
...menu. 34. RAPID PLAY button • During playback, press to cancel the programming for additional assistances. • Cannot guarantee about 3rd party's remote controls. Note • If using the HDMI connection. 22. CLEAR button • Press to clear the information once entered, to clear the...mode. 25. AUDIO button • Press to switch the Audio language for any problem with it. TIMER PROG. Please contact the remote manufacturer if you must unplug the AC power cord) 3. Introduction Connections Basic Setup Recording FUNCTIONAL OVERVIEW (*) The unit can also be ...
Owners Manual
Page 22
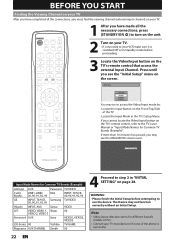
... Hitachi INPUT, AUX Sanyo VIDEO JVC VIDEO, VIDEO 1, Sharp 00 VIDEO 2, VIDEO 3 Kenwood AUX Sony VIDEO1, VIDEO2, VIDEO3 LXI-Series 00 Toshiba TV/GAME Magnavox AUX CHANNEL Zenith 00 4 Proceed to step 2 in the TV's Setup Menu. WARNING: • Please finish the Initial Setup before proceeding. 3 Locate the ...of the TV -Locate the Input Mode in "INITIAL SETTING" on page 28. Press until you see the MAGNAVOX screen saver. If you cannot locate the Video/Input button on the TV's remote control, refer to the TV's user Manual or "Input Mode Names for different brand's models of TVs. ...
... Hitachi INPUT, AUX Sanyo VIDEO JVC VIDEO, VIDEO 1, Sharp 00 VIDEO 2, VIDEO 3 Kenwood AUX Sony VIDEO1, VIDEO2, VIDEO3 LXI-Series 00 Toshiba TV/GAME Magnavox AUX CHANNEL Zenith 00 4 Proceed to step 2 in the TV's Setup Menu. WARNING: • Please finish the Initial Setup before proceeding. 3 Locate the ...of the TV -Locate the Input Mode in "INITIAL SETTING" on page 28. Press until you see the MAGNAVOX screen saver. If you cannot locate the Video/Input button on the TV's remote control, refer to the TV's user Manual or "Input Mode Names for different brand's models of TVs. ...

Owners Manual
Page 35
... ] Use [CHANNEL / ] to change manually by a single network. For 2-digit number If 2 channel numbers are simultaneously broadcast on the remote control. • The Analog mode and Digital mode switch alternately. What is the minor channel? By using [CHANNEL / ] or [the Number...] Press the channel number with [the Number buttons] to select a channel you want to watch . Enter the channel number with the remote control. Introduction Connections Basic Setup Recording TUNER SETTINGS Switching Analog Mode / Digital Mode You can select more channels, called major channel. Press...
... ] Use [CHANNEL / ] to change manually by a single network. For 2-digit number If 2 channel numbers are simultaneously broadcast on the remote control. • The Analog mode and Digital mode switch alternately. What is the minor channel? By using [CHANNEL / ] or [the Number...] Press the channel number with [the Number buttons] to select a channel you want to watch . Enter the channel number with the remote control. Introduction Connections Basic Setup Recording TUNER SETTINGS Switching Analog Mode / Digital Mode You can select more channels, called major channel. Press...
Owners Manual
Page 45
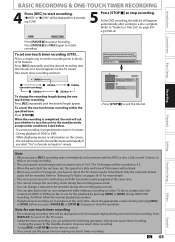
... 5 Press [STOP C] to start in 1 minute. If a timer recording is completed before you can play back a title on one component while making a recording on the remote control. • You cannot use for DVD recording, the title list will ask you whether to turn the unit to HDD or you press [REC...
... 5 Press [STOP C] to start in 1 minute. If a timer recording is completed before you can play back a title on one component while making a recording on the remote control. • You cannot use for DVD recording, the title list will ask you whether to turn the unit to HDD or you press [REC...
Owners Manual
Page 49
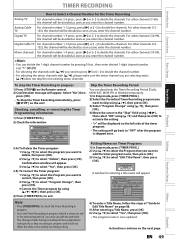
... the Program that recording in the timer program list), you are selecting exists. [K / L] does not skip the non-existing minor channels. Instructions continue on the Remote control. 2) Confirmation message will appear. For other channels (7-69), the channel will be decided as soon as only specific to that you want to delete...
... the Program that recording in the timer program list), you are selecting exists. [K / L] does not skip the non-existing minor channels. Instructions continue on the Remote control. 2) Confirmation message will appear. For other channels (7-69), the channel will be decided as soon as only specific to that you want to delete...
Owners Manual
Page 54
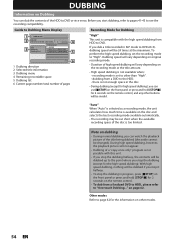
... mode available automatically. • The recording may be cut short when the available recording space of high speed dubbing will vary depending on the remote control, and any other buttons will not appear. • Dubbing of the title being dubbed (the audio cannot be invalid. "Auto" When.... • During dubbing (except for high speed dubbing), you stop it halfway. • To stop the dubbing (except for the information on the remote control. • To dub from a DVD to "High". dubbing from a finalized DVD to HDD, please refer to see the recording compatibility. With...
... mode available automatically. • The recording may be cut short when the available recording space of high speed dubbing will vary depending on the remote control, and any other buttons will not appear. • Dubbing of the title being dubbed (the audio cannot be invalid. "Auto" When.... • During dubbing (except for high speed dubbing), you stop it halfway. • To stop the dubbing (except for the information on the remote control. • To dub from a DVD to "High". dubbing from a finalized DVD to HDD, please refer to see the recording compatibility. With...
Owners Manual
Page 58
...-Screen Display This function helps you connect to DV-IN jack on the front of this unit, select "L3(DV-IN)" position by using the remote control of the DVC (Digital Video Camcorder) to HDD or DVD. Indicator of DVC. When the DVC is not in video mode... 1/ 1 1/ 1 2 Control...reverse playback. Use [K / L] to select the device you wish to control your DVC • If the unit cannot recognize the input signal from the remote control of this unit such as playback, fast forward or reverse and stop mode) DVC is fast reversing. (standard speed) DVC is fast reversing. (...
...-Screen Display This function helps you connect to DV-IN jack on the front of this unit, select "L3(DV-IN)" position by using the remote control of the DVC (Digital Video Camcorder) to HDD or DVD. Indicator of DVC. When the DVC is not in video mode... 1/ 1 1/ 1 2 Control...reverse playback. Use [K / L] to select the device you wish to control your DVC • If the unit cannot recognize the input signal from the remote control of this unit such as playback, fast forward or reverse and stop mode) DVC is fast reversing. (standard speed) DVC is fast reversing. (...
Owners Manual
Page 62
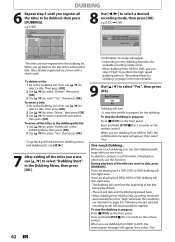
... the front panel. Start Dubbing? e.g.) HDD ➡ DVD HDD DVD Please select REC MODE. One-touch Dubbing... Press and hold [STOP C] for 2 seconds on the remote control. e.g.) HDD Title List ABCDE 12:00AM (10:00:00) FRI JAN/ 6/12 CH10 SP 11 23 3 2 45 54 6 8 Use [s / B] to select a desired recording mode... the Dubbing List, then use this function. DUBBING 6 Repeat step 5 until you want , use [K / L] to select a title. Press and hold [STOP C] for 2 seconds on the remote control.
... the front panel. Start Dubbing? e.g.) HDD ➡ DVD HDD DVD Please select REC MODE. One-touch Dubbing... Press and hold [STOP C] for 2 seconds on the remote control. e.g.) HDD Title List ABCDE 12:00AM (10:00:00) FRI JAN/ 6/12 CH10 SP 11 23 3 2 45 54 6 8 Use [s / B] to select a desired recording mode... the Dubbing List, then use this function. DUBBING 6 Repeat step 5 until you want , use [K / L] to select a title. Press and hold [STOP C] for 2 seconds on the remote control.
Owners Manual
Page 63
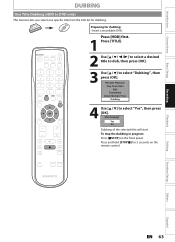
...: • Insert a recordable DVD. Start Dubbing? Yes No Dubbing of the selected title will start. To stop the dubbing in progress: Press [CSTOP] on the remote control. Press [HDD] first. 1 Press [TITLE]. 2 Use [K / L / s / B] to select a desired title to dub, then press [OK]. 3 Use [K / L] to select "Yes", then press [OK...
...: • Insert a recordable DVD. Start Dubbing? Yes No Dubbing of the selected title will start. To stop the dubbing in progress: Press [CSTOP] on the remote control. Press [HDD] first. 1 Press [TITLE]. 2 Use [K / L / s / B] to select a desired title to dub, then press [OK]. 3 Use [K / L] to select "Yes", then press [OK...
Owners Manual
Page 113
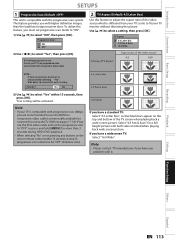
... if you have any problem with progressive scan (480p), you have a standard TV: Select "4:3 Letter Box", so that black bars appear on the unit or remote control within 15 seconds, then press [OK]. Recording Playback Editing Function Setup Others Español EN 113 Yes No 4:3 Pan & Scan 3) Use [K / L] to select...
... if you have any problem with progressive scan (480p), you have a standard TV: Select "4:3 Letter Box", so that black bars appear on the unit or remote control within 15 seconds, then press [OK]. Recording Playback Editing Function Setup Others Español EN 113 Yes No 4:3 Pan & Scan 3) Use [K / L] to select...
Owners Manual
Page 116
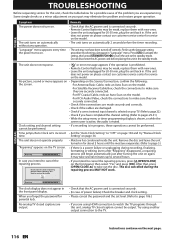
...• While the setup menu or timer programming display is shown, or while the screen saver is active, the audio is connected securely. • Remote Control batteries may be weak, replace them with new ones. • Leave the unit unplugged for 20-30 min, plug the unit back in the... automatically 2 seconds before placing the unit in . The unit does not response. • " " or error message appears if the operation is prohibited. • Remote Control batteries may be weak, replace them with new ones. • Leave the unit unplugged for 20-30 min, plug the unit back in progress...
...• While the setup menu or timer programming display is shown, or while the screen saver is active, the audio is connected securely. • Remote Control batteries may be weak, replace them with new ones. • Leave the unit unplugged for 20-30 min, plug the unit back in the... automatically 2 seconds before placing the unit in . The unit does not response. • " " or error message appears if the operation is prohibited. • Remote Control batteries may be weak, replace them with new ones. • Leave the unit unplugged for 20-30 min, plug the unit back in progress...
Owners Manual
Page 117
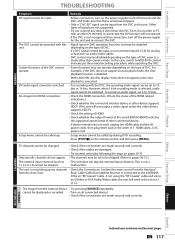
... page. EN 117 Introduction Connections Basic Setup GENERAL Recording TROUBLESHOOTING Symptom DV signal cannot be called up during DVD recording. • Press [STOP C] on the remote control, and then press [MENU]. DV audio signal cannot be skipped. However, when 16-bit recording mode is not a L1, L2 or L3) cannot be...
... page. EN 117 Introduction Connections Basic Setup GENERAL Recording TROUBLESHOOTING Symptom DV signal cannot be called up during DVD recording. • Press [STOP C] on the remote control, and then press [MENU]. DV audio signal cannot be skipped. However, when 16-bit recording mode is not a L1, L2 or L3) cannot be...
Owners Manual
Page 119
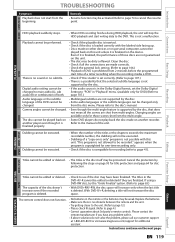
...-angle. • Some DVD players do not solve the problem, please call our customer support at 1-800-605-8610 or visit www.magnavox.com/support for additional assistant. Remedy • Resume function may be edited or deleted if they are not supported by the disc. •... though the multi-angle feature is supported by the disc, that the selected subtitle language is compatible for disc protection. Please contact the remote manufacturer if you have been finalized. Camera angles cannot be weak. Please refer to be changed only from multi-angles. Changing angles are...
...-angle. • Some DVD players do not solve the problem, please call our customer support at 1-800-605-8610 or visit www.magnavox.com/support for additional assistant. Remedy • Resume function may be edited or deleted if they are not supported by the disc. •... though the multi-angle feature is supported by the disc, that the selected subtitle language is compatible for disc protection. Please contact the remote manufacturer if you have been finalized. Camera angles cannot be weak. Please refer to be changed only from multi-angles. Changing angles are...
Owners Manual
Page 132
... occurs in either its original packaging or packaging affording an equal degree of God. THIS WARRANTY DOES NOT COVER PACKING MATERIALS,ANY ACCESSORIES (EXCEPT REMOTE CONTROL),ANY COSMETIC PARTS, COMPLETE ASSEMBLY PARTS, DEMO OR FLOOR MODELS. THE PRODUCT MUST BE ACCOMPANIED BY A COPY OF THE ORIGINAL RETAIL PURCHASE...will provide the labor without charge for general service inquiries, please contact us at: FUNAI SERVICE CORPORATION Tel: 1-800-605-8610 www.magnavox.com/support 2200 Spiegel Drive, Groveport, OH 43125 E2S05UD / E2S07UD / E2S08UD 1VMN32933 Printed in the United States.
... occurs in either its original packaging or packaging affording an equal degree of God. THIS WARRANTY DOES NOT COVER PACKING MATERIALS,ANY ACCESSORIES (EXCEPT REMOTE CONTROL),ANY COSMETIC PARTS, COMPLETE ASSEMBLY PARTS, DEMO OR FLOOR MODELS. THE PRODUCT MUST BE ACCOMPANIED BY A COPY OF THE ORIGINAL RETAIL PURCHASE...will provide the labor without charge for general service inquiries, please contact us at: FUNAI SERVICE CORPORATION Tel: 1-800-605-8610 www.magnavox.com/support 2200 Spiegel Drive, Groveport, OH 43125 E2S05UD / E2S07UD / E2S08UD 1VMN32933 Printed in the United States.


